


导读
本篇文章的话捋一下多光源和模型加载的内容
练习一、多光源
首先我们弄个柔和光,与聚光灯类似,设定范围内光照强度高,不同的是出范围后,聚光灯强度是骤减,而柔和光是渐渐衰减。部分代码如下
	//cpp代码
    Utils::setFloat(renderingProgram1, "light.cutOff", glm::cos(glm::radians(5.0)));
	Utils::setFloat(renderingProgram1, "light.cutOffOut", glm::cos(glm::radians(12.0)));

    //片段着色器代码
    //soft spot柔光
    float theta = dot(lightVec,-normalize(light.direction));
    float intensity = clamp((theta - light.cutOffOut) / (light.cutOff - light.cutOffOut),0.0,1.0);
    diffuse *= intensity;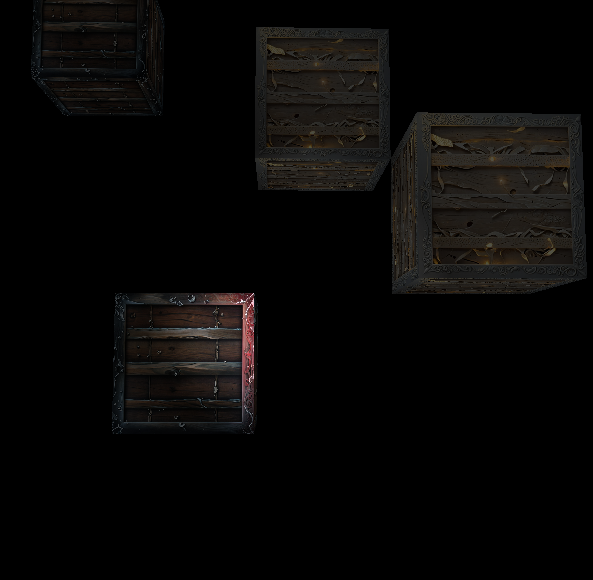
specular *= intensity;其中clamp用来确保intensity∈【0,1】,这里若夹角值≤5°,intensity值为1,若夹角值∈【5,12】,则intensity∈【0,1】,并且成反比,逐渐衰减。若夹角值≥12°,则intensity值为0,效果如下。
后面的话,我们依次加上平行光和点光源,然后封装一下,部分代码如下
    //片段着色器
    ...
    vec3 result = CalcDirLight(dirLight,normal);
    result += CalcPointLight(pointLight,normal);
result += CalcSpotLight(spotLight,normal);原LearnOpenGL项目的这三个函数的参数很多,感觉没必要。平行光、点光源、聚光灯的具体实现原理可参考这篇文章哈【实践LearnOpenGL项目】光照基础篇
最终效果如下
练习二、模型加载
《计算机图形学编程(使用OpenGL和C++)》这本书上有讲外部构建的模型,一般是加载Blender等软件生成的.obj后缀文件,这类文件存储了顶点坐标、纹理坐标、法向量等数据,这本书是通过逐行分类提取,而LearnOpenGL项目的模型加载是通过ASSIMP库加载文件,并且做了很多封装,适合后续处理更复杂的需求,这里就分析下ASSIMP库加载文件的处理流程和各部分功能
可以分为类Model和类Mesh,分别用来加载模型文件获取网格数据和存储网格并实现渲染。先看下类Model,上代码~
    // 通过ASSIMP库加载文件
    void loadModel(string const &path)
    {
        Assimp::Importer importer;
        // 将面转换成三角形、生成平滑法线、翻转成适配的纹理坐标、计算法线贴图需要的(副)切线
        const aiScene* scene = importer.ReadFile(path, aiProcess_Triangulate | aiProcess_GenSmoothNormals | aiProcess_FlipUVs | aiProcess_CalcTangentSpace);
        // 检测读取结果
        if(!scene || scene->mFlags & AI_SCENE_FLAGS_INCOMPLETE || !scene->mRootNode)
        {
            cout << "ERROR::ASSIMP:: " << importer.GetErrorString() << endl;
            return;
        }
        // 记录模型所在目录
        m_directory = path.substr(0, path.find_last_of('/'));

        // 递归处理节点
        processNode(scene->mRootNode, scene);
}上面切线和副切线实际上是用来计算法向贴图的,而法线贴图实际上是通过将法线三维数据【-1,1】转换RGB值【0,1】,不过LearnOpenGL这里的项目model_loading还没用上,就不展开了。其中的processNode代码如下
    // 深度优先遍历
    void processNode(aiNode *node, const aiScene *scene)
    {
        // 处理当前节点的网格数据
        for(unsigned int i = 0; i < node->mNumMeshes; i++)
        {
            aiMesh* mesh = scene->mMeshes[node->mMeshes[i]];
            m_meshes.push_back(processMesh(mesh, scene));
        }
        // 处理其子节点
        for(unsigned int i = 0; i < node->mNumChildren; i++)
        {
            processNode(node->mChildren[i], scene);
        }
}其中类aiNode存储了子节点mChildren、网格索引数组mMeshes、网格数量mNumMeshes等数据成员,类aiScene存储了场景结构根节点mRootNode(aiNode类)、网格数据数组aiNode、材质数据mMaterials等数据成员,其中的processMesh代码如下
    // 处理网格数据
    Mesh processMesh(aiMesh *mesh, const aiScene *scene)
    {
        vector<Vertex> vertices;
        vector<unsigned int> indices;
        vector<Texture> textures;

        // 处理网格的每个顶点坐标
        for(unsigned int i = 0; i < mesh->mNumVertices; i++)
        {
            Vertex vertex;
            glm::vec3 vector;
            // 坐标
            vector.x = mesh->mVertices[i].x;
            vector.y = mesh->mVertices[i].y;
            vector.z = mesh->mVertices[i].z;
            vertex.Position = vector;
            // 法向量
            if (mesh->HasNormals())
            {
                vector.x = mesh->mNormals[i].x;
                vector.y = mesh->mNormals[i].y;
                vector.z = mesh->mNormals[i].z;
                vertex.Normal = vector;
            }
            // 纹理坐标
            if(mesh->mTextureCoords[0])
            {
                glm::vec2 vec;
                vec.x = mesh->mTextureCoords[0][i].x;
                vec.y = mesh->mTextureCoords[0][i].y;
                vertex.TexCoords = vec;
                // 切向量
                vector.x = mesh->mTangents[i].x;
                vector.y = mesh->mTangents[i].y;
                vector.z = mesh->mTangents[i].z;
                vertex.Tangent = vector;
                // 副切向量
                vector.x = mesh->mBitangents[i].x;
                vector.y = mesh->mBitangents[i].y;
                vector.z = mesh->mBitangents[i].z;
                vertex.Bitangent = vector;
            }
            else
                vertex.TexCoords = glm::vec2(0.0f, 0.0f);

            vertices.push_back(vertex);
        }
        // 通过面获取索引
        for(unsigned int i = 0; i < mesh->mNumFaces; i++)
        {
            aiFace face = mesh->mFaces[i];
            for(unsigned int j = 0; j < face.mNumIndices; j++)
                indices.push_back(face.mIndices[j]);
        }
        // 处理材质
        aiMaterial* material = scene->mMaterials[mesh->mMaterialIndex];

        // 1. 漫反射贴图
        vector<Texture> diffuseMaps = loadMaterialTextures(material, aiTextureType_DIFFUSE, "texture_diffuse");
        textures.insert(textures.end(), diffuseMaps.begin(), diffuseMaps.end());
        // 2. 镜面反射贴图
        vector<Texture> specularMaps = loadMaterialTextures(material, aiTextureType_SPECULAR, "texture_specular");
        textures.insert(textures.end(), specularMaps.begin(), specularMaps.end());
        // 3. 法向贴图
        std::vector<Texture> normalMaps = loadMaterialTextures(material, aiTextureType_NORMALS, "texture_normal");
        textures.insert(textures.end(), normalMaps.begin(), normalMaps.end());
        // 4. 高度贴图
        std::vector<Texture> heightMaps = loadMaterialTextures(material, aiTextureType_HEIGHT, "texture_height");
        textures.insert(textures.end(), heightMaps.begin(), heightMaps.end());

        return Mesh(vertices, indices, textures);
}这里虽然有生成四种贴图,但原项目实际上只用到了漫反射贴图。其中的loadMaterialTextures代码如下
     //加载对应类型纹理图并且返回纹理信息
    vector<Texture> loadMaterialTextures(aiMaterial *mat, aiTextureType type, string typeName)
    {
        vector<Texture> textures;
        for(unsigned int i = 0; i < mat->GetTextureCount(type); i++)
        {
            aiString str;
            mat->GetTexture(type, i, &str);
            //  避免重复加载
            bool skip = false;
            for(unsigned int j = 0; j < m_textures_loaded.size(); j++)
            {
                if(std::strcmp(m_textures_loaded[j].path.data(), str.C_Str()) == 0)
                {
                    textures.push_back(m_textures_loaded[j]);
                    skip = true;
                    break;
                }
            }
            if(!skip)
            {
                Texture texture;
                texture.id = TextureFromFile(str.C_Str(), this->m_directory);
                texture.type = typeName;
                texture.path = str.C_Str();
                textures.push_back(texture);
                m_textures_loaded.push_back(texture);
            }
        }
        return textures;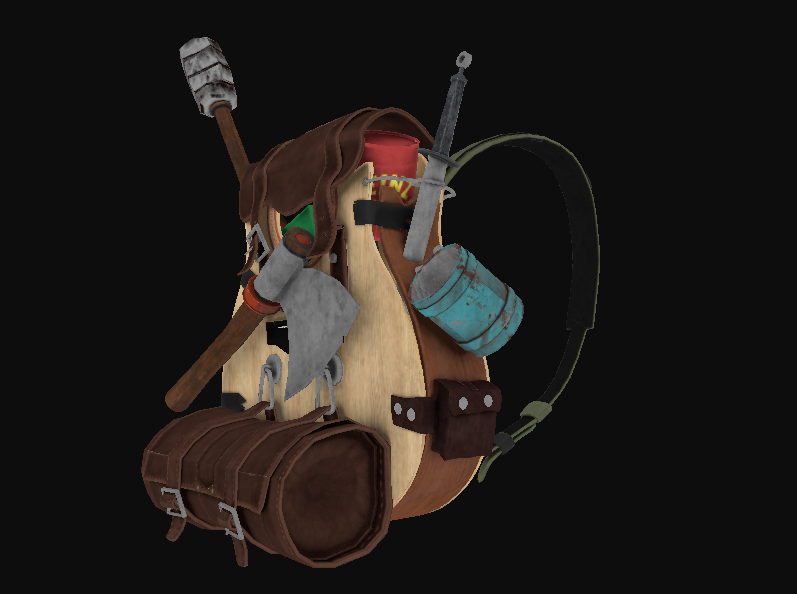
}其中的工具函数TextureFromFile,用来加载图片并且返回纹理标识,之前的文章有展示过,就不赘述了。Model类分析完了,下面看较简单的Mesh类,上面的processMesh函数有调用Mesh的构造函数,除了给数据成员赋值外,还会给VAO/VBO初始化。最后当这俩类对象都处理填充好数据后,在渲染环节遍历网格Mesh对象去调用glDrawElements等函数。效果如下
接下来我们来加上镜面反射,原理和之前基本一样,注意下sampler2D变量的名称就行,具体可参考【实践LearnOpenGL项目】光照基础篇。不太一样的部分如下
    // 片段着色器
    vec3 specular = dirLight.specular * specu * texture(texture_specular1,TexCoords).r;
这里的用的是“.r”而不是“.rgb”,我一开始用的后者老是出现红色镜面光,一度怀疑自己红色和白色都分不清了!
原因我略微查了下,这里只用“.r”来控制镜面反射的强度,而具体颜色由backpack.mtl文件中的材质参数Ks决定。效果如下
其实原项目还给了法线贴图和高度贴图对应的文件,就放到后面高级篇再去展开吧~
最后,水平有限,欢迎指正和交流~觉得有用的话点点赞或收藏吧~


 1133
1133

 被折叠的 条评论
为什么被折叠?
被折叠的 条评论
为什么被折叠?
 到【灌水乐园】发言


