


参考
shader学习记录,参考https://space.bilibili.com/40018594。
准备
内置变量
| threejs中的变量 | 含义 |
|---|---|
| uv | 纹理坐标值 |
| gl_Position | 裁剪坐标值 |
| position | 模型坐标系的坐标值 |
| modelMatrix | 模型转换矩阵,将模型坐标转换为世界坐标 |
| viewMatrix | 视图矩阵,将世界坐标转换至相机坐标系下 |
| projectionMatrix | 投影矩阵,将相机坐标转换至屏幕坐标 |
| gl_FragColor | 片元颜色(r,g,b,a) |
使用的函数
内置函数
| 函数名 | 含义 |
|---|---|
| mod | float mod (float x, float y); 返回x除以y的余数 |
| step | float step (float Edge, float x); x<Edge返回0.0,否则返回1.0 |
| abs | float abs(float a);返回a的绝对值 |
| max | float max(float x, float y);返回下,y中较大的值 |
| min | float min(float x, float y);返回x,y中较小的值 |
| floor | float floor (float x); x向下取整 |
| ceil | float step (float x); x向上取整 |
| length | float length(v);返回向量的长度 |
| distance | float distance(v1, v2);返回点/向量v1,v2之间的距离 |
| atan | float atan(float a1,float a2);返回a1/a2 的正切值[-1,1] |
| mix | mix(a,b,r);a,b可以是float也可以是向量,返回类型由参数决定,mix(a,b,r) = (1-r)*a + br |
旋转函数
// 旋转函数v1
vec2 rotate(vec2 uv, float rotation, vec2 mid) {
return vec2(cos(rotation) * (uv.x - mid.x) + sin(rotation) * (uv.y - mid.y) + mid.x, cos(rotation) * (uv.y - mid.y) - sin(rotation) * (uv.x - mid.x) + mid.y);
}
// 旋转函数v2
vec2 rotate2D(vec2 _st, float _angle){
    _st -= 0.5;
    _st =  mat2(cos(_angle),-sin(_angle),
                sin(_angle),cos(_angle)) * _st;
    _st += 0.5;
    return _st;
}
随机函数
// https://thebookofshaders.com/10/
float random(vec2 st) {
return fract(sin(dot(st.xy, vec2(12.9898, 78.233))) * 43758.5453123);
}
- 初始化threejs项目
- 引入外部着色器,用于创建shaderMaterial的几何体,向着色器中传入uniform
import { useRef, useEffect, useCallback, useState } from 'react'
import * as THREE from 'three'
import OrbitControls from 'three-orbitcontrols';
import texture from '../../assets/textures/water/texture.jpg'
import './index.scss'

import vertexShader from '../shader/examples/vertex'
import fragmentShader from '../shader/examples/fragMent'

const View = () => {
  const page = useRef(); // useRef不会导致重新渲染

  /**
   * 场景、相机、渲染器作为threejs的基本结构,需要在页面进入时渲染完毕
   */
  const scence = useRef(new THREE.Scene()).current; //场景
  const camera = useRef(new THREE.PerspectiveCamera()).current; //摄像机(透视投影)
  const render = useRef(new THREE.WebGLRenderer()).current; //渲染器
  const controls = new OrbitControls(camera, render.domElement);//创建控件对象
  const clock = useRef(new THREE.Clock()).current
  const shaderMaterial = useRef(null)
  const timer = useRef(null) // 定义定时器

  const textureLoader = new THREE.TextureLoader()
  const Texture =  textureLoader.load(texture)

  useEffect(() => {
    page.current.appendChild(render.domElement);
    init();
    initLight();
    initGeometry();
    renderScene();
  }, [])

  // 初始化场景
  const init = useCallback(() => {
    render.setSize(page.current.offsetWidth, page.current.offsetHeight); // 渲染器设置尺寸
    // 设置背景颜色
    render.setClearColor(new THREE.Color(0x000000)); // 设置背景颜色和透明度
    render.shadowMap.enabled = true; // 渲染器允许渲染阴影⭐

    // 添加坐标轴
    // 红色代表 X 轴;绿色代表 Y 轴;蓝色代表 Z 轴
    const axes = new THREE.AxesHelper(20);
    scence.add(axes);

    /**
     * 设置摄像机的属性
     */
    camera.aspect = (page.current.offsetWidth / page.current.offsetHeight) // 摄像机设置屏幕宽高比
    camera.fov = 45; // 摄像机的视角
    camera.near = 0.01; // 近面距离
    camera.far = 1001; // 远面距离
    camera.position.set(2, 2, 2) // 设置摄像机在threejs坐标系中的位置
    camera.lookAt(0, 0, 0) // 摄像机的指向
    camera.updateProjectionMatrix(); // 更新摄像机投影矩阵,在任何参数被改变以后必须被调用
  }, [render, scence])

  // 初始化环境光
  const initLight = () => {
    const ambLight = new THREE.AmbientLight('#ffffff', 0.3) // 基本光源

    /**
     * 设置聚光灯相关的的属性,详情见P54
     */
    const spotLight = new THREE.SpotLight(0xFFFFFF); // 聚光灯
    spotLight.position.set(40, 200, 10);
    spotLight.castShadow = true; // 只有该属性为true时,该点光源允许产生阴影,并且下列属性可用
    scence.add(ambLight, spotLight); // 向场景中添加光源
  }

  // 初始化地板
  const initGeometry = () => {
    // 原始着色器材质
    shaderMaterial.current = new THREE.ShaderMaterial({
      vertexShader:vertexShader, // 引入顶点着色器
      fragmentShader:fragmentShader, // 引入片元着色器
      uniforms: {
        uTime: { value: 0 },
        uTexture: { value: Texture }
      },
      side: THREE.DoubleSide,
      transparent: true
    })

    const mesh = new THREE.Mesh(
      new THREE.PlaneBufferGeometry(1, 1, 32, 32),
      shaderMaterial.current
    );
    scence.add(mesh)
  }

  // 渲染器执行渲染
  const renderScene = useCallback(() => {
    // console.log('renderScene')
    timer.current = window.requestAnimationFrame(() => renderScene())
    controls.update();
    const curElapsedTime = clock.getElapsedTime()
    // 传入当前时间
    shaderMaterial.current.uniforms.uTime.value = curElapsedTime
    render.render(scence, camera);
  }, [render])

  return (
    <div className='page' ref={page} />
  )
};
export default View
在vscode中使用glsl推荐使用Comment target templates,使用其它的插件引入glsl文件时总是报错,无法识别。

采用ES Module方式导出即可,声明glsl类型可出现高亮效果,最重要的是会自动出现glsl代码智能提示。
顶点着色器:
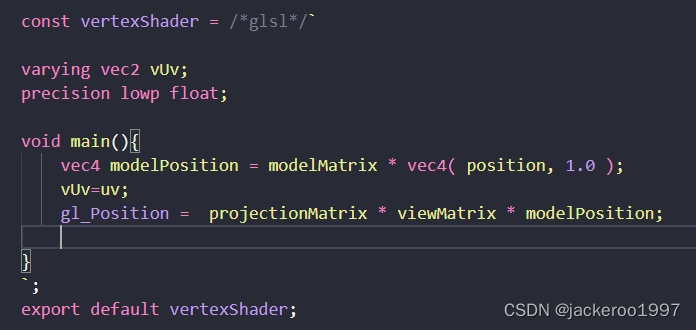
片元着色器:
const fragMentShader = /*glsl*/`

precision lowp float;
uniform float uTime;
uniform float uScale;
varying vec2 vUv;
void main() {
	// 待填充
}`;
export default fragMentShader;
着色器
静态
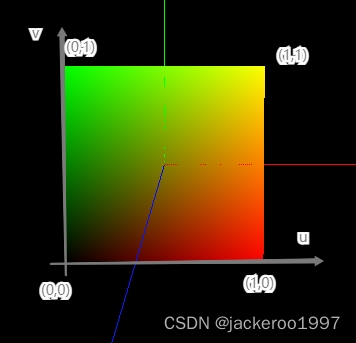
uv坐标
gl_FragColor = vec4(vUv, 0, 1);
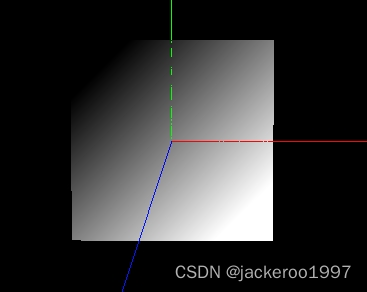
向量长度
float rgba = length(vUv);
gl_FragColor =vec4(rgba,rgba,rgba,1);

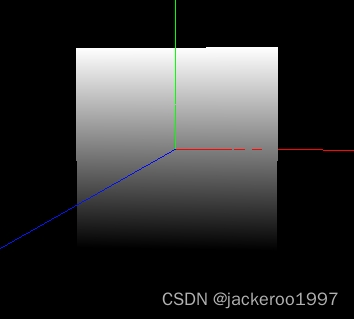
旋转渐变
vec2 rotateUv = rotate(vUv,3.14*0.25,vec2(0.5,0.5));
float rbga = 1.0-rotateUv.y;
gl_FragColor =vec4(rbga,rbga,rbga,1);
取模渐变
float rgba = mod(vUv.y , 1.0) ;
gl_FragColor =vec4(rgba, rgba, rgba, 1);
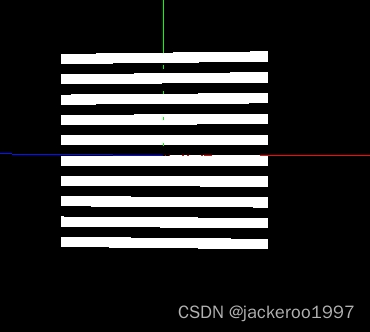
黑白条纹
float rgba =  mod(vUv.y * 10.0 , 1.0) ;
rgba = step(0.5,rgba);
gl_FragColor =vec4(rgba,rgba,rgba,1);
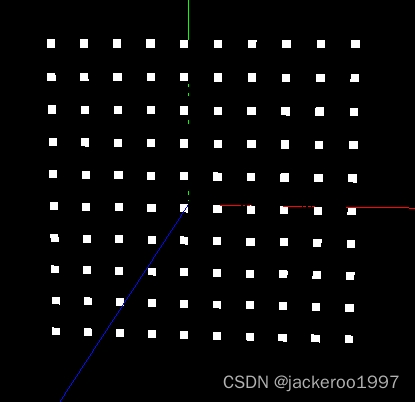
粒子
float rgba = step(0.75, mod(vUv.x * 10.0 , 1.0)) ;
rgba *= step(0.75, mod(vUv.y * 10.0 , 1.0)) ;
gl_FragColor =vec4(rbga,rbga,rbga,1);
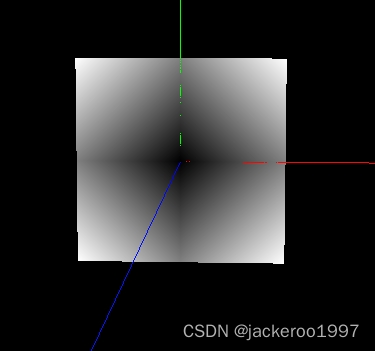
绝对值
float rgbaX = abs(vUv.x - 0.5) ;
float rgbaY = abs(vUv.y - 0.5) ;
float rgba = rgbaX + rgbaY ;
gl_FragColor =vec4(rgba,rgba,rgba,1);
空洞
float rgba =step(0.2,max(abs(vUv.x - 0.5), abs(vUv.y - 0.5)))   ;
gl_FragColor =vec4(rgba,rgba,rgba,1);

空洞2
float rgbaX = abs(vUv.x - 0.5) ;
float rgbaY = abs(vUv.y - 0.5) ;
float rgba = step(0.25,(rgbaX + rgbaY)) ;
gl_FragColor =vec4(rgba,rgba,rgba,1);

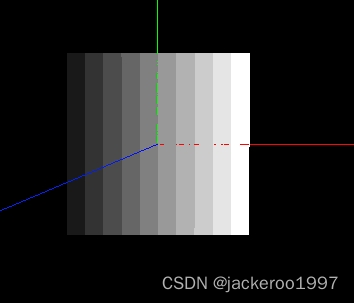
向上取整
float rgba = ceil(vUv.y*10.0)/10.0;
 gl_FragColor =vec4(rgba,rgba,rgba,1);
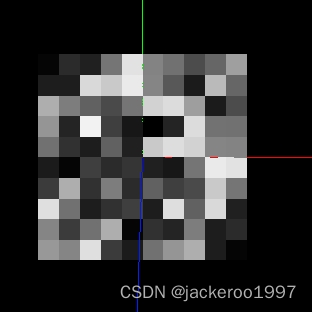
马赛克
float rgba = ceil(vUv.x*10.0)/10.0 * floor(vUv.y*10.0)/10.0;
rgba = random(vec2(rgba,rgba));
gl_FragColor =vec4(rgba,rgba,rgba,1);
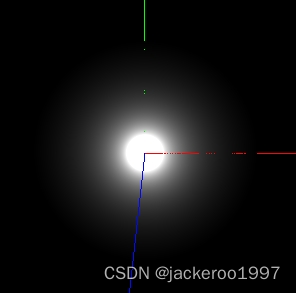
光晕
float rgba =0.1/ distance(vUv,vec2(0.5,0.5)) - 0.2;
gl_FragColor =vec4(rgba,rgba,rgba,rgba);
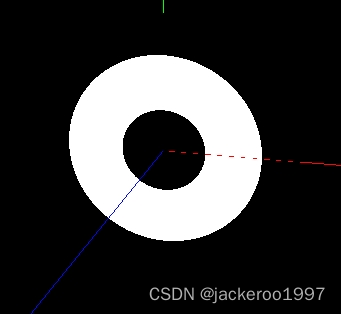
环形
float rgba = 1.0 - step(0.1,abs(distance(vUv,vec2(0.5))-0.25));
gl_FragColor =vec4(rgba,rgba,rgba,1);;
动画
旋转星星
vec2 rotateUv = rotate(vUv,-uTime*5.0,vec2(0.5));
float  rgba = 0.15 / distance(vec2(rotateUv.x,(rotateUv.y-0.5)*5.0+0.5),vec2(0.5,0.5)) - 1.0;
rgba += 0.15 / distance(vec2(rotateUv.y,(rotateUv.x-0.5)*5.0+0.5),vec2(0.5,0.5)) - 1.0;
gl_FragColor =vec4(rgba,rgba,rgba,rgba);

扫描
vec2 rotateUv = rotate2D(vUv,-uTime*5.0);
float alpha =  1.0 - step(0.5,distance(vUv,vec2(0.5)));
float angle = atan(rotateUv.x-0.5,rotateUv.y-0.5);
float rgba = (angle+3.14)/6.28;
gl_FragColor =vec4(rgba,rgba,rgba,alpha);

万花筒
vec2 rotateUv = rotate2D(vUv,-uTime*1.0);
float angle = atan(rotateUv.x-0.5,rotateUv.y-0.5)/(2.0*PI);
float rgba = sin(angle*100.0);

万花筒2
vec2 rotateUv = rotate2D(vUv,-uTime*1.0);
    float angle = atan(rotateUv.x-0.5,rotateUv.y-0.5)/PI;
    float rgba = mod(angle*10.0,1.0);
    gl_FragColor =vec4(rgba,rgba,rgba,1);

噪声飘动
// 顶点着色器
const vertexShader = /*glsl*/`
precision lowp float; // 精度限定,提高性能

uniform float u_scale;
uniform float u_wareFrequency;
uniform float u_noiseFrequency;
uniform float u_noiseScale;
uniform float xz_scale;
uniform float u_time;
uniform float u_noiseSpeed;
uniform float u_xSpeed;
uniform float u_zSpeed;

// 将计算的高度传给片元着色器
varying float v_height;
float cnoise(vec2); // 函数规范声明

void main() {
  vec4 modelPosition = modelMatrix * vec4(position, 1.0);  // 转换矩阵

  //(高程x * 频率) * (高程z * 频率 * xz缩放比)=> [-1,1]
  float height = sin(modelPosition.x * u_wareFrequency + u_time * u_xSpeed)
  * sin(modelPosition.z * u_wareFrequency * xz_scale + u_time * u_zSpeed); // h = asinx(bx)

  // 加入噪声,同时加入时间实现流动效果
  height += -abs(cnoise(vec2(modelPosition.xz * u_noiseFrequency + u_time * u_noiseSpeed)) * u_noiseScale);
  // 将计算的高度传给片元着色器
  v_height = height;

  // 比例缩放,并传递给模型坐标
  height *= u_scale;
  modelPosition.y = height;


  gl_Position = projectionMatrix * viewMatrix * modelPosition;
}


vec4 permute(vec4 x)
{
    return mod(((x*34.0)+1.0)*x, 289.0);
}

vec2 fade(vec2 t)
{
    return t*t*t*(t*(t*6.0-15.0)+10.0);
}

// 噪声函数
float cnoise(vec2 P)
{
    vec4 Pi = floor(P.xyxy) + vec4(0.0, 0.0, 1.0, 1.0);
    vec4 Pf = fract(P.xyxy) - vec4(0.0, 0.0, 1.0, 1.0);
    Pi = mod(Pi, 289.0); // To avoid truncation effects in permutation
    vec4 ix = Pi.xzxz;
    vec4 iy = Pi.yyww;
    vec4 fx = Pf.xzxz;
    vec4 fy = Pf.yyww;
    vec4 i = permute(permute(ix) + iy);
    vec4 gx = 2.0 * fract(i * 0.0243902439) - 1.0; // 1/41 = 0.024...
    vec4 gy = abs(gx) - 0.5;
    vec4 tx = floor(gx + 0.5);
    gx = gx - tx;
    vec2 g00 = vec2(gx.x,gy.x);
    vec2 g10 = vec2(gx.y,gy.y);
    vec2 g01 = vec2(gx.z,gy.z);
    vec2 g11 = vec2(gx.w,gy.w);
    vec4 norm = 1.79284291400159 - 0.85373472095314 * vec4(dot(g00, g00), dot(g01, g01), dot(g10, g10), dot(g11, g11));
    g00 *= norm.x;
    g01 *= norm.y;
    g10 *= norm.z;
    g11 *= norm.w;
    float n00 = dot(g00, vec2(fx.x, fy.x));
    float n10 = dot(g10, vec2(fx.y, fy.y));
    float n01 = dot(g01, vec2(fx.z, fy.z));
    float n11 = dot(g11, vec2(fx.w, fy.w));
    vec2 fade_xy = fade(Pf.xy);
    vec2 n_x = mix(vec2(n00, n01), vec2(n10, n11), fade_xy.x);
    float n_xy = mix(n_x.x, n_x.y, fade_xy.y);
    return 2.3 * n_xy;
}
`;
export default vertexShader;
// 片元着色器

const fragMentShader = /*glsl*/`

// 来自shader的颜色信息
uniform vec3 u_highColor;
uniform vec3 u_lowColor;

// 来自shader的透明度信息
uniform float u_opacity;

varying float v_height ;// 来自顶点着色器的height


void main() {
  float stand_height = (v_height + 1.0) / 2.0; // [-1,1] => [0,1]

  vec3 color = mix(u_lowColor, u_highColor,stand_height); // mix(a,b,r) = (1-r)*a + br

  gl_FragColor = vec4(color, u_opacity); // 着色器设置透明度
}
`;
export default fragMentShader;


 2607
2607


 被折叠的 条评论
为什么被折叠?
被折叠的 条评论
为什么被折叠?
 到【灌水乐园】发言


