


本文章介绍在vscode、linux bash中,指定某张或某几种gpu的方法。环境为:torch+nvidia、torch+910。
读卡规则
当服务器(nvidia为例,国产卡是否这样没有验证过,应该类似)有多个显卡时,设置CUDA_VISIBLE_DEVICES环境变量,可以改变cuda程序所能使用(检测到)的GPU设备。默认,显卡标号有0开始。
CUDA_VISIBLE_DEVICES=1:只有1卡可以使用
CUDA_VISIBLE_DEVICES=“0,2”(0,2) 0卡和2卡可以使用
CUDA运行时,会根据 CUDA_VISIBLE_DEVICES 遍历所有当前可见的设备,并从零开始为可见设备编号。如上述第一种情况,虽然指定使用1卡,但CUDA遍历时会将1卡的编号设置为0。依次类推,上述第二种情况分别被编号为:0,1。
嗯,很好,CUDA这波操作真棒,现在我终于知道为什么无论设置为哪张卡,当显存不足时,报错:cuda:0 out of memory了!
了解cuda的读卡规则后,让我们看一下,配置gpu的几种方法。
配置gpu的方法
1. 临时设置
# linxu shell中直接设置,仅在当前shell有效
export CUDA_VISIBLE_DEVICES=1
2. 运行py脚本时指定
CUDA_VISIBLE_DEVICES=1 python xx.py
也可以写个sh脚本,脚本中:CUDA_VISIBLE_DEVICES=1 python xx.py,然后shell中直接 sh xx.sh同样的效果。
3. 代码中指定(环境变量方式)
假如共有3中卡:
import os
os.environ["CUDA_VISIBLE_DEVICES"] = "1"
torch.cuda.device_count()  #输出1,只有卡1可用
torch.cuda.current_device() #输出0,卡1被编号为0,为主卡
import os
os.environ["CUDA_VISIBLE_DEVICES"] = "2,0"
torch.cuda.device_count()  #输出2,只有卡0,2可用
torch.cuda.current_device() #输出0,卡2被编号为0,卡0被编号为1,卡2为主卡
实际工程中,指定gpu(个人推荐)
1. 单卡方式
import os
os.environ["CUDA_VISIBLE_DEVICES"] = "1"
device = "cuda"
model = AutoModelForCausalLM.from_pretrained(device_map="auto")
# 输入序列也要同步放到device上
inputs = inputs.to(device)
2. 单机多卡方式
import os
os.environ["CUDA_VISIBLE_DEVICES"] = "0,1"
device = "cuda"
model = AutoModelForCausalLM.from_pretrained(device_map="auto")
# 输入序列也要同步放到device上
inputs = inputs.to(device)
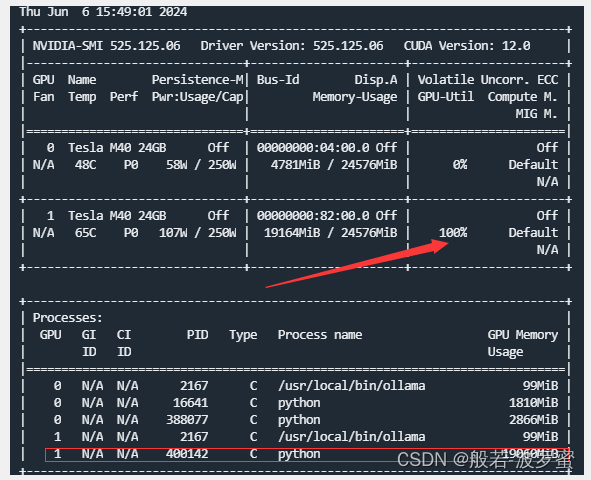
这种方式,模型需要的显存会分摊到指定的多张卡上,如下图所示,但是,速度并未提升(如果有大佬知道原因,欢迎在评论区指教)。
昇腾环境
torch:2.2.0
新版torch中,支持了昇腾gpu。但是设置方法有点不友好。环境变量+device_map的方式不生效。
经过实验验证,单卡设置方法方法如下:
import torch
import torch_npu
from torch_npu.contrib import transfer_to_npu

device = "cuda:1" if torch.cuda.is_available() else "cpu"
torch.cuda.set_device(device)
model = AutoModelForCausalLM.from_pretrained().half().npu()
单机多卡方式没有验证出来,欢迎大佬评论区指教。


 15万+
15万+

 被折叠的 条评论
为什么被折叠?
被折叠的 条评论
为什么被折叠?
 到【灌水乐园】发言


