


LVGL8.1笔记2--触摸移植
转载请注明出处:https://blog.csdn.net/qq_38685043/article/details/124786944?spm=1001.2014.3001.5501

前言
移植好显示驱动后,就可以移植输入驱动了。所谓输入其实就是按键或触摸。LVGL支持多种输入设备:鼠标、触摸屏、 键盘、编码器、按键等,通常在项目中比较常用的是按键和触摸,我用的是一块3.2寸的电阻触摸屏,电阻触摸就是以前那种老式的触摸屏手机那样的屏幕,灵敏度、手感、耐磨性都比电容式的差很多。电容触屏就是现在智能手机这样的屏幕。主要是自己用来学习和测试,电阻触摸也无所谓。毕竟在工作项目开发中都是有什么屏用什么屏的。
这次先使用触摸屏,以后在试着用按键作为输入,后续也会尝试用摇杆、编码器等。
其实移植这个非常简单,一般都是移植完显示驱动,顺便就把输入移植好了。
一、移植前准备
- 硬件(带触摸屏幕的STM32F407VE核心板)
- Keil工程,实现屏幕显示、按键或触摸等
- 移植好LVGL-8.1显示驱动(可以参考LVGL8.1笔记1–显示移植(2022-0504))

二、屏幕触摸
关于屏幕触摸,相关的知识还是挺多的。好在一般触摸屏厂家都会提供例程。我们一般只需要简单的修改一下例程代码中的引脚就能在自己的板子上使用。比如我用的这个屏幕就和板子是一套的,有现成的例程可以使用,所以关于触摸驱动根本不需要自己写,只需要知道怎么用及可以了。
在LVGL8.1笔记1--显示移植中已经对LVGL的目录结构进行了一个比较详细的介绍,在example/porting/中有两个文件lv_port_indev.c和lv_port_indev.h,我们只需要把触摸程序的一些内容放到这里就可以了。
三、开始移植
1. 首先打开lv_port_indev.c和lv_port_indev.h开头的#if 0 改为#if 1
这样就使能这里面的内容,编译的时候就可以顺编译。
2. 去掉没用的代码,留下和触摸相关的函数
下面是截取的一部分里面的代码,进行一个简单的说明。LVGL官方给的例程包括很多在输入设备,因为使用的是触摸屏,所以可以只保留下触摸相关的函数,其他的可以全部删除。
/*********************
 *      INCLUDES
 *********************/
#include "lv_port_indev_template.h" // 由于我们把文件名改了,所以这里也要改一下,改成和文件名一样的就行,不然编译会报错
// 改成:#include "lv_port_indev.h"
#include "../../lvgl.h"

// 在这还需要添加触摸程序的.h声明
#include "touch.h"

/*********************
 *      DEFINES
 *********************/

/**********************
 *      TYPEDEFS
 **********************/

/**********************
 *  STATIC PROTOTYPES
 **********************/

// 下面这些是触摸相关的函数
static void touchpad_init(void);	// 触摸初始化
static void touchpad_read(lv_indev_drv_t * indev_drv, lv_indev_data_t * data);	// 读取被触摸的坐标点
static bool touchpad_is_pressed(void);	// 检测到是否被触摸
static void touchpad_get_xy(lv_coord_t * x, lv_coord_t * y);	// 获取被触摸点的坐标

// 下面这些是鼠标相关的函数
static void mouse_init(void);
static void mouse_read(lv_indev_drv_t * indev_drv, lv_indev_data_t * data);
static bool mouse_is_pressed(void);
static void mouse_get_xy(lv_coord_t * x, lv_coord_t * y);

// 下面这些是键盘相关的函数
static void keypad_init(void);
static void keypad_read(lv_indev_drv_t * indev_drv, lv_indev_data_t * data);
static uint32_t keypad_get_key(void);

// 下面这些是编码开关相关的函数
static void encoder_init(void);
static void encoder_read(lv_indev_drv_t * indev_drv, lv_indev_data_t * data);
static void encoder_handler(void);

// 下面这些是按键相关的函数
static void button_init(void);
static void button_read(lv_indev_drv_t * indev_drv, lv_indev_data_t * data);
static int8_t button_get_pressed_id(void);
static bool button_is_pressed(uint8_t id);

/**********************
 *  STATIC VARIABLES
 **********************/
lv_indev_t * indev_touchpad;	// 触摸用的的全局变量
lv_indev_t * indev_mouse;
lv_indev_t * indev_keypad;
lv_indev_t * indev_encoder;
lv_indev_t * indev_button;

static int32_t encoder_diff;
static lv_indev_state_t encoder_state;
可以注意到这些函数都是用static修饰的,表明只能在这个文件中调用,所以就会有一个在可以在其他文件中使用的正常的函数。
3. 把触摸驱动相关的一些内容移植过来
-
void lv_port_indev_init(void)这个函数见名知意,作用的LVGL输入设备初始化函数,既然是初始化就一定需要在其他地方调用(主要是在main主函数中调用一次),所以我们需要在lv_port_indev.h中进行一下声明。然后.h文件我们就修改完成了。这个函数中有挺多内容,我们使用触摸,就可以只留下触摸相关内容,其他的全部删除掉就可以了。下面为了清楚的说明一下,所以我没有删掉用不到的内容,只是注释掉了。
void lv_port_indev_init(void) { /** * Here you will find example implementation of input devices supported by LittelvGL: * - Touchpad * - Mouse (with cursor support) * - Keypad (supports GUI usage only with key) * - Encoder (supports GUI usage only with: left, right, push) * - Button (external buttons to press points on the screen) * * The `..._read()` function are only examples. * You should shape them according to your hardware */ static lv_indev_drv_t indev_drv; /*------------------ * Touchpad * -----------------*/ /*Initialize your touchpad if you have*/ touchpad_init(); /*Register a touchpad input device*/ lv_indev_drv_init(&indev_drv); // 用默认值初始化一个触摸设备 indev_drv.type = LV_INDEV_TYPE_POINTER; // 选择输入设备类型(触摸) indev_drv.read_cb = touchpad_read; // 添加触摸回调函数(那些静态函数就是通过这样回调的方式来使用的,函数指针的一种用法) indev_touchpad = lv_indev_drv_register(&indev_drv); // 注册触摸设备 //------------------------------以下这些内容都是可以直接删掉的------------------------------------// /*------------------ * Mouse * -----------------*/ /*Initialize your touchpad if you have*/ // mouse_init(); /*Register a mouse input device*/ // lv_indev_drv_init(&indev_drv); // indev_drv.type = LV_INDEV_TYPE_POINTER; // indev_drv.read_cb = mouse_read; // indev_mouse = lv_indev_drv_register(&indev_drv); /*Set cursor. For simplicity set a HOME symbol now.*/ // lv_obj_t * mouse_cursor = lv_img_create(lv_scr_act()); // lv_img_set_src(mouse_cursor, LV_SYMBOL_HOME); // lv_indev_set_cursor(indev_mouse, mouse_cursor); /*------------------ * Keypad * -----------------*/ /*Initialize your keypad or keyboard if you have*/ // keypad_init(); /*Register a keypad input device*/ // lv_indev_drv_init(&indev_drv); // indev_drv.type = LV_INDEV_TYPE_KEYPAD; // indev_drv.read_cb = keypad_read; // indev_keypad = lv_indev_drv_register(&indev_drv); /*Later you should create group(s) with `lv_group_t * group = lv_group_create()`, *add objects to the group with `lv_group_add_obj(group, obj)` *and assign this input device to group to navigate in it: *`lv_indev_set_group(indev_keypad, group);`*/ /*------------------ * Encoder * -----------------*/ /*Initialize your encoder if you have*/ // encoder_init(); /*Register a encoder input device*/ // lv_indev_drv_init(&indev_drv); // indev_drv.type = LV_INDEV_TYPE_ENCODER; // indev_drv.read_cb = encoder_read; // indev_encoder = lv_indev_drv_register(&indev_drv); /*Later you should create group(s) with `lv_group_t * group = lv_group_create()`, *add objects to the group with `lv_group_add_obj(group, obj)` *and assign this input device to group to navigate in it: *`lv_indev_set_group(indev_encoder, group);`*/ /*------------------ * Button * -----------------*/ /*Initialize your button if you have*/ // button_init(); /*Register a button input device*/ // lv_indev_drv_init(&indev_drv); // indev_drv.type = LV_INDEV_TYPE_BUTTON; // indev_drv.read_cb = button_read; // indev_button = lv_indev_drv_register(&indev_drv); /*Assign buttons to points on the screen*/ // static const lv_point_t btn_points[2] = { // {10, 10}, /*Button 0 -> x:10; y:10*/ // {40, 100}, /*Button 1 -> x:40; y:100*/ // }; // lv_indev_set_button_points(indev_button, btn_points); } -
static void touchpad_init(void)这个函数是初始化触摸驱动的。通常我们写程序都会写一些初始化函数,比如点亮LED灯,一般会有的一个函数叫做LCD_init,我们会在main函数中调用,这样就可以初始化好LED引脚等内容了。触摸屏也是一样的,也需要一个初始化函数。我们自己在main函数里面调用就就可以了,不需要移植到这来,所以这里空着就可以。// 主函数 int main(void) { NVIC_PriorityGroupConfig(NVIC_PriorityGroup_2); //设置系统中断优先级分组2 delay_init(168); //初始化延时函数 uart_init(115200); //初始化串口波特率为115200 W25QXX_Init(); //外部Flash--W25Q16初始化 TIM3_Int_Init(999,83); //定时器配置1ms中断 KEY_Init(); //按键初始化 LED_Init(); //初始化LED LCD_Init(); //LCD初始化 //---------------------------------------------------------------------------------------- tp_dev.init(); //一般我是在这里调用触摸屏初始化函数的 //---------------------------------------------------------------------------------------- lv_init(); //LVGL初始化 lv_port_disp_init(); //LVGL 显示接口初始化,放在 lv_init()的后面 lv_port_indev_init(); //LVGL 输入接口初始化,放在 lv_init()的后面 lv_example_get_started_1(); while(1) { tp_dev.scan(0); lv_task_handler(); } } /*Initialize your touchpad*/ static void touchpad_init(void) { /*Your code comes here*/ 这里空着就可以了 } -
static void touchpad_read(lv_indev_drv_t * indev_drv, lv_indev_data_t * data)这个函数用来读取触摸到的位置的坐标,网上有些教程都会修改这个函数,我觉得不需要修改,更简单容易理解。所以我没做任何修改,只是添加了一点注释做说明/*Will be called by the library to read the touchpad*/ static void touchpad_read(lv_indev_drv_t * indev_drv, lv_indev_data_t * data) { static lv_coord_t last_x = 0; static lv_coord_t last_y = 0; /*Save the pressed coordinates and the state*/ if(touchpad_is_pressed()) { // 判断是否有触摸操作 touchpad_get_xy(&last_x, &last_y); // 读取触摸的坐标 data->state = LV_INDEV_STATE_PR; // 设置被触摸状态 } else { data->state = LV_INDEV_STATE_REL; // 清除被触摸状态 } /*Set the last pressed coordinates*/ data->point.x = last_x; data->point.y = last_y; } -
static bool touchpad_is_pressed(void)这个函数是用来检测是否有触摸操作的。我用的屏幕的例程中就有是否被触摸的标志,所以只需要在这函数里判断一下并返回值就行/* Return true is the touchpad is pressed 这个函数就是在上面调用的,用来判断是否有触摸操作,简单的写个判断就可以了 */ static bool touchpad_is_pressed(void) { /*Your code comes here*/ if(TP_PRES_DOWN & tp_dev.sta) // 判断触摸标志位 { return true; // 有触摸操作 返回true } return false; // 没有触摸操作 返回false } -
static void touchpad_get_xy(lv_coord_t * x, lv_coord_t * y)这个函数用来获取被触摸位置的坐标。我们只需要吧触摸驱动中读取的坐标放到这就行了,参数是两个指针,所以直接赋值操作/*Get the x and y coordinates if the touchpad is pressed*/ static void touchpad_get_xy(lv_coord_t * x, lv_coord_t * y) { /*Your code comes here*/ (*x) = tp_dev.x[0]; // 赋值x坐标 (*y) = tp_dev.y[0]; // 赋值y坐标 }
如果触摸驱动本身没有问题,那么这样就移植完成了。总共就需要修改三个函数,其中一个还只是删除内容,总共写不到10行代码就搞定了。是不是很简单。
下面列出我移植完成的.c和.h文件
lv_port_indev.h
/**
 * @file lv_port_indev_templ.h
 *
 */

 /*Copy this file as "lv_port_indev.h" and set this value to "1" to enable content*/
#if 1

#ifndef LV_PORT_INDEV_H
#define LV_PORT_INDEV_H

#ifdef __cplusplus
extern "C" {
#endif

/*********************
 *      INCLUDES
 *********************/
#include "lvgl.h"

/*********************
 *      DEFINES
 *********************/

/**********************
 *      TYPEDEFS
 **********************/

/**********************
 * GLOBAL PROTOTYPES
 **********************/
void lv_port_indev_init(void);
/**********************
 *      MACROS
 **********************/

#ifdef __cplusplus
} /*extern "C"*/
#endif

#endif /*LV_PORT_INDEV_TEMPL_H*/

#endif /*Disable/Enable content*/
lv_port_indev.c
/**
 * @file lv_port_indev_templ.c
 *
 */

 /*Copy this file as "lv_port_indev.c" and set this value to "1" to enable content*/
#if 1

/*********************
 *      INCLUDES
 *********************/
#include "lv_port_indev.h"
#include "../../lvgl.h"

#include "touch.h"

/*********************
 *      DEFINES
 *********************/

/**********************
 *      TYPEDEFS
 **********************/

/**********************
 *  STATIC PROTOTYPES
 **********************/

static void touchpad_init(void);
static void touchpad_read(lv_indev_drv_t * indev_drv, lv_indev_data_t * data);
static bool touchpad_is_pressed(void);
static void touchpad_get_xy(lv_coord_t * x, lv_coord_t * y);

/**********************
 *  STATIC VARIABLES
 **********************/
lv_indev_t * indev_touchpad;

/**********************
 *      MACROS
 **********************/

/**********************
 *   GLOBAL FUNCTIONS
 **********************/

void lv_port_indev_init(void)
{
    /**
     * Here you will find example implementation of input devices supported by LittelvGL:
     *  - Touchpad
     *  - Mouse (with cursor support)
     *  - Keypad (supports GUI usage only with key)
     *  - Encoder (supports GUI usage only with: left, right, push)
     *  - Button (external buttons to press points on the screen)
     *
     *  The `..._read()` function are only examples.
     *  You should shape them according to your hardware
     */

    static lv_indev_drv_t indev_drv;

    /*------------------
     * Touchpad
     * -----------------*/

    /*Initialize your touchpad if you have*/
    touchpad_init();

    /*Register a touchpad input device*/
    lv_indev_drv_init(&indev_drv);
    indev_drv.type = LV_INDEV_TYPE_POINTER;
    indev_drv.read_cb = touchpad_read;
    indev_touchpad = lv_indev_drv_register(&indev_drv);
}

/**********************
 *   STATIC FUNCTIONS
 **********************/

/*------------------
 * Touchpad
 * -----------------*/

/*Initialize your touchpad*/
static void touchpad_init(void)
{
    /*Your code comes here*/
}

/*Will be called by the library to read the touchpad*/
static void touchpad_read(lv_indev_drv_t * indev_drv, lv_indev_data_t * data)
{
    static lv_coord_t last_x = 0;
    static lv_coord_t last_y = 0;

    /*Save the pressed coordinates and the state*/
    if(touchpad_is_pressed()) {
        touchpad_get_xy(&last_x, &last_y);
        data->state = LV_INDEV_STATE_PR;
    } else {
        data->state = LV_INDEV_STATE_REL;
    }

    /*Set the last pressed coordinates*/
    data->point.x = last_x;
    data->point.y = last_y;
}

/*Return true is the touchpad is pressed*/
static bool touchpad_is_pressed(void)
{
    /*Your code comes here*/
    if(TP_PRES_DOWN & tp_dev.sta)
    {
        return true;
    }
    return false;
}

/*Get the x and y coordinates if the touchpad is pressed*/
static void touchpad_get_xy(lv_coord_t * x, lv_coord_t * y)
{
    /*Your code comes here*/

    (*x) = tp_dev.x[0];
    (*y) = tp_dev.y[0];
}


#else /*Enable this file at the top*/

/*This dummy typedef exists purely to silence -Wpedantic.*/
typedef int keep_pedantic_happy;
#endif
四、测试使用
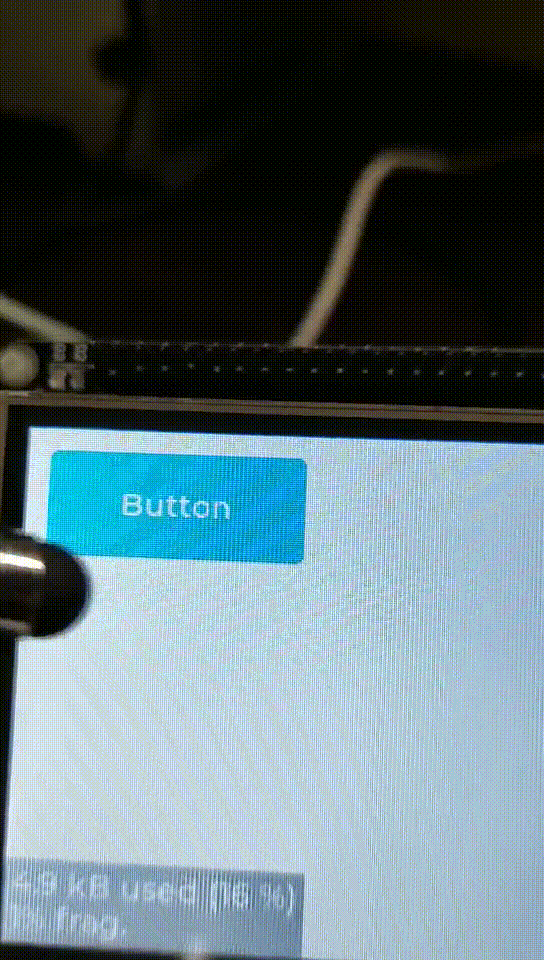
写个两个小函数来测试一下我们移植是否成功,直接把这函数复制到程序中就能用,先不要研究里面这些函数是干啥的。直接用一下测试自己移植成功没。如果成功了,在屏幕上会显示一个按钮,点击这个按钮会出现数字,每点击一次数字自增 1。
static void btn_event_cb(lv_event_t *e)
{
    lv_event_code_t code = lv_event_get_code(e);
    lv_obj_t *btn = lv_event_get_target(e);

    if(code == LV_EVENT_CLICKED)
    {
        static uint8_t cnt = 0;
        cnt++;

        lv_obj_t *label = lv_obj_get_child(btn,0);
        lv_label_set_text_fmt(label, "Butten: %d", cnt);
    }
}

// 在main函数中调用 才能出现效果
void lv_example_get_started_1(void)
{
    lv_obj_t * btn = lv_btn_create(lv_scr_act());
    lv_obj_set_pos(btn, 10,10);
    lv_obj_set_size(btn, 120,50);
    lv_obj_add_event_cb(btn, btn_event_cb, LV_EVENT_ALL, NULL);

    lv_obj_t *label = lv_label_create(btn);
    lv_label_set_text(label, "Button");
    lv_obj_center(label);
}
如果一切正常,屏幕上会显示如下,每次点击都会自动加1
我的完整程序放在了gitee上,https://gitee.com/WRS0923/stm32_little-vgl/tree/dev/ 有需要的可以自行下载,以后分享的笔记也会在这个程序上修改。争取把LVGL玩明白
注意
可能出现的问题
- 屏幕没有显示或显示不正常。
- 需要检查显示是否移植成功了,可能是显示驱动有问题,具体可以参考LVGL8.1笔记1–显示移植(2022-0504)
- 触摸没反应。
- 检查不使用LVGL时触摸是否正常,确保触摸驱动以及硬件是正常的
- 检查是否有初始化触摸
- 检查坐标传入的是否正确
- 检查是否被触摸的状态标志是否正常
- lv_port_indev_init(); // LVGL 输入接口初始化,放在 lv_init()的后面
检查改调用的函数有没有调用,文件有没有添加到工程中编译,有啥疏忽错漏的地方。输入接口移植还是非常简单的,细心一定就可以了。
网上的教程五花八门,其实最好的资料就是LVGL官方手册了。要知道不是所有的东西网上都会有教程,有些路还是要自己走


 1484
1484

 被折叠的 条评论
为什么被折叠?
被折叠的 条评论
为什么被折叠?
 到【灌水乐园】发言


