


Yolov8_obb_tracker,基于anchor_free的旋转框检测的跟踪算法(StrongSort,ByteTracker)
一、ByteTracker代码跟踪讲解
1、ByteTracker匹配逻辑
逻辑参考https://blog.csdn.net/wentinghappyday/article/details/128376299
①按设定帧的次数读取视频,将当前帧传入yolov8_obb检测器获取到当前帧的检测结果
   # Inference
   pred = model(im)
   # NMS
   pred = non_max_suppression_obb(pred, 0.3, 0.1, multi_label=True, max_det=1000)
②根据当前帧检测框的得分值将框分为高质量检测框det和低质量检测框det_second
  # 根据检测框的分数将框分为高质量框det和低质量框det_second,阈值可自行设定
  track_high_thresh=0.5
  track_low_thresh=0.1
  det=[]
  det_second=[]

  for i, conf in enumerate(confidences):
      if conf >= track_high_thresh:
          det.append([rbox[i],confidences[i],classes[i]])
      elif conf > track_low_thresh :
          det_second.append([rbox[i],confidences[i],classes[i]])
代码中score>0.5为高质量框,0.1<score<0.5为低质量框。
③对跟踪轨迹中的track进行卡尔曼滤波预测当前帧的位置,再进行匹配更新
  # update tracker
  self.tracker.predict()
  self.tracker.update(det, det_second)
如果是第一帧,跟踪轨迹里的track为0,则predict不生效,检测框都是未匹配状态,所以会将第一帧所有的检测框初始化为track并添加到跟踪轨迹中。
 #从上述3个step过程中都未匹配到的检测框,我们将它认定为一个新的轨迹进行初始化。
 for detection_idx in unmatched_detections_c:
     self._initiate_track(det[detection_idx][0], det[detection_idx][1], det[detection_idx][2])
 def _initiate_track(self, rbox,conf, class_id):
     self.tracks.append(Track(rbox, self._next_id,conf, class_id, self.n_init, self.max_age))
     self._next_id += 1
初始化跟踪轨迹,就是往跟踪队列里添加track,
track里包括的属性有
1、rbox,旋转框的坐标值
2、track_id,即 self._next_id,每往self.tracks里添加一个track,track_id+1(跟踪框的id值)
3、class_id,track目标所属类别
4、hits ,是否匹配中
5、time_since_update ,已确认状态的track未匹配到则time_since_update 值会加1
6、self.state = TrackState.Tentative,初始化的track的状态设置为TrackState.Tentative,即待激活状态
7、self._max_age,最大预留帧数,当已确认状态的track未匹配次数大于self._max_age,则会将该框从跟踪轨迹中删除
8、self.mean, self.covariance = self.kf.initiate(rbox) 初始化卡尔曼滤波参数
9、self.kf = KalmanFilter_Rbox(),用于调用卡尔曼滤波类中函数
10、self._n_init,当初始化的track连续匹配到的次数大于self._n_init,则会将初始待激活状态的track设置成激活状态 TrackState.Confirmed
class Track:
    def __init__(self, rbox, track_id, conf, class_id, n_init, max_age):
        self.track_id = track_id
        self.class_id = class_id
        self.hits = 1
        self.age = 1
        self.time_since_update = 0
        self.rbox = rbox
        self.state = TrackState.Tentative

        self.conf = conf
        self._n_init = n_init
        self._max_age = max_age

        self.kf = KalmanFilter_Rbox()
        self.mean, self.covariance = self.kf.initiate(rbox)
当程序运行到第二帧时,此时得到第二帧的检测结果同样划分为高质量检测框det和低质量检测框det_second。再运行
self.tracker.predict()
此时第一帧的跟踪轨迹中的track都会预测它们在当前第二帧所处于的位置,我们记作pred_track。再运行
self.tracker.update(det, det_second)
此时会进行pred_track与高质量检测框det和低质量检测框det_second,进行匹配来更新当前帧确定框的位置。
④匹配规则
跟踪轨迹tracks中的每一个track我们初始化都给予了一个状态,并将跟踪轨迹traks分为已经证实的跟踪轨迹confirmed_tracks,和还未证实的跟踪轨迹,unconfirmed_tracks 。
step1
先将高质量检测框和已经证实的跟踪轨迹中的跟踪track框(已经更新了在当前帧的位置)进行匈牙利匹配,其中的代价矩阵需要计算每两个旋转框之间的iou值,然后乘上检测框的score作为一个联合分数cost_matrix,显然如果IOU越大且score越大,那么认为检测框和跟踪轨迹中的track关联性越大。得到三个结果集合,已经匹配上的高质量检测框和已经证实的跟踪轨迹中的跟踪track框的集合matches_a,未匹配上的已经证实的跟踪轨迹中的跟踪track框的集合unmatched_tracks_a,未匹配上的高质量检测框的集合unmatched_detections_a 。
对于已经匹配上的框,根据卡尔曼滤波来更新一个新的位置。self.tracks[track_idx]即跟踪轨迹中的匹配到的第track_idx号轨迹框,update更新改track框的位置和状态信息。
 # 更新step1中与高质量检测框匹配的跟踪框状态
 for track_idx, detection_idx in matches_a:
     self.tracks[track_idx].update(
         det[detection_idx][0], det[detection_idx][1], det[detection_idx][2])
例如高质量检测框1号匹配上了已经证实的跟踪轨迹中的跟踪track框2号,我们认为此时高质量检测框1可能是有误差的,匹配上了已经证实的跟踪轨迹中的跟踪track框2也是有误差的,我们需要给这两个框各自一个权重占比来将两个框的值进行融合得到一个相对更准确的新的位置,这个权重是通过计算卡尔曼系数K来赋予的,后续介绍卡尔曼滤波再详细介绍。

除了通过卡尔曼滤波更新位置信息 self.mean, self.covariance = self.kf.update(self.mean, self.covariance, rbox, conf)
self.hits += 1,hit即命中,匹配数+1,
判断当前track是否处于待激活状态,且连续匹配数是否大于初始化的阈值self._n_init,一般设置为3帧,如果满足将此时框的状态设置为已经证实激活的状态self.state = TrackState.Confirmed,这些框将会被输出到最终的图像上显示。
self.time_since_update = 0,匹配到的框会将其等待更新的状态置为0。
    def update(self, rbox,  conf,class_id):
        """Perform Kalman filter measurement update step and update the feature
        cache.
        Parameters
        ----------
        detection : Detection
            The associated detection.
        """
        self.conf = conf
        self.class_id = class_id
        self.rbox = rbox
        self.mean, self.covariance = self.kf.update(self.mean, self.covariance, rbox, conf)

        self.hits += 1
        self.time_since_update = 0
        if self.state == TrackState.Tentative and self.hits >= self._n_init:
            self.state = TrackState.Confirmed
step2
将低质量的检测框和step1中未匹配到的跟踪框进行匹配,此时计算代价矩阵仅仅需要计算旋转框的IOU,并不需要乘以框的得分值。同样得到三个匹配结果,即已匹配上的低质量检测框和step1中未匹配到的跟踪track框的集合matches_b,未匹配上的已经证实的跟踪轨迹中的跟踪track框的集合unmatched_tracks_b,未匹配上的低质量检测框的集unmatched_detections_b
对于匹配上的matches_b按照第一步更新位置和状态信息。
对于未匹配到的unmatched_tracks_b,判断其是否需要从跟踪轨迹中删除,如果是待激活状态的跟踪框且等待更新的帧数大于3帧,将其状态设置为删除状态,如果是已经证实激活状态的框且等待更新的帧数大于self._max_age,一般设置为30帧,即连续30帧都没匹配上,将其状态设置为删除状态,进行删除。
  # step2未匹配到的框状态置为missed
  for track_idx in unmatched_tracks_b:
      self.tracks[track_idx].mark_missed()
 def mark_missed(self):
     """Mark this track as missed (no association at the current time step).
     """
     if self.state == TrackState.Tentative and self.time_since_update > 3:
         self.state = TrackState.Deleted
     if self.time_since_update > self._max_age:
         self.state = TrackState.Deleted
对于未匹配上的低质量检测框的集unmatched_detections_b 不做任何操作
step3
将step1中未匹配上的高质量检测框和跟踪轨迹中待激活状态的框进行匹配。同样得到三个匹配结果,即已匹配上的高质量检测框和跟踪轨迹中待激活状态的跟踪track框的集合matches_c,未匹配上的待激活状态的跟踪track框的集合unmatched_tracks_c,仍未匹配上的高质量检测框的集合unmatched_detections_c
  matches_c, unmatched_tracks_c, unmatched_detections_c = \
      linear_assignment.min_cost_matching(
          iou_matching.iou_cost, 0.7,  self.tracks,det ,unconfirmed_tracks,unmatched_detections_a)
对matches_c和unmatched_tracks_c进行step2中相同的状态更新
对于仍未匹配上的高质量检测框,我们便认为这是一个新的轨迹,将其进行初始化
 for detection_idx in unmatched_detections_c:
      self._initiate_track(det[detection_idx][0], det[detection_idx][1], det[detection_idx][2])
最后从跟踪队列里剔除删除状态的跟踪框,得到该帧最新的跟踪结果。
当第三帧,第四帧检测结果进来,匹配的结果以此类推。
self.tracks = [t for t in self.tracks if not t.is_deleted()]
 #get confirmed_tracks and  unconfirmed_tracks indices
  confirmed_tracks = [
      i for i, t in enumerate(self.tracks) if t.is_confirmed()]
  unconfirmed_tracks = [
      i for i, t in enumerate(self.tracks) if not t.is_confirmed()]

  #step1,计算高质量检测框与已经激活的跟踪框的匹配结果
  matches_a, unmatched_tracks_a, unmatched_detections_a = \
      linear_assignment.min_cost_matching(
          iou_matching.iou_cost_fuse_score, self.max_iou_distance, self.tracks,
          det, confirmed_tracks)
  #是否要融合得分值看数据需求,测试版本并未使用iou_matching.iou_cost_fuse_score
  # matches_a, unmatched_tracks_a, unmatched_detections_a = \
  #     linear_assignment.min_cost_matching(
  #         iou_matching.iou_cost, self.max_iou_distance, self.tracks,
  #         det, confirmed_tracks)

  # 更新step1中与高质量检测框匹配的跟踪框状态
  for track_idx, detection_idx in matches_a:
      self.tracks[track_idx].update(
          det[detection_idx][0], det[detection_idx][1], det[detection_idx][2])

  # step2,计算低质量框的检测结果与第一步未匹配到的跟踪框的匹配结果
  matches_b, unmatched_tracks_b, unmatched_detections_b = \
      linear_assignment.min_cost_matching(
          iou_matching.iou_cost, 0.5, self.tracks , det_scond, unmatched_tracks_a)

  # 更新step2已匹配框的状态
  for track_idx, detection_idx in matches_b:
      self.tracks[track_idx].update(
          det_scond[detection_idx][0], det_scond[detection_idx][1], det_scond[detection_idx][2])
  # step2未匹配到的框状态置为missed
  for track_idx in unmatched_tracks_b:
      self.tracks[track_idx].mark_missed()

  #step3 将step1中未匹配上的检测框和unconfirmed_tracks中的框进行匹配
  matches_c, unmatched_tracks_c, unmatched_detections_c = \
      linear_assignment.min_cost_matching(
          iou_matching.iou_cost, 0.7,  self.tracks,det ,unconfirmed_tracks,unmatched_detections_a)

  # 更新step3已匹配框的状态
  for track_idx, detection_idx in matches_c:
      self.tracks[track_idx].update(
          det[detection_idx][0], det[detection_idx][1], det[detection_idx][2])
  # step3未匹配到的框状态置为missed
  for track_idx in unmatched_tracks_c:
      self.tracks[track_idx].mark_missed()
  #从上述3个step过程中都未匹配到的检测框,我们将它认定为一个新的轨迹进行初始化。
  for detection_idx in unmatched_detections_c:
      self._initiate_track(det[detection_idx][0], det[detection_idx][1], det[detection_idx][2])
  #从跟踪队列里剔除删除状态的跟踪框
  self.tracks = [t for t in self.tracks if not t.is_deleted()]
2、卡尔曼滤波的预测和更新。
理论细节可以看啊b上的视频讲解,非常的清晰详细https://www.bilibili.com/video/BV1gX4y1j7ok?p=7&spm_id_from=pageDriver&vd_source=e9fe318d5cf880bb21b301822fcb1442
可参考的博客
https://blog.csdn.net/weixin_38145317/article/details/104607062?spm=1001.2101.3001.6650.3&utm_medium=distribute.pc_relevant.none-task-blog-2%7Edefault%7ECTRLIST%7ERate-3-104607062-blog-126752956.235%5Ev38%5Epc_relevant_yljh&depth_1-utm_source=distribute.pc_relevant.none-task-blog-2%7Edefault%7ECTRLIST%7ERate-3-104607062-blog-126752956.235%5Ev38%5Epc_relevant_yljh&utm_relevant_index=4
①、卡尔曼滤波器的启动
目标跟在初始化跟踪器tracker时,就会启动卡尔曼滤波器
class KalmanFilter_Rbox(object):
    def __init__(self):
        ndim, dt = 5, 1.
        # Create Kalman filter model matrices.
        self._motion_mat = np.eye(2 * ndim, 2 * ndim)
        for i in range(ndim):
            self._motion_mat[i, ndim + i] = dt
        self._update_mat = np.eye(ndim, 2 * ndim)

        # Motion and observation uncertainty are chosen relative to the current
        # state estimate. These weights control the amount of uncertainty inW
        # the model. This is a bit hacky.WW
        self._std_weight_position = 1. / 20
        self._std_weight_velocity = 1. / 160
②每个track均值mean与方差covariance的初始化
在目标跟踪中,需要估计track的两个状态均值和方差:
均值(mean),表示目标的位置信息,由bbox的中心坐标(cx,cy),宽高比r,高h,角度theta,以及各自的速度变化值组成,由10维向量表示为
x=[cx,cy,r,h,theta,vx,vy,vr,vh,vtheta]
各个速度值初始化为0。卡尔曼滤波器采用匀速模型和线性观测器模型,其观测变量为(cx,cy,r,h,theta)
协方差(covariance):表示目标位置信息的不确定性,由10*10的对角矩阵表示,矩阵中数字越大则表明不确定性越大,可以以任意值初始化。
对于每一个不能匹配成功的新的检测目标detection,都将其初始化为一个新的track,均值mean与方差covariance为每个
track的属性,所以在构建新的track之前,需要通过卡尔曼滤波器计算其初始均值和方差
 def initiate(self, measurement):
        """Create track from unassociated measurement.

        Parameters
        ----------
        measurement : ndarray
            Bounding box coordinates (x, y, a, h) with center position (x, y),
            aspect ratio a, and height h.

        Returns
        -------
        (ndarray, ndarray)
            Returns the mean vector (8 dimensional) and covariance matrix (8x8
            dimensional) of the new track. Unobserved velocities are initialized
            to 0 mean.

        """
        measurement=measurement.cpu()
        mean_pos = measurement  #检测目标的位置[旋转框, x, y, w, h, theta]
        mean_vel = np.zeros_like(mean_pos) #刚出现的新目标默认其速度=0,构造一个与box维度一样的向量 [0. 0. 0. 0. 0.]
        mean = np.r_[mean_pos, mean_vel]  # 是按列连接两个矩阵 [ x, y, w, h, theta, 0. 0. 0. 0. 0.]
        # print('mean_init',mean)

        #协方差矩阵,元素值越大,表明不确定性越大,可以以任意值初始化
        std = [
            2 * self._std_weight_position * measurement[0],   # the center point x
            2 * self._std_weight_position * measurement[1],   # the center point y
            1 * (measurement[2]/measurement[3]),                               # the ratio of width/height
            2 * self._std_weight_position * measurement[3],   # the height
            2 * self._std_weight_position * measurement[4],   # the theta
            10 * self._std_weight_velocity * measurement[0],
            10 * self._std_weight_velocity * measurement[1],
            0.1 * (measurement[2]/measurement[3]),
            10 * self._std_weight_velocity * measurement[3],
            10 * self._std_weight_velocity * measurement[4]]

        covariance = np.diag(np.square(std))  #np.square(std)对std中的每个元素平方,np.diag构成一个10×10的对角矩阵,对角线上的元素是np.square(std)
        return mean, covariance
③预测track在下一时刻的位置
基于track在t-1时刻的状态x来预测其在t时刻的状态x’
x’=Fx
其中,x为track在t-1时刻的均值,F为状态转移矩阵(元素取值如下图1所示,代码是实现在kalman滤波器的启动时就已经构造self._motion_mat),公式(1)预测t时刻的x’
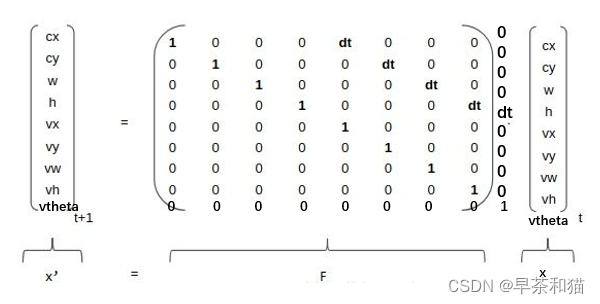
矩阵F中的dt是当前帧和前一帧之间的差(程序中取值=1),将等号右边的矩阵乘法展开,可以得到
cx’=cx+dtvx
cy’=cy+dtvy (新的位置=原来的位置+位移量,位移量=时间×速度),程序实现代码为
可以看出,这里的卡尔曼滤波是一个匀速模型.
根据t-1时刻的协方差P,系统的噪声矩阵Q(代表整个系统的可靠程度,一般初始化为很小的值,代码中是根据track的高度h初始化的motion_cov),预测t时刻的协方差矩阵P’,
    # 相当于得到t时刻估计值
    def predict(self, mean, covariance):
        # Q 预测过程中噪声协方差
        std_pos = [
            self._std_weight_position * mean[0],
            self._std_weight_position * mean[1],
            1 *(mean[2]/ mean[3]),
            self._std_weight_position * mean[3],
            self._std_weight_position * mean[4]]
        std_vel = [
            self._std_weight_velocity * mean[0],
            self._std_weight_velocity * mean[1],
            0.1 * (mean[2]/ mean[3]),
            self._std_weight_velocity * mean[3],
            self._std_weight_velocity * mean[4]]
        # np.r_ 按列连接两个矩阵
        # 初始化噪声矩阵Q=motion_cov
        motion_cov = np.diag(np.square(np.r_[std_pos, std_vel]))
        # 预测当前帧框的位置x' = Fx
        mean = np.dot(self._motion_mat, mean)
        # P' = FPF^T+Q
        covariance = np.linalg.multi_dot((
            self._motion_mat, covariance, self._motion_mat.T)) + motion_cov

        return mean, covariance
④卡尔曼滤波器的更新
懒得写了直接沾,理论就是上面博客的内容
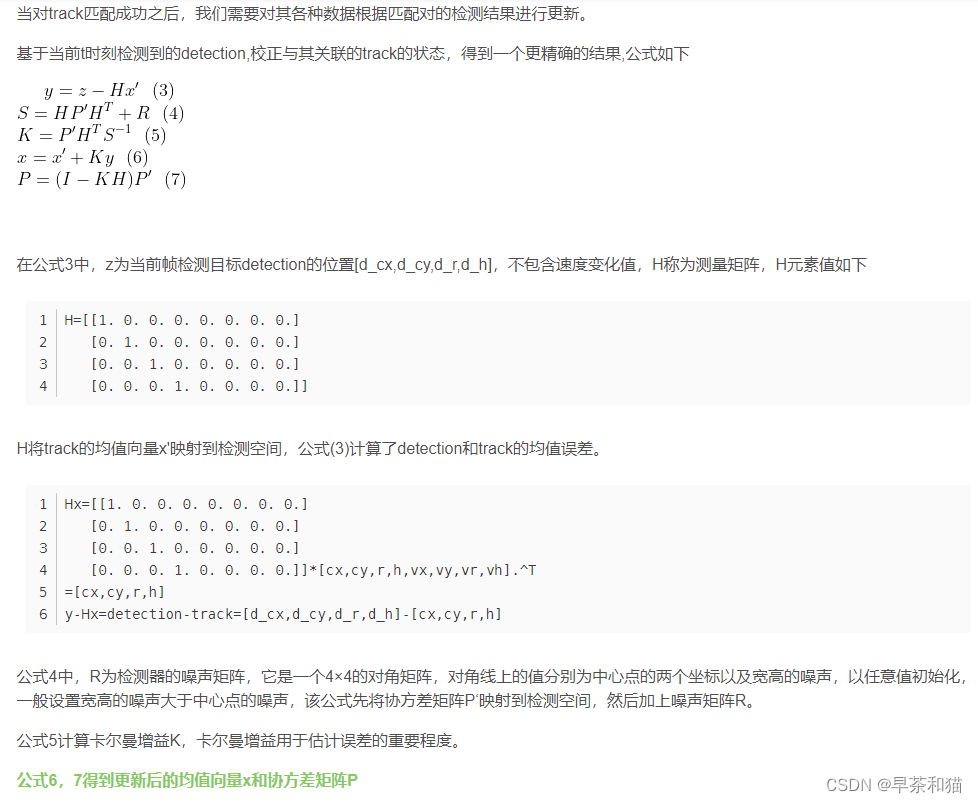
  def project(self, mean, covariance,confidence=.0):
        # R 测量过程中噪声的协方差
        std = [
            self._std_weight_position * mean[3],
            self._std_weight_position * mean[3],
            1e-1,
            self._std_weight_position * mean[3],
            1e-3]

        # std = [(1 - confidence) * x for x in std]
        # 初始化噪声矩阵R
        innovation_cov = np.diag(np.square(std))
        # 将均值向量映射到检测空间,即Hx'
        mean = np.dot(self._update_mat, mean)
        # 将协方差矩阵映射到检测空间,即HP'H^T
        covariance = np.linalg.multi_dot((
            self._update_mat, covariance, self._update_mat.T))

        return mean, covariance + innovation_cov

    # 通过估计值和观测值估计最新结果
    def update(self, mean, covariance, measurement, confidence=.0):
        measurement=measurement.cpu()
        # 将均值和协方差映射到检测空间,得到 Hx' 和 S
        projected_mean, projected_cov = self.project(mean, covariance,confidence)
        # 矩阵分解
        chol_factor, lower = scipy.linalg.cho_factor(
            projected_cov, lower=True, check_finite=False)
        # 计算卡尔曼增益K
        kalman_gain = scipy.linalg.cho_solve(
            (chol_factor, lower), np.dot(covariance, self._update_mat.T).T,
            check_finite=False).T
        # y = z - Hx' 当前帧检测框减去卡尔曼预测的框位置获得的偏移量
        innovation = measurement - projected_mean  #
        # x = x' + Ky
        new_mean = mean + np.dot(innovation, kalman_gain.T)
        # P = (I - KH)P'
        new_covariance = covariance - np.linalg.multi_dot((
            kalman_gain, projected_cov, kalman_gain.T))
        return new_mean, new_covariance


 227
227


 被折叠的 条评论
为什么被折叠?
被折叠的 条评论
为什么被折叠?
 到【灌水乐园】发言


