


1. 拦截器概述
Spring MVC中的拦截器(Interceptor)类似于Servlet中的过滤器(Filter),它主要用于拦截用户请求并做相应的处理。例如通过拦截器可以进行权限验证、记录请求信息的日志、判断用户是否登录等
要使用Spring MVC中的拦截器,就需要对拦截器类进行定义和配置。通常拦截器类可以通过两种方式来定义
一种是通过实现HandlerInterceptor接口,或继承HandlerInterceptor接口的实现类(如HandlerInterceptorAdapter)来定义;
另一种是通过实现WebRequestInterceptor接口,或继承WebRequestInterceptor接口的实现类来定义
package com.clarence.controller;

import javax.servlet.http.HttpServletRequest;
import javax.servlet.http.HttpServletResponse;

import org.springframework.web.servlet.HandlerInterceptor;
import org.springframework.web.servlet.ModelAndView;

public class CustomInterceptor implements HandlerInterceptor{

    @Override
    public void afterCompletion(HttpServletRequest arg0,
            HttpServletResponse arg1, Object arg2, Exception arg3)
            throws Exception {
        // TODO Auto-generated method stub

    }

    @Override
    public void postHandle(HttpServletRequest arg0, HttpServletResponse arg1,
            Object arg2, ModelAndView arg3) throws Exception {
        // TODO Auto-generated method stub

    }

    @Override
    public boolean preHandle(HttpServletRequest arg0, HttpServletResponse arg1,
            Object arg2) throws Exception {
        // TODO Auto-generated method stub
        return false;
    }
}
自定义的拦截器类实现了HandlerInterceptor接口,并实现了接口中的三个方法。关于这三个方法的具体描述如下
- preHandler()方法:该方法会在控制器方法前执行,其返回值表示是否中断后续操作。当其返回值为true时,表示继续向下执行;当其返回值为false时,会中断后续的所有操作(包括调用下一个拦截器和控制器类中的方法执行等)
- postHandle()方法:该方法会在控制器方法调用之后,且解析视图之前执行。可以通过此方法对请求域中的模型和视图做出进一步的修改
- afterCompletion()方法:该方法会在整个请求完成,即视图渲染结束之后执行。可以通过此方法实现一些资源清理、记录日志信息等工作
1.springmvc配置
<!-- 配置拦截器 -->
    <mvc:interceptors>
        <!-- 其子元素<bean>中定义的是全局拦截器,它会拦截所有的请求 -->
        <bean class="com.clarence.interceptor.CustomerInterceptor"></bean>
        <mvc:interceptor>
            <!-- 配置拦截路径 “/ **” 表示拦截所有路径-->
            <mvc:mapping path="/**"/>
            <!-- 不需要拦截的路径 -->
            <mvc:exclude-mapping path=""/>
            <!-- 只对路径下的请求拦截 -->
            <bean class="com.clarence.interceptor.Interceptor1"/>
        </mvc:interceptor>
        <mvc:interceptor>
            <!-- “/hello”表示拦截所有以“/hello”结尾的路径 -->
            <mvc:mapping path="/hello"/>
            <bean class="com.clarence.interceptor.Interceptor2"/>
        </mvc:interceptor>
    </mvc:interceptors>
需要注意的是,< mvc:interceptor>中的子元素必须按照上述代码的配置顺序进行编写,即<mvc:mapping … />→<mvc:exclude-mapping …/>→<bean … />的顺序,否则文件会报错。
2. 拦截器的执行流程
2.1 单个拦截器的执行流程
在运行程序时,拦截器的执行是有一定顺序的,该顺序与配置文件中所定义的拦截器的顺序相关。如果在项目中只定义了一个拦截器,那么该拦截器在程序中的执行流程如图所示
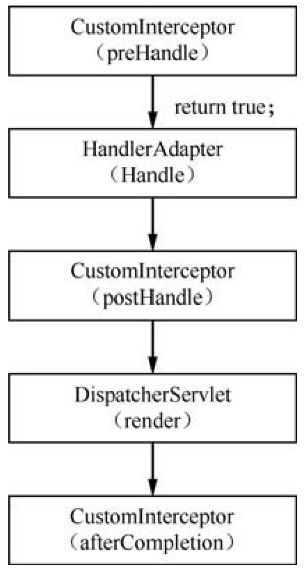
程序首先会执行拦截器类中的preHandle()方法,如果该方法的返回值为true,则程序会继续向下执行处理器中的方法,否则将不再向下执行;
在业务处理器(即控制器Controller类)处理完请求后,会执行postHandle()方法,然后会通过DispatcherServlet向客户端返回响应;
在DispatcherServlet处理完请求后,才会执行afterCompletion()方法
1.拦截器
package com.clarence.interceptor;

import javax.servlet.http.HttpServletRequest;
import javax.servlet.http.HttpServletResponse;

import org.springframework.web.servlet.HandlerInterceptor;
import org.springframework.web.servlet.ModelAndView;

public class CustomInterceptor implements HandlerInterceptor{

    @Override
    public void afterCompletion(HttpServletRequest arg0,
            HttpServletResponse arg1, Object arg2, Exception arg3)
            throws Exception {
        System.out.println("Cunstomer.....Intercepter1....afterHandle");

    }

    @Override
    public void postHandle(HttpServletRequest arg0, HttpServletResponse arg1,
            Object arg2, ModelAndView arg3) throws Exception {
        // handler (or HandlerMethod) that started asynchronousexecution, for type and/or instance examination
        System.out.println("Cunstomer.....Intercepter1....postHandle");

    }

    @Override
    public boolean preHandle(HttpServletRequest arg0, HttpServletResponse arg1,
            Object arg2) throws Exception {
        //  arg2:chosen handler to execute, for type and/or instance evaluation
        System.out.println("Cunstomer.....Intercepter1....preHandle");
        return true;
    }

}
2.springmvc-config.xml配置
    <mvc:interceptors>
        <!-- 其子元素<bean>中定义的是全局拦截器,它会拦截所有的请求 -->
        <bean class="com.clarence.interceptor.CustomInterceptor"></bean>
    </mvc:interceptors>

3.controller类
@Controller
public class HelloController {
   /**
    * 页面跳转
    */
    @RequestMapping("/hello")
    public String toHello() {
        System.out.println("hello!");
        return "success";
    }
}
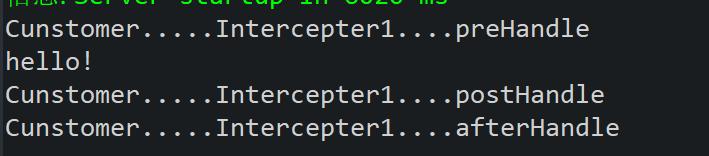
运行结果
多个拦截器的执行流程

显然,这里的调用方式为栈式调用
假设Interceptorn的preHandle为An,postHandle为Bn,afterCompletion为Cn
出栈顺序(执行顺序)为:
A1,A2,A3,…,An,handleAdapter,Bn,Bn-1,Bn-2,…,B1,DispatcherServlet,Cn,Cn-1,Cn-2,…,C1
其中,排序是按照配置文件中拦截器配置的先后顺序
拦截用户登录的简单案例
流程图

1.拦截器
package com.clarence.interceptor;

import javax.servlet.http.HttpServletRequest;
import javax.servlet.http.HttpServletResponse;
import javax.servlet.http.HttpSession;

import org.springframework.web.servlet.HandlerInterceptor;
import org.springframework.web.servlet.ModelAndView;

import com.clarence.po.User;

public class LoginInterceptor implements HandlerInterceptor{

    @Override
    public boolean preHandle(HttpServletRequest request,
            HttpServletResponse response, Object handler) throws Exception {
        String url = request.getRequestURI();
        if(url.indexOf("/login")>0) {
            return true;
        }
        HttpSession httpSession = request.getSession();
        User user = (User)httpSession.getAttribute("USER_SESSION");
        if(user!=null) {
            return true;
        }
        request.setAttribute("msg", "您还没有登录!");
        request.getRequestDispatcher("/WEB-INF/jsp/login.jsp").forward(request, response);;
        return false;
    }

    @Override
    public void postHandle(HttpServletRequest request,
            HttpServletResponse response, Object handler,
            ModelAndView modelAndView) throws Exception {
        // TODO Auto-generated method stub
    }

    @Override
    public void afterCompletion(HttpServletRequest request,
            HttpServletResponse response, Object handler, Exception ex)
            throws Exception {
        // TODO Auto-generated method stub
    }
}
2.控制类
package com.clarence.controller;

import javax.servlet.http.HttpSession;

import org.springframework.stereotype.Controller;
import org.springframework.ui.Model;
import org.springframework.web.bind.annotation.PathVariable;
import org.springframework.web.bind.annotation.RequestBody;
import org.springframework.web.bind.annotation.RequestMapping;
import org.springframework.web.bind.annotation.RequestMethod;
import org.springframework.web.bind.annotation.ResponseBody;

import com.clarence.po.User;

@Controller
public class UserController {
    @RequestMapping(value="/login",method = RequestMethod.GET )
    public String toLogin() {
        return "login";
    }

    @RequestMapping(value="/login",method = RequestMethod.POST)
    public String login(User user,Model model,HttpSession httpSession) {
        String username = user.getUsername();
        String password = user.getPassword();
        if(username!=null&&username.equals("Caris")){
            if(password!=null&&password.equals("123456")) {
               httpSession.setAttribute("USER_SESSION", user);
               return "redirect:main";
            }
        }
        model.addAttribute("msg", "用户名或密码错误");
        return "login";
    }

    @RequestMapping("/main")
    public String toMain() {
        return "main";
    }

    @RequestMapping("/logout")
    public String logout(HttpSession httpSession) {
        httpSession.invalidate();
        return "redirect:login";
    }

}
3.jsp页面
1.login.jsp
<%@ page language="java" contentType="text/html; charset=UTF-8"
    pageEncoding="UTF-8"%>
<!DOCTYPE html>
<html>
<head>
<meta charset="UTF-8">
<title>Insert title here</title>
</head>
<body>
${msg}
<form action="${pageContext.request.contextPath}/login" method="post">
    用户名:<input type="text" name="username"/>
    密码:<input type="password" name="password"/>
    <input type="submit" value="登录"/>
</form>
</body>
</html>
2.main.jsp
<%@ page language="java" contentType="text/html; charset=UTF-8"
    pageEncoding="UTF-8"%>
<!DOCTYPE html>
<html>
<head>
<meta charset="UTF-8">
<title>Insert title here</title>
</head>
<body>
当前用户:${USER_SESSION.username };
<a href="${pageContext.request.contextPath}/logout">退出</a>
</body>
</html>
配置文件
1.Springmvc-config.xml
    <mvc:interceptors>
        <mvc:interceptor>
            <!-- 配置拦截路径 “/ **” 表示拦截所有路径 -->
            <mvc:mapping path="/**"/>
            <!-- 不需要拦截的路径 -->
            <mvc:exclude-mapping path=""/>
           <!--  只对路径下的请求拦截 -->
            <bean class="com.clarence.interceptor.LoginInterceptor"/>
        </mvc:interceptor>
    </mvc:interceptors>


 2269
2269


 被折叠的 条评论
为什么被折叠?
被折叠的 条评论
为什么被折叠?
 到【灌水乐园】发言


