


Nvidia Jetson Camera Gets RGB Images with CUDA Optimization
通过 NVIDIA jetson 官方提供的两个sample整合一个通过GMSL2相机获取rgb图像的程序,可以预览,并获得图像的rgb格式(就可以对图像做OpenCV处理或保存了)。最后是实现对采集的图像做实时车道检测(车道检测的模型是github开源的 UFLD-V2)。
- 因为是实时,所以对性能有一定要求(使用了cuda对图像进行加速,yuv转rgb)
- 技能点(Jetson Orin, iSX031 camera,图像转换,Makefile转CMake)
官方示例目录在:/usr/src/jetson_multimedia_api
两个sample分别是 12_v4l2_camera_cuda 和 18_v4l2_camera_cuda_rgb:
12_v4l2_camera_cuda:
#include <stdio.h>
#include <unistd.h>
#include <sys/ioctl.h>
#include <sys/stat.h>
#include <sys/mman.h>
#include <fcntl.h>
#include <errno.h>
#include <stdlib.h>
#include <signal.h>
#include <poll.h>

#include "NvEglRenderer.h"
#include "NvUtils.h"
#include "NvCudaProc.h"

#include "camera_v4l2_cuda.h"

// ... 源代码比较多 ...

int
main(int argc, char *argv[])
{
    context_t ctx;
    int error = 0;

    set_defaults(&ctx);

    CHECK_ERROR(parse_cmdline(&ctx, argc, argv), cleanup,
            "Invalid options specified");

    /* Initialize camera and EGL display, EGL Display will be used to map
       the buffer to CUDA buffer for CUDA processing */
    CHECK_ERROR(init_components(&ctx), cleanup,
            "Failed to initialize v4l2 components");

    if (ctx.cam_pixfmt == V4L2_PIX_FMT_MJPEG) {
        CHECK_ERROR(prepare_buffers_mjpeg(&ctx), cleanup,
                "Failed to prepare v4l2 buffs");
    } else {
        CHECK_ERROR(prepare_buffers(&ctx), cleanup,
                "Failed to prepare v4l2 buffs");
    }

    CHECK_ERROR(start_stream(&ctx), cleanup,
            "Failed to start streaming");

    CHECK_ERROR(start_capture(&ctx), cleanup,
            "Failed to start capturing");

    CHECK_ERROR(stop_stream(&ctx), cleanup,
            "Failed to stop streaming");

cleanup:
    if (ctx.cam_fd > 0)
        close(ctx.cam_fd);

    if (ctx.renderer != NULL)
        delete ctx.renderer;

    if (ctx.egl_display && !eglTerminate(ctx.egl_display))
        printf("Failed to terminate EGL display connection\n");

    if (ctx.g_buff != NULL)
    {
        for (unsigned i = 0; i < V4L2_BUFFERS_NUM; i++) {
            if (ctx.g_buff[i].dmabuff_fd)
                NvBufSurf::NvDestroy(ctx.g_buff[i].dmabuff_fd);
            if (ctx.cam_pixfmt == V4L2_PIX_FMT_MJPEG)
                munmap(ctx.g_buff[i].start, ctx.g_buff[i].size);
        }
        free(ctx.g_buff);
    }

    NvBufSurf::NvDestroy(ctx.render_dmabuf_fd);

    if (error)
        printf("App run failed\n");
    else
        printf("App run was successful\n");

    return -error;
}
- 这个程序提供的功能是使用CUDA对相机获取到的图像进行预览,然后也提供了一个保存图像的功能,只不过这个保存的是相机获取到的原始数据UYVY。
- 使用的相机是SONY的相机,模组是森云智能的ISX031。比较奇怪的分别率(1920*1536)
18_v4l2_camera_cuda_rgb:
#include <stdio.h>
#include <stdlib.h>
#include <string.h>
#include <assert.h>

#include <getopt.h>             /* getopt_long() */

#include <fcntl.h>              /* low-level i/o */
#include <unistd.h>
#include <errno.h>
#include <malloc.h>
#include <sys/stat.h>
#include <sys/types.h>
#include <sys/time.h>
#include <sys/mman.h>
#include <sys/ioctl.h>

#include <asm/types.h>          /* for videodev2.h */

#include <linux/videodev2.h>

#include <cuda_runtime.h>
#include "yuv2rgb.cuh"

// ...省略源代码
// 代码排版有点奇怪,源代码就是奇怪的排版

int
main                            (int                    argc,
                                 char **                argv)
{
    for (;;) {
        int index;
        int c;

        c = getopt_long (argc, argv,
                short_options, long_options,
                &index);

        if (-1 == c)
            break;

        switch (c) {
            case 0: /* getopt_long() flag */
                break;

            case 'c':
                count = atoi (optarg);
                break;
						// ...
        }
    }

    open_device ();

    init_device ();

    init_cuda ();

    start_capturing ();

    mainloop ();

    stop_capturing ();

    uninit_device ();

    close_device ();

    exit (EXIT_SUCCESS);

    return 0;
}
- 这个sample没有预览的功能,不过有一个yuv转rgb的cuda实现。
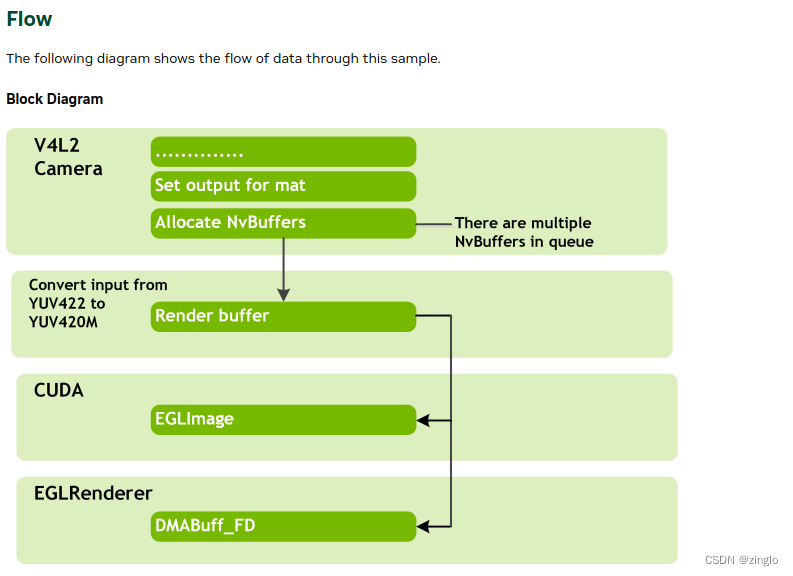
主要就基于12_v4l2_camera_cuda做自己的程序,代码结构也比较清晰,做一些初始化,检查相机是否正确工作一类的。
贴一个官网的图:https://docs.nvidia.com/jetson/archives/r36.2/ApiReference/l4t_mm_12_v4l2_camera_cuda.html
主函数开始:
    context_t ctx;
    int error = 0;

    set_defaults(&ctx);

    CHECK_ERROR(parse_cmdline(&ctx, argc, argv), cleanup,
            "Invalid options specified");

    /* Initialize camera and EGL display, EGL Display will be used to map
       the buffer to CUDA buffer for CUDA processing */
    CHECK_ERROR(init_components(&ctx), cleanup,
            "Failed to initialize v4l2 components");


    CHECK_ERROR(start_stream(&ctx), cleanup,
            "Failed to start streaming");

    CHECK_ERROR(start_capture(&ctx), cleanup,
            "Failed to start capturing");

    CHECK_ERROR(stop_stream(&ctx), cleanup,
            "Failed to stop streaming");
set_defaults(), parse_cmdline(), init_components() 主要都是初始化配置,比如指定相机,图像宽高,帧率和图像格式等。
官网给的一个运行推荐,根据自己相机修改宽高和格式
./v4l2_camera_cuda -d /dev/video0 -s 640x480 -f YUYV -n 30 -c
YUV的图像格式真多。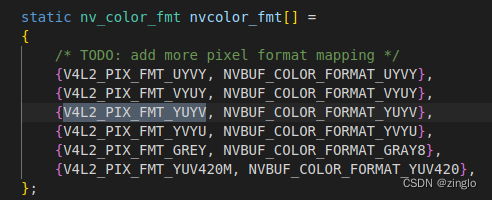
init_components()有两个初始化:
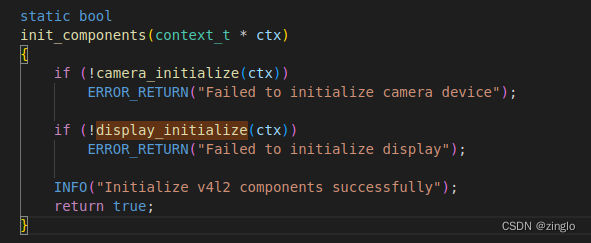
display_initialize()初始化用了EGL库的函数。
    if (ctx.cam_pixfmt == V4L2_PIX_FMT_MJPEG) {
        CHECK_ERROR(prepare_buffers_mjpeg(&ctx), cleanup,
                "Failed to prepare v4l2 buffs");
    } else {
        CHECK_ERROR(prepare_buffers(&ctx), cleanup,
                "Failed to prepare v4l2 buffs");
    }

// ...

static bool
prepare_buffers(context_t * ctx)
{
    NvBufSurf::NvCommonAllocateParams camparams = {0};
    int fd[V4L2_BUFFERS_NUM] = {0};

    /* Allocate global buffer context */
    ctx->g_buff = (nv_buffer *)malloc(V4L2_BUFFERS_NUM * sizeof(nv_buffer));
    if (ctx->g_buff == NULL)
        ERROR_RETURN("Failed to allocate global buffer context");

    camparams.memType = NVBUF_MEM_SURFACE_ARRAY;
    camparams.width = ctx->cam_w;
    camparams.height = ctx->cam_h;
    camparams.layout = NVBUF_LAYOUT_PITCH;
    camparams.colorFormat = get_nvbuff_color_fmt(ctx->cam_pixfmt);
    camparams.memtag = NvBufSurfaceTag_CAMERA;
    if (NvBufSurf::NvAllocate(&camparams, V4L2_BUFFERS_NUM, fd))
        ERROR_RETURN("Failed to create NvBuffer");
    /* Create buffer and provide it with camera */
    for (unsigned int index = 0; index < V4L2_BUFFERS_NUM; index++)
    {
        NvBufSurface *pSurf = NULL;

        ctx->g_buff[index].dmabuff_fd = fd[index];

        if (-1 == NvBufSurfaceFromFd(fd[index], (void**)(&pSurf)))
            ERROR_RETURN("Failed to get NvBuffer parameters");

        if (ctx->cam_pixfmt == V4L2_PIX_FMT_GREY &&
            pSurf->surfaceList[0].pitch != pSurf->surfaceList[0].width)
            ctx->capture_dmabuf = false;

        /* TODO: add multi-planar support
           Currently only supports YUV422 interlaced single-planar */
        if (ctx->capture_dmabuf) {
            if (-1 == NvBufSurfaceMap (pSurf, 0, 0, NVBUF_MAP_READ_WRITE))
                ERROR_RETURN("Failed to map buffer");
            ctx->g_buff[index].start = (unsigned char *)pSurf->surfaceList[0].mappedAddr.addr[0];
            ctx->g_buff[index].size = pSurf->surfaceList[0].dataSize;
        }
    }

    camparams.colorFormat = get_nvbuff_color_fmt(V4L2_PIX_FMT_YUV420M);
    camparams.memtag = NvBufSurfaceTag_NONE;
    /* Create Render buffer */
    if (NvBufSurf::NvAllocate(&camparams, 1, &ctx->render_dmabuf_fd))
        ERROR_RETURN("Failed to create NvBuffer");

    if (ctx->capture_dmabuf) {
        if (!request_camera_buff(ctx))
            ERROR_RETURN("Failed to set up camera buff");
    } else {
        if (!request_camera_buff_mmap(ctx))
            ERROR_RETURN("Failed to set up camera buff");
    }

    INFO("Succeed in preparing stream buffers");
    return true;
}
根据不同的输入格式准备不同的buffer,基本是Nvidia底层的函数了。ctx->capture_dmabuf默认是开启的。
到现在已经把buf申请好了。
start_stream()里会检查相机是否有VIDIOC_STREAMON的属性,如果有就成功。
ioctl(ctx->cam_fd, VIDIOC_STREAMON, &type)
- 重点来了:start_capture()
static bool
start_capture(context_t * ctx)
{
		// 删除了一些关闭信号和配置的代码

    NvBufSurf::NvCommonTransformParams transform_params = {0};

    fds[0].fd = ctx->cam_fd;
    fds[0].events = POLLIN;
    /* Wait for camera event with timeout = 5000 ms */
    while (poll(fds, 1, 5000) > 0 && !quit)
    {
        if (fds[0].revents & POLLIN) {
            struct v4l2_buffer v4l2_buf;

            /* Dequeue a camera buff */
            memset(&v4l2_buf, 0, sizeof(v4l2_buf));
            v4l2_buf.type = V4L2_BUF_TYPE_VIDEO_CAPTURE;
            if (ctx->capture_dmabuf)
                v4l2_buf.memory = V4L2_MEMORY_DMABUF;
            else
                v4l2_buf.memory = V4L2_MEMORY_MMAP;
            if (ioctl(ctx->cam_fd, VIDIOC_DQBUF, &v4l2_buf) < 0)
                ERROR_RETURN("Failed to dequeue camera buff: %s (%d)",
                        strerror(errno), errno);

            ctx->frame++;

            /* Save the n-th frame to file */
            if (ctx->frame == ctx->save_n_frame)
                save_frame_to_file(ctx, &v4l2_buf);

            if (ctx->cam_pixfmt == V4L2_PIX_FMT_MJPEG) {
                int fd = 0;
                uint32_t width, height, pixfmt;
                unsigned int i = 0;
                unsigned int eos_search_size = MJPEG_EOS_SEARCH_SIZE;
                unsigned int bytesused = v4l2_buf.bytesused;
                uint8_t *p;

                /* v4l2_buf.bytesused may have padding bytes for alignment
                   Search for EOF to get exact size */
                if (eos_search_size > bytesused)
                    eos_search_size = bytesused;
                for (i = 0; i < eos_search_size; i++) {
                    p =(uint8_t *)(ctx->g_buff[v4l2_buf.index].start + bytesused);
                    if ((*(p-2) == 0xff) && (*(p-1) == 0xd9)) {
                        break;
                    }
                    bytesused--;
                }

                /* Decoding MJPEG frame */
                if (ctx->jpegdec->decodeToFd(fd, ctx->g_buff[v4l2_buf.index].start,
                    bytesused, pixfmt, width, height) < 0)
                    ERROR_RETURN("Cannot decode MJPEG");

                /* Convert the decoded buffer to YUV420P */
                if (NvBufSurf::NvTransform(&transform_params, fd, ctx->render_dmabuf_fd))
                    ERROR_RETURN("Failed to convert the buffer");
            } else {
                NvBufSurface *pSurf = NULL;
                if (-1 == NvBufSurfaceFromFd(ctx->g_buff[v4l2_buf.index].dmabuff_fd,
                        (void**)(&pSurf)))
                    ERROR_RETURN("Cannot get NvBufSurface from fd");
                if (ctx->capture_dmabuf) {
                    /* Cache sync for VIC operation since the data is from CPU */
                    if (-1 == NvBufSurfaceSyncForDevice (pSurf, 0, 0))
                        ERROR_RETURN("Cannot sync output buffer");
                } else {
                    /* Copies raw buffer plane contents to an NvBufsurface plane */
                    if (-1 == Raw2NvBufSurface (ctx->g_buff[v4l2_buf.index].start, 0, 0,
                             ctx->cam_w, ctx->cam_h, pSurf))
                        ERROR_RETURN("Cannot copy raw buffer to NvBufsurface plane");
                }

                /*  Convert the camera buffer from YUV422 to YUV420P */
                if (NvBufSurf::NvTransform(&transform_params, ctx->g_buff[v4l2_buf.index].dmabuff_fd, ctx->render_dmabuf_fd))
                    ERROR_RETURN("Failed to convert the buffer");

                if (ctx->cam_pixfmt == V4L2_PIX_FMT_GREY) {
                    if(!nvbuff_do_clearchroma(ctx->render_dmabuf_fd))
                        ERROR_RETURN("Failed to clear chroma");
                }
            }
            cuda_postprocess(ctx, ctx->render_dmabuf_fd);

            /* Preview */
            ctx->renderer->render(ctx->render_dmabuf_fd);

            /* Enqueue camera buffer back to driver */
            if (ioctl(ctx->cam_fd, VIDIOC_QBUF, &v4l2_buf))
                ERROR_RETURN("Failed to queue camera buffers: %s (%d)",
                        strerror(errno), errno);
        }
    }

    /* Print profiling information when streaming stops */
    ctx->renderer->printProfilingStats();

    if (ctx->cam_pixfmt == V4L2_PIX_FMT_MJPEG)
        delete ctx->jpegdec;

    return true;
}
在while循环里对buf做各种处理,CUDA加速。后处理后做一个预览,原本是想追着ctx->renderer->render(ctx->render_dmabuf_fd);看一下是用什么方式进行预览的,但进去后发现是一个多线程编程,广播了一个条件变量,试着在整个工程里搜索这个条件变量找到wait()代码。然后发现是NVIDIA和EGL的底层代码,目标不是这个,用这种方式实现格式转换应该会有一些不能控制的坑。
注意到save_frame_to_file(ctx, &v4l2_buf);,对图像数据的处理就比较清晰了。
static bool
save_frame_to_file(context_t * ctx, struct v4l2_buffer * buf)
{
    int file;

    file = open(ctx->cam_file, O_CREAT | O_WRONLY | O_APPEND | O_TRUNC,
            S_IRUSR | S_IWUSR | S_IRGRP | S_IWGRP | S_IROTH | S_IWOTH);

    if (-1 == file)
        ERROR_RETURN("Failed to open file for frame saving");

    if (-1 == write(file, ctx->g_buff[buf->index].start,
                ctx->g_buff[buf->index].size))
    {
        close(file);
        ERROR_RETURN("Failed to write frame into file");
    }

    close(file);

    return true;
}
这里的保存就是保存buf里的数据,没有做什么转换。
这个时候转到18_v4l2_camera_cuda_rgb:
其实两个程序结构很相似,直接在这个程序里找图像处理的部分。
static void
mainloop                        (void)
{
    while (count-- > 0) {
        for (;;) {
            fd_set fds;
            struct timeval tv;
            int r;

            FD_ZERO (&fds);
            FD_SET (fd, &fds);

            /* Timeout. */
            tv.tv_sec = 2;
            tv.tv_usec = 0;

            r = select (fd + 1, &fds, NULL, NULL, &tv);

            if (-1 == r) {
                if (EINTR == errno)
                    continue;

                errno_exit ("select");
            }

            if (0 == r) {
                fprintf (stderr, "select timeout\n");
                exit (EXIT_FAILURE);
            }

            if (read_frame ())
                break;

            /* EAGAIN - continue select loop. */
        }
    }
}
mainloop() --> read_frame() --> process_image() --> gpuConvertYUYVtoRGB()
把 gpuConvertYUYVtoRGB()放到12_v4l2_camera_cuda中就可以了。
代码的部分就这样。


 947
947


 被折叠的 条评论
为什么被折叠?
被折叠的 条评论
为什么被折叠?
 到【灌水乐园】发言


