


深度学习目标检测方法则是利用深度神经网络模型进行目标检测,主要有以下几种:
- R-CNN系列:包括R-CNN、Fast R-CNN、Faster R-CNN等,通过候选区域法生成候选目标区域,然后使用卷积神经网络提取特征,并通过分类器对每个候选区域进行分类。
- SSD:Single Shot MultiBox Detector,通过在特征图上利用不同大小和形状的卷积核进行目标检测,同时预测目标的类别和位置。
- YOLO:You Only Look Once,将目标检测问题转化为回归问题,通过将图像分割成网格单元,并预测每个单元中是否存在目标以及目标的位置和类别。
- RetinaNet:通过引入Focal Loss解决目标检测中类别不平衡问题,提高了小目标的检测效果。
YOLOv8是一种用于对象检测的深度学习模型,它是YOLO系列模型的最新版本。本文介绍了基于Yolov8的任务摔倒检测模型,包括训练过程和数据准备过程,同时提供了推理的代码。
模型在线体验:模型乐园
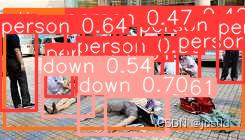
效果如下图,可以看到,躺着的人都被检测出来了:
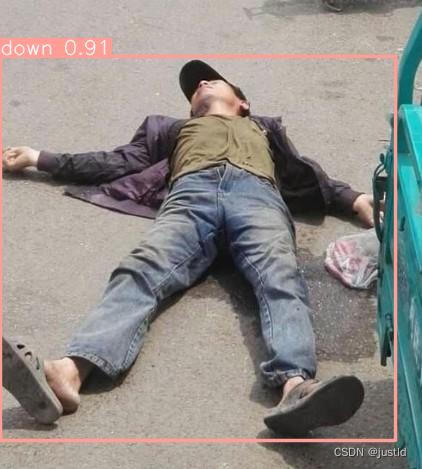
示例2:
一、安装yolov8
yolov8官方文档:https://docs.ultralytics.com/zh/
安装部分参考:官方安装教程
二、数据集处理
本次训练使用的摔倒数据集来自aistudio摔倒数据集,该数据集默认的格式是VOC格式,使用yolov8训练需要转换数据集格式。
该数据集包含3个类别:正常、摔倒、其他
其示例图片如下:
数据集的格式转换可以参考:官方数据集格式转换教程
本文提供已经完成转换的数据集,可以使用yolov8直接训练(因为有的数据有问题,训练的时候可能有警告,但是可以忽略):yolov8格式的任务摔倒数据集
三、修改yolov8配置文件
1、添加数据集配置文件
在ultralytics/ultralytics/cfg/datasets目录下添加fall.yaml,添加以下内容:
# Ultralytics YOLO 🚀, AGPL-3.0 license
# COCO 2017 dataset http://cocodataset.org by Microsoft
# Example usage: yolo train data=coco.yaml
# parent
# ├── ultralytics
# └── datasets
#     └── coco  ← downloads here (20.1 GB)


# Train/val/test sets as 1) dir: path/to/imgs, 2) file: path/to/imgs.txt, or 3) list: [path/to/imgs1, path/to/imgs2, ..]
path: datasets/fall/fall-yolov8  # 改成你的数据集的路径,最好用绝对路径
train: images/train
val: images/val
test: images/val

# Classes
names:
  0: person
  1: down
  2: other
2、添加模型配置文件
在ultralytics/ultralytics/cfg/models/v8目录下添加yolov8n_fall.yaml,添加以下内容:
# Ultralytics YOLO 🚀, AGPL-3.0 license
# YOLOv8 object detection model with P3-P5 outputs. For Usage examples see https://docs.ultralytics.com/tasks/detect

# Parameters
nc: 3  # number of classes
scales: # model compound scaling constants, i.e. 'model=yolov8n.yaml' will call yolov8.yaml with scale 'n'
  # [depth, width, max_channels]
  n: [0.33, 0.25, 1024]  # YOLOv8n summary: 225 layers,  3157200 parameters,  3157184 gradients,   8.9 GFLOPs
  s: [0.33, 0.50, 1024]  # YOLOv8s summary: 225 layers, 11166560 parameters, 11166544 gradients,  28.8 GFLOPs
  m: [0.67, 0.75, 768]   # YOLOv8m summary: 295 layers, 25902640 parameters, 25902624 gradients,  79.3 GFLOPs
  l: [1.00, 1.00, 512]   # YOLOv8l summary: 365 layers, 43691520 parameters, 43691504 gradients, 165.7 GFLOPs
  x: [1.00, 1.25, 512]   # YOLOv8x summary: 365 layers, 68229648 parameters, 68229632 gradients, 258.5 GFLOPs

# YOLOv8.0n backbone
backbone:
  # [from, repeats, module, args]
  - [-1, 1, Conv, [64, 3, 2]]  # 0-P1/2
  - [-1, 1, Conv, [128, 3, 2]]  # 1-P2/4
  - [-1, 3, C2f, [128, True]]
  - [-1, 1, Conv, [256, 3, 2]]  # 3-P3/8
  - [-1, 6, C2f, [256, True]]
  - [-1, 1, Conv, [512, 3, 2]]  # 5-P4/16
  - [-1, 6, C2f, [512, True]]
  - [-1, 1, Conv, [1024, 3, 2]]  # 7-P5/32
  - [-1, 3, C2f, [1024, True]]
  - [-1, 1, SPPF, [1024, 5]]  # 9

# YOLOv8.0n head
head:
  - [-1, 1, nn.Upsample, [None, 2, 'nearest']]
  - [[-1, 6], 1, Concat, [1]]  # cat backbone P4
  - [-1, 3, C2f, [512]]  # 12

  - [-1, 1, nn.Upsample, [None, 2, 'nearest']]
  - [[-1, 4], 1, Concat, [1]]  # cat backbone P3
  - [-1, 3, C2f, [256]]  # 15 (P3/8-small)

  - [-1, 1, Conv, [256, 3, 2]]
  - [[-1, 12], 1, Concat, [1]]  # cat head P4
  - [-1, 3, C2f, [512]]  # 18 (P4/16-medium)

  - [-1, 1, Conv, [512, 3, 2]]
  - [[-1, 9], 1, Concat, [1]]  # cat head P5
  - [-1, 3, C2f, [1024]]  # 21 (P5/32-large)

  - [[15, 18, 21], 1, Detect, [nc]]  # Detect(P3, P4, P5)
3、开始训练
使用如下命令(命令中的配置文件路径可以根据自己的需要改成绝对路径):
yolo detect train project=deploy name=yolov8_fall exist_ok=True optimizer=auto val=True amp=True epochs=100 imgsz=640 model=ultralytics/ultralytics/cfg/models/v8/yolov8_fall.yaml data=ultralytics/ultralytics/cfg/datasets/fall.yaml
4、评估
评估命令如下:
yolo detect val imgsz=640 model=deploy/yolov8_fall/weights/best.pt data=ultralytics/ultralytics/cfg/datasets/fall.yaml
结果如下:

四、推理
训练好了模型之后,可以使用如下的命令轻松推理,将best.pt复制到推理代码同级目录:
from PIL import Image
from ultralytics import YOLO

# 加载预训练的YOLOv8n模型
model = YOLO('best.pt')

# 在'bus.jpg'上运行推理
image_path = 'people(16).jpg'
results = model(image_path)  # 结果列表

# 展示结果
for r in results:
    im_array = r.plot()  # 绘制包含预测结果的BGR numpy数组
    im = Image.fromarray(im_array[..., ::-1])  # RGB PIL图像
    im.show()  # 显示图像
im.save('results.jpg') # 保存图像本文也提供训练好的权重和预测代码:摔倒检测yolov8的训练权重和推理代码


 312
312


 被折叠的 条评论
为什么被折叠?
被折叠的 条评论
为什么被折叠?
 到【灌水乐园】发言


