


前言
虚拟机里的linux系统似乎不能安装nvidia显卡驱动,在虚拟机Ubuntu系统上跑tensorflow只能使用cpu。。看来还得去物理机装双系统或者用服务器了
因为,安装nvidia驱动报错:
sudo sh cuda_11.2.2_460.32.03_linux.run出现错误:
Installation failed. See log at /var/log/cuda-installer.log for details.
显示nvidia驱动安装失败
安装NVIDIA驱动,官网下载,https://www.nvidia.cn/Download/index.aspx?lang=cn,
su root
sh NVIDIA-Linux-x86_64-515.65.01.run
报错:
WARNING: You do not appear to have an NVIDIA GPU supported by the 515.65.01
NVIDIA Linux graphics driver installed in this system. For further
details, please see the appendix SUPPORTED NVIDIA GRAPHICS CHIPS in
the README available on the Linux driver download page at
www.nvidia.com.
查找原因后发现,虚拟机里的linux系统似乎不能安装nvidia显卡驱动,使用
ubuntu-drivers devices
看到的也只有VMWare的驱动
不过,以下在VMWare Ubuntu18.04安装失败的过程也可以看作我的笔记,供日后参考。
以下是我的安装过程:
一、更新源(有时下载时有用,有时没啥用,可跳过也可先加上)
为了方便,可以下载vim:
sudo apt-get install vim
若报错如下图,则

sudo apt-get update
sudo apt-get install vim

不行的话再
sudo rm /var/lib/dpkg/lock
sudo apt-get install vim
继续:
sudo vim /etc/apt/sources.list

打开sources.list后把光标移到末尾,按i进入编辑,添加清华源、阿里源:
deb http://mirrors.tuna.tsinghua.edu.cn/ubuntu/ bionic main restricted universe multiverse
deb-src http://mirrors.tuna.tsinghua.edu.cn/ubuntu/ bionic main restricted universe multiverse
deb http://mirrors.tuna.tsinghua.edu.cn/ubuntu/ bionic-updates main restricted universe multiverse
deb-src http://mirrors.tuna.tsinghua.edu.cn/ubuntu/ bionic-updates main restricted universe multiverse
deb http://mirrors.tuna.tsinghua.edu.cn/ubuntu/ bionic-security main restricted universe multiverse
deb-src http://mirrors.tuna.tsinghua.edu.cn/ubuntu/ bionic-security main restricted universe multiverse
deb http://mirrors.aliyun.com/ubuntu/ bionic main restricted universe multiverse
deb http://mirrors.aliyun.com/ubuntu/ bionic-security main restricted universe multiverse
deb http://mirrors.aliyun.com/ubuntu/ bionic-updates main restricted universe multiverse
deb http://mirrors.aliyun.com/ubuntu/ bionic-proposed main restricted universe multiverse
deb http://mirrors.aliyun.com/ubuntu/ bionic-backports main restricted universe multiverse
deb-src http://mirrors.aliyun.com/ubuntu/ bionic main restricted universe multiverse
deb-src http://mirrors.aliyun.com/ubuntu/ bionic-security main restricted universe multiverse
deb-src http://mirrors.aliyun.com/ubuntu/ bionic-updates main restricted universe multiverse
deb-src http://mirrors.aliyun.com/ubuntu/ bionic-proposed main restricted universe multiverse
deb-src http://mirrors.aliyun.com/ubuntu/ bionic-backports main restricted universe multiverse

按Esc键,再输入 :wq 后回车,保存并退出。

输入命令更新源地址:
sudo apt-get update
二、下载安装CUDA、cudnn
开始之前,先查看对应版本:https://tensorflow.google.cn/install/source
我安装tensorflow-gpu-2.6.0、CUDA11.2(nvidia显卡驱动好像对应≥460.32.03)、cudnn8.1、GCC7.3.1
1、下载CUDA:
https://developer.nvidia.cn/cuda-toolkit-archive
找到对应版本
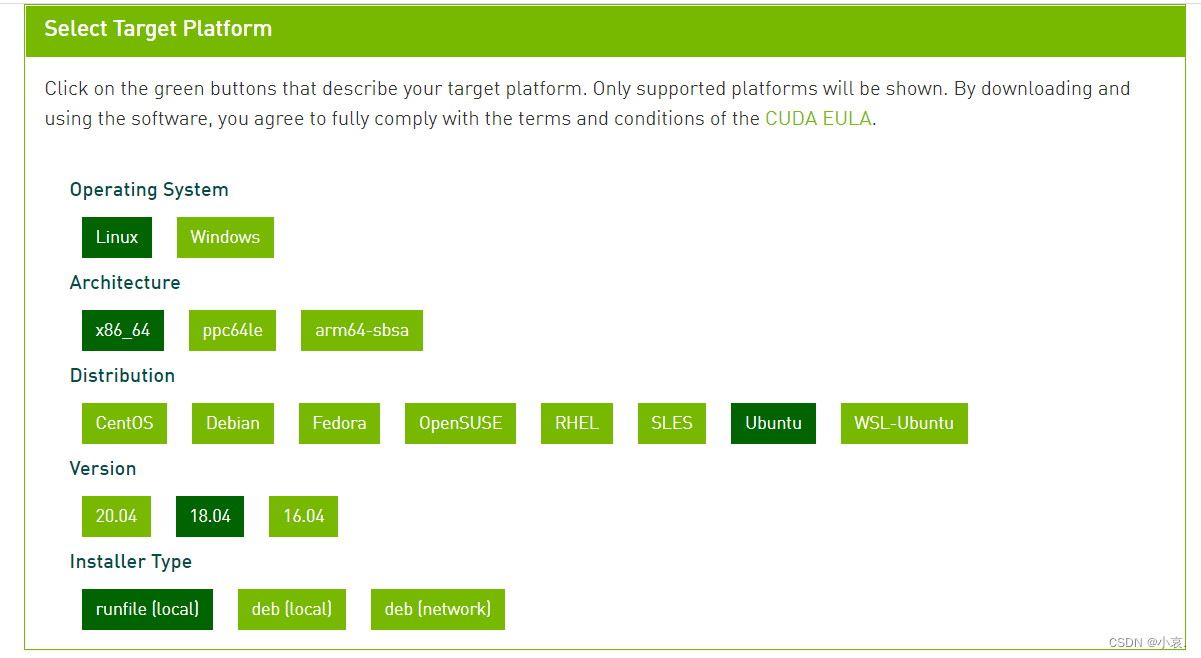

复制链接到迅雷下载,嘎嘎快。下载完成后拖入到虚拟机主目录可以新建文件夹。
2、下载cudnn
https://developer.nvidia.cn/rdp/cudnn-archive
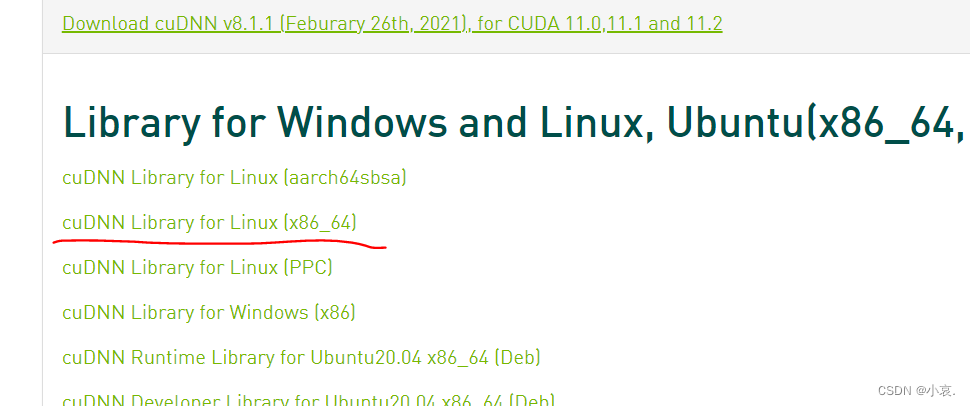
拖入虚拟机
4、安装CUDA
参考:linux安装CUDA+cuDNN
Ubuntu 配置多个版本cuda(10.0、10.1)
以下是我的安装过程:
(1)安装CUDA:
先查看是否安装了GCC,因为下一步可能报错(错误见下):
gcc -v
没安装的话安装gcc,注意版本配对:
sudo apt install gcc
gcc -v
显示是系统默认的7.5.0版本,tensorflow2.6.0官方给出的gcc版本是7.3.1,没找到,先试试下一句能不能成功验证gcc版本
sudo sh cuda_11.2.2_460.32.03_linux.run

可能遇到的报错:Failed to verify gcc version. See log at /var/log/cuda-installer.log for details.

如未报错
输入accpet
如果勾选了Driver安装,报错,则重来,按回车取消Driver,自行安装nvidia驱动(我在虚拟机里无法安装),光标移到install回车
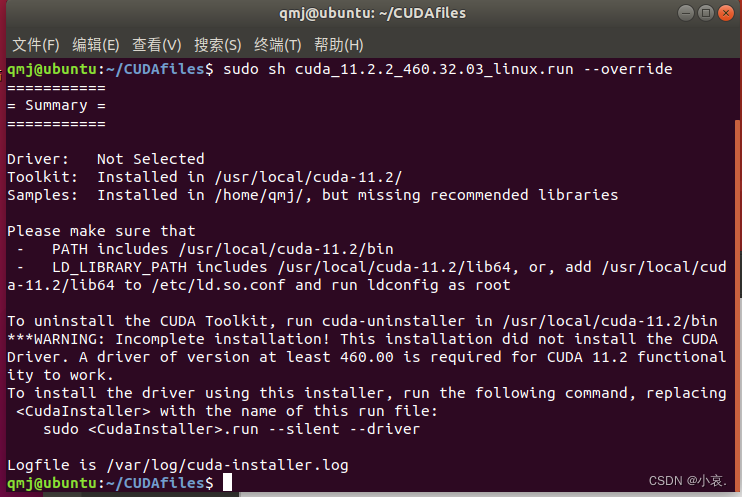
此时
nvidia-smi
仍报错(因为虚拟机没安装nvidia驱动),物理机上安装可以参照前言部分
安装后nvidia-smi,如遇:
NVIDIA-SMI has failed because it couldn’t communicate with the NVIDIA driver. Make sure that the latest NVIDIA driver is installed and running.
则
sudo apt-get install dkms
sudo dkms install -m nvidia -v 515.65.01
(2)添加环境变量
sudo vim ~/.bashrc
光标移动到末尾,按i,进入编辑

export PATH="/usr/local/cuda/bin:$PATH"
export LD_LIBRARY_PATH="/usr/local/cuda/lib64:$LD_LIBRARY_PATH"

按esc键退出vim编辑器,再输入:wq保存文件并退出。
输入以下命令,激活更新后的环境变量:
source ~/.bashrc

注意,上面路径中是用/cuda而不是/cuda-11.2,因为接下来需要通过软链接,以实现多个CUDA版本共存。输入下面代码,即可完成软链接的生成,其中/cuda-11.2替换成自己的cuda安装目录名称。

sudo rm -rf /usr/local/cuda  #删除之前生成的软链接
sudo ln -s /usr/local/cuda-11.2 /usr/local/cuda  #生成新的软链接

如果安装了多个版本的CUDA,也可使用上述两行命令进行版本切换
最后

nvcc -V

显示CUDA版本即完成
至此
@ubuntu:~$ nvcc -V
nvcc: NVIDIA (R) Cuda compiler driver
Copyright (c) 2005-2021 NVIDIA Corporation
Built on Sun_Feb_14_21:12:58_PST_2021
Cuda compilation tools, release 11.2, V11.2.152
Build cuda_11.2.r11.2/compiler.29618528_0
@ubuntu:~$ ls /usr/src | grep nvidia
nvidia-515.65.01
nvidia-smi应该能成功显示
(3)安装cudnn
tar -xzvf /home/qmj/cudnnfiles/cudnn-11.2-linux-x64-v8.1.1.33.tgz
解压后生成名为CUDA的文件夹跟cuda_11.2.2_460.32.03_linux.run在同一个文件夹下
sudo cp /home/qmj/CUDAfiles/cuda/include/cudnn*.h /usr/local/cuda/include/
sudo cp /home/qmj/CUDAfiles/cuda/lib64/libcudnn* /usr/local/cuda/lib64/
sudo chmod a+r /usr/local/cuda/include/cudnn.h
sudo chmod a+r /usr/local/cuda/lib64/libcudnn*
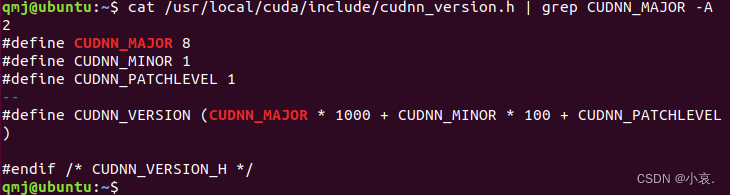
#查看cudnn版本
cat /usr/local/cuda/include/cudnn_version.h | grep CUDNN_MAJOR -A 2
完成
三、安装pip
打算偷懒,不下载安装python,直接使用系统自带的python3.6。。。
安装pip和依赖包并升级
sudo apt-get install python3-pip python3-dev
sudo pip3 install --upgrade pip
四、安装pycharm
下载,拖入到Ubuntu主目录:https://www.jetbrains.com/pycharm/download/#section=linux
解压
tar -xzvf pycharm-community-2022.2.tar
安装
. pycharm.sh
以后可以在pycharm.sh所在的文件夹下使用
sh pycharm.sh &
来打开pycharm
参考:安装pycharm
五、安装tensorflow-gpu
pip3 install tensorflow-gpu==2.6.0 -i https://pypi.tuna.tsinghua.edu.cn/simple/
太慢可以换阿里源,否则跳过这条:
pip3 install tensorflow-gpu==2.6.0 -i https://mirrors.aliyun.com/pypi/simple/?spm=a2c6h.25603864.0.0.7a345992gApCnw
pychram创建项目时interpreter选择python3.6,并勾选inherit啥啥啥就可以用上所有packages
我的tensorflow-gpu跑得有点不够快。。一会想想办法。
六、安装其他包
sudo apt-get install python3-pandas
修改最后面的包名称即可,太慢就在后面加源,末尾添加 -i https://啥啥啥
附录
安装gcc7.3.0
https://support.huaweicloud.com/instg-9000-A800_9000_9010/atlastrain_03_0062.html
需要先安装C/C++编译器
sudo apt install gcc g++
然后
以下步骤请在root用户下执行:
(1)sudo passwd root
设置密码(设置过的可跳过)
su root
进入root用户权限(退出用exit,回车)
(2)下载gcc-7.3.0.tar.gz,下载地址为 https://mirrors.tuna.tsinghua.edu.cn/gnu/gcc/gcc-7.3.0/gcc-7.3.0.tar.gz。
安装gcc时候会占用大量临时空间,所以先执行下面的命令清空/tmp目录:
sudo rm -rf /tmp/*
安装依赖。
(1) centos/bclinux执行如下命令安装:
yum install bzip2
(2) ubuntu/debian执行如下命令安装:
apt-get install bzip2
编译安装gcc。
进入gcc-7.3.0.tar.gz源码包所在目录,解压源码包,命令为:
tar -zxvf gcc-7.3.0.tar.gz
进入解压后的文件夹,执行如下命令下载gcc依赖包:
cd gcc-7.3.0
./contrib/download_prerequisites
如果执行上述命令报错,需要执行如下命令在“gcc-7.3.0/”文件夹下下载依赖包:
wget http://gcc.gnu.org/pub/gcc/infrastructure/gmp-6.1.0.tar.bz2
wget http://gcc.gnu.org/pub/gcc/infrastructure/mpfr-3.1.4.tar.bz2
wget http://gcc.gnu.org/pub/gcc/infrastructure/mpc-1.0.3.tar.gz
wget http://gcc.gnu.org/pub/gcc/infrastructure/isl-0.16.1.tar.bz2
下载好上述依赖包后,重新执行以下命令:
./contrib/download_prerequisites
如果上述命令校验失败,需要确保依赖包为一次性下载成功,无重复下载现象。
执行配置、编译和安装命令:
./configure --enable-languages=c,c++ --disable-multilib --with-system-zlib --prefix=/usr/local/gcc7.3.0
make -j15 # 通过grep -w processor /proc/cpuinfo|wc -l查看cpu数,示例为15,用户可自行设置相应参数。(make -j4 用了1小时,下文有可能遇到的报错和解决方法)
make install
注意:
其中“–prefix”参数用于指定gcc7.3.0安装路径,用户可自行配置,但注意不要配置为“/usr/local”及“/usr”,因为会与系统使用软件源默认安装的gcc相冲突,导致系统原始gcc编译环境被破坏。示例指定为“/usr/local/gcc7.3.0”。
(3)配置环境变量。
当用户执行训练时,需要用到gcc升级后的编译环境,因此要在训练脚本中配置环境变量,通过如下命令配置。
export LD_LIBRARY_PATH= i n s t a l l p a t h / l i b 64 : {install_path}/lib64: installpath/lib64:{LD_LIBRARY_PATH}
其中${install_path}为4.c中配置的gcc7.3.0安装路径,本示例为“/usr/local/gcc7.3.0/”。
说明:
本步骤为用户在需要用到gcc升级后的编译环境时才配置环境变量。
以下为 make -j4 时的报错:
1、
root@ubuntu:/home/qmj/gcc-7.3.0# make -j4
Command ‘make’ not found, but can be installed with:
apt install make
apt install make-guile
安装make即可
2、
make -j4
make[3]: 离开目录“/home/qmj/gcc-7.3.0/build-x86_64-pc-linux-gnu/libiberty”
make[2]: 离开目录“/home/qmj/gcc-7.3.0”
Makefile:25224: recipe for target ‘stage1-bubble’ failed
make[1]: *** [stage1-bubble] Error 2
make[1]: 离开目录“/home/qmj/gcc-7.3.0”
Makefile:941: recipe for target ‘all’ failed
make: *** [all] Error 2
或
make[2]: 离开目录“/home/qmj/gcc-7.3.0”
Makefile:25224: recipe for target ‘stage1-bubble’ failed
make[1]: *** [stage1-bubble] Error 2
make[1]: 离开目录“/home/qmj/gcc-7.3.0”
Makefile:941: recipe for target ‘all’ failed
make: *** [all] Error 2
或
configure: error: C++ compiler missing or inoperational
Makefile:11605: recipe for target ‘configure-stage1-libcpp’ failed
make[2]: *** [configure-stage1-libcpp] Error 1
make[2]: 离开目录“/home/qmj/gcc-7.3.0”
Makefile:25224: recipe for target ‘stage1-bubble’ failed
make[1]: *** [stage1-bubble] Error 2
make[1]: 离开目录“/home/qmj/gcc-7.3.0”
Makefile:941: recipe for target ‘all’ failed
make: *** [all] Error 2
解决:
exit
回车,退出root
sudo apt-get install g++
再
su root
sudo rm -rf /tmp/*
cd gcc-7.3.0
./configure --enable-languages=c,c++ --disable-multilib --with-system-zlib --prefix=/usr/local/gcc7.3.0
make -j4
2、
…/…/./gcc/lto-compress.c:34:10: fatal error: zlib.h: 没有那个文件或目录
#include <zlib.h>
^~~~~~~~
compilation terminated.
Makefile:1099: recipe for target ‘lto-compress.o’ failed
make[3]: *** [lto-compress.o] Error 1
make[3]: *** 正在等待未完成的任务…
rm gcc.pod
make[3]: 离开目录“/home/qmj/gcc-7.3.0/host-x86_64-pc-linux-gnu/gcc”
Makefile:4555: recipe for target ‘all-stage1-gcc’ failed
make[2]: *** [all-stage1-gcc] Error 2
make[2]: 离开目录“/home/qmj/gcc-7.3.0”
Makefile:25224: recipe for target ‘stage1-bubble’ failed
make[1]: *** [stage1-bubble] Error 2
make[1]: 离开目录“/home/qmj/gcc-7.3.0”
Makefile:941: recipe for target ‘all’ failed
make: *** [all] Error 2
解决:
exit
回车,退出root
sudo apt-get install zlib1g-dev
再
su root
sudo rm -rf /tmp/*
cd gcc-7.3.0
./configure --enable-languages=c,c++ --disable-multilib --with-system-zlib --prefix=/usr/local/gcc7.3.0
make -j4
3、
libtool: link: ranlib .libs/libtsan.a
libtool: link: rm -fr .libs/libtsan.lax
libtool: link: ( cd “.libs” && rm -f “libtsan.la” && ln -s “…/libtsan.la” “libtsan.la” )
make[4]: 离开目录“/home/qmj/gcc-7.3.0/x86_64-pc-linux-gnu/libsanitizer/tsan”
make[4]: 进入目录“/home/qmj/gcc-7.3.0/x86_64-pc-linux-gnu/libsanitizer”
true “AR_FLAGS=rc” “CC_FOR_BUILD=gcc” “CFLAGS=-g -O2” “CXXFLAGS=-g -O2 -D_GNU_SOURCE” “CFLAGS_FOR_BUILD=-g -O2” “CFLAGS_FOR_TARGET=-g -O2” “INSTALL=/usr/bin/install -c” “INSTALL_DATA=/usr/bin/install -c -m 644” “INSTALL_PROGRAM=/usr/bin/install -c” “INSTALL_SCRIPT=/usr/bin/install -c” “JC1FLAGS=” “LDFLAGS=” “LIBCFLAGS=-g -O2” “LIBCFLAGS_FOR_TARGET=-g -O2” “MAKE=make” "MAKEINFO=/home/qmj/gcc-7.3.0/missing makeinfo --split-size=5000000 --split-size=5000000 " “PICFLAG=” “PICFLAG_FOR_TARGET=” “SHELL=/bin/bash” “RUNTESTFLAGS=” “exec_prefix=/usr/local/gcc7.3.0” “infodir=/usr/local/gcc7.3.0/share/info” “libdir=/usr/local/gcc7.3.0/lib” “prefix=/usr/local/gcc7.3.0” “includedir=/usr/local/gcc7.3.0/include” “AR=ar” “AS=/home/qmj/gcc-7.3.0/host-x86_64-pc-linux-gnu/gcc/as” “LD=/home/qmj/gcc-7.3.0/host-x86_64-pc-linux-gnu/gcc/collect-ld” “LIBCFLAGS=-g -O2” “NM=/home/qmj/gcc-7.3.0/host-x86_64-pc-linux-gnu/gcc/nm” “PICFLAG=” “RANLIB=ranlib” “DESTDIR=” DO=all multi-do # make
make[4]: 离开目录“/home/qmj/gcc-7.3.0/x86_64-pc-linux-gnu/libsanitizer”
make[3]: 离开目录“/home/qmj/gcc-7.3.0/x86_64-pc-linux-gnu/libsanitizer”
make[2]: 离开目录“/home/qmj/gcc-7.3.0/x86_64-pc-linux-gnu/libsanitizer”
make[1]: 离开目录“/home/qmj/gcc-7.3.0”
完成了?
在root下接着
make install
出现:
Libraries have been installed in:
/usr/local/gcc7.3.0/lib/…/lib64
If you ever happen to want to link against installed libraries
in a given directory, LIBDIR, you must either use libtool, and
specify the full pathname of the library, or use the `-LLIBDIR’
flag during linking and do at least one of the following:
- add LIBDIR to the `LD_LIBRARY_PATH’ environment variable
during execution - add LIBDIR to the `LD_RUN_PATH’ environment variable
during linking - use the `-Wl,-rpath -Wl,LIBDIR’ linker flag
- have your system administrator add LIBDIR to `/etc/ld.so.conf’
See any operating system documentation about shared libraries for
more information, such as the ld(1) and ld.so(8) manual pages.
make[4]: 对“install-data-am”无需做任何事。
make[4]: 离开目录“/home/qmj/gcc-7.3.0/x86_64-pc-linux-gnu/libatomic”
make[3]: 离开目录“/home/qmj/gcc-7.3.0/x86_64-pc-linux-gnu/libatomic”
make[2]: 离开目录“/home/qmj/gcc-7.3.0/x86_64-pc-linux-gnu/libatomic”
make[1]: 离开目录“/home/qmj/gcc-7.3.0”
完成!


 2万+
2万+

 被折叠的 条评论
为什么被折叠?
被折叠的 条评论
为什么被折叠?
 到【灌水乐园】发言


