创建comfyui自定义节点

参考

https://github.com/liubai-liubai/ComfyUI-ImgSeg-LB/tree/main
https://blog.styxhelix.life/?p=33


安装

不需要安装任何其他依赖文件,只需要把0x_erthor_node文件夹复制到custom_nodes文件夹下,就能安装成功。

a1:展示了代码结构,表明了每一块代码的作用是什么,哪里是输入,哪里是参数栏,哪里是输出。

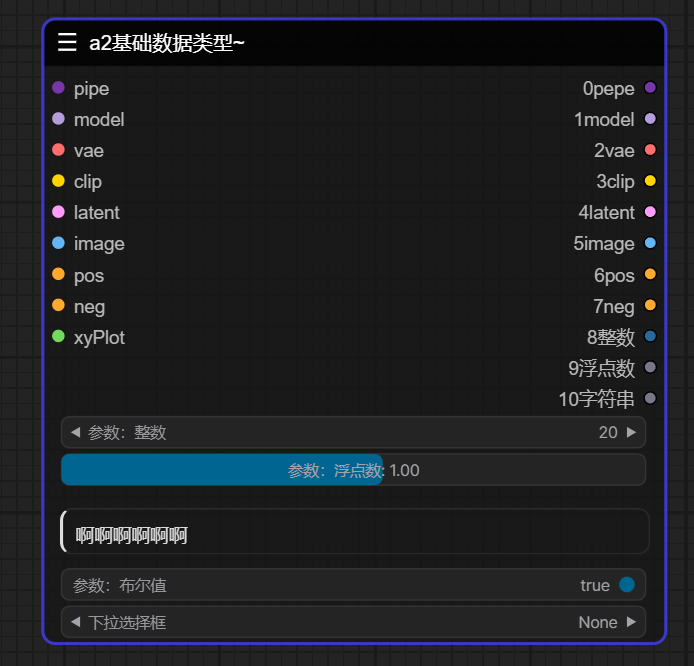
a2:如何加入各种comfyui支持的数据类型,包括img,latent等。👇

在这里插入图片描述

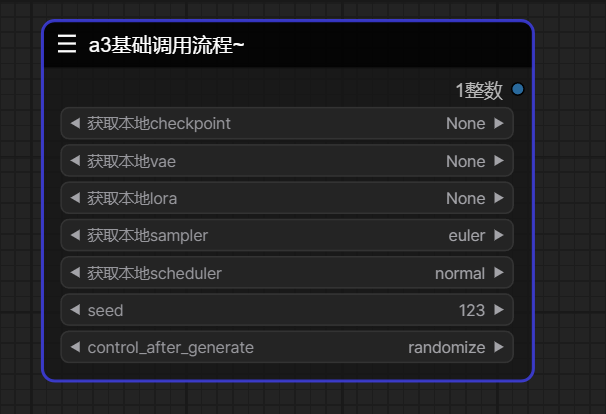
a3:如何使用comfyui自带的库去索引参数,如ckpt,vae,clip等。👇

在这里插入图片描述

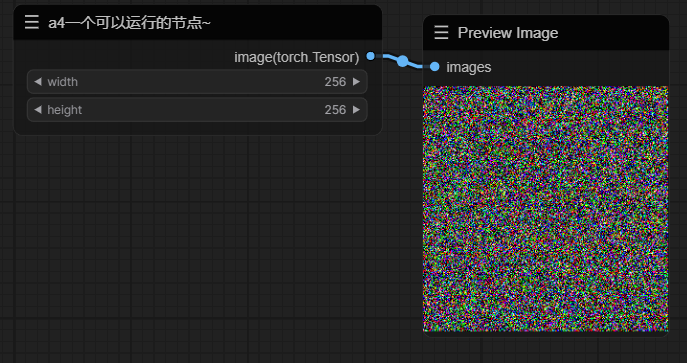
a4:一个最简的可以运行的节点,它创建一个空的torch.Tensor向量空间,也叫噪点图,并输出。只需要连接最基础的preview image节点就能展示出来。👇

在这里插入图片描述


模板

class MyNode:
    def __init__(self):
        pass
    
    @classmethod
    def INPUT_TYPES(s):
        return {
            "required": {
            
            
            },
        }
 
    RETURN_TYPES = ()
    RETURN_NAMES = ()
 
    FUNCTION = "test"
 
    #OUTPUT_NODE = False
 
    CATEGORY = "image/mynode2"
 
    def test(self):
        return ()
 
 
# A dictionary that contains all nodes you want to export with their names
# NOTE: names should be globally unique
NODE_CLASS_MAPPINGS = {
    "MyNode": MyNode
}
 
# A dictionary that contains the friendly/humanly readable titles for the nodes
NODE_DISPLAY_NAME_MAPPINGS = {
    "FirstNode": "My First Node"
}
  • 4
    点赞
  • 4
    收藏
    觉得还不错? 一键收藏
  • 0
    评论

“相关推荐”对你有帮助么?

  • 非常没帮助
  • 没帮助
  • 一般
  • 有帮助
  • 非常有帮助
提交
评论
添加红包

请填写红包祝福语或标题

红包个数最小为10个

红包金额最低5元

当前余额3.43前往充值 >
需支付:10.00
成就一亿技术人!
领取后你会自动成为博主和红包主的粉丝 规则
hope_wisdom
发出的红包
实付
使用余额支付
点击重新获取
扫码支付
钱包余额 0

抵扣说明:

1.余额是钱包充值的虚拟货币,按照1:1的比例进行支付金额的抵扣。
2.余额无法直接购买下载,可以购买VIP、付费专栏及课程。

余额充值