


Neural network@TOC
In the beginning, I will talk about the underlying principle of deep learning and the implementation of underlying algorithm with numpy
Logistic regression with neural network thinking
first,we should learn some formula
z(i)=wTx(i)+b
(We see a simple linear function with W and B in it. This is an important way for neural network to spread forward. The significance of neural network training is to update W and B continuously)
y^(i)=a(i)=sigmoid(z(i))
(Because the data we pass in is likely to be very large, we need an activation function to implement its value in [0,1] or [- 1,1], and the created activation function is relu, tanh)
L(a(i),y(i))=−y(i)log(a(i))−(1−y(i))log(1−a(i))
J=m1i=1∑mL(a(i),y(i))
(If neural network is trained continuously, it will produce deviation constantly, so we need to calculate deviation and sum it)
All the above formulas can be expressed by an expression
def propagate(w, b, X, Y):

	m = X.shape[1]

    #正向传播
    A = sigmoid(np.dot(w.T,X) + b) #计算激活值,请参考公式2。
    cost = (- 1 / m) * np.sum(Y * np.log(A) + (1 - Y) * (np.log(1 - A))) #计算成本,请参考公式3和4。

    #反向传播
    dw = (1 / m) * np.dot(X, (A - Y).T) #请参考视频中的偏导公式。
    db = (1 / m) * np.sum(A - Y) #请参考视频中的偏导公式。

	#使用断言确保我的数据是正确的
    assert(dw.shape == w.shape)
    assert(db.dtype == float)
    cost = np.squeeze(cost)
    assert(cost.shape == ())

    #创建一个字典,把dw和db保存起来。
    grads = {
                "dw": dw,
                "db": db
             }
    return (grads , cost)
The purpose of calculating the cost function is to update the parameters w and B, so here we need to use the gradient descent method, which is actually to find the derivative, and then to find the differential
def optimize(w , b , X , Y , num_iterations , learning_rate , print_cost = False):
costs = []
for i in range(num_iterations):
grads, cost = propagate(w, b, X, Y)
dw = grads["dw"]
db = grads["db"]
w = w - learning_rate * dw
b = b - learning_rate * db
#记录成本
if i % 100 == 0:
costs.append(cost)
#打印成本数据
if (print_cost) and (i % 100 == 0):
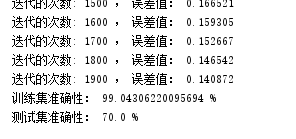
print("迭代的次数: %i , 误差值: %f" % (i,cost))
params = {
"w" : w,
"b" : b }
grads = {
"dw": dw,
"db": db }
return (params , grads , costs)
This is the basic training model. Let’s define another prediction model
def predict(w , b , X ):

    m  = X.shape[1] #图片的数量
    Y_prediction = np.zeros((1,m))
    w = w.reshape(X.shape[0],1)

    #计预测猫在图片中出现的概率
    A = sigmoid(np.dot(w.T , X) + b)
    for i in range(A.shape[1]):
        #将概率a [0,i]转换为实际预测p [0,i]
        Y_prediction[0,i] = 1 if A[0,i] > 0.5 else 0
    #使用断言
    assert(Y_prediction.shape == (1,m))

    return Y_prediction
So we went to the Internet to find some data for training and prediction
Next we study neural network based on Torch
First of all, we should understand that CNN does not traverse every pixel like other neural networks. They use the convolution layer to find the smaller picture features first, and then to find the deep features. One of them is the convolution core, which will stack the features to increase the number of picture layers. The whole process can be completed by pooling
class CNN(nn.Module):
    def __init__(self):
        super(CNN, self).__init__()
        self.conv1 = nn.Sequential(
            nn.Conv2d(
                in_channels=1,              # input height
                out_channels=16,            # n_filters
                kernel_size=5,              # filter size
                stride=1,                   # filter movement/step
                padding=2,                  # if want same width and length of this image after Conv2d, padding=(kernel_size-1)/2 if stride=1
            ),
            nn.ReLU(),                      # activation
            nn.MaxPool2d(kernel_size=2),    # choose max value in 2x2 area, output shape (16, 14, 14)
        )
        self.conv2 = nn.Sequential(
            nn.Conv2d(16, 32, 5, 1, 2),
            nn.ReLU(),
            nn.MaxPool2d(2),
        self.out = nn.Linear(32 * 7 * 7, 10)   # fully connected layer, output 10 classes

    def forward(self, x):
        x = self.conv1(x)
        x = self.conv2(x)
        x = x.view(x.size(0), -1)           # flatten the output of conv2 to (batch_size, 32 * 7 * 7)
        output = self.out(x)
        return output, x    # return x for visualization
After the framework is built, we need to do gradient descent. We use the mini batch of neural network,It will divide the training set into many small pieces for training to improve efficiency
train_loader = Data.DataLoader(dataset=train_data, batch_size=BATCH_SIZE, shuffle=True)
Adam optimization algorithm is also needed
optimizer = torch.optim.Adam(cnn.parameters(), lr=LR)
first,let’s start with the data set of torchvision
train_data = torchvision.datasets.MNIST(
    root='./mnist/',
    train=True,                                     # this is training data
    transform=torchvision.transforms.ToTensor(),    # Converts a PIL.Image or numpy.ndarray to
                                                    # torch.FloatTensor of shape (C x H x W) and normalize in the range [0.0, 1.0]
    download=DOWNLOAD_MNIST,
)
Results

Next we need to import our own data
We use Python crawler to crawl in Baidu pictures
 We need to define an interface to create our own dataset
class CustomDataset(Dataset):
    def __init__(self, txt, transform=None, target_transform=None, ):
        fh = open(txt, 'r')  # 打开标签文件
        imgs = []
        for line in fh:  # 遍历标签文件每行
            line = line.rstrip()  # 删除字符串末尾的空格
            words = line.split()  # 通过空格分割字符串,变成列表
            imgs.append((words[0], int(words[1])))  # 把图片名words[0],标签int(words[1])放到imgs里
        self.imgs = imgs
        self.transform = transform
        self.target_transform = target_transform
        self.test_data = []
        self.test_labels =[]

    def __getitem__(self, index):  # 检索函数
        fn, label = self.imgs[index]  # 读取文件名、标签
        img = Image.open(fn).convert('RGBA')  # 通过PIL.Image读取图片,因为有透明度所以转换为RGBA
        img = img.resize((64, 64), Image.ANTIALIAS)
        if self.transform is not None:
            img = self.transform(img)
        return img, label

    def __len__(self):
        return len(self.imgs)
In the end, the data we trained ourselves to find is not satisfactory

/


 1270
1270


 被折叠的 条评论
为什么被折叠?
被折叠的 条评论
为什么被折叠?
 到【灌水乐园】发言


