


Opencv|Document Scanning & Optical Character Recognition(OCR)
Step 1. Import some packages and a pyfile named resize for the project.
import cv2
import numpy as np
import resize
Step 2. Import and preliminary processing of the image.
Read in the picture to be detected. If the resolution is good enough, we can also use the laptop camera.
image = cv2.imread('test.jpg')
image = cv2.resize(image, (1500, 1125))

orig = image.copy()
# Create a copy of the original image.

gray = cv2.cvtColor(image, cv2.COLOR_BGR2GRAY)
blurred = cv2.GaussianBlur(gray, (5, 5), 0)
# Grayscale the image, and then perform line Gaussian blur to reduce noise

edged = cv2.Canny(blurred, 0, 50)
# Use canny algorithm for edge detection
orig_edged = edged.copy()
# Create a copy processed by the canny algorithm.
Step 3. Get approximate contours of the image.
Find the outline in the edge image, keep only the largest one, and initialize the screen outline.
contours, hierarchy = cv2.findContours(edged, cv2.RETR_LIST, cv2.CHAIN_APPROX_NONE)
# findContours() for finding contours from binary images

contours = sorted(contours, key=cv2.contourArea, reverse=True)
# Use the sorted function in python to return the results of contours

# Get approximate contours:
for c in contours:
    p = cv2.arcLength(c, True)
    # Calculate the circumference of the closed contour or the length of the curve
    approx = cv2.approxPolyDP(c, 0.02 * p, True)
    # Specify (0.02 * p) as precision to approximate the polygon curve. Because approximate curve is a closed curve, the parameter closed is True.
    if len(approx) == 4:
        target = approx
        break
    #Find the rectangle profile we are looking for.
Step 4. Create a function to rectify and resize the target image.
ps: Function rectify is stored in resize.py.
def rectify(h):
    h = h.reshape((4, 2))
    hnew = np.zeros((4, 2), dtype=np.float32)
    add = h.sum(1)
    hnew[0] = h[np.argmin(add)]
    # return the larger number
    hnew[2] = h[np.argmax(add)]
    diff = np.diff(h, axis=1)
    # Calculate the N-dimensional discrete difference along the specified axis.
    hnew[1] = h[np.argmin(diff)]
    hnew[3] = h[np.argmax(diff)]
    # Determine the four vertices of the detected document.
    return hnew

 approx = resize.rectify(target)
Step 5. Map our target to a quadrilateral size of (400 * 600) after perspective transformation.
pts2 = np.float32([[0, 0], [400, 0], [400, 600], [0, 600]])

M = cv2.getPerspectiveTransform(approx, pts2)
#Use the gtePerspectiveTransform function to obtain the perspective transformation matrix.
#(approx is the four fixed-point collection positions of the quadrilateral in the source image; pts2 is the four fixed-point collection positions of the target image.)

dst = cv2.warpPerspective(orig, M, (400,600))
# Use the warpPerspective function to perform perspective transformation on the source image, the output image dst size is 400 * 600.
Step 6. Use several different ways to optimize the perspective transformed image to obtain the final result.
We can also compare different ways of processing below to choose the properest one to be our final results. The results of image processing are not shown in the article. If you are interested in it, just try it by yourself.
dst = cv2.cvtColor(dst, cv2.COLOR_BGR2GRAY)
# Grayscale the image after perspective transformation
cv2.drawContours(image, [target], -1, (0, 255, 0), 2)
# Draw the outline, -1 means all the outlines, the color of the brush is green, and the thickness is 2.
ret, th1 = cv2.threshold(dst, 127, 255, cv2.THRESH_BINARY)
#Threshold
ret2, th2 = cv2.threshold(dst, 0, 255, cv2.THRESH_BINARY + cv2.THRESH_OTSU)
# Otsu's binarization
th3 = cv2.adaptiveThreshold(dst, 255, cv2.ADAPTIVE_THRESH_MEAN_C, cv2.THRESH_BINARY, 11, 2)
#Adaptive threshold of mean
th4 = cv2.adaptiveThreshold(dst, 255, cv2.ADAPTIVE_THRESH_GAUSSIAN_C, cv2.THRESH_BINARY, 11, 2)
#Adaptive threshold of gaussian
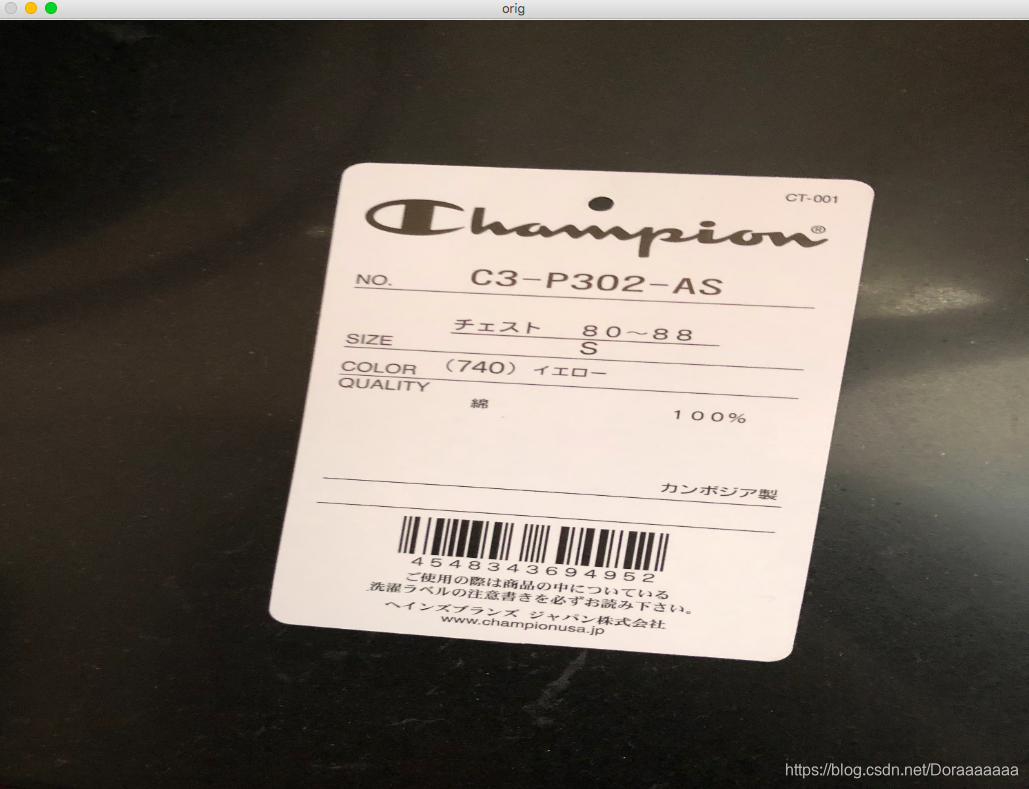
The origianal image is :
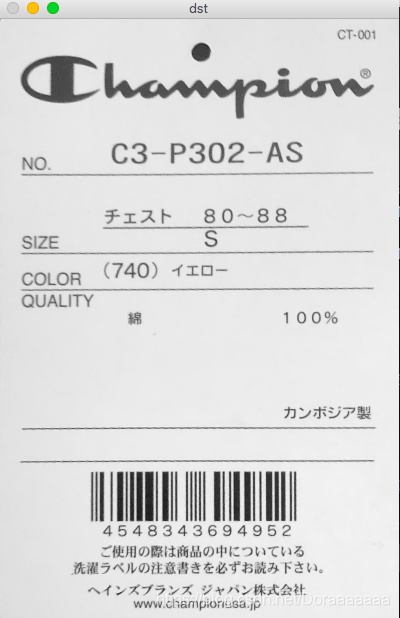
result:

Step 7. Do the Optical Character Recognition.
ps:
1.For windows users, before we install the pytesseract package, we need to install the tesseract-ocr-setup-4.00.00dev.exe program on windows system.
2. For Mac users, we need to install Homebrew on Mac system and install pytesseract by Homebrew.
Code:
from PIL import Image
import pytesseract
import cv2
import os

preprocess='thresh'
image= cv2.imread('scan.jpg')
gray = cv2.cvtColor(image,cv2.COLOR_BGR2GRAY)

if preprocess =='thresh':
    gray = cv2.threshold(gray,0,255,cv2.THRESH_BINARY|cv2.THRESH_OTSU)[1]
if preprocess=='blur':
    gray=cv2.medianBlur(gray,3)
#Choose an appropriate method to process the image.
filename="{}.jpg".format(os.getpid())
cv2.imwrite(filename,gray)
text = pytesseract.image_to_string(Image.open(filename))
#Use OCR to recognize the text information on the image.
print(text)
# Print the information.
os.remove(filename)

cv2.imshow('image',image)
cv2.imshow('output',gray)
cv2.waitKey(0)
cv2.destroyAllWindows()
It can only recognize English and numbers, however, there is Japanese in the scanned pictures, as a result of which, the effect is not good.
The scanned image:

result:

Therefore, we chose another scanned image, mostly in English and numbers, for text recognition to see the real effect of OCR.
The scanned image:
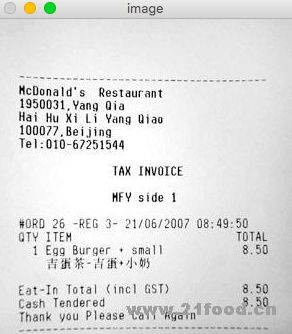 The results are as follows.

The result is much better but there still exists some small mistakes which can not be organized correctly.
Thank you for reading!
--credit by dora 2020.4.13
Resources:
https://www.bilibili.com/video/BV1X4411Z7qV?p=10
https://blog.csdn.net/showgea/article/details/82656515
https://zhuanlan.zhihu.com/p/93092044
https://blog.csdn.net/gaoyu1253401563/article/details/84995349
https://zhuanlan.zhihu.com/p/59805070


 1151
1151

 被折叠的 条评论
为什么被折叠?
被折叠的 条评论
为什么被折叠?
 到【灌水乐园】发言


