


目录
图形
前提
巩固之前python基本要素,输入和输出、变量、判断、循环、列表、函数、对象和模块等。
一、Pygame
要让游戏在不同计算机和操作系统上都能工作,其所需要的图形和其他内容可以利用 Pygame 来创建。
Pygame 网站(www.pygame.org)
Pygame 文档(http://www.pygame.org/docs/ref/draw.html)
#了解一些绘制方法
>>> import pygame
>>> help()
help> pygame.draw
二、 pygame窗口
创建一个pygame窗口
import pygame
pygame.init()
screen = pygame.display.set_mode([640,480])
//使用了 Pygame 的事件循环

import pygame

pygame.init()
screen = pygame.display.set_mode([640,480])
running = True

while running:
    for event in pygame.event.get():
        if event.type == pygame.QUIT:
            running = False

pygame.quit()
三、在窗口画圆
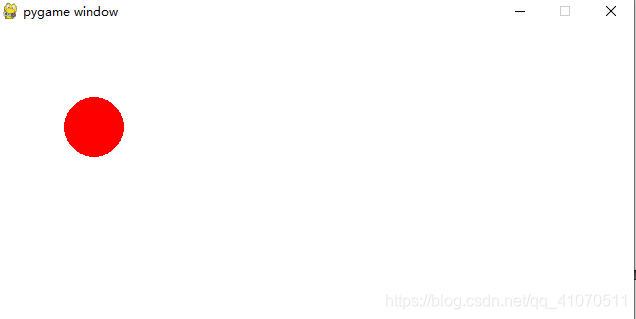
如何创建一个圆:
- 在哪个surface画圆
- 什么颜色画 [255, 0, 0]
- 什么位置画 ,[100, 100] —— 圆心位置:左上角向下 100 像素再 向右 100 像素
- 圆的大小(半径) 30
- 线宽 width = 0,圆是完全填充的
import pygame

pygame.init()
screen = pygame.display.set_mode([640,480])
screen.fill([255, 255, 255])  /#用白色背景填充窗口
pygame.draw.circle(screen, [255, 0, 0], [100, 100], 30, 0) #画一个圆
pygame.display.flip() #翻转
running = True

while running:
    for event in pygame.event.get():
        if event.type == pygame.QUIT:
            running = False

pygame.quit()
解释一些需要了解的知识点
ⅰ 什么是翻转?
在pygame窗口中显示的所有内容都会有这些内容的两个副本。
——这是因为:要让动画尽可能流畅,速度尽可能快。不必在每次对图形做修改时都更新显示,可以做很多修改后再“翻转”(flip)到图形的新版本。可以把两个副本,当作一个“当前屏”和“下一屏”,当前屏就是我们现在看到的,下一屏是完成“翻转”之后看到的。
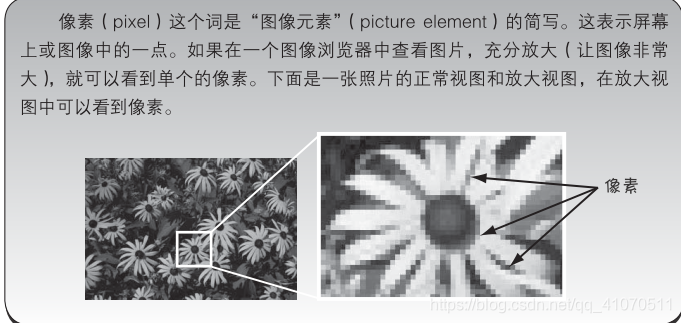
ⅱ 像素
LCD屏幕可能有 768 行像素,每行有 1024 个像素。就会说这个屏幕“分辨率是 1024×768”。
ⅲ pygame 表面
Pygame 程序可有多个表面,可以把图像从一个表面复制到另一个表面或对表面进行多个操作
显示表面有两个副本 == 双缓冲的(double-buffered) 即不会在屏幕上看到只画了一半的形状和图像。会在缓冲区里画圆、外星人或者任何东西,然后“翻转”显示表面,来显示已经完全绘制的图像。
ⅳ pygame中的颜色
颜色系统 RGB
colormixer.py 程序:可以尝试红、绿、蓝的任意组合

ⅴ位置——屏幕坐标
在屏幕绘制,需要指定其所在的位置。:一个对应 x 轴(水平方向),还有一个对应 y 轴(垂直方向)
pygame.draw.circle(screen, [255,0,0],[320,240], 30, 0) 
ⅵ 形状大小
矩形还需要指定宽高

pygame.draw.rect(screen, [255, 0, 0], [250, 150, 300, 200], 0)

或

my_list = [250, 150, 300, 200]
pygame.draw.rect(screen, [255, 0, 0], my_list, 0)
四、单个像素
①、用矩形画曲线
import pygame, sys
import math

pygame.init()
screen = pygame.display.set_mode([640,480])
screen.fill([255, 255, 255])

for x in range(0, 640):
    y = int(math.sin(x / 640.0 * 4 * math.pi) * 200 + 240)
    pygame.draw.rect(screen, [0, 0, 0, 0], [x, y, 1, 1], 1)


pygame.display.flip()
running = True

while running:
    for event in pygame.event.get():
        if event.type == pygame.QUIT:
            running = False

pygame.quit()

②、连接多个点
如上图,可以发现曲线不是连续,可用一条短线把各个点连接 或 以在一系列点之间画线 pygame.draw.lines()
需要的元素
- 画线的表面surface
- 颜色( color)
- 是否要画一条线将最后一个点与第一个点相连接,使形状闭合( closed)
- 要连接的点的列表( list)。
- 线宽( width)
pygame.draw.lines(screen, [0,0,0],False, plotPoints, 1)import pygame, sys
import math
pygame.init()
screen = pygame.display.set_mode([640,480])
screen.fill([255, 255, 255])
plotPoints = [(0,0)]
for x in range(0, 640):
y = int(math.sin(x / 640.0 * 4 * math.pi) * 200 + 240)
plotPoints.append([x, y])
pygame.draw.lines(screen, [0, 0, 0], False, plotPoints, 1)
pygame.display.flip()
running = True
while running:
for event in pygame.event.get():
if event.type == pygame.QUIT:
running = False
pygame.quit()

③、再连接多个点
- draw.lines() 函数和一个点列表来创建图形
import pygame, sys
import math

pygame.init()
dots = [[221, 432], [225, 331], [133, 342], [141, 310],
        [51, 230],  [74, 217],  [58, 153],  [114, 164],
        [123, 135], [176, 190], [159, 77],  [193, 93],
        [230, 28],  [267, 93],  [301, 77],  [284, 190],
        [327, 135], [336, 164], [402, 153], [386, 217],
        [409, 230], [319, 310], [327, 342], [233, 331],
        [237, 432]]

screen = pygame.display.set_mode([640,480])
screen.fill([255, 255, 255])

pygame.draw.lines(screen, [0, 0, 0], True, dots, 1)

pygame.display.flip()

running = True
while running:
    for event in pygame.event.get():
        if event.type == pygame.QUIT:
            running = False

pygame.quit()
- 逐点绘制
Surface.set_at() 方法访问一个表面上的单个像素
Surface.get_at() 方法检查一个像素设置为什么颜色
import pygame, sys
import math

pygame.init()
screen = pygame.display.set_mode([640,480])
screen.fill([255, 255, 255])

for x in range(0, 640):
    y = int(math.sin(x / 640.0 * 4 * math.pi) * 200 + 240)
    screen.set_at([x, y], [255, 177, 0])
    #pygame.draw.rect(screen, [0, 0, 0, 0], [x, y, 1, 1], 1)


pygame.display.flip()
running = True

while running:
    for event in pygame.event.get():
        if event.type == pygame.QUIT:
            running = False

pygame.quit()
五、图像
在 Pygame 中,使用图像最简单的方法——利用 image 函数
相应图片要放在python程序的同一位置上
import pygame, sys
import math

pygame.init()
screen = pygame.display.set_mode([640,480])
screen.fill([255, 255, 255])

my_ball = pygame.image.load("beach_ball.png") # 从硬盘加载一个图像
screen.blit(my_ball, [50, 50]) # 把 my_ball表面复制到 screen 表面上

pygame.display.flip()
running = True

while running:
    for event in pygame.event.get():
        if event.type == pygame.QUIT:
            running = False

pygame.quit()

问题:

解释:
说明没有将图片放在与python程序的同一路径上

六、将图像动起来
计算机动画实际上就是把图像(像素组)从一个地方移动到另一个地方。
- (1) 在新的位置上画出图形。
- (2) 把原来的图形擦掉。
①、在新的位置上画出图形
import pygame, sys
import math

pygame.init()
screen = pygame.display.set_mode([640,480])
screen.fill([255, 255, 255])

my_ball = pygame.image.load("beach_ball.png")
screen.blit(my_ball, [50, 50])
pygame.display.flip()

pygame.time.delay(2000)

screen.blit(my_ball, [150, 50])
pygame.display.flip()

running = True

while running:
    for event in pygame.event.get():
        if event.type == pygame.QUIT:
            running = False

pygame.quit()
从效果图可以看出前一个小球忘记擦除
②、把原来的图形擦掉
计算机图形就像水彩画,不像铅笔画或粉笔画。可以“擦掉”某个东西,实际要做的是把它“盖住”。但是用什么来盖住呢?对于蓝天水彩画,天是蓝的,可以用蓝色来覆盖小鸟。程序背景是白色的,所以必须用白色覆盖沙滩球原来的图像。
import pygame, sys
import math

pygame.init()
screen = pygame.display.set_mode([640,480])
screen.fill([255, 255, 255])

my_ball = pygame.image.load("beach_ball.png")
screen.blit(my_ball, [50, 50])
pygame.display.flip()

pygame.time.delay(2000)

screen.blit(my_ball, [150, 50])
pygame.draw.rect(screen, [255, 255, 255], [50, 50, 90, 90], 0)
pygame.display.flip()

running = True

while running:
    for event in pygame.event.get():
        if event.type == pygame.QUIT:
            running = False

pygame.quit()
注意:
必须知道背景上有什么,也就是在图像“底下”是什么,因为移动图像时,必须放回或者重绘这个位置上原来的背景。
如:如果背景是一个沙滩场景,移动小球就会困难得多。不只是涂上白色,我们必须画出正确的背景图像部分。还有一个选择是重绘整个场景,然后把沙滩球放在它的新位置上。
③ 、提升让动画更流畅
让更逼真方式,让小球移动,小步移动
import pygame, sys
import math

pygame.init()
screen = pygame.display.set_mode([640,480])
screen.fill([255, 255, 255])

my_ball = pygame.image.load("beach_ball.png")

x = 50
y = 50

screen.blit(my_ball, [x, y])
pygame.display.flip()

for looper in range(1, 100):
    pygame.time.delay(20)
    pygame.draw.rect(screen, [255, 255, 255], [x, y, 90, 90], 0)
    x = x + 5
    screen.blit(my_ball, [x, y])
    pygame.display.flip()

running = True

while running:
    for event in pygame.event.get():
        if event.type == pygame.QUIT:
            running = False

pygame.quit()
④、让小球反弹
界面是有限制的,若一直向右移动,最终小球会消失再屏幕上,需要小球碰到界面边缘在反弹
- 球从窗口边界反弹。
- 让球重新翻转到窗口的另一边。
左边界判断:小球起始点是否是0
右边界:要加上小球的宽
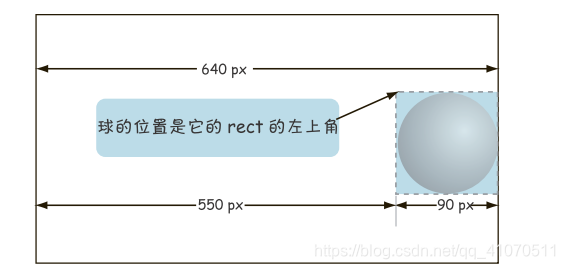
- 希望球永远来回反弹(或者直到我们关闭 Pygame 窗口)。因为已经有了一 个 while 循环,只要窗口打开,这个 while 循环就一直运行,所以我们要把示球的代码移到这个循环内部(这就是程序最后一部分中的 while 循环)。
- 并不总是将球的位置增加 5,会建立一个新变量 speed,用来确定每次迭代时以多快的速度移动球。我还打算把这个值设置为 10,让球稍稍加快速度。
import pygame, sys
import math

pygame.init()
screen = pygame.display.set_mode([640,480])
screen.fill([255, 255, 255])

my_ball = pygame.image.load("beach_ball.png")

x = 50
y = 50
x_speed = 10

running = True

while running:
    for event in pygame.event.get():
        if event.type == pygame.QUIT:
            running = False


    pygame.time.delay(20)
    pygame.draw.rect(screen, [255, 255, 255], [x, y, 90, 90], 0)
    x = x + x_speed

    if x > screen.get_width() - 90 or x < 0 :
        x_speed = - x_speed

    screen.blit(my_ball, [x, y])
    pygame.display.flip()


pygame.quit()
⑤、让小球在2D空间反弹
目前只是让小球在一个方向上移动,让其可以上下移动
import pygame, sys
import math

pygame.init()
screen = pygame.display.set_mode([640,480])
screen.fill([255, 255, 255])

my_ball = pygame.image.load("beach_ball.png")

x = 50
y = 50
x_speed = 10
y_speed = 10

running = True

while running:
    for event in pygame.event.get():
        if event.type == pygame.QUIT:
            running = False

    pygame.time.delay(20)
    pygame.draw.rect(screen, [255, 255, 255], [x, y, 90, 90], 0)
    x = x + x_speed
    y = y + y_speed

    if x > screen.get_width() - 90 or x < 0 :
        x_speed = - x_speed

    if y > screen.get_height() - 90 or y < 0 :
        y_speed = - y_speed

    screen.blit(my_ball, [x, y])
    pygame.display.flip()

pygame.quit()
可以让球慢下来:
- 减小速度
- 增加延迟设置
⑥、让小球翻转
球在屏幕右边界消失时,又会在左边界重新出现
import pygame, sys
import math

pygame.init()
screen = pygame.display.set_mode([640,480])
screen.fill([255, 255, 255])

my_ball = pygame.image.load("beach_ball.png")

x = 50
y = 50
x_speed = 10
y_speed = 10

running = True

while running:
    for event in pygame.event.get():
        if event.type == pygame.QUIT:
            running = False

    pygame.time.delay(20)
    pygame.draw.rect(screen, [255, 255, 255], [x, y, 90, 90], 0)
    x = x + x_speed
    #y = y + y_speed

    if x > screen.get_width() - 90 or x < 0 :
        x = 0


    screen.blit(my_ball, [x, y])
    pygame.display.flip()

pygame.quit()


 1万+
1万+


 被折叠的 条评论
为什么被折叠?
被折叠的 条评论
为什么被折叠?
 到【灌水乐园】发言


