


目录
进入python,运行netron.start(‘模型路径’),如下:
目录
进入python,运行netron.start(‘模型路径’),如下:
目录
2、跑起来了也没有报错,但是一直卡在这个界面,显示完了超参数也不进入训练状态,打开tensorboard显示没有训练数据。
1、登录服务器
1.1通过命令行SSH进行登录。我们可以通过SSH,配合服务器IP,帐号密码进行登录。
ssh root@8.xxx.xxx.xxx1.2 如果是Windows的话,可以下下载一个XShelll也能进行操作登录。

2、配置服务器
2.1 创建新用户
adduser example_user # 比如我创建pengtao新用户 ,输入密码一路回车下去创建即可
adduser pengtao 2.2 添加用户权限
adduser pengtao sudo
2.3 进入用户更新软件包
比如 在pengtao 用户下更新软件包
su - pengtao
sudo apt update
apt list --upgradable #查看要升级的软件包
3、搭建Python环境
3.1 安装Aaaconda3
1、直接下载
wget https://repo.anaconda.com/archive/Anaconda3-2020.11-Linux-x86_64.sh

2、进行安装

sh Anaconda3-<对应的版本号>-Linux-x86_64.sh -- python3

bash Anaconda2-2019.10-Linux-x86_64.sh -- python2
一般使用默认的安装即可,官方也推荐使用默认的安装路径,默认的安装路径格式如下:/home/<user>/anaconda<2 or 3> 如果是root用户则是:/root/anaconda<2 or 3>

3、验证安装成功

conda -V


4、linux下anacond配置环境变量
进入配置信息 sudo vi /etc/profile
或者在vi ~/.bashrc进行配置
在末尾添加自己的安装路径 export PATH=$PATH:/home/software/anaconda3/bin
按下ESC键,输入:,然后输入wq按下回车就保存退出了
最后重新载入配置文件,输入source /etc/profile


5、linux下cuda配置环境变量
进入配置信息 sudo vi /etc/profile
export LD_LIBRARY_PATH=$LD_LIBRARY_PATH:/usr/local/cuda/lib64
export PATH=$PATH:/usr/local/cuda/bin
export CUDA_HOME=$CUDA_HOME:/usr/local/cuda
按下ESC键,输入:,然后输入wq按下回车就保存退出了
最后重新载入配置文件,输入source /etc/profile
最后输入nvcc -V如果出现如下即表示安装成功。
nvcc: NVIDIA (R) Cuda compiler driver
Copyright (c) 2005-2019 NVIDIA Corporation
Built on Wed_Oct_23_19:24:38_PDT_2019
Cuda compilation tools, release 10.2, V10.2.89
如果安装完成后出现下面问题:输入source ~/.bashrc或者重新开下终端即可。

3.2 搭建yolov5环境
pip install requests  -i https://pypi.tuna.tsinghua.edu.cn/simple
pip install matplotlib==3.2.2  -i https://pypi.tuna.tsinghua.edu.cn/simple
pip install numpy==1.18.5  -i https://pypi.tuna.tsinghua.edu.cn/simple
pip install scipy==1.4.1  -i https://pypi.tuna.tsinghua.edu.cn/simple
# pip install -r requirements.txt

# Base ----------------------------------------
matplotlib>=3.2.2
numpy>=1.18.5
opencv-python>=4.1.2
Pillow>=7.1.2
PyYAML>=5.3.1
requests>=2.23.0
scipy>=1.4.1
torch>=1.7.0
torchvision>=0.8.1
tqdm>=4.41.0

# Logging -------------------------------------
tensorboard>=2.4.1
# wandb

# Plotting ------------------------------------
pandas>=1.1.4
seaborn>=0.11.0

# Export --------------------------------------
# coremltools>=4.1  # CoreML export
# onnx>=1.9.0  # ONNX export
# onnx-simplifier>=0.3.6  # ONNX simplifier
# scikit-learn==0.19.2  # CoreML quantization
# tensorflow>=2.4.1  # TFLite export
# tensorflowjs>=3.9.0  # TF.js export
# openvino-dev  # OpenVINO export

# Extras --------------------------------------
# albumentations>=1.0.3
# Cython  # for pycocotools https://github.com/cocodataset/cocoapi/issues/172
# pycocotools>=2.0  # COCO mAP
# roboflow
thop  # FLOPs computation
3.3 yolov5环境测试
3.3.1 下载模型
1、网址下载
2、脚本下载
bash data/scripts/download_weights.sh3.3.2 测试模型
进入YOLO V5工程的根目录
$ cd   /media/yolov5
执行命令:
$ python detect.py --source ./data/images/bus.jpg


#通用
python path/to/detect.py --weights yolov5s.pt --source 0         # webcam,读取摄像头视频流
                                                      path/to/img.jpg    # image,读取图片
                                                      vid.mp4        # video,读取视频
                                                      path/          # directory,读取文件
                                                      path/*.jpg     # glob
                                                      'https://youtu.be/Zgi9g1ksQHc'  # YouTube
'rtsp://example.com/media.mp4' # RTSP, RTMP, HTTP stream 
3.3.3 模型验证
1、下载coco数据集
download: bash data/scripts/get_coco.sh

2、验证coco.yaml里的数据
python val.py --weights yolov5x.pt --data coco.yaml --img 640 --iou 0.65 --half

val: data=/content/yolov5/data/coco.yaml, weights=['yolov5x.pt'], batch_size=32, imgsz=640, conf_thres=0.001, iou_thres=0.65, task=val, device=, single_cls=False, augment=False, verbose=False, save_txt=False, save_hybrid=False, save_conf=False, save_json=True, project=runs/val, name=exp, exist_ok=False, half=True
YOLOv5 🚀 v6.0-48-g84a8099 torch 1.10.0+cu102 CUDA:0 (Tesla V100-SXM2-16GB, 16160MiB)

Downloading https://github.com/ultralytics/yolov5/releases/download/v6.0/yolov5x.pt to yolov5x.pt...
100% 166M/166M [00:03<00:00, 54.1MB/s]

Fusing layers...
Model Summary: 444 layers, 86705005 parameters, 0 gradients
val: Scanning '../datasets/coco/val2017' images and labels...4952 found, 48 missing, 0 empty, 0 corrupted: 100% 5000/5000 [00:01<00:00, 2636.64it/s]
val: New cache created: ../datasets/coco/val2017.cache
               Class     Images     Labels          P          R     mAP@.5 mAP@.5:.95: 100% 157/157 [01:12<00:00,  2.17it/s]
                 all       5000      36335      0.729       0.63      0.683      0.496
Speed: 0.1ms pre-process, 4.9ms inference, 1.9ms NMS per image at shape (32, 3, 640, 640)

Evaluating pycocotools mAP... saving runs/val/exp/yolov5x_predictions.json...
loading annotations into memory...
Done (t=0.46s)
creating index...
index created!
Loading and preparing results...
DONE (t=5.15s)
creating index...
index created!
Running per image evaluation...
Evaluate annotation type *bbox*
DONE (t=90.39s).
Accumulating evaluation results...
DONE (t=14.54s).
 Average Precision  (AP) @[ IoU=0.50:0.95 | area=   all | maxDets=100 ] = 0.507
 Average Precision  (AP) @[ IoU=0.50      | area=   all | maxDets=100 ] = 0.689
 Average Precision  (AP) @[ IoU=0.75      | area=   all | maxDets=100 ] = 0.552
 Average Precision  (AP) @[ IoU=0.50:0.95 | area= small | maxDets=100 ] = 0.345
 Average Precision  (AP) @[ IoU=0.50:0.95 | area=medium | maxDets=100 ] = 0.559
 Average Precision  (AP) @[ IoU=0.50:0.95 | area= large | maxDets=100 ] = 0.652
 Average Recall     (AR) @[ IoU=0.50:0.95 | area=   all | maxDets=  1 ] = 0.381
 Average Recall     (AR) @[ IoU=0.50:0.95 | area=   all | maxDets= 10 ] = 0.630
 Average Recall     (AR) @[ IoU=0.50:0.95 | area=   all | maxDets=100 ] = 0.682
 Average Recall     (AR) @[ IoU=0.50:0.95 | area= small | maxDets=100 ] = 0.526
 Average Recall     (AR) @[ IoU=0.50:0.95 | area=medium | maxDets=100 ] = 0.732
 Average Recall     (AR) @[ IoU=0.50:0.95 | area= large | maxDets=100 ] = 0.829
Results saved to runs/val/exp

3、模型测试
python val.py --weights yolov5x.pt --data coco.yaml --img 640 --iou 0.65 --half --task test

4、模型训练

python train.py --weights yolov5x.pt --data coco.yaml --img 640 --iou 0.65 --half --task test
3.4 训练自己的数据集
参考博客:YOLOv5的详细使用教程,以及使用yolov5训练自己的数据集
1、利用LabelImg进行数据的标注

2、进行数据的划分
# coding:utf-8

import os
import random
import argparse

parser = argparse.ArgumentParser()
#xml文件的地址,根据自己的数据进行修改 xml一般存放在Annotations下
parser.add_argument('--xml_path', default='Annotations', type=str, help='input xml label path')
#数据集的划分,地址选择自己数据下的ImageSets/Main
parser.add_argument('--txt_path', default='ImageSets/Main', type=str, help='output txt label path')
opt = parser.parse_args()

trainval_percent = 1.0
train_percent = 0.9
xmlfilepath = opt.xml_path
txtsavepath = opt.txt_path
total_xml = os.listdir(xmlfilepath)
if not os.path.exists(txtsavepath):
    os.makedirs(txtsavepath)

num = len(total_xml)
list_index = range(num)
tv = int(num * trainval_percent)
tr = int(tv * train_percent)
trainval = random.sample(list_index, tv)
train = random.sample(trainval, tr)

file_trainval = open(txtsavepath + '/trainval.txt', 'w')
file_test = open(txtsavepath + '/test.txt', 'w')
file_train = open(txtsavepath + '/train.txt', 'w')
file_val = open(txtsavepath + '/val.txt', 'w')

for i in list_index:
    name = total_xml[i][:-4] + '\n'
    if i in trainval:
        file_trainval.write(name)
        if i in train:
            file_train.write(name)
        else:
            file_val.write(name)
    else:
        file_test.write(name)

file_trainval.close()
file_train.close()
file_val.close()
file_test.close()
3、进行数据标签格式的转换
# -*- coding: utf-8 -*-
import xml.etree.ElementTree as ET
import os
from os import getcwd

sets = ['train', 'val', 'test']
classes = ["a", "b"]   # 改成自己的类别
abs_path = os.getcwd()
print(abs_path)

def convert(size, box):
    dw = 1. / (size[0])
    dh = 1. / (size[1])
    x = (box[0] + box[1]) / 2.0 - 1
    y = (box[2] + box[3]) / 2.0 - 1
    w = box[1] - box[0]
    h = box[3] - box[2]
    x = x * dw
    w = w * dw
    y = y * dh
    h = h * dh
    return x, y, w, h

def convert_annotation(image_id):
    in_file = open('/home/trainingai/zyang/yolov5/paper_data/Annotations/%s.xml' % (image_id), encoding='UTF-8')
    out_file = open('/home/trainingai/zyang/yolov5/paper_data/labels/%s.txt' % (image_id), 'w')
    tree = ET.parse(in_file)
    root = tree.getroot()
    size = root.find('size')
    w = int(size.find('width').text)
    h = int(size.find('height').text)
    for obj in root.iter('object'):
        # difficult = obj.find('difficult').text
        difficult = obj.find('Difficult').text
        cls = obj.find('name').text
        if cls not in classes or int(difficult) == 1:
            continue
        cls_id = classes.index(cls)
        xmlbox = obj.find('bndbox')
        b = (float(xmlbox.find('xmin').text), float(xmlbox.find('xmax').text), float(xmlbox.find('ymin').text),
             float(xmlbox.find('ymax').text))
        b1, b2, b3, b4 = b
        # 标注越界修正
        if b2 > w:
            b2 = w
        if b4 > h:
            b4 = h
        b = (b1, b2, b3, b4)
        bb = convert((w, h), b)
        out_file.write(str(cls_id) + " " + " ".join([str(a) for a in bb]) + '\n')

wd = getcwd()
for image_set in sets:
    if not os.path.exists('/home/trainingai/zyang/yolov5/paper_data/labels/'):
        os.makedirs('/home/trainingai/zyang/yolov5/paper_data/labels/')
    image_ids = open('/home/trainingai/zyang/yolov5/paper_data/ImageSets/Main/%s.txt' % (image_set)).read().strip().split()
    list_file = open('paper_data/%s.txt' % (image_set), 'w')
    for image_id in image_ids:
        list_file.write(abs_path + '/paper_data/images/%s.jpg\n' % (image_id))
        convert_annotation(image_id)
    list_file.close()
4、构建数据集的配置文件
在yolov5目录下的data文件夹下新建一个dataname.yaml文件(可以自定义命名),用来存放训练集和验证集的划分文件(train.txt和val.txt),这两个文件是通过运行上面的代码生成,然后是目标的类别数目和具体类别列表

5、编辑模型的配置文件
5.1 聚类得出先验框(可选)(聚类重新生成anchors运行时间较长)
最新版的yolov5,它会自动kmeans算出anchors
kmeans.py代码内容如下:
import numpy as np

def iou(box, clusters):
    """
    Calculates the Intersection over Union (IoU) between a box and k clusters.
    :param box: tuple or array, shifted to the origin (i. e. width and height)
    :param clusters: numpy array of shape (k, 2) where k is the number of clusters
    :return: numpy array of shape (k, 0) where k is the number of clusters
    """
    x = np.minimum(clusters[:, 0], box[0])
    y = np.minimum(clusters[:, 1], box[1])
    if np.count_nonzero(x == 0) > 0 or np.count_nonzero(y == 0) > 0:
        raise ValueError("Box has no area")                 # 如果报这个错,可以把这行改成pass即可

    intersection = x * y
    box_area = box[0] * box[1]
    cluster_area = clusters[:, 0] * clusters[:, 1]

    iou_ = intersection / (box_area + cluster_area - intersection)

    return iou_

def avg_iou(boxes, clusters):
    """
    Calculates the average Intersection over Union (IoU) between a numpy array of boxes and k clusters.
    :param boxes: numpy array of shape (r, 2), where r is the number of rows
    :param clusters: numpy array of shape (k, 2) where k is the number of clusters
    :return: average IoU as a single float
    """
    return np.mean([np.max(iou(boxes[i], clusters)) for i in range(boxes.shape[0])])

def translate_boxes(boxes):
    """
    Translates all the boxes to the origin.
    :param boxes: numpy array of shape (r, 4)
    :return: numpy array of shape (r, 2)
    """
    new_boxes = boxes.copy()
    for row in range(new_boxes.shape[0]):
        new_boxes[row][2] = np.abs(new_boxes[row][2] - new_boxes[row][0])
        new_boxes[row][3] = np.abs(new_boxes[row][3] - new_boxes[row][1])
    return np.delete(new_boxes, [0, 1], axis=1)


def kmeans(boxes, k, dist=np.median):
    """
    Calculates k-means clustering with the Intersection over Union (IoU) metric.
    :param boxes: numpy array of shape (r, 2), where r is the number of rows
    :param k: number of clusters
    :param dist: distance function
    :return: numpy array of shape (k, 2)
    """
    rows = boxes.shape[0]

    distances = np.empty((rows, k))
    last_clusters = np.zeros((rows,))

    np.random.seed()

    # the Forgy method will fail if the whole array contains the same rows
    clusters = boxes[np.random.choice(rows, k, replace=False)]

    while True:
        for row in range(rows):
            distances[row] = 1 - iou(boxes[row], clusters)

        nearest_clusters = np.argmin(distances, axis=1)

        if (last_clusters == nearest_clusters).all():
            break

        for cluster in range(k):
            clusters[cluster] = dist(boxes[nearest_clusters == cluster], axis=0)

        last_clusters = nearest_clusters

    return clusters

if __name__ == '__main__':
    a = np.array([[1, 2, 3, 4], [5, 7, 6, 8]])
    print(translate_boxes(a))
聚类生成新anchors的文件clauculate_anchors.py,代码内容如下:
# -*- coding: utf-8 -*-
# 根据标签文件求先验框

import os
import numpy as np
import xml.etree.cElementTree as et
from kmeans import kmeans, avg_iou

FILE_ROOT = "/home/trainingai/zyang/yolov5/paper_data/"     # 根路径
ANNOTATION_ROOT = "Annotations"  # 数据集标签文件夹路径
ANNOTATION_PATH = FILE_ROOT + ANNOTATION_ROOT

ANCHORS_TXT_PATH = "/home/trainingai/zyang/yolov5/data/anchors.txt"

CLUSTERS = 9
CLASS_NAMES = ['a', 'b']

def load_data(anno_dir, class_names):
    xml_names = os.listdir(anno_dir)
    boxes = []
    for xml_name in xml_names:
        xml_pth = os.path.join(anno_dir, xml_name)
        tree = et.parse(xml_pth)

        width = float(tree.findtext("./size/width"))
        height = float(tree.findtext("./size/height"))

        for obj in tree.findall("./object"):
            cls_name = obj.findtext("name")
            if cls_name in class_names:
                xmin = float(obj.findtext("bndbox/xmin")) / width
                ymin = float(obj.findtext("bndbox/ymin")) / height
                xmax = float(obj.findtext("bndbox/xmax")) / width
                ymax = float(obj.findtext("bndbox/ymax")) / height

                box = [xmax - xmin, ymax - ymin]
                boxes.append(box)
            else:
                continue
    return np.array(boxes)

if __name__ == '__main__':

    anchors_txt = open(ANCHORS_TXT_PATH, "w")

    train_boxes = load_data(ANNOTATION_PATH, CLASS_NAMES)
    count = 1
    best_accuracy = 0
    best_anchors = []
    best_ratios = []

    for i in range(10):      ##### 可以修改,不要太大,否则时间很长
        anchors_tmp = []
        clusters = kmeans(train_boxes, k=CLUSTERS)
        idx = clusters[:, 0].argsort()
        clusters = clusters[idx]
        # print(clusters)

        for j in range(CLUSTERS):
            anchor = [round(clusters[j][0] * 640, 2), round(clusters[j][1] * 640, 2)]
            anchors_tmp.append(anchor)
            print(f"Anchors:{anchor}")

        temp_accuracy = avg_iou(train_boxes, clusters) * 100
        print("Train_Accuracy:{:.2f}%".format(temp_accuracy))

        ratios = np.around(clusters[:, 0] / clusters[:, 1], decimals=2).tolist()
        ratios.sort()
        print("Ratios:{}".format(ratios))
        print(20 * "*" + " {} ".format(count) + 20 * "*")

        count += 1

        if temp_accuracy > best_accuracy:
            best_accuracy = temp_accuracy
            best_anchors = anchors_tmp
            best_ratios = ratios

    anchors_txt.write("Best Accuracy = " + str(round(best_accuracy, 2)) + '%' + "\r\n")
    anchors_txt.write("Best Anchors = " + str(best_anchors) + "\r\n")
    anchors_txt.write("Best Ratios = " + str(best_ratios))
    anchors_txt.close()
clauculate_anchors.py 内要修改为自己数据集的路径,如下:
FILE_ROOT = "xxx" # 根路径
ANNOTATION_ROOT = "xxx" # 数据集标签文件夹路径
ANNOTATION_PATH = FILE_ROOT + ANNOTATION_ROOT
运行clauculate_anchors.py跑完会生成一个文件 anchors.txt,里面有得出的建议先验框anchors,内容如下:

问题:
PS: 如果自己动手生成anchors时候报错“ raise ValueError(“Box has no area”)”,可能是标注数据中有的目标物很小很小,可以把kmeans.py中第13行注释掉,改成pass即可解决这个报错。
或者直接调用yolov5/utils/autoanchor.py
# YOLOv5 🚀 by Ultralytics, GPL-3.0 license
"""
AutoAnchor utils
"""

import random

import numpy as np
import torch
import yaml
from tqdm import tqdm

from utils.general import LOGGER, colorstr, emojis

PREFIX = colorstr('AutoAnchor: ')


def check_anchor_order(m):
    # Check anchor order against stride order for YOLOv5 Detect() module m, and correct if necessary
    a = m.anchors.prod(-1).view(-1)  # anchor area
    da = a[-1] - a[0]  # delta a
    ds = m.stride[-1] - m.stride[0]  # delta s
    if da.sign() != ds.sign():  # same order
        LOGGER.info(f'{PREFIX}Reversing anchor order')
        m.anchors[:] = m.anchors.flip(0)


def check_anchors(dataset, model, thr=4.0, imgsz=640):
    # Check anchor fit to data, recompute if necessary
    m = model.module.model[-1] if hasattr(model, 'module') else model.model[-1]  # Detect()
    shapes = imgsz * dataset.shapes / dataset.shapes.max(1, keepdims=True)
    scale = np.random.uniform(0.9, 1.1, size=(shapes.shape[0], 1))  # augment scale
    wh = torch.tensor(np.concatenate([l[:, 3:5] * s for s, l in zip(shapes * scale, dataset.labels)])).float()  # wh

    def metric(k):  # compute metric
        r = wh[:, None] / k[None]
        x = torch.min(r, 1 / r).min(2)[0]  # ratio metric
        best = x.max(1)[0]  # best_x
        aat = (x > 1 / thr).float().sum(1).mean()  # anchors above threshold
        bpr = (best > 1 / thr).float().mean()  # best possible recall
        return bpr, aat

    anchors = m.anchors.clone() * m.stride.to(m.anchors.device).view(-1, 1, 1)  # current anchors
    bpr, aat = metric(anchors.cpu().view(-1, 2))
    s = f'\n{PREFIX}{aat:.2f} anchors/target, {bpr:.3f} Best Possible Recall (BPR). '
    if bpr > 0.98:  # threshold to recompute
        LOGGER.info(emojis(f'{s}Current anchors are a good fit to dataset ✅'))
    else:
        LOGGER.info(emojis(f'{s}Anchors are a poor fit to dataset ⚠️, attempting to improve...'))
        na = m.anchors.numel() // 2  # number of anchors
        try:
            anchors = kmean_anchors(dataset, n=na, img_size=imgsz, thr=thr, gen=1000, verbose=False)
        except Exception as e:
            LOGGER.info(f'{PREFIX}ERROR: {e}')
        new_bpr = metric(anchors)[0]
        if new_bpr > bpr:  # replace anchors
            anchors = torch.tensor(anchors, device=m.anchors.device).type_as(m.anchors)
            m.anchors[:] = anchors.clone().view_as(m.anchors) / m.stride.to(m.anchors.device).view(-1, 1, 1)  # loss
            check_anchor_order(m)
            s = f'{PREFIX}Done ✅ (optional: update model *.yaml to use these anchors in the future)'
        else:
            s = f'{PREFIX}Done ⚠️ (original anchors better than new anchors, proceeding with original anchors)'
        LOGGER.info(emojis(s))


def kmean_anchors(dataset='./data/coco128.yaml', n=9, img_size=640, thr=4.0, gen=1000, verbose=True):
    """ Creates kmeans-evolved anchors from training dataset

        Arguments:
            dataset: path to data.yaml, or a loaded dataset
            n: number of anchors,anchors的数量
            img_size: image size used for training,用于训练的图像大小
            thr: anchor-label wh ratio threshold hyperparameter hyp['anchor_t'] used for training, default=4.0
            gen: generations to evolve anchors using genetic algorithm
            verbose: print all results

        Return:
            k: kmeans evolved anchors

        Usage:
            from utils.autoanchor import *; _ = kmean_anchors()
    """
    from scipy.cluster.vq import kmeans

    npr = np.random
    thr = 1 / thr

    def metric(k, wh):  # compute metrics
        r = wh[:, None] / k[None]
        x = torch.min(r, 1 / r).min(2)[0]  # ratio metric
        # x = wh_iou(wh, torch.tensor(k))  # iou metric
        return x, x.max(1)[0]  # x, best_x

    def anchor_fitness(k):  # mutation fitness
        _, best = metric(torch.tensor(k, dtype=torch.float32), wh)
        return (best * (best > thr).float()).mean()  # fitness

    def print_results(k, verbose=True):
        k = k[np.argsort(k.prod(1))]  # sort small to large
        x, best = metric(k, wh0)
        bpr, aat = (best > thr).float().mean(), (x > thr).float().mean() * n  # best possible recall, anch > thr
        s = f'{PREFIX}thr={thr:.2f}: {bpr:.4f} best possible recall, {aat:.2f} anchors past thr\n' \
            f'{PREFIX}n={n}, img_size={img_size}, metric_all={x.mean():.3f}/{best.mean():.3f}-mean/best, ' \
            f'past_thr={x[x > thr].mean():.3f}-mean: '
        for i, x in enumerate(k):
            s += '%i,%i, ' % (round(x[0]), round(x[1]))
        if verbose:
            LOGGER.info(s[:-2])
        return k

    if isinstance(dataset, str):  # *.yaml file
        with open(dataset, errors='ignore') as f:
            data_dict = yaml.safe_load(f)  # model dict
        from utils.datasets import LoadImagesAndLabels
        dataset = LoadImagesAndLabels(data_dict['train'], augment=True, rect=True)

    # Get label wh
    shapes = img_size * dataset.shapes / dataset.shapes.max(1, keepdims=True)
    wh0 = np.concatenate([l[:, 3:5] * s for s, l in zip(shapes, dataset.labels)])  # wh

    # Filter
    i = (wh0 < 3.0).any(1).sum()
    if i:
        LOGGER.info(f'{PREFIX}WARNING: Extremely small objects found: {i} of {len(wh0)} labels are < 3 pixels in size')
    wh = wh0[(wh0 >= 2.0).any(1)]  # filter > 2 pixels
    # wh = wh * (npr.rand(wh.shape[0], 1) * 0.9 + 0.1)  # multiply by random scale 0-1

    # Kmeans calculation
    LOGGER.info(f'{PREFIX}Running kmeans for {n} anchors on {len(wh)} points...')
    s = wh.std(0)  # sigmas for whitening
    k = kmeans(wh / s, n, iter=30)[0] * s  # points
    if len(k) != n:  # kmeans may return fewer points than requested if wh is insufficient or too similar
        LOGGER.warning(f'{PREFIX}WARNING: scipy.cluster.vq.kmeans returned only {len(k)} of {n} requested points')
        k = np.sort(npr.rand(n * 2)).reshape(n, 2) * img_size  # random init
    wh = torch.tensor(wh, dtype=torch.float32)  # filtered
    wh0 = torch.tensor(wh0, dtype=torch.float32)  # unfiltered
    k = print_results(k, verbose=False)

    # Plot
    # k, d = [None] * 20, [None] * 20
    # for i in tqdm(range(1, 21)):
    #     k[i-1], d[i-1] = kmeans(wh / s, i)  # points, mean distance
    # fig, ax = plt.subplots(1, 2, figsize=(14, 7), tight_layout=True)
    # ax = ax.ravel()
    # ax[0].plot(np.arange(1, 21), np.array(d) ** 2, marker='.')
    # fig, ax = plt.subplots(1, 2, figsize=(14, 7))  # plot wh
    # ax[0].hist(wh[wh[:, 0]<100, 0],400)
    # ax[1].hist(wh[wh[:, 1]<100, 1],400)
    # fig.savefig('wh.png', dpi=200)

    # Evolve
    f, sh, mp, s = anchor_fitness(k), k.shape, 0.9, 0.1  # fitness, generations, mutation prob, sigma
    pbar = tqdm(range(gen), desc=f'{PREFIX}Evolving anchors with Genetic Algorithm:')  # progress bar
    for _ in pbar:
        v = np.ones(sh)
        while (v == 1).all():  # mutate until a change occurs (prevent duplicates)
            v = ((npr.random(sh) < mp) * random.random() * npr.randn(*sh) * s + 1).clip(0.3, 3.0)
        kg = (k.copy() * v).clip(min=2.0)
        fg = anchor_fitness(kg)
        if fg > f:
            f, k = fg, kg.copy()
            pbar.desc = f'{PREFIX}Evolving anchors with Genetic Algorithm: fitness = {f:.4f}'
            if verbose:
                print_results(k, verbose)

    return print_results(k)

if __name__=='__main__':
    # data_path='../data/seaship2048.yaml'
    data_path='./data/tower.yaml'
    kmean_anchors(data_path, 9, 1024, 4, 1000, True)
2-2) 选择一个你需要的模型
在yolov5目录下的model文件夹下是模型的配置文件,这边提供s、m、l、x版本,逐渐增大(随着架构的增大,训练时间也是逐渐增大),假设采用yolov5s.yaml,只用修改一个参数,把nc改成自己的类别数;如果anchors是重新生成的,也需要修改,根据anchors.txt 中的 Best Anchors 修改,需要取整(可选) 如下: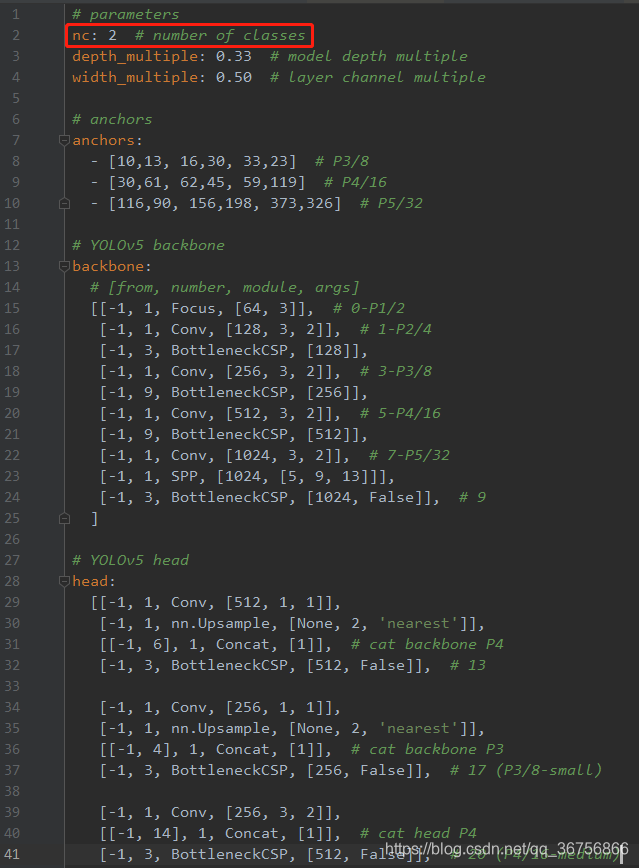
至此,自定义数据集已创建完毕,接下来就是训练模型了。
6、训练模型
在train.py进行以下几个修改:
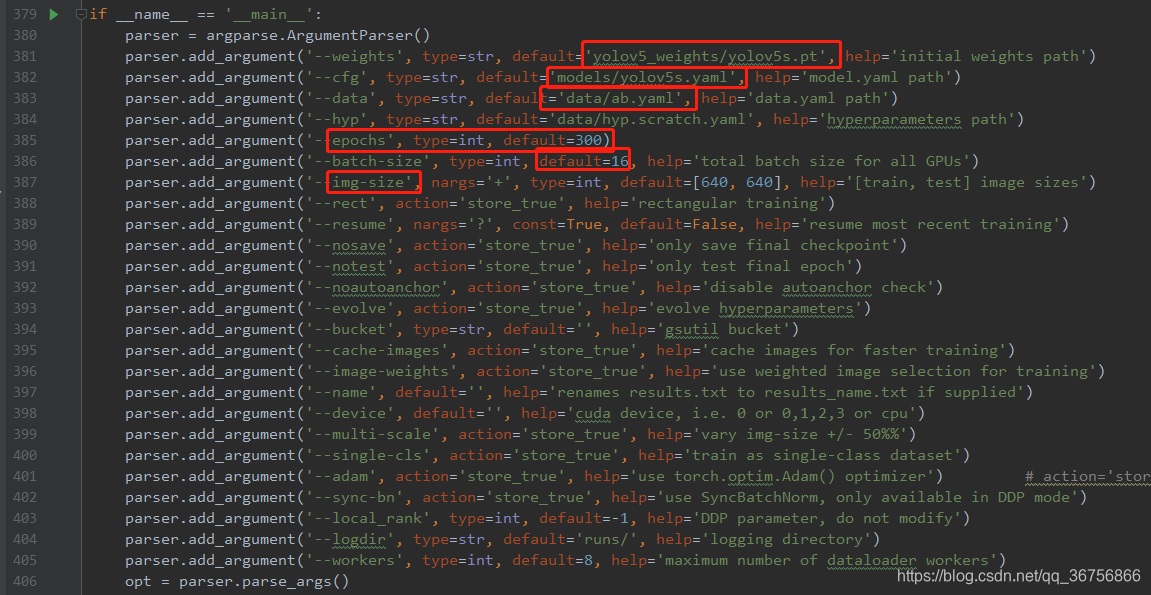
以上参数解释如下:
epochs:指的就是训练过程中整个数据集将被迭代多少次,显卡不行你就调小点。
batch-size:一次看完多少张图片才进行权重更新,梯度下降的mini-batch,显卡不行你就调小点。
cfg:存储模型结构的配置文件
data:存储训练、测试数据的文件
img-size:输入图片宽高,显卡不行你就调小点。
rect:进行矩形训练
resume:恢复最近保存的模型开始训练
nosave:仅保存最终checkpoint
notest:仅测试最后的epoch
evolve:进化超参数
bucket:gsutil bucket
cache-images:缓存图像以加快训练速度
weights:权重文件路径
name: 重命名results.txt to results_name.txt
device:cuda device, i.e. 0 or 0,1,2,3 or cpu
adam:使用adam优化
multi-scale:多尺度训练,img-size +/- 50%
single-cls:单类别的训练集
之后运行训练命令如下:
python train.py --img 640 --batch 16 --epoch 300 --data data/ab.yaml --cfg models/yolov5s.yaml --weights weights/yolov5s.pt --device '0'     # 0号GPU


1、单个GPU模型训练
python train.py  --batch 64 --data coco.yaml --weights yolov5s.pt --device 0

2、Multi-GPU DataParallel Mode (⚠️ not recommended)
You can increase the device to use Multiple GPUs in DataParallel mode.
$ python train.py  --batch 64 --data coco.yaml --weights yolov5s.pt --device 0,1
与仅使用1个GPU相比,这种方法很慢,几乎不能加快训练速度。

3、Multi-GPU DistributedDataParallel Mode (✅ recommended)
You will have to pass python -m torch.distributed.launch --nproc_per_node, followed by the usual arguments.
$ python -m torch.distributed.launch --nproc_per_node 2 train.py --batch 64 --data coco.yaml --weights yolov5s.pt --device 0,1

参数解释
--nproc_per_node 指定要使用多少个GPU. In the example above, it is 2.
--batch is the total batch-size. It will be divided evenly to each GPU. In the example above, it is 64/2=32 per GPU.


4、Use specific GPUs (click to expand)使用指定的的GPUS
You can do so by simply passing --device followed by your specific GPUs. For example, in the code below, we will use GPUs 2,3
$ python -m torch.distributed.launch --nproc_per_node 2 train.py --batch 64 --data coco.yaml --cfg yolov5s.yaml --weights '' --device 2,3


5、SyncBatchNorm可以提高多gpu训练的精度,但是,它会显著降低训练速度。它只适用于多个GPU distributeddatparallel训练。

It is best used when the batch-size on each GPU is small (<= 8).
To use SyncBatchNorm, simple pass --sync-bn to the command like below,
$ python -m torch.distributed.launch --nproc_per_node 2 train.py --batch 64 --data coco.yaml --cfg yolov5s.yaml --weights '' --sync-bn


6、使用多台计算机
只适用于多个GPU distributeddatparallel训练。
在继续之前,请确保所有机器上的文件(数据集、代码库等)都是相同的。然后,确保机器之间可以通信。
你将不得不选择一个主机器(其他机器将交谈)。记下它的地址(master_addr)并选择一个端口(master_port)。下面的例子中,我将使用master_addr - 192.168.1.1和master_port - 1234。

# On master machine 0
$ python -m torch.distributed.launch --nproc_per_node G --nnodes N --node_rank 0 --master_addr "192.168.1.1" --master_port 1234 train.py --batch 64 --data coco.yaml --cfg yolov5s.yaml --weights ''


# On machine R
$ python -m torch.distributed.launch --nproc_per_node G --nnodes N --node_rank R --master_addr "192.168.1.1" --master_port 1234 train.py --batch 64 --data coco.yaml --cfg yolov5s.yaml --weights ''

where G is number of GPU per machine, N is the number of machines, and R is the machine number from 0...(N-1).
Let's say I have two machines with two GPUs each, it would be G = 2 , N = 2, and R = 1 for the above.
python train.py --batch-size 16 --data coco_profile.yaml --weights yolov5l.pt --epochs 1 --device 0
python -m torch.distributed.run --nproc_per_node 2 train.py --batch-size 32 --data coco_profile.yaml --weights yolov5l.pt --epochs 1 --device 0,1
python -m torch.distributed.run --nproc_per_node 4 train.py --batch-size 64 --data coco_profile.yaml --weights yolov5l.pt --epochs 1 --device 0,1,2,3
python -m torch.distributed.run --nproc_per_node 8 train.py --batch-size 128 --data coco_profile.yaml --weights yolov5l.pt --epochs 1 --device 0,1,2,3,4,5,6,7| GPUs A100 | batch-size | CUDA_mem device0 (G) | COCO train | COCO val |
|---|---|---|---|---|
| 1x | 16 | 26GB | 20:39 | 0:55 |
| 2x | 32 | 26GB | 11:43 | 0:57 |
| 4x | 64 | 26GB | 5:57 | 0:55 |
| 8x | 128 | 26GB | 3:09 | 0:57 |
根据自己的硬件配置修改参数,训练好的模型会被保存在yolov5目录下的runs/exp0/weights/last.pt和best.pt,详细训练数据保存在runs/exp0/results.txt文件中。
出现的问题
1、如果Cuda版本不对(不是>=10.1版本),在调用GPU训练时会报错如下: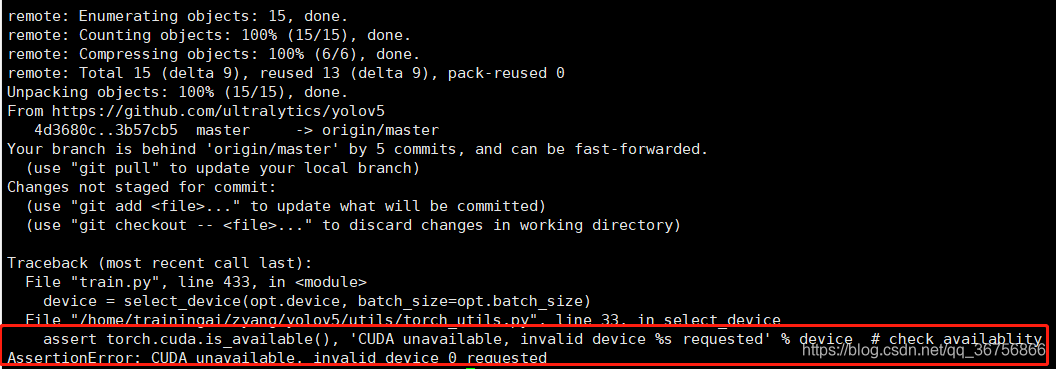
2、跑起来了也没有报错,但是一直卡在这个界面,显示完了超参数也不进入训练状态,打开tensorboard显示没有训练数据
跑起来了也没有报错,但是一直卡在这个界面,显示完了超参数也不进入训练状态,打开tensorboard显示没有训练数据。

batch_size设小一点,input设置小一点:- 我刚开始取得batch_size是16(没错我的笔记本就是如此的垃圾)- inputsize取得6000X2000(因为之前想要完成的任务是要做焊缝识别的,图片数据的分辨率比较特殊,暴力的修改了inputsize然后忘记修改了) 最终导致了直接卡死~所以说深度学习真的很依赖于硬件配置哦。
6补充 (断点训练)
在训练YOLOv5时由于数据集很大导致训练时间十分漫长,这期间Python、主机等可能遇到死机的情况,如果需要训练300个epoch但是训练一晚后发现在200epoch时停下是十分崩溃了,好在博主摸索到在yolov5中接续训练的方法了。
如果你想从上一次训练结果中回复训练,那么首先保证你的训练结果(一般都存放在/runs/train目录下)在保存目录中代号为最大的。
将train.py中的参数进行修改
注意上面patser中第9个参数resume,将其设置为default=True即可,也就是那一行代码改变为接下来运行python train.py边不会产生新的exp而是在最新的exp上接续训练。
我们每次训练模型时都会生成新的模型结果,存放在/runs/train/expxxx/weights下,接续训练就是将上次训练一半得到的结果拿来和模型结合进行训练。具体来说:如果最终训练目标是300个epoch,上次训练完了139个epoch,那么就是将第139个epoch得到的权重载入到模型中再训练161个epoch便可等效为训练了300个epoch。
断点训练:
python train.py --resume automatically find latest checkpoint (searches yolov5/ directory)(未训练完最初设定的epochs)
继续训练:
python train.py --weights path/to/best.pt
python train.py --weights ./runs/train/exp2/weights/last.pt --cfg ./models/yolov5s.yaml --data ./data/voc.yaml --batch-size 8 --img 512 weights后直接加需要继续训练的权重地址(已训练完最初设定的epochs,但认为还未完全收敛,在此基础上继续训练,需注意学习率的调整)
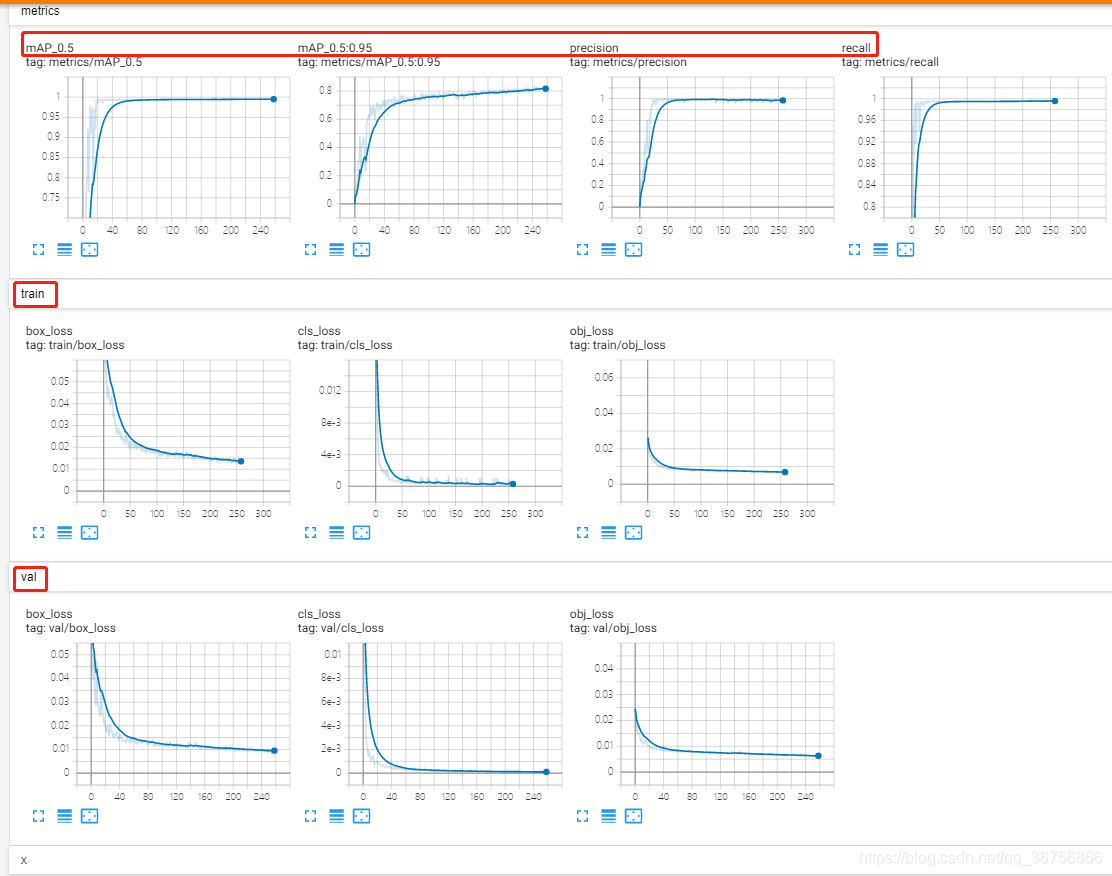
7、训练过程可视化
利用tensorboard可视化训练过程,训练开始会在yolov5目录生成一个runs文件夹,利用tensorboard打开即可查看训练日志,命令如下:
pycharm终端输入tensorboard --logdir=./runs目录
进入python,运行netron.start(‘模型路径’),如下:
至此YOLOv5训练自己的数据集,训练阶段已完毕。
YOLOv5训练速度更快,准确率更高,个人感觉最大的优势是相比YOLOv3,YOLOv5的模型更加轻量级,同样的数据集训练出来的模型大小是YOLOv3的将近四分之一大小。
8、模型测试
评估模型好坏就是在有标注的测试集或者验证集上进行模型效果的评估,在目标检测中最常使用的评估指标为mAP。在val.py文件中指定数据集配置文件和训练结果模型,如下:

9、模型推理
最后,模型在没有标注的数据集上进行推理,在detect.py文件中指定测试图片和测试模型的路径,其他参数(img_size、置信度object confidence threshold、IOU threshold for NMS)可自行修改,如下:

使用下面的命令(该命令中save_txt选项用于生成结果的txt标注文件,不指定则只会生成结果图像),其中,weights使用最满意的训练模型即可,source则提供一个包含所有测试图片的文件夹路径即可。
python detect.py --weights runs/exp1/weights/best.pt --source inference/images/ --device 0 --save-txt
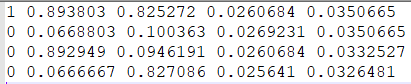
测试完毕后,每个测试图片会在指定的inference/output输出文件夹中生成结果图片和同名的txt文件,如下:
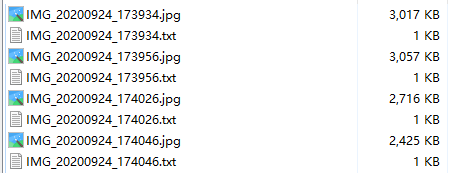
每个txt会生成一行一个目标的信息,信息包括类别序号、xcenter ycenter w h,后面四个为bbox位置,均为归一化数值,如下图
python根据yolov5检测得到的txt文件,截取目标框图片并保存(即从原图中裁剪出检测到的目标物小图),代码如下:
# -*- coding: utf-8 -*-
import os
import cv2

path = "jpg_txt"         # jpg图片和对应的生成结果的txt标注文件,放在一起
path3 = "bboxcut"    # 裁剪出来的小图保存的根目录
w = 100                         # 原始图片resize
h = 100
img_total = []
txt_total = []

file = os.listdir(path)
for filename in file:
    first,last = os.path.splitext(filename)
    if last == ".jpg":                      # 图片的后缀名
        img_total.append(first)
    #print(img_total)
    else:
        txt_total.append(first)

for img_ in img_total:
    if img_ in txt_total:
        filename_img = img_+".jpg"          # 图片的后缀名
        # print('filename_img:', filename_img)
        path1 = os.path.join(path,filename_img)
        img = cv2.imread(path1)
        img = cv2.resize(img,(w,h),interpolation = cv2.INTER_CUBIC)        # resize 图像大小,否则roi区域可能会报错
        filename_txt = img_+".txt"
        # print('filename_txt:', filename_txt)
        n = 1
        with open(os.path.join(path,filename_txt),"r+",encoding="utf-8",errors="ignore") as f:
            for line in f:
                aa = line.split(" ")
                x_center = w * float(aa[1])       # aa[1]左上点的x坐标
                y_center = h * float(aa[2])       # aa[2]左上点的y坐标
                width = int(w*float(aa[3]))       # aa[3]图片width
                height = int(h*float(aa[4]))      # aa[4]图片height
                lefttopx = int(x_center-width/2.0)
                lefttopy = int(y_center-height/2.0)
                roi = img[lefttopy+1:lefttopy+height+3,lefttopx+1:lefttopx+width+1]   # [左上y:右下y,左上x:右下x] (y1:y2,x1:x2)需要调参,否则裁剪出来的小图可能不太好
                print('roi:', roi)                        # 如果不resize图片统一大小,可能会得到有的roi为[]导致报错
                filename_last = img_+"_"+str(n)+".jpg"    # 裁剪出来的小图文件名
                # print(filename_last)
                path2 = os.path.join(path3,"roi")           # 需要在path3路径下创建一个roi文件夹
                print('path2:', path2)                    # 裁剪小图的保存位置
                cv2.imwrite(os.path.join(path2,filename_last),roi)
                n = n+1
    else:
        continue
在进行模型推理时,无论是加载模型的速度还是对测试图片的推理速度,都能明显感觉到YOLOv5比YOLOv3速度快,尤其是加载模型的速度,因为同样的数据集训练出来的模型YOLOv5更加轻量级,模型大小减小为YOLOv3的将近四分之一。
至此YOLOv5训练自己的数据集整个过程:制作数据集----模型训练----模型测试----模型推理阶段已全部完成。
9.1 卫星遥感大尺度图像切片延迟辅助推理
安装库:(https://github.com/obss/sahi)
pip install sahi
pip install yolov5
pip install IPython
python sahidetection_for_yolov5.py

如果执行出错,请按照如下及逆行修改
matched_box_indices = other_pred_inds[(mask == False).nonzero(as_tuple=False).flatten()].flip(dims=(0,))
下面为输出结果

下面为代码详情
#sahidetection_for_yolov5.py详情,可以根据情况将自己的模型路径、图像路径、推理方式、输出路径、切片的图像大小、重叠比率进行修改
import os
import argparse
from pathlib import Path
FILE = Path(__file__).resolve()
ROOT = FILE.parents[0]  # YOLOv5 root directory
print("ROOT",ROOT)

import copy
import cv2
import numpy as np
import time
# arrange an instance segmentation model for test
from sahi.utils.yolov5 import (download_yolov5s6_model)
from sahi.model import Yolov5DetectionModel
from sahi.utils.cv import read_image
from sahi.utils.file import download_from_url
from sahi.predict import get_prediction, get_sliced_prediction, predict
from IPython.display import Image
import matplotlib.pyplot as plt

#1、标准的预测
def StandardInference_YOLOv5Model(yolov5_model_path,inference_image,out_dir):
    detection_model = Yolov5DetectionModel(model_path=yolov5_model_path,confidence_threshold=0.3,device="cpu",)
    result = get_prediction(read_image(str(inference_image)), detection_model)
    # result.export_visuals(export_dir=str(out_dir)+os.sep)

    image_name=os.path.basename(inference_image).split('.')[0]
    image=result.image
    object_prediction_list = result.object_prediction_list
    #将预测的结果进行可视化展示
    export_visuals(export_dir=str(out_dir)+os.sep, image=image,object_prediction_list=object_prediction_list,image_name=image_name)

    #将预测的类别名称,置信度得分和坐标框[xmin, ymin, xmax, ymax]存储到txt文本框中
    txt_dir = str(out_dir) + os.sep + 'labels'
    if  not  os.path.exists(txt_dir):
        os.mkdir(txt_dir)

    txt_path = txt_dir+os.sep+ image_name + '.txt'
    object_prediction_list = list(result.object_prediction_list)
    with open(txt_path, 'a') as f:
        for object_prediction in object_prediction_list:
            object_prediction = object_prediction.deepcopy()
            bbox = object_prediction.bbox.to_voc_bbox()#输出 [xmin, ymin, xmax, ymax]
            category_name = object_prediction.category.name
            score = object_prediction.score.value
            object = (category_name,score,bbox[0],bbox[1],bbox[1],bbox[2],bbox[3])
            f.write(' ' + ",".join([str(a) for a in object]))
            f.write('\n')
        ##何时换行
        f.write('\n')
        f.close()

#2、切片辅助推理的预测
def SlicedInference_YOLOv5Model(yolov5_model_path,inference_image,out_dir):
    image_name=os.path.basename(inference_image).split('.')[0]
    detection_model = Yolov5DetectionModel(model_path=yolov5_model_path,confidence_threshold=0.3,device="cpu",)
    result = get_sliced_prediction(read_image(str(inference_image)),detection_model,
    slice_height = 1024,
    slice_width = 1024,
    overlap_height_ratio = 0.2,
    overlap_width_ratio = 0.2)
    image_name=os.path.basename(inference_image).split('.')[0]
    image=result.image
    object_prediction_list = result.object_prediction_list
    #将预测的结果进行可视化展示
    export_visuals(export_dir=str(out_dir)+os.sep, image=image,object_prediction_list=object_prediction_list,image_name=image_name)

    #将预测的类别名称,置信度得分和坐标框[xmin, ymin, xmax, ymax]存储到txt文本框中
    txt_dir = str(out_dir) + os.sep + 'labels'
    if  not  os.path.exists(txt_dir):
        os.mkdir(txt_dir)

    txt_path = txt_dir+os.sep+ image_name + '.txt'
    object_prediction_list = list(result.object_prediction_list)
    with open(txt_path, 'a') as f:
        for object_prediction in object_prediction_list:
            object_prediction = object_prediction.deepcopy()
            bbox = object_prediction.bbox.to_voc_bbox()#输出 [xmin, ymin, xmax, ymax]
            category_name = object_prediction.category.name
            score = object_prediction.score.value
            object = (category_name,score,bbox[0],bbox[1],bbox[1],bbox[2],bbox[3])
            f.write(' ' + ",".join([str(a) for a in object]))
            f.write('\n')
        ##何时换行
        f.write('\n')
        f.close()
    # Image("demo_data/prediction_visual.png")
    # object_prediction_list = result.object_prediction_list
    # object_prediction_list[0]
    # result.to_coco_annotations()[:3]
    # result.to_coco_predictions(image_id=1)[:3]
    # result.to_imantics_annotations()[:3]
    # result.to_fiftyone_detections()[:3]

#3、切片辅助推理的多张图像批量预测
def BatchPrediction_YOLOv5Model(yolov5_model_path,inference_image,out_dir):
    model_type = "yolov5"
    model_path = yolov5_model_path
    model_device = "cpu" # or 'cuda:0'
    model_confidence_threshold = 0.4
    slice_height = 1024
    slice_width = 1024
    overlap_height_ratio = 0.2
    overlap_width_ratio = 0.2
    source_image_dir = str(inference_image)

    result=predict(
    model_type=model_type,
    model_path=model_path,
    model_device=model_device,
    model_confidence_threshold=model_confidence_threshold,
    source=source_image_dir,
    slice_height=slice_height,
    slice_width=slice_width,
    overlap_height_ratio=overlap_height_ratio,
    overlap_width_ratio=overlap_width_ratio,)
    # result.export_visuals(export_dir=str(out_dir)+os.sep)

def export_visuals(export_dir: str, text_size: float = None, rect_th: int = None, image: np.ndarray=None ,object_prediction_list:list=None,image_name:str=None):
        Path(export_dir).mkdir(parents=True, exist_ok=True)#创建模型的输出路径
        visualize_object_predictions(
            image=np.ascontiguousarray(image),
            object_prediction_list=object_prediction_list,
            rect_th=rect_th,
            text_size=text_size,
            text_th=None,
            color=None,
            output_dir=export_dir,
            file_name="{}".format(image_name),
            export_format="png",
        )

class Colors:
    # color palette
    def __init__(self):
        hex = (
            "FF3838",
            "2C99A8",
            "FF701F",
            "6473FF",
            "CFD231",
            "48F90A",
            "92CC17",
            "3DDB86",
            "1A9334",
            "00D4BB",
            "FF9D97",
            "00C2FF",
            "344593",
            "FFB21D",
            "0018EC",
            "8438FF",
            "520085",
            "CB38FF",
            "FF95C8",
            "FF37C7",
        )
        self.palette = [self.hex2rgb("#" + c) for c in hex]
        self.n = len(self.palette)

    def __call__(self, i, bgr=False):
        c = self.palette[int(i) % self.n]
        return (c[2], c[1], c[0]) if bgr else c

    @staticmethod
    def hex2rgb(h):  # rgb order
        return tuple(int(h[1 + i : 1 + i + 2], 16) for i in (0, 2, 4))

def visualize_object_predictions(
    image: np.array,
    object_prediction_list,
    rect_th: int = None,
    text_size: float = None,
    text_th: float = None,
    color: tuple = None,
    output_dir= None,
    file_name: str = "prediction_visual",
    export_format: str = "png",):
    """
    Visualizes prediction category names, bounding boxes over the source image
    and exports it to output folder.
    Arguments:
        object_prediction_list: a list of prediction.ObjectPrediction
        rect_th: rectangle thickness
        text_size: size of the category name over box
        text_th: text thickness
        color: annotation color in the form: (0, 255, 0)
        output_dir: directory for resulting visualization to be exported
        file_name: exported file will be saved as: output_dir+file_name+".png"
        export_format: can be specified as 'jpg' or 'png'
    """
    elapsed_time = time.time()
    # deepcopy image so that original is not altered
    image = copy.deepcopy(image)
    # select predefined classwise color palette if not specified
    if color is None:
        colors = Colors()
    else:
        colors = None
    # set rect_th for boxes,设置矩形边框的宽度
    rect_th = rect_th or max(round(sum(image.shape) / 2 * 0.001), 2)
    # set text_th for category names,设置类别名称的text文本框的大小
    text_th = text_th or max(rect_th - 1, 1)
    # set text_size for category names
    text_size = text_size or rect_th / 3
    # add bbox and mask to image if present
    for object_prediction in object_prediction_list:
        # deepcopy object_prediction_list so that original is not altered
        object_prediction = object_prediction.deepcopy()
        bbox = object_prediction.bbox.to_voc_bbox()
        category_name = object_prediction.category.name
        score = object_prediction.score.value

        # set color
        if colors is not None:
            color = colors(object_prediction.category.id)
        # visualize masks if present
        if object_prediction.mask is not None:
            # deepcopy mask so that original is not altered
            mask = object_prediction.mask.bool_mask
            # draw mask
            rgb_mask = apply_color_mask(mask, color)
            image = cv2.addWeighted(image, 1, rgb_mask, 0.4, 0)
        # set bbox points
        p1, p2 = (int(bbox[0]), int(bbox[1])), (int(bbox[2]), int(bbox[3]))
        # visualize boxes
        cv2.rectangle(
            image,
            p1,
            p2,
            color=color,
            thickness=rect_th,
        )
        # arange bounding box text location
        label = f"{category_name} {score:.2f}"
        w, h = cv2.getTextSize(label, 0, fontScale=text_size, thickness=text_th)[0]  # label width, height
        outside = p1[1] - h - 3 >= 0  # label fits outside box
        p2 = p1[0] + w, p1[1] - h - 3 if outside else p1[1] + h + 3
        # add bounding box text
        cv2.rectangle(image, p1, p2, color, -1, cv2.LINE_AA)  # filled
        cv2.putText(
            image,
            label,
            (p1[0], p1[1] - 2 if outside else p1[1] + h + 2),
            0,
            text_size,
            (255, 255, 255),
            thickness=text_th,
        )
    if output_dir:
        # create output folder if not present
        Path(output_dir).mkdir(parents=True, exist_ok=True)
        # save inference result
        save_path = os.path.join(output_dir, file_name + "." + export_format)
        cv2.imwrite(save_path, cv2.cvtColor(image, cv2.COLOR_RGB2BGR))
    elapsed_time = time.time() - elapsed_time
    return {"image": image, "elapsed_time": elapsed_time}

def apply_color_mask(image: np.ndarray, color: tuple):
    """
    Applies color mask to given input image.
    """
    r = np.zeros_like(image).astype(np.uint8)
    g = np.zeros_like(image).astype(np.uint8)
    b = np.zeros_like(image).astype(np.uint8)

    (r[image == 1], g[image == 1], b[image == 1]) = color
    colored_mask = np.stack([r, g, b], axis=2)
    return colored_mask


def parse_opt():
    parser = argparse.ArgumentParser()
    parser.add_argument('--weights', type=str, default=ROOT / 'runs/train/exp5/weights/best.pt', help='model path(s)')
    parser.add_argument('--source', type=str, default=ROOT / 'inference/input/liangxi.tif', help='file/dir/URL/glob, 0 for webcam')
    parser.add_argument('--out_dir', type=str, default=ROOT / 'inference/output', help='(optional) dataset.yaml path')
    parser.add_argument('--inference_type', type=str, default='SlicedInference_YOLOv5Model', help='StandardInference_YOLOv5Model,SlicedInference_YOLOv5Model,BatchPrediction_YOLOv5Model')
    opt = parser.parse_args()
    return opt

def main(opt):
    yolov5_model_path=opt.weights
    inference_image=opt.source
    out_dir=opt.out_dir
    inference_type=opt.inference_type

    if inference_type == "StandardInference_YOLOv5Model":
        print("Start StandardInference_YOLOv5Model")
        StandardInference_YOLOv5Model(yolov5_model_path,inference_image,out_dir)

    if inference_type == "SlicedInference_YOLOv5Model":
        print("Start SlicedInference_YOLOv5Model")
        SlicedInference_YOLOv5Model(yolov5_model_path,inference_image,out_dir)

    if inference_type == "BatchPrediction_YOLOv5Model":
        BatchPrediction_YOLOv5Model(yolov5_model_path,inference_image,out_dir)

if __name__ == "__main__":
    opt = parse_opt()
    main(opt)
10、模型的导出与部署
如何将经过训练的YOLOv5模型从PyTorch导出到ONNX和TorchScript格式
Formats
YOLOv5 inference is officially supported in 11 formats:
| Format | export.py --include | Model |
|---|---|---|
| PyTorch | - | yolov5s.pt |
| TorchScript | torchscript | yolov5s.torchscript |
| ONNX | onnx | yolov5s.onnx |
| OpenVINO | openvino | yolov5s_openvino_model/ |
| TensorRT | engine | yolov5s.engine |
| CoreML | coreml | yolov5s.mlmodel |
| TensorFlow SavedModel | saved_model | yolov5s_saved_model/ |
| TensorFlow GraphDef | pb | yolov5s.pb |
| TensorFlow Lite | tflite | yolov5s.tflite |
| TensorFlow Edge TPU | edgetpu | yolov5s_edgetpu.tflite |
| TensorFlow.js | tfjs | yolov5s_web_model/ |
1. pytorch的pt模型转onnx模型
使用yolov5中自带的 export.py 脚本(在models下)可以将模型导出为 TorchScript, ONNX, CoreML。
python path/to/export.py --weights yolov5s.pt --include torchscript onnxexport: data=data/coco128.yaml, weights=yolov5s.pt, imgsz=[640, 640], batch_size=1, device=cpu, half=False, inplace=False, train=False, optimize=False, int8=False, dynamic=False, simplify=False, opset=12, verbose=False, workspace=4, nms=False, agnostic_nms=False, topk_per_class=100, topk_all=100, iou_thres=0.45, conf_thres=0.25, include=['torchscript', 'onnx']
YOLOv5 🚀 v6.0-241-gb17c125 torch 1.10.0 CPUFusing layers...
Model Summary: 213 layers, 7225885 parameters, 0 gradientsPyTorch: starting from yolov5s.pt (14.7 MB)
TorchScript: starting export with torch 1.10.0...
TorchScript: export success, saved as yolov5s.torchscript (29.4 MB)ONNX: starting export with onnx 1.10.2...
ONNX: export success, saved as yolov5s.onnx (29.3 MB)Export complete (7.63s)
Results saved to /Users/glennjocher/PycharmProjects/yolov5
Detect: python detect.py --weights yolov5s.onnx
PyTorch Hub: model = torch.hub.load('ultralytics/yolov5', 'custom', 'yolov5s.onnx')
Validate: python val.py --weights yolov5s.onnx
Visualize: https://netron.app

使用Netron来查看你的ONNX文件模型
netron现已支持大部分格式的模型文件,都是可以查看的。
PaddlePaddle、OpenVINO、TensorFlow 、Caffe…
安装netron
pip install netron
进入python,运行netron.start(‘模型路径’),如下:
import netron
netron.start('best.onnx')
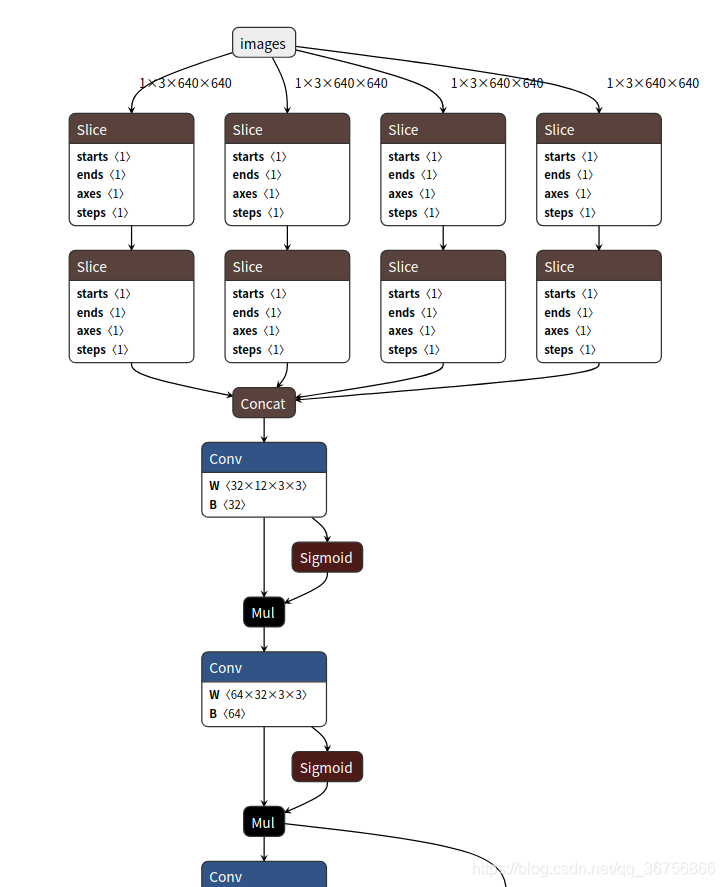
然后复制红框中的链接浏览器打开即可看到模型的网络结构,如下:
2、onnx模型转换为tfserving的savedmode模型
在模型路径下创建一个onnx2pb.py脚本,转换代码如下:
import onnx
import numpy as np
from onnx_tf.backend import prepare

model = onnx.load('best.onnx')      # yolov5 pt模型转换得到的onnx模型
tf_model = prepare(model)
tf_model.export_graph('yolov5_saved_model')     #  onnx模型转换为tfserving的savedmode模型

导出模型可直接用于 tensorflow_server, 签名默认 default_serving, 输入输出如下:
"inputs": [{'node_name': 'images', 'node_type': 'DT_FLOAT', 'node_shape': [1, 3, 640, 640]}],
"outputs": [{'node_name': 'output_0', 'node_type': 'DT_FLOAT', 'node_shape': [1, 3, 20, 20, 8]}]
下面是savemodel pb模型的输入、输出节点的具体信息:
"metadata": {"signature_def": {
 "signature_def": {
  "__saved_model_init_op": {
   "inputs": {},
   "outputs": {
    "__saved_model_init_op": {
     "dtype": "DT_INVALID",
     "tensor_shape": {
      "dim": [],
      "unknown_rank": true
     },
     "name": "NoOp"
    }
   },
   "method_name": ""
  },
  "serving_default": {
   "inputs": {
    "images": {
     "dtype": "DT_FLOAT",
     "tensor_shape": {
      "dim": [
       {
        "size": "1",
        "name": ""
       },
       {
        "size": "3",
        "name": ""
       },
       {
        "size": "640",
        "name": ""
       },
       {
        "size": "640",
        "name": ""
       }
      ],
      "unknown_rank": false
     },
     "name": "serving_default_images:0"
    }
   },
   "outputs": {
    "output_0": {
     "dtype": "DT_FLOAT",
     "tensor_shape": {
      "dim": [
       {
        "size": "1",
        "name": ""
       },
       {
        "size": "3",
        "name": ""
       },
       {
        "size": "80",
        "name": ""
       },
       {
        "size": "80",
        "name": ""
       },
       {
        "size": "8",
        "name": ""
       }
      ],
      "unknown_rank": false
     },
     "name": "StatefulPartitionedCall:0"
    },
    "output_1": {
     "dtype": "DT_FLOAT",
     "tensor_shape": {
      "dim": [
       {
        "size": "1",
        "name": ""
       },
       {
        "size": "3",
        "name": ""
       },
       {
        "size": "40",
        "name": ""
       },
       {
        "size": "40",
        "name": ""
       },
       {
        "size": "8",
        "name": ""
       }
      ],
      "unknown_rank": false
     },
     "name": "StatefulPartitionedCall:1"
    },
    "output_2": {
     "dtype": "DT_FLOAT",
     "tensor_shape": {
      "dim": [
       {
        "size": "1",
        "name": ""
       },
       {
        "size": "3",
        "name": ""
       },
       {
        "size": "20",
        "name": ""
       },
       {
        "size": "20",
        "name": ""
       },
       {
        "size": "8",
        "name": ""
       }
      ],
      "unknown_rank": false
     },
     "name": "StatefulPartitionedCall:2"
    }
   },
   "method_name": "tensorflow/serving/predict"
  }
 }
}
}
}
4、从经验中需要注意的事情:
好了,现在我们已经浏览了基本知识,让我们来看看重要的东西:
-
别忘了归一化坐标。
-
如果你的初始性能比预期的差得多,那么最可能的原因(我在许多其他参赛者身上看到过这种情况)是你在预处理方面做错了什么。这看起来很琐碎,但有很多细节你必须注意,特别是如果这是你的第一次。
-
YoloV5有多种型号(yolov5s、yolov5m、yolov5l、yolov5x),不要只选择最大的一个,因为它可能会过拟合。从一个基线开始,比如中等大小的,然后试着改善它。
-
虽然我是在512尺寸的图像上训练的,但我发现用640来infer可以提高性能。
-
不要忘记加载预训练的权重(-weights标志)。迁移学习将大大提高你的性能,并将为你节省大量的训练时间(在我的例子中,大约50个epoch,每个epoch大约需要20分钟!)
-
Yolov5x需要大量的内存,当训练尺寸为512,批大小为4时,它需要大约14GB的GPU内存(大多数GPU大约8GB内存)。
-
YoloV5已经使用了数据增强,你可以选择喜欢或不喜欢的增强,你所需要做的就是使用yolov5/data/hyp.scratch.yml文件去调整。
-
默认的yolov5训练脚本使用weights and biases,说实话,这非常令人印象深刻,它在模型训练时保存所有度量。但是,如果你想关闭它,只需在训练脚本标记中添加WANDB_MODE= " dryrun "即可。
-
我希望早就发现的一件事是,YoloV5将大量有用的指标保存到目录YoloV5 /runs/train/exp/中。训练之后,你可以找到“confusion_matrix.png”和“results.png”。
5、 提高模型性能的一些技巧
一、Dataset:
1、Images per class. ≥ 1500 images per class recommended
2、Instances per class. ≥ 10000 instances (labeled objects) per class recommended
3、Image variety. Must be representative of deployed environment. For real-world use cases we recommend images from different times of day, different seasons, different weather, different lighting, different angles, different sources (scraped online, collected locally, different cameras) etc.
4、Label consistency. All instances of all classes in all images must be labelled. Partial labelling will not work.
5、Label accuracy. Labels must closely enclose each object. No space should exist between an object and it's bounding box. No objects should be missing a label.
6、Background images. Background images are images with no objects that are added to a dataset to reduce False Positives (FP). We recommend about 0-10% background images to help reduce FPs (COCO has 1000 background images for reference, 1% of the total). No labels are required for background images.

二、Model Selection:
Larger models like YOLOv5x and YOLOv5x6 will produce better results in nearly all cases, but have more parameters, require more CUDA memory to train, and are slower to run. For mobile deployments we recommend YOLOv5s/m, for cloud deployments we recommend YOLOv5l/x. See our README table for a full comparison of all models.

1、Start from Pretrained weights. Recommended for small to medium sized datasets (i.e. VOC, VisDrone, GlobalWheat). Pass the name of the model to the --weights argument. Models download automatically from the latest YOLOv5 release.

python train.py --data custom.yaml --weights yolov5s.pt
                                             yolov5m.pt
                                             yolov5l.pt
                                             yolov5x.pt
                                             custom_pretrained.pt

2、Start from Scratch. Recommended for large datasets (i.e. COCO, Objects365, OIv6). Pass the model architecture yaml you are interested in, along with an empty --weights '' argument:

python train.py --data custom.yaml --weights '' --cfg yolov5s.yaml
                                                      yolov5m.yaml
                                                      yolov5l.yaml
                                                      yolov5x.yaml
3、Training Settings(训练参数设置)
Before modifying anything, first train with default settings to establish a performance baseline. A full list of train.py settings can be found in the train.py argparser.

3.1
Epochs. Start with 300 epochs. If this overfits early then you can reduce epochs. If overfitting does not occur after 300 epochs, train longer, i.e. 600, 1200 etc epochs.
3.2
Image size. COCO trains at native resolution of --img 640, though due to the high amount of small objects in the dataset it can benefit from training at higher resolutions such as --img 1280. If there are many small objects then custom datasets will benefit from training at native or higher resolution. Best inference results are obtained at the same --img as the training was run at, i.e. if you train at --img 1280 you should also test and detect at --img 1280.
3.3
Batch size. Use the largest --batch-size that your hardware allows for. Small batch sizes produce poor batchnorm statistics and should be avoided.
3.4
Hyperparameters. Default hyperparameters are in hyp.scratch.yaml. We recommend you train with default hyperparameters first before thinking of modifying any. In general, increasing augmentation hyperparameters will reduce and delay overfitting, allowing for longer trainings and higher final mAP. Reduction in loss component gain hyperparameters like hyp['obj'] will help reduce overfitting in those specific loss components. For an automated method of optimizing these hyperparameters, see our Hyperparameter Evolution Tutorial.
1、初始化的超参数
Initialize Hyperparameters
yolov5/data/hyps/hyp.scratch.yaml


# Hyperparameters for COCO training from scratch
 # python train.py --batch 40 --cfg yolov5m.yaml --weights '' --data coco.yaml --img 640 --epochs 300
 # See tutorials for hyperparameter evolution https://github.com/ultralytics/yolov5#tutorials


 lr0: 0.01  # initial learning rate(初始学习率) (SGD=1E-2, Adam=1E-3)
 lrf: 0.2  # final OneCycleLR learning rate(最后final OneCycleLR 的学习率) (lr0 * lrf)
 momentum: 0.937  # SGD momentum/Adam beta1 (动量)
 weight_decay: 0.0005  # optimizer weight decay 5e-4 (权重系数)
 warmup_epochs: 3.0  # warmup epochs (fractions ok)
 warmup_momentum: 0.8  # warmup initial momentum
 warmup_bias_lr: 0.1  # warmup initial bias lr
 box: 0.05  # box loss gain
 cls: 0.5  # cls loss gain
 cls_pw: 1.0  # cls BCELoss positive_weight
 obj: 1.0  # obj loss gain (scale with pixels)
 obj_pw: 1.0  # obj BCELoss positive_weight
 iou_t: 0.20  # IoU training threshold
 anchor_t: 4.0  # anchor-multiple threshold
 # anchors: 3  # anchors per output layer (0 to ignore)
 fl_gamma: 0.0  # focal loss gamma (efficientDet default gamma=1.5)
 hsv_h: 0.015  # image HSV-Hue augmentation (fraction)
 hsv_s: 0.7  # image HSV-Saturation augmentation (fraction)
 hsv_v: 0.4  # image HSV-Value augmentation (fraction)
 degrees: 0.0  # image rotation (+/- deg)
 translate: 0.1  # image translation (+/- fraction)
 scale: 0.5  # image scale (+/- gain)
 shear: 0.0  # image shear (+/- deg)
 perspective: 0.0  # image perspective (+/- fraction), range 0-0.001
 flipud: 0.0  # image flip up-down (probability)
 fliplr: 0.5  # image flip left-right (probability)
 mosaic: 1.0  # image mosaic (probability)
 mixup: 0.0  # image mixup (probability)
 copy_paste: 0.0  # segment copy-paste (probability)
2、Define Fitness
yolov5/utils/metrics.py

Lines 12 to 16 in 4103ce9

 def fitness(x):
     # Model fitness as a weighted combination of metrics
     w = [0.0, 0.0, 0.1, 0.9]  # weights for [P, R, mAP@0.5, mAP@0.5:0.95]
     return (x[:, :4] * w).sum(1)
3、Evolve
# Single-GPU
python train.py --epochs 10 --data coco128.yaml --weights yolov5s.pt --cache --evolve

# Multi-GPU
for i in 0 1 2 3 4 5 6 7; do
  sleep $(expr 30 \* $i) &&  # 30-second delay (optional)
  echo 'Starting GPU '$i'...' &&
  nohup python train.py --epochs 10 --data coco128.yaml --weights yolov5s.pt --cache --device $i --evolve > evolve_gpu_$i.log &
done

# Multi-GPU bash-while (not recommended)
for i in 0 1 2 3 4 5 6 7; do
  sleep $(expr 30 \* $i) &&  # 30-second delay (optional)
  echo 'Starting GPU '$i'...' &&
  "$(while true; do nohup python train.py... --device $i --evolve 1 > evolve_gpu_$i.log; done)" &
done


 804
804


 被折叠的 条评论
为什么被折叠?
被折叠的 条评论
为什么被折叠?
 到【灌水乐园】发言


