


文章目录
介绍
Pytorch入门选手的学习笔记 (序号与视频序号完全对应), 本文尽可能的在详细记录了自己的学习内容, 包括但不限于(加了详细注释的代码, 截图并补充了说明的插图, UP讲课时的关键内容),因为自己学习过程中看其他博主的笔记, 有所收获,.
希望我的笔记也可以帮助一起学习的小伙伴, 加油哇~
视频链接
PyTorch深度学习快速入门教程【小土堆】: 通往学习之门-点 这 里 !!!
参考的其他博主的笔记链接 ,非常感谢!!
笔记链接 再次感谢上述博主分享, 在学习过程中有效帮助我节约了时间并加深了理解~
22.搭建网络模型和Sequential使用
CIFAR10网络模型
进行分类的简单神经网络
模型: 10个类别
几个卷积核就是几通道的。一个卷积核作用完RGB三个通道后会把得到的三个矩阵的对应值相加,也就是说会合并,所以一个卷积核产生一个通道。
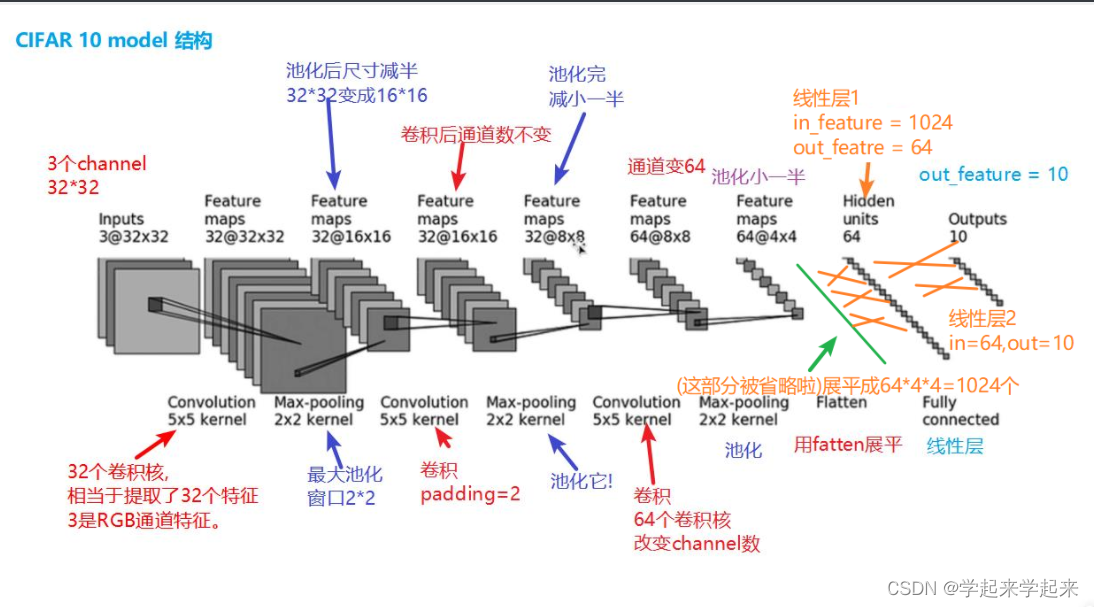
碎碎念: 我真的觉得我这个图上注释写的棒极了~
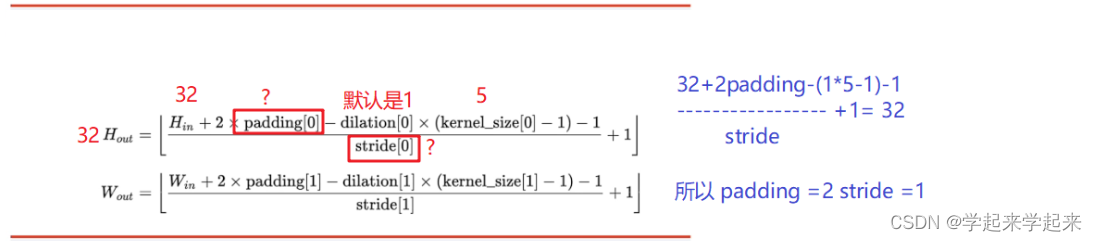
第一层卷积 计算padding 和 stride 的参数
# CIFAR 10 网络模型
import torch
from torch import nn
from torch.nn import Conv2d, MaxPool2d,  Linear
from torch.nn.modules.flatten import Flatten


class Tudui(nn.Module):
    # 初始化
    def __init__(self):
        # 继承父类 初始化
        super(Tudui, self).__init__()
        # 1.卷积1
        # 浅浅计算 padding和dilation应该如何设置?  stride=1,padding=2
        self.conv1 = Conv2d(in_channels=3,out_channels=32,kernel_size=5,stride=1,padding=2)
        # 2.最大池化1
        self.maxpool1 = MaxPool2d(kernel_size=2)
        # 3.卷积2
        self.conv2 = Conv2d(32,32,5,padding=2)
        # 4.最大池化2
        self.maxpool2 = MaxPool2d(kernel_size=2)
        # 5.卷积3
        self.conv3 = Conv2d(32,64,5,padding=2) # padding要写,因为padding前面一个参数是stride
        # 6 最大池化3
        self.maxpool3 = MaxPool2d(kernel_size=2)
        # 7. 通过fatten数据展平
        self.flatten = Flatten()
        # 8. 线性层1
        self.linear1 = Linear(in_features=1024,out_features=64)
        # 9. 线性层2
        self.linear2 = Linear(64,10)

    def forward(self,x):
        x = self.conv1(x)
        x = self.maxpool1(x)
        x = self.conv2(x)
        x = self.maxpool2(x)
        x = self.conv3(x)
        x = self.maxpool3(x)
        x = self.flatten(x)
        x = self.linear1(x)
        x = self.linear2(x)
        return x

# 实例化
tudui = Tudui()
print(tudui) # 检查网络正确性
'''
输出结果:网络结构
Tudui(
  (conv1): Conv2d(3, 32, kernel_size=(5, 5), stride=(1, 1), padding=(2, 2))
  (maxpool1): MaxPool2d(kernel_size=2, stride=2, padding=0, dilation=1, ceil_mode=False)
  (conv2): Conv2d(32, 32, kernel_size=(5, 5), stride=(1, 1), padding=(2, 2))
  (maxpool2): MaxPool2d(kernel_size=2, stride=2, padding=0, dilation=1, ceil_mode=False)
  (conv3): Conv2d(32, 64, kernel_size=(5, 5), stride=(2, 2))
  (maxpool3): MaxPool2d(kernel_size=2, stride=2, padding=0, dilation=1, ceil_mode=False)
  (flatten): Flatten()
  (linear1): Linear(in_features=1024, out_features=64, bias=True)
  (linear2): Linear(in_features=64, out_features=10, bias=True)
  )

'''
加入input (其实只在末尾加了几行,为了代码的完整性,我整个贴过来了~)
# CIFAR 10 网络模型
import torch
from torch import nn
from torch.nn import Conv2d, MaxPool2d,  Linear
from torch.nn.modules.flatten import Flatten


class Tudui(nn.Module):
    # 初始化
    def __init__(self):
        # 继承父类 初始化
        super(Tudui, self).__init__()
        # 1.卷积1
        # 浅浅计算 padding和dilation应该如何设置?  stride=1,padding=2
        self.conv1 = Conv2d(in_channels=3,out_channels=32,kernel_size=5,stride=1,padding=2)
        # 2.最大池化1
        self.maxpool1 = MaxPool2d(kernel_size=2)
        # 3.卷积2
        self.conv2 = Conv2d(32,32,5,padding=2)
        # 4.最大池化2
        self.maxpool2 = MaxPool2d(kernel_size=2)
        # 5.卷积3
        self.conv3 = Conv2d(32,64,5,padding=2)
        # 6 最大池化3
        self.maxpool3 = MaxPool2d(kernel_size=2)
        # 7. 通过fatten数据展平
        self.flatten = Flatten()
        # 8. 线性层1
        self.linear1 = Linear(in_features=1024,out_features=64)
        # 9. 线性层2
        self.linear2 = Linear(in_features=64,out_features=10)

    def forward(self,x):
        x = self.conv1(x)
        x = self.maxpool1(x)
        x = self.conv2(x)
        x = self.maxpool2(x)
        x = self.conv3(x)
        x = self.maxpool3(x)
        x = self.flatten(x)
        x = self.linear1(x)
        x = self.linear2(x)
        return x

# 实例化
tudui = Tudui()
# print(tudui) # 检查网络正确性

input = torch.ones((64,3,32,32))
output = tudui(input)
print(output.shape)
'''
输出:
torch.Size([64, 10]) # 理解: 相当于有64个图片 每个图片10个东西
'''
Sequential
# CIFAR 10 网络模型 引入 Sequential
import torch
from torch import nn
from torch.nn import Conv2d, MaxPool2d, Linear, Sequential
from torch.nn.modules.flatten import Flatten


class Tudui(nn.Module):
    # 初始化
    def __init__(self):
        # 继承父类 初始化
        super(Tudui, self).__init__()
        # 引入 Seqential
        self.model1 = Sequential(
            Conv2d(3,32,5,padding=2),
            MaxPool2d(2),
            Conv2d(32,32,5,padding=2),
            MaxPool2d(2),
            Conv2d(32,64,5,padding=2),
            MaxPool2d(2),
            Flatten(),
            Linear(1024,64),
            Linear(64,10)
        )

    def forward(self,x):
        # x = self.conv1(x)
        # x = self.maxpool1(x)
        # x = self.conv2(x)
        # x = self.maxpool2(x)
        # x = self.conv3(x)
        # x = self.maxpool3(x)
        # x = self.flatten(x)
        # x = self.linear1(x)
        # x = self.linear2(x)
        x = self.model1(x)
        return x

# 实例化
tudui = Tudui()
# print(tudui) # 检查网络正确性

input = torch.ones((64,3,32,32))
output = tudui(input)
print(output.shape)
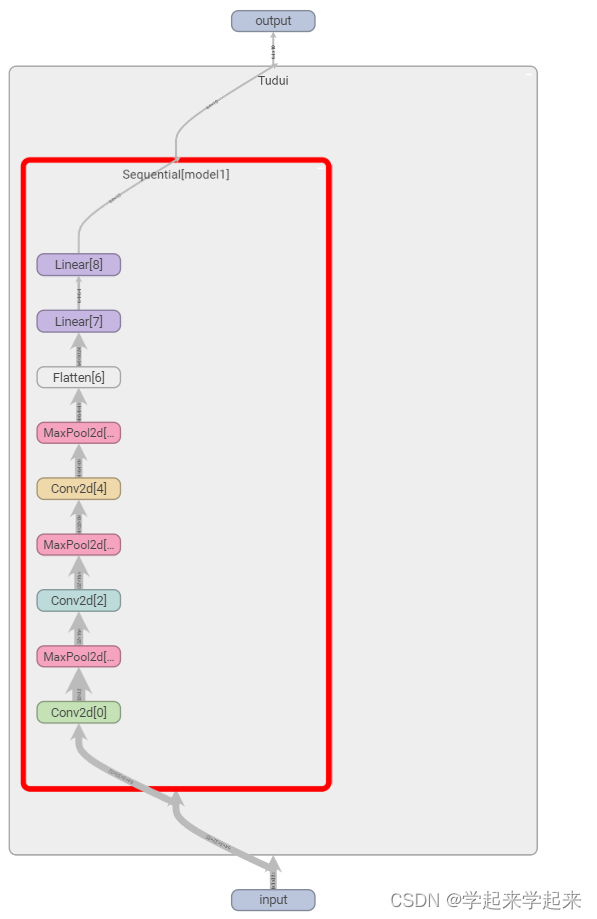
可视化
# CIFAR 10 网络模型
import torch
from torch import nn
from torch.nn import Conv2d, MaxPool2d, Linear, Sequential
from torch.nn.modules.flatten import Flatten
from torch.utils.tensorboard import SummaryWriter


class SZmodule(nn.Module):
    # 初始化
    def __init__(self):
        # 继承父类 初始化
        super(SZmodule, self).__init__()
        # # 1.卷积1
        # # 浅浅计算 padding和dilation应该如何设置?  stride=1,padding=2
        # self.conv1 = Conv2d(in_channels=3,out_channels=32,kernel_size=5,stride=1,padding=2)
        # # 2.最大池化1
        # self.maxpool1 = MaxPool2d(kernel_size=2)
        # # 3.卷积2
        # self.conv2 = Conv2d(32,32,5,padding=2)
        # # 4.最大池化2
        # self.maxpool2 = MaxPool2d(kernel_size=2)
        # # 5.卷积3
        # self.conv3 = Conv2d(32,64,5,padding=2)
        # # 6 最大池化3
        # self.maxpool3 = MaxPool2d(kernel_size=2)
        # # 7. 通过fatten数据展平
        # self.flatten = Flatten()
        # # 8. 线性层1
        # self.linear1 = Linear(in_features=1024,out_features=64)
        # # 9. 线性层2
        # self.linear2 = Linear(in_features=64,out_features=10)

        # 引入 Seqential
        self.model1 = Sequential(
            Conv2d(3,32,5,padding=2),
            MaxPool2d(2),
            Conv2d(32,32,5,padding=2),
            MaxPool2d(2),
            Conv2d(32,64,5,padding=2),
            MaxPool2d(2),
            Flatten(),
            Linear(1024,64),
            Linear(64,10)
        )

    def forward(self,x):
        x = self.model1(x)
        return x

# 实例化
SZ = SZmodule()
# print(tudui) # 检查网络正确性

input = torch.ones((64,3,32,32))
output = tudui(input)
print(output.shape)

# 通过tensorboard显示网络框架
writer = SummaryWriter("../logs_seq")
writer.add_graph(tudui,input)
writer.close()
23.损失函数与反向传播
Loss Functions
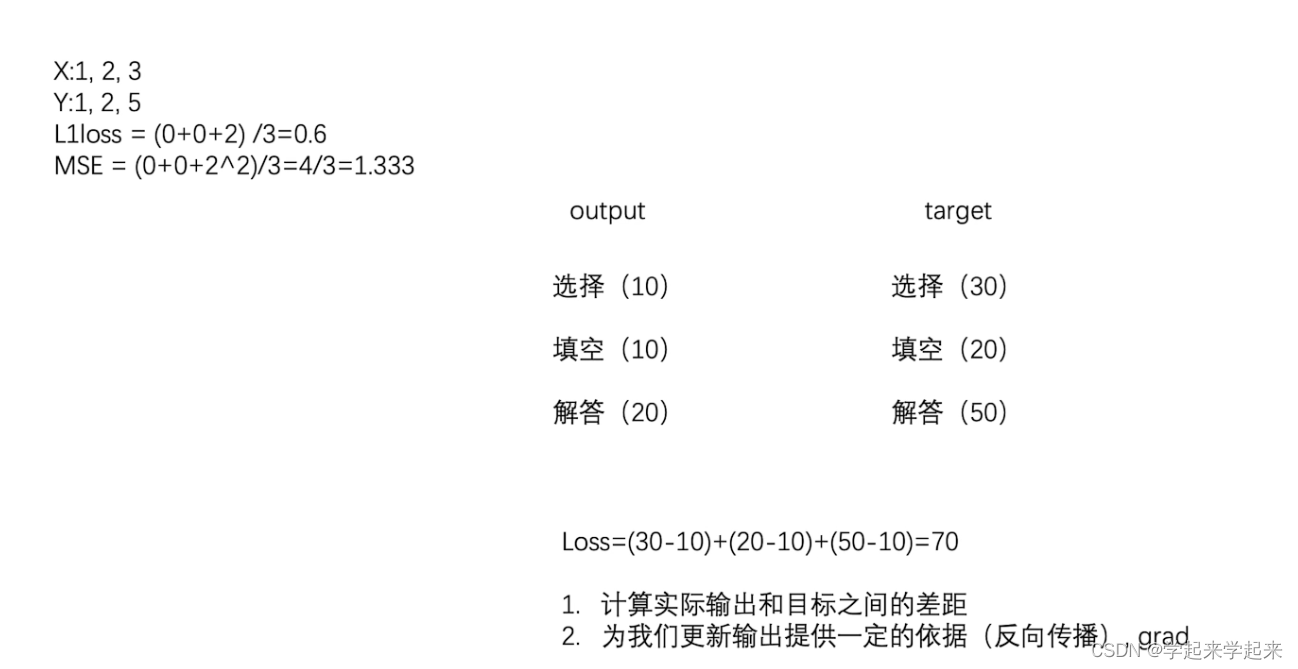
损失函数的作用:
- 衡量神经网络输入和输出的差距,越小越好
- 为更新输出提供一定的依据(反向传播)
L1Loss 和 MSELoss
-
此版本torch(1.12.0)对输入和目标shape无要求,均为(*)
-
但input.shape和target.shape要一致
-
输入和目标的数据要为浮点型
import torch
from torch import nn
from torch.nn import L1Loss

inputs = torch.tensor([1,2,3],dtype=torch.float32)
targets = torch.tensor([1,2,5],dtype=torch.float32)

inputs = torch.reshape(inputs,(1,1,1,3)) # batch_size = 1.channel =1,1行3列
targets = torch.reshape(targets,(1,1,1,3))

loss = L1Loss(reduction='sum') # 可加入 reduction 设计计算方式,eg:reduction='sum' 输出为2
result = loss(inputs,targets)

loss_mse = nn.MSELoss()
result_mse = loss_mse(inputs,targets)

print(result)
print(result_mse)


'''
输出:
tensor(2.)
tensor(1.3333)
'''
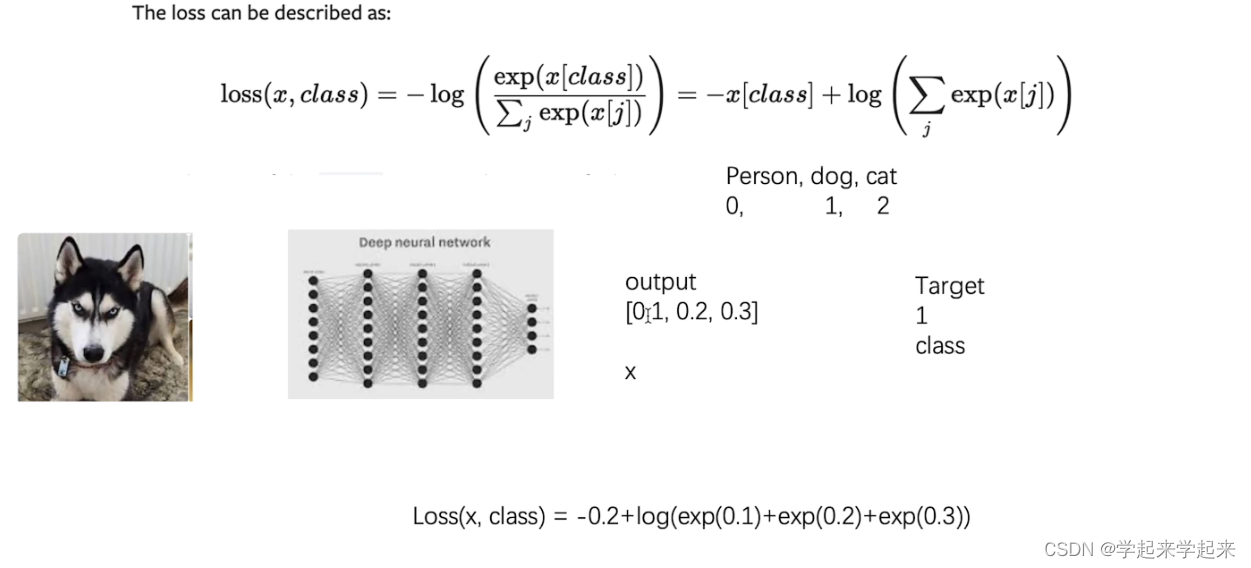
交叉熵
- 适用于分类问题中
- torch.nn.CrossEntropyLoss(weight=None, size_average=None, ignore_index=- 100, reduce=None, reduction=‘mean’, label_smoothing=0.0)
- 按照输入shape为 (N, C),目标shape为 (N)
- 其中C= number of classes ; N = batch size
这个公式是把softmax函数和多分类交叉熵的式子叠加在一起写成这样子了 有不明白的可以分别搜下softmax 和交叉熵各自的公式
import torch
from torch import nn


# 交叉熵Loss
x = torch.tensor([0.1, 0.2, 0.3])
y = torch.tensor([1])
x = torch.reshape(x,(1,3))
loss_cross = nn.CrossEntropyLoss()
result_cross= loss_cross(x,y)
print(result_cross) # tensor(1.1019)
网络中损失函数的计算和反向传播
反向传播:计算节点梯度,优化网络中的参数
import torchvision
from torch import nn
from torch.nn import Sequential, Conv2d, MaxPool2d, Linear
from torch.nn.modules.flatten import Flatten
from torch.utils.data import DataLoader

dataset = torchvision.datasets.CIFAR10('../data', train=False,
                                       transform=torchvision.transforms.ToTensor(),
                                       download=True)

dataloader = DataLoader(dataset,batch_size=1)


class Tudui(nn.Module):
    # 初始化
    def __init__(self):
        # 继承父类 初始化
        super(Tudui, self).__init__()
        # 引入 Seqential
        self.model1 = Sequential(
            Conv2d(3, 32, 5, padding=2),
            MaxPool2d(2),
            Conv2d(32, 32, 5, padding=2),
            MaxPool2d(2),
            Conv2d(32, 64, 5, padding=2),
            MaxPool2d(2),
            Flatten(),
            Linear(1024, 64),
            Linear(64, 10)
        )

    def forward(self, x):
        x = self.model1(x)
        return x

# 计算交叉熵
loss = nn.CrossEntropyLoss()


tudui = Tudui()
for data in dataloader:
    imgs, targets = data
    outputs = tudui(imgs)
    result_loss = loss(outputs,targets)
    print(outputs)
    print(targets)

    '''
    输出
    tensor([[-0.0549, -0.0800, -0.0625,  0.0550,  0.0861,  0.0304, -0.1175,  0.0740,
          0.0017,  0.0224]], grad_fn=<AddmmBackward>)
    tensor([9])
    tensor([[-0.0460, -0.0763, -0.0580,  0.0765,  0.0697,  0.0213, -0.1197,  0.0781,
          0.0140,  0.0327]], grad_fn=<AddmmBackward>)
    tensor([9])
    tensor([[-0.0372, -0.0863, -0.0581,  0.0738,  0.0784,  0.0194, -0.1176,  0.0831,
          0.0115,  0.0307]], grad_fn=<AddmmBackward>)
    ...
    '''
tudui = Tudui()
for data in dataloader:
    imgs, targets = data
    outputs = tudui(imgs)
    result_loss = loss(outputs,targets)
    result_loss.backward() # 可以计算各个节点的参数,降低loss
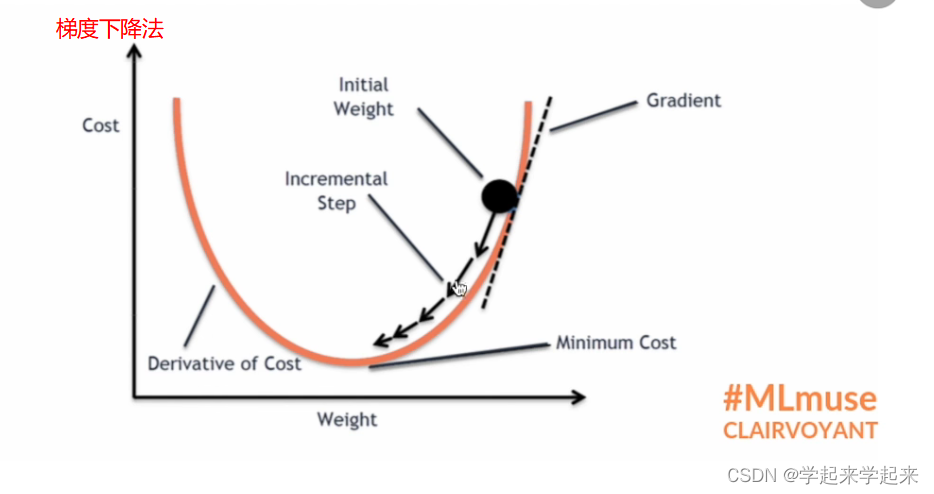
24.优化器
- 优化器根据梯度对参数进行调整,降低损失
- torch.optim.SGD(params, lr=, momentum=0, dampening=0, weight_decay=0, nesterov=False, , maximize=False, foreach=None)
- 参数params 代表网络模型中的参数,必须项目
- 参数lr = learining rate,学习速率。
- lr太大会造成模型训练起来不稳定,太小训练比较慢。
- 建议刚开始lr大一些,后面就小一些。
- 其余参数为算法SGD本身特有的,初学时可以直接使用默认即可。
操作步骤:
-
对每个节点对应的梯度清零。
optim.zero_grad() -
反向传播,计算节点梯度。
result_loss.backward() -
根据节点中的梯度对参数进行调优。
optim.step()
import torch
import torchvision
from torch import nn
from torch.nn import Sequential, Conv2d, MaxPool2d, Linear
from torch.nn.modules.flatten import Flatten
from torch.utils.data import DataLoader
dataset = torchvision.datasets.CIFAR10('../data', train=False,
transform=torchvision.transforms.ToTensor(),
download=True)
dataloader = DataLoader(dataset,batch_size=1)
class Tudui(nn.Module):
# 初始化
def __init__(self):
# 继承父类 初始化
super(Tudui, self).__init__()
# 引入 Seqential
self.model1 = Sequential(
Conv2d(3, 32, 5, padding=2),
MaxPool2d(2),
Conv2d(32, 32, 5, padding=2),
MaxPool2d(2),
Conv2d(32, 64, 5, padding=2),
MaxPool2d(2),
Flatten(),
Linear(1024, 64),
Linear(64, 10)
)
def forward(self, x):
x = self.model1(x)
return x
# 计算交叉熵
loss = nn.CrossEntropyLoss()
tudui = Tudui()
# 加入优化器
optim = torch.optim.SGD(tudui.parameters(),lr=0.01) # SGD 随机梯度下降
for epoch in range(20):
running_loss = 0.0
for data in dataloader:
imgs, targets = data
outputs = tudui(imgs)
result_loss = loss(outputs,targets)
# 将网络中每一个梯度可调节参数调为0
optim.zero_grad()
# 调入损失函数的反向传播(每一参数节点的梯度)
result_loss.backward()
# 对模型参数进行调优
optim.step()
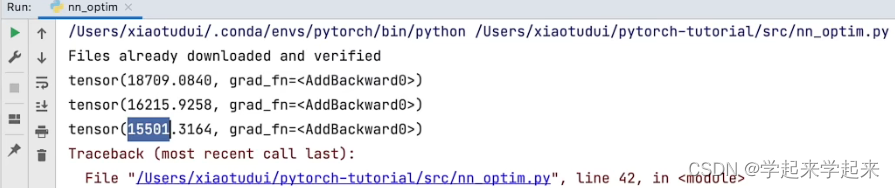
running_loss = running_loss + result_loss
print(running_loss)
Up的运行结果
25.现有模型网络的使用与更改
- 以VGG16网络模型为例,最后分类是1000类,而使用的CIFAR10数据集需要最后分成10类,因此需要进行网络模型的修改。
- 直接添加线性层
- 修改最后线性层的参数
# torchvision.models.vgg16(pretrained: bool = False, progress: bool = True, **kwargs)
# pretrained (bool) – If True, returns a model pre-trained on ImageNet
# progress (bool) – If True, displays a progress bar of the download to stderr
# 参数pretrained:为True代表下载的网络模型中的参数已经在ImageNet数据集中训练好了,预训练
# 为False代表下载的网络模型中的参数为初始值,并没有训练过
# 参数progress为True,显示下载进度条
import torchvision

# ../代表返回上一路径,通常./就可以
# train_data = torchvision.datasets.ImageNet("./ImageNet", split="train", transform=torchvision.transforms.ToTensor(),download = True)
# RuntimeError: The archive ILSVRC2012_devkit_t12.tar.gz is not present in the root directory or is corrupted.
# You need to download it externally and place it in ./ImageNet.
from torch import nn

vgg16_false = torchvision.models.vgg16(pretrained=False)
vgg16_true = torchvision.models.vgg16(pretrained=True)
# print(vgg16_true)

train_data = torchvision.datasets.CIFAR10("./dataset", train=True, download=True,
                                          transform=torchvision.transforms.ToTensor())
# 如何改进现有的网络去实现自己的目标
# Vgg16训练好的模型,最后为1000类,而CIFAR10为10类

# 第一种实现,在 最后 添加Linear层,将1000类转换成10类
# vgg16_true.add_module("add_linear", nn.Linear(1000, 10))
# print(vgg16_true)

# 第二种实现,在 classifier 中添加 Linear层,加在最末端
# vgg16_true.classifier.add_module("add_linear", nn.Linear(1000, 10))
# print(vgg16_true)

# 第三种实现,直接修改VGG16模型最后Linear层的参数 把4096,1000改成4096,10
print(vgg16_false)
vgg16_false.classifier[6] = nn.Linear(4096, 10) # 标明[6] 更改的就是6
print(vgg16_false)
26.网络模型的保存与读取
import torch
import torchvision
from torch import nn

# # 加载方式1->保存方式1,加载模型结构
# model1 = torch.load("vgg16_method1.pth")
# print(model1)

# # 加载方式2->保存方式2,加载模型字典参数
# vgg16 = torchvision.models.vgg16(pretrained=False)
# vgg16.load_state_dict(torch.load("vgg16_method2.pth")) # 显示模型架构
# # model2 = torch.load("vgg16_method2.pth")
# # print(model2)
# print(vgg16) # 打印架构

# 陷阱1 一般在抬头引入 from model_save import * 引入所有定义则不会报错
class Tudui(nn.Module):
    def __init__(self):
        super(Tudui, self).__init__()
        self.conv1 = nn.Conv2d(3, 64,kernel_size=3)

    def forward(self, x):
        x = self.conv1(x)
        return x

model3 = torch.load("tudui_method1.pth")
print(model3)
'''
输出
Tudui((conv1): Conv2d(3, 64, kernel_size=(3, 3), stride=(1, 1))
'''


 1007
1007


 被折叠的 条评论
为什么被折叠?
被折叠的 条评论
为什么被折叠?
 到【灌水乐园】发言


