


 本文详细解释了如何在Vivado工程中配置AXI_GPIO,包括设备树的编写与解析,以及如何利用Linux内核的gpiod接口进行GPIO控制,强调了方向设置和使用gpiod_get函数的重要性。
vivado工程
vivado 配置一个 AXI GPIO, 全输出,宽度为1
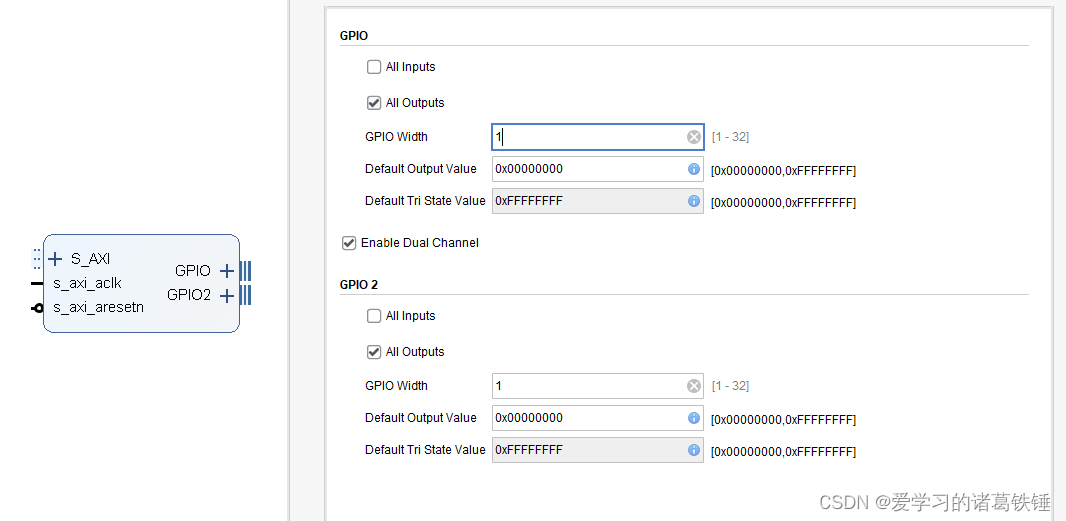
设备树解读
生成的对应pl.dtsi设备树文件如下
		axi_gpio: gpio@40020000 {
			#gpio-cells = <2>;
			clock-names = "s_axi_aclk";
			clocks = <&clkc 15>;
			compatible = "xlnx,axi-gpio-2.0", "xlnx,xps-gpio-1.00.a";
			gpio-controller ;
			reg = <0x40020000 0x10000>;
			xlnx,all-inputs = <0x0>;
			xlnx,all-inputs-2 = <0x0>;
			xlnx,all-outputs = <0x1>;
			xlnx,all-outputs-2 = <0x1>;
			xlnx,dout-default = <0x00000000>;
			xlnx,dout-default-2 = <0x00000000>;
			xlnx,gpio-width = <0x1>;
			xlnx,gpio2-width = <0x1>;
			xlnx,interrupt-present = <0x0>;
			xlnx,is-dual = <0x1>;
			xlnx,tri-default = <0xFFFFFFFF>;
			xlnx,tri-default-2 = <0xFFFFFFFF>;
		};
根据 compatible = “xlnx,xps-gpio-1.00.a” 找到内核文档 Documentaion/devicetree/bindings/gpio/gpio-xilinx.txt
关注以下部分
- #gpio-cells : Should be two or three. The first cell is the pin number,
  The second cell is used to specify channel offset:
		0 - first channel
		8 - second channel
  The third cell is optional and used to specify flags. Use the macros
  defined in include/dt-bindings/gpio/gpio.h
- gpio-controller : Marks the device node as a GPIO controller.
意思是需要至少两个参数,第一个是引脚号,第二个是用来指定通道,第三个参数可有可无,只是一个flag
而对于刚才生成的双通道axi gpio,引脚号从0开始,而第一个通道号为0,第二个为8
例如,可以这样访问
	name1-gpios = <&axi_gpio 0 0 GPIO_ACTIVE_LOW>;
	name2-gpios = <&axi_gpio 0 8 GPIO_ACTIVE_HIGH>;
gpio驱动
先去看文档 Documentaion/gpio/consumer.txt
首先要 #include <linux/gpio/consumer.h>,定义了几个flags和重要的函数
The flags parameter is used to optionally specify a direction and initial value
for the GPIO. Values can be:
* GPIOD_IN to initialize the GPIO as input.
* GPIOD_OUT_LOW to initialize the GPIO as output with a value of 0.
* GPIOD_OUT_HIGH to initialize the GPIO as output with a value of 1.
flags 讲的就很清楚,设置flags 可以指定方向和初始值
使用GPIOs 部分解读
按照以前的理解,GPIO肯定要先初始化,再设置方向,再设置高低电平
Obtaining and Disposing GPIOs
=============================
Like many other kernel subsystems, gpiod_get() takes the
device that will use the GPIO and the function the requested GPIO is supposed to
fulfill:

	struct gpio_desc *gpiod_get(struct device *dev, const char *con_id,
				    enum gpiod_flags flags)
也就是可以调用gpiod_get()函数来请求使用GPIO并实现某种功能
然后根据指示,通过 see Documentation/gpio/board.txt 来理解 the con_id parameter in the DeviceTree
假设有个设备树
	foo_device {
		compatible = "acme,foo";
		...
		led-gpios = <&gpio 15 GPIO_ACTIVE_HIGH>, /* red */
			    <&gpio 16 GPIO_ACTIVE_HIGH>, /* green */
			    <&gpio 17 GPIO_ACTIVE_HIGH>; /* blue */

		power-gpios = <&gpio 1 GPIO_ACTIVE_LOW>;
	};
可以使用以下函数访问
struct gpio_desc *red, *green, *blue, *power;

red = gpiod_get_index(dev, "led", 0, GPIOD_OUT_HIGH);
green = gpiod_get_index(dev, "led", 1, GPIOD_OUT_HIGH);
blue = gpiod_get_index(dev, "led", 2, GPIOD_OUT_HIGH);

power = gpiod_get(dev, "power", GPIOD_OUT_HIGH);
但是gpiod_get()还需要其他函数搭配使用吗?继续看
Using GPIOs
===========
Setting Direction
-----------------
The first thing a driver must do with a GPIO is setting its direction. If no
direction-setting flags have been given to gpiod_get*(), this is done by
invoking one of the gpiod_direction_*() functions:

	int gpiod_direction_input(struct gpio_desc *desc)
	int gpiod_direction_output(struct gpio_desc *desc, int value)
但是这里说,如果没有在调用gpiod_get*()函数时给一个 direction-setting flags,那就需要调用gpiod_direction_*() 这两个函数之一
换句话说,如果在调用gpiod_get*()函数时给一个 direction-setting flag,就不需要设置其他函数了
所以,gpiod_get*()函数 完成了三件事:申请使用GPIO,通过flags设置了方向并初始化值
重要函数
struct gpio_desc *devm_gpiod_get_optional(struct device *dev, const char *con_id, enum gpiod_flags flags)
很多驱动文件里在用,文档里只提到了是一个变体函数,调用关系如下
devm_gpiod_get_optional ->
 devm_gpiod_get_index_optional -> //index为0
  devm_gpiod_get_index ->
   gpiod_get_index
本质就是 gpiod_get_index
因此,对于我们的设备树
	name1-gpios = <&axi_gpio 0 0 GPIO_ACTIVE_LOW>;
	name2-gpios = <&axi_gpio 0 8 GPIO_ACTIVE_HIGH>;
可以这么用
struct i2c_client *client;
struct gpio_desc name1_gpio;
name1_gpio = devm_gpiod_get_optional(&client->dev, "name1", GPIOD_OUT_HIGH);
if(IS_ERR(name1_gpio)){
	dev_err(&client->dev, "can't get %s name1 GPIO in DT\n", "name1");
	return PTR_ERR(name1_gpio);
}
做了几件事:
- 寻找设备树中有没有 name1-gpios
- 申请GPIO使用
- 通过 flag 初始化方向并设置高低电平
结束语
多看内核文档,多看参考驱动代码,多理解


 4774
4774

 被折叠的 条评论
为什么被折叠?
被折叠的 条评论
为什么被折叠?
 到【灌水乐园】发言


