


PyCaret是一个Python中的开源、低代码机器学习库,可以自动化机器学习工作流。它是一个端到端的机器学习和模型管理工具,可以成倍地加快实验周期,提高工作效率。
与其他开源机器学习库相比,PyCaret是一个替代的低代码库,可以用几行代码替换数百行代码。这使得实验以指数方式快速和高效。PyCaret本质上是几个机器学习库和框架的Python包装器,例如scikit-learn,XGBoost,LightGBM,CatBoost,spaCy,Optuna,Hyperopt,Ray等等。
PyCaret的设计和简单性受到了公民数据科学家的新兴角色的启发,这是Gartner首次使用的术语。公民数据科学家是高级用户,他们可以执行简单和中等复杂的分析任务,这些任务以前需要更多的技术专业知识。
💻 安装
PyCaret在以下64位系统上测试和支持:
- Python 3.7 – 3.10
- Python 3.9 for Ubuntu only
- Ubuntu 16.04 or later
- Windows 7 or later
你可以使用Python的pip包管理器安装PyCaret:
pip install pycaret
PyCaret的默认安装不会自动安装所有额外的依赖项。您必须安装完整版本:
pip install pycaret[full]
或者根据您的使用情况,您可以安装以下变体之一:
- pip install pycaret[analysis]
- pip install pycaret[models]
- pip install pycaret[tuner]
- pip install pycaret[mlops]
- pip install pycaret[parallel]
- pip install pycaret[test]
# check installed version
import pycaret
pycaret.__version__

'''
'3.0.0'
'''
🚀 快速开始
PyCaret的分类模块是一个监督机器学习模块,用于将元素分类到组中。目标是预测离散和无序的类别标签。
一些常见的用例包括预测客户违约(是或否)、预测客户流失(客户将离开或留下)、发现疾病(阳性或阴性)。
该模块可用于二进制或多类问题。它提供了几个预处理功能,通过设置功能为建模准备数据。它有超过18个现成的算法和几个图来分析训练模型的性能。
PyCaret中的一个典型工作流程包括以下5个步骤:

# loading sample dataset from pycaret dataset module
from pycaret.datasets import get_data
data = get_data('diabetes')

Setup
此函数初始化训练环境并创建转换管道。在执行PyCaret中的任何其他函数之前,必须调用Setup函数。它只有两个必需的参数,即数据和目标。所有其他参数都是可选的。
# import pycaret classification and init setup
from pycaret.classification import *
s = setup(data, target = 'Class variable', session_id = 123)

一旦设置成功执行,它将显示包含实验级信息的信息网格。
Session id: 作为种子分布在所有函数中的伪随机数,用于以后的可重复性。如果没有传递session_id,则会自动生成一个随机数,并将其分发给所有函数。.
Target type: 二进制、多类或回归。自动检测目标类型。
Label Encoding: 当Target变量是字符串类型(即“是”或“否”)而不是1或0时,它会自动将标签编码为1和0,并显示映射(0:否,1:是)供参考。在本教程中,不需要标签编码,因为目标变量是数值类型。
Original data shape: 原始数据在任何变换之前的形状。
Transformed train set shape : 变换训练集形状
Transformed test set shape : 变换测试集形状
Numeric features : 数值特征
Categorical features : 分类特征
PyCaret有两套API可以使用。(1)函数式(如上所述)和(2)面向对象的API。
使用面向对象的API,而不是直接执行函数,您将导入一个类并执行类的方法。
# import ClassificationExperiment and init the class
from pycaret.classification import ClassificationExperiment
exp = ClassificationExperiment()
# check the type of exp
type(exp)

'''
pycaret.classification.oop.ClassificationExperiment
'''
# init setup on exp
exp.setup(data, target = 'Class variable', session_id = 123)

你可以使用这两种方法中的任何一种,即函数式或OOP,甚至可以在两组API之间来回切换。方法的选择不会影响结果,并已进行一致性检测。
Compare Models
此函数使用交叉验证为模型库中可用的所有估计量定型并评估其性能。该函数的输出是一个评分网格,其中包含平均交叉验证分数。可以使用get_metrics函数访问CV期间评估的指标。可以使用add_metric和remove_metric函数添加或删除自定义指标。
# compare baseline models
best = compare_models()

Analyze Model
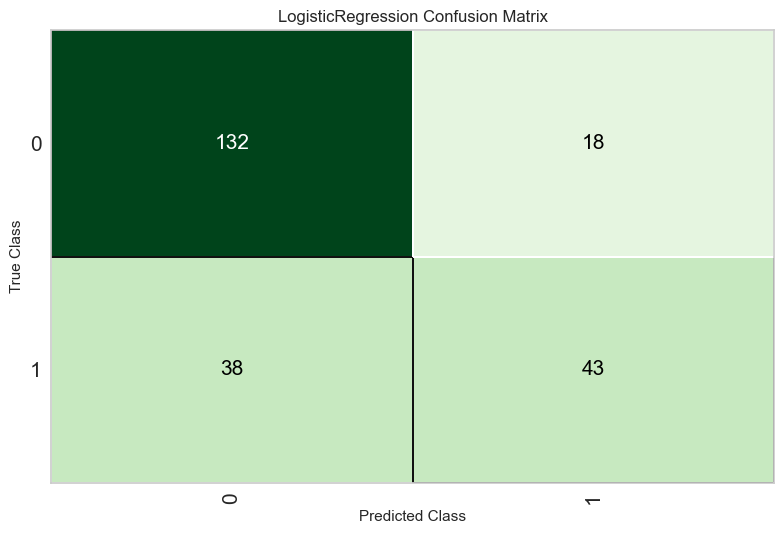
# plot confusion matrix
plot_model(best, plot = 'confusion_matrix')
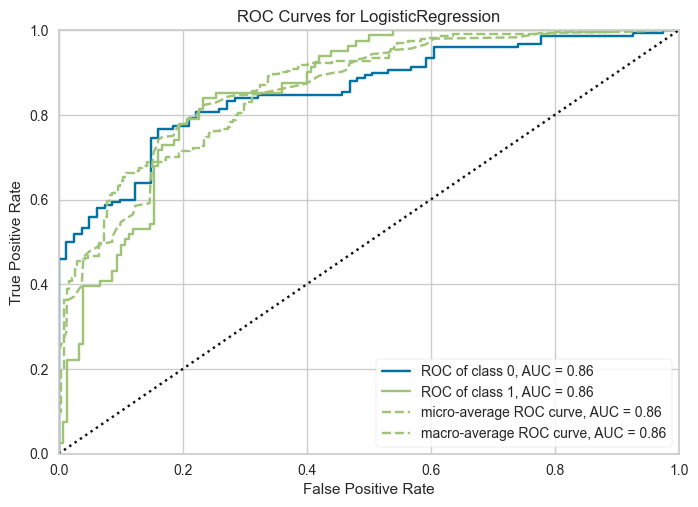
# plot AUC
plot_model(best, plot = 'auc')
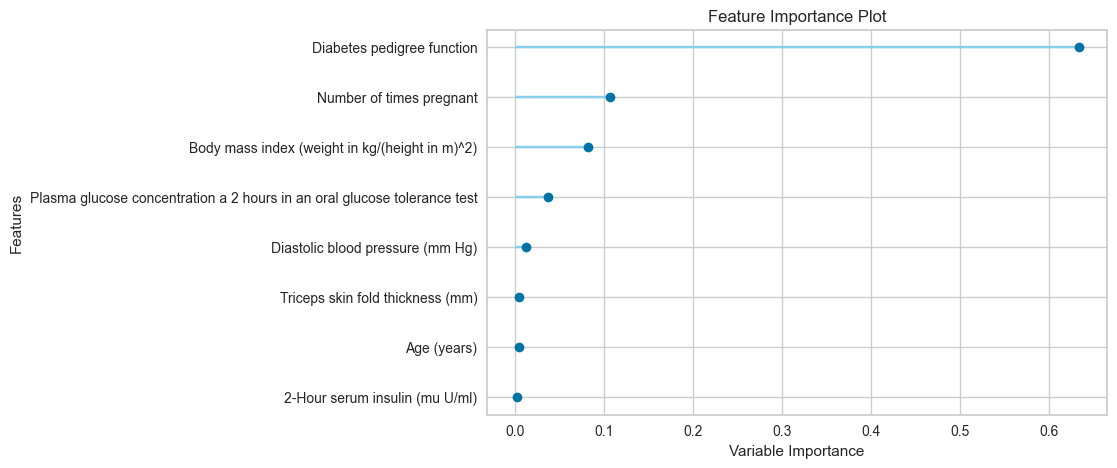
# plot feature importance
plot_model(best, plot = 'feature')
Prediction
# predict on test set
holdout_pred = predict_model(best)

同样的函数也适用于预测看不见的数据集上的标签。让我们创建原始数据的副本并删除Class变量。然后,我们可以使用没有标签的新数据帧进行评分。
# copy data and drop Class variable

new_data = data.copy()
new_data.drop('Class variable', axis=1, inplace=True)
new_data.head()

# predict model on new_data
predictions = predict_model(best, data = new_data)
predictions.head()

Save Model
# save pipeline
save_model(best, 'my_first_pipeline')

👇 详细的功能概述
✅ Setup
# init setup function
s = setup(data, target = 'Class variable', session_id = 123)
要访问设置函数创建的所有变量,如转换的数据集,random_state等,您可以使用get_config方法。
# check all available config
get_config()

'''
{'USI',
 'X',
 'X_test',
 'X_test_transformed',
 'X_train',
 'X_train_transformed',
 'X_transformed',
 '_available_plots',
 '_ml_usecase',
 'data',
 'dataset',
 'dataset_transformed',
 'exp_id',
 'exp_name_log',
 'fix_imbalance',
 'fold_generator',
 'fold_groups_param',
 'fold_shuffle_param',
 'gpu_n_jobs_param',
 'gpu_param',
 'html_param',
 'idx',
 'is_multiclass',
 'log_plots_param',
 'logging_param',
 'memory',
 'n_jobs_param',
 'pipeline',
 'seed',
 'target_param',
 'test',
 'test_transformed',
 'train',
 'train_transformed',
 'variable_and_property_keys',
 'variables',
 'y',
 'y_test',
 'y_test_transformed',
 'y_train',
 'y_train_transformed',
 'y_transformed'}
'''
# lets access X_train_transformed
get_config('X_train_transformed')

# another example: let's access seed
print("The current seed is: {}".format(get_config('seed')))

# now lets change it using set_config
set_config('seed', 786)
print("The new seed is: {}".format(get_config('seed')))

'''
The current seed is: 123
The new seed is: 786
'''
# init setup with normalize = True

s = setup(data, target = 'Class variable', session_id = 123,
          normalize = True, normalize_method = 'minmax')

# lets check the X_train_transformed to see effect of params passed
get_config('X_train_transformed')['Number of times pregnant'].hist()
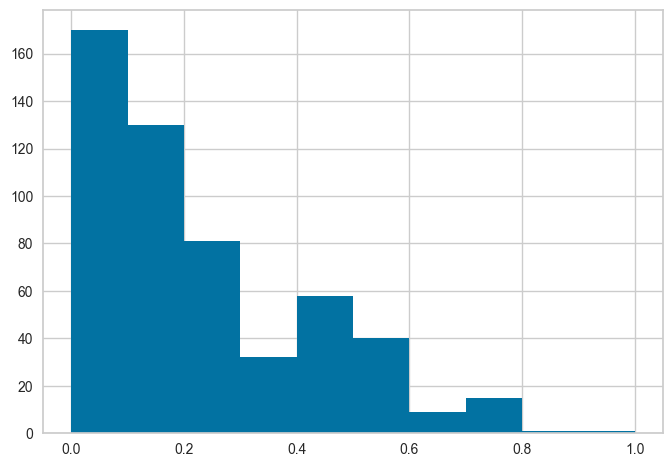
请注意,所有的值都在0和1之间。这是因为我们在setup函数中传递了normalize=True。如果你不记得它是如何与实际数据进行比较的,我们也可以使用get_config访问未转换的值,然后进行比较。见下文,注意x轴上的值范围,并将其与上面的直方图进行比较。
get_config('X_train')['Number of times pregnant'].hist()

✅ Compare Models
best = compare_models()

compare_models默认使用模型库中的所有估计量(Turbo=False的模型除外)。要查看所有可用的模型,可以使用函数models()
# check available models
models()

您可以使用compare_models中的include和exclude参数来只训练选定模型,或者通过在exclude参数中传递模型id来从训练中排除特定模型。
compare_tree_models = compare_models(include = ['dt', 'rf', 'et', 'gbc', 'xgboost', 'lightgbm', 'catboost'])

compare_tree_models

'''
RandomForestClassifier(bootstrap=True, ccp_alpha=0.0, class_weight=None,
                       criterion='gini', max_depth=None, max_features='sqrt',
                       max_leaf_nodes=None, max_samples=None,
                       min_impurity_decrease=0.0, min_samples_leaf=1,
                       min_samples_split=2, min_weight_fraction_leaf=0.0,
                       n_estimators=100, n_jobs=-1, oob_score=False,
                       random_state=123, verbose=0, warm_start=False)
'''
上面的函数返回训练好的模型对象作为输出。评分网格仅显示而不返回。如果你需要访问计分网格,你可以使用pull函数来访问dataframe。
compare_tree_models_results = pull()
compare_tree_models_results

默认情况下,compare_models根据sort参数中定义的度量返回单个性能最佳的模型。让我们改变我们的代码,返回3个基于Recall的顶级模型。
best_recall_models_top3 = compare_models(sort = 'Recall', n_select = 3)

# list of top 3 models by Recall
best_recall_models_top3

'''
[GaussianNB(priors=None, var_smoothing=1e-09),
 GradientBoostingClassifier(ccp_alpha=0.0, criterion='friedman_mse', init=None,
                            learning_rate=0.1, loss='log_loss', max_depth=3,
                            max_features=None, max_leaf_nodes=None,
                            min_impurity_decrease=0.0, min_samples_leaf=1,
                            min_samples_split=2, min_weight_fraction_leaf=0.0,
                            n_estimators=100, n_iter_no_change=None,
                            random_state=123, subsample=1.0, tol=0.0001,
                            validation_fraction=0.1, verbose=0,
                            warm_start=False),
 LinearDiscriminantAnalysis(covariance_estimator=None, n_components=None,
                            priors=None, shrinkage=None, solver='svd',
                            store_covariance=False, tol=0.0001)]
'''
✅ Set Custom Metrics
# check available metrics used in CV
get_metrics()
# create a custom function
import numpy as np

def custom_metric(y, y_pred):
    tp = np.where((y_pred==1) & (y==1), (100), 0)
    fp = np.where((y_pred==1) & (y==0), -5, 0)
    return np.sum([tp,fp])

# add metric to PyCaret
add_metric('custom_metric', 'Custom Metric', custom_metric)

'''
Name                                                  Custom Metric
Display Name                                          Custom Metric
Score Function       <function custom_metric at 0x000002E24B0EA430>
Scorer                                   make_scorer(custom_metric)
Target                                                         pred
Args                                                             {}
Greater is Better                                              True
Multiclass                                                     True
Custom                                                         True
Name: custom_metric, dtype: object
'''
# now let's run compare_models again
compare_models()

✅ Create Model
该函数使用交叉验证来训练和评估给定估计器的性能。此函数的输出是一个评分网格,其中包含按倍数显示的CV评分。可以使用get_metrics函数访问CV期间评估的指标。可以使用add_metric和remove_metric函数添加或删除自定义指标。所有可用的模型都可以使用模型功能访问。
# check all the available models
models()
# train logistic regression with default fold=10
lr = create_model('lr')

上面的函数返回训练好的模型对象作为输出。评分网格仅显示而不返回。如果你需要访问计分网格,你可以使用pull函数来访问dataframe。
lr_results = pull()
print(type(lr_results))
lr_results

# train logistic regression with fold=3
lr = create_model('lr', fold=3)

# train logistic regression with specific model parameters
create_model('lr', C = 0.5, l1_ratio = 0.15)

# train lr and return train score as well alongwith CV
create_model('lr', return_train_score=True)

# change the probability threshold of classifier from 0.5 to 0.66
create_model('lr', probability_threshold = 0.66)

✅ Tune Model
该函数调整模型的超参数。该函数的输出是一个评分网格,其中包含按倍数交叉验证的分数。根据优化参数中定义的度量选择最佳模型。可以使用get_metrics函数访问交叉验证期间评估的度量。可以使用add_metric和remove_metric函数添加或删除自定义指标。
# train a dt model with default params
dt = create_model('dt')

# tune hyperparameters of dt
tuned_dt = tune_model(dt)

要优化的指标可以在优化参数中定义(默认值= ‘Accuracy’)。此外,可以使用custom_grid参数传递自定义的调优网格。
dt

'''
DecisionTreeClassifier(ccp_alpha=0.0, class_weight=None, criterion='gini',
                       max_depth=None, max_features=None, max_leaf_nodes=None,
                       min_impurity_decrease=0.0, min_samples_leaf=1,
                       min_samples_split=2, min_weight_fraction_leaf=0.0,
                       random_state=123, splitter='best')
'''
# define tuning grid
dt_grid = {'max_depth' : [None, 2, 4, 6, 8, 10, 12]}

# tune model with custom grid and metric = F1
tuned_dt = tune_model(dt, custom_grid = dt_grid, optimize = 'F1')

# to access the tuner object you can set return_tuner = True
tuned_dt, tuner = tune_model(dt, return_tuner=True)

# model object
tuned_dt

'''
DecisionTreeClassifier(ccp_alpha=0.0, class_weight=None, criterion='gini',
                       max_depth=1, max_features=1.0, max_leaf_nodes=None,
                       min_impurity_decrease=0.01, min_samples_leaf=6,
                       min_samples_split=5, min_weight_fraction_leaf=0.0,
                       random_state=123, splitter='best')
'''
# tuner object
tuner

'''
RandomizedSearchCV(cv=StratifiedKFold(n_splits=10, random_state=None, shuffle=False),
                   error_score=nan,
                   estimator=Pipeline(memory=FastMemory(location=C:\Users\owner\AppData\Local\Temp\joblib),
                                      steps=[('clean_column_names',
                                              TransformerWrapper(exclude=None,
                                                                 include=None,
                                                                 transformer=CleanColumnNames(match='[\\]\\[\\,\\{\\}\\"\\:]+'))),
                                             ('numerical_imputer',
                                              Tra...
                                        'actual_estimator__max_features': [1.0,
                                                                           'sqrt',
                                                                           'log2'],
                                        'actual_estimator__min_impurity_decrease': [0,
                                                                                    0.0001,
                                                                                    0.001,
                                                                                    0.01,
                                                                                    0.0002,
                                                                                    0.002,
                                                                                    0.02,
                                                                                    0.0005,
                                                                                    0.005,
                                                                                    0.05,
                                                                                    0.1,
                                                                                    0.2,
                                                                                    0.3,
                                                                                    0.4,
                                                                                    0.5],
                                        'actual_estimator__min_samples_leaf': [2,
                                                                               3,
                                                                               4,
                                                                               5,
                                                                               6],
                                        'actual_estimator__min_samples_split': [2,
                                                                                5,
                                                                                7,
                                                                                9,
                                                                                10]},
                   pre_dispatch='2*n_jobs', random_state=123, refit=False,
                   return_train_score=False, scoring='accuracy', verbose=1)
'''
默认的搜索算法是来自sklearn的RandomizedSearchCV。这可以通过使用search_library和search_algorithm参数来更改。
# tune dt using optuna
tuned_dt = tune_model(dt, search_library = 'optuna')

✅ Ensemble Model
该函数集成给定的估计量。此函数的输出是一个评分网格,其中包含按倍数显示的CV评分。可以使用get_metrics函数访问CV期间评估的指标。可以使用add_metric和remove_metric函数添加或删除自定义指标。
# ensemble with bagging
ensemble_model(dt, method = 'Bagging')

# ensemble with boosting
ensemble_model(dt, method = 'Boosting')

✅ Blend Models
此函数为estimator_list参数中传递的选择模型训练软投票/多数规则分类器。此函数的输出是一个评分网格,其中包含按倍数显示的CV评分。可以使用get_metrics函数访问CV期间评估的指标。可以使用add_metric和remove_metric函数添加或删除自定义指标。
# top 3 models based on recall
best_recall_models_top3

'''
[GaussianNB(priors=None, var_smoothing=1e-09),
 GradientBoostingClassifier(ccp_alpha=0.0, criterion='friedman_mse', init=None,
                            learning_rate=0.1, loss='log_loss', max_depth=3,
                            max_features=None, max_leaf_nodes=None,
                            min_impurity_decrease=0.0, min_samples_leaf=1,
                            min_samples_split=2, min_weight_fraction_leaf=0.0,
                            n_estimators=100, n_iter_no_change=None,
                            random_state=123, subsample=1.0, tol=0.0001,
                            validation_fraction=0.1, verbose=0,
                            warm_start=False),
 LinearDiscriminantAnalysis(covariance_estimator=None, n_components=None,
                            priors=None, shrinkage=None, solver='svd',
                            store_covariance=False, tol=0.0001)]
'''
# blend top 3 models
blend_models(best_recall_models_top3)

✅ Stack Models
此函数通过estimator_list参数中传递的选定估计器训练元模型。此函数的输出是一个评分网格,其中包含按倍数显示的CV评分。可以使用get_metrics函数访问CV期间评估的指标。可以使用add_metric和remove_metric函数添加或删除自定义指标。
# stack models
stack_models(best_recall_models_top3)

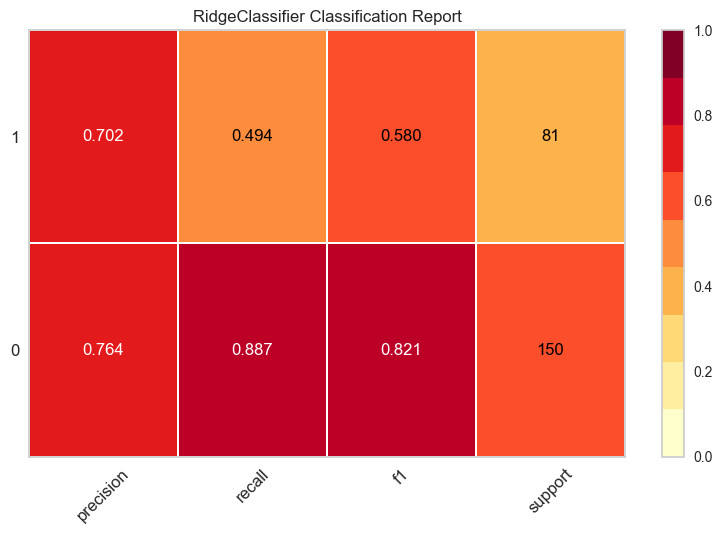
✅ Plot Model
该函数分析训练模型在保留集上的性能。在某些情况下,可能需要重新训练模型。
# plot class report
plot_model(best, plot = 'class_report')
# to control the scale of plot
plot_model(best, plot = 'class_report', scale = 2)
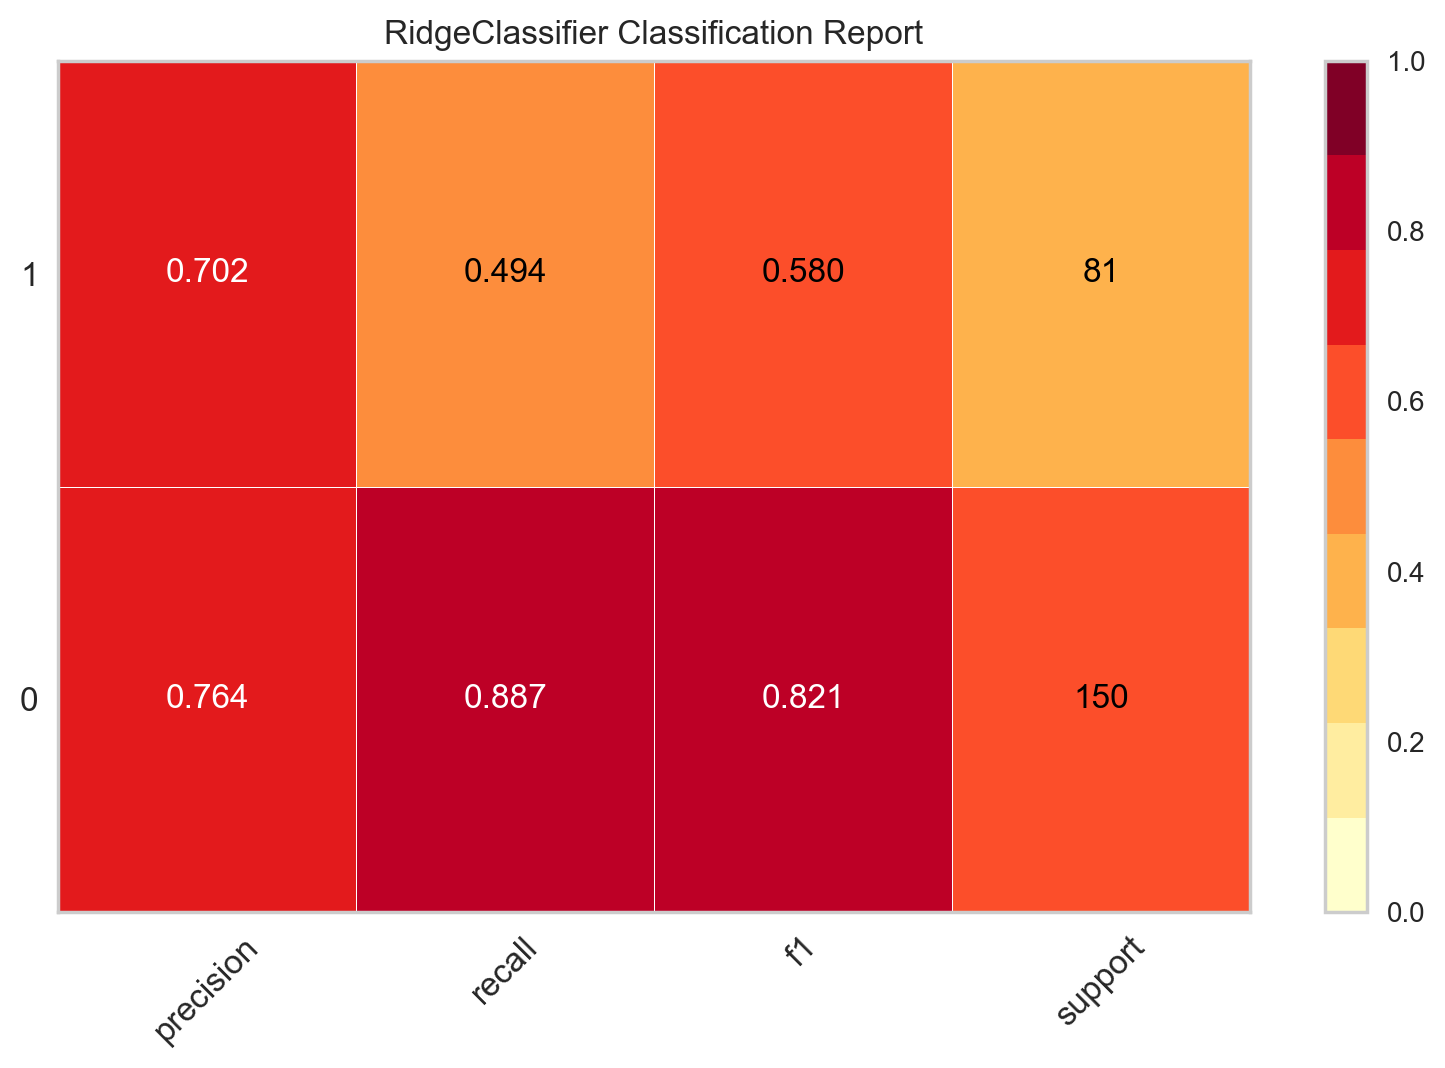
# to save the plot
plot_model(best, plot = 'class_report', save=True)

'''
'Class Report.png'
'''
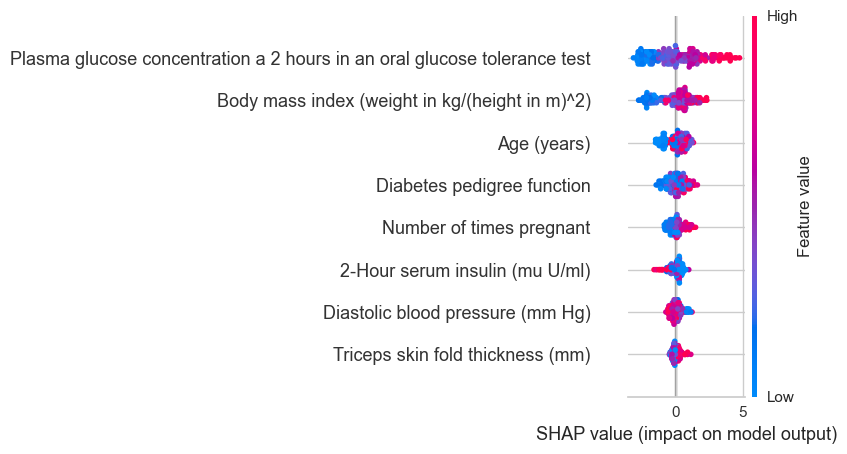
✅ Interpret Model
该函数分析从训练模型生成的预测。此函数中的大多数图都是基于SHAP(Shapley加法解释)实现的。有关此方面的更多信息,请访问https://shap.readthedocs.io/en/latest/
# train lightgbm model
lightgbm = create_model('lightgbm')

# interpret summary model
interpret_model(lightgbm, plot = 'summary')
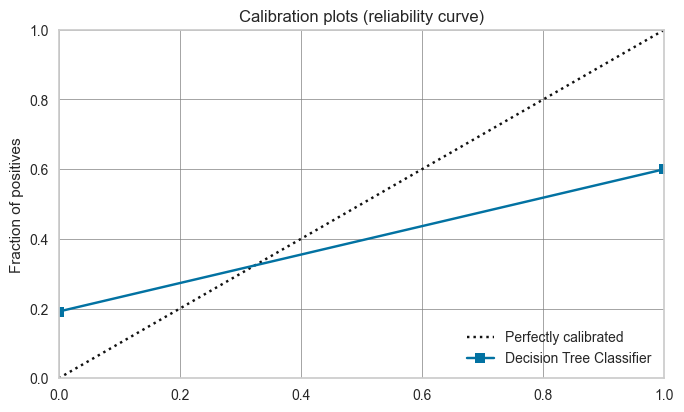
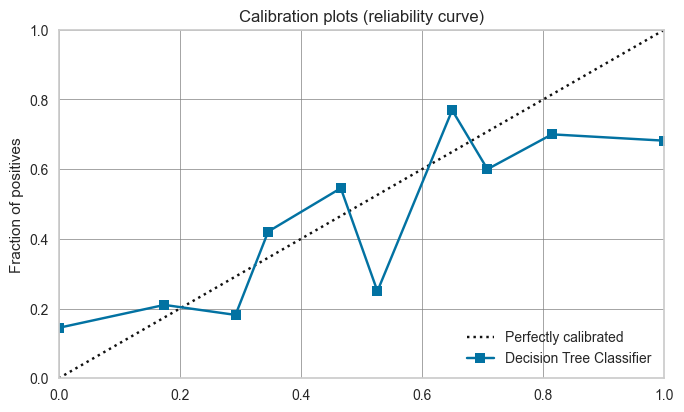
✅ Calibrate Model
该函数使用等渗或逻辑回归校准给定模型的概率。此函数的输出是一个评分网格,其中包含按倍数显示的CV评分。可以使用get_metrics函数访问CV期间评估的指标。可以使用add_metric和remove_metric函数添加或删除自定义指标。
# check calbiration of default dt
plot_model(dt, plot = 'calibration')
# calibrate default dt
calibrated_dt = calibrate_model(dt)

# check calbiration of calibrated dt
plot_model(calibrated_dt, plot = 'calibration')
✅ Get Leaderboard
此函数返回在当前设置中训练的所有模型的排行榜。
# get leaderboard
lb = get_leaderboard()
lb

# select the best model based on F1
lb.sort_values(by='F1', ascending=False)['Model'].iloc[0]

'''
Pipeline(memory=FastMemory(location=C:\Users\owner\AppData\Local\Temp\joblib),
         steps=[('clean_column_names',
                 TransformerWrapper(exclude=None, include=None,
                                    transformer=CleanColumnNames(match='[\\]\\[\\,\\{\\}\\"\\:]+'))),
                ('numerical_imputer',
                 TransformerWrapper(exclude=None,
                                    include=['Number of times pregnant',
                                             'Plasma glucose concentration a 2 '
                                             'hours in an oral glu...
                                                              strategy='most_frequent',
                                                              verbose='deprecated'))),
                ('normalize',
                 TransformerWrapper(exclude=None, include=None,
                                    transformer=MinMaxScaler(clip=False,
                                                             copy=True,
                                                             feature_range=(0,
                                                                            1)))),
                ['trained_model',
                 LinearDiscriminantAnalysis(covariance_estimator=None,
                                            n_components=None, priors=None,
                                            shrinkage=None, solver='svd',
                                            store_covariance=False,
                                            tol=0.0001)]],
         verbose=False)
'''
✅ AutoML
此函数基于优化参数返回当前设置中所有已训练模型中的最佳模型。可以使用get_metrics函数访问评估的指标。
automl()

'''
RidgeClassifier(alpha=1.0, class_weight=None, copy_X=True, fit_intercept=True,
                max_iter=None, normalize='deprecated', positive=False,
                random_state=123, solver='auto', tol=0.001)
'''
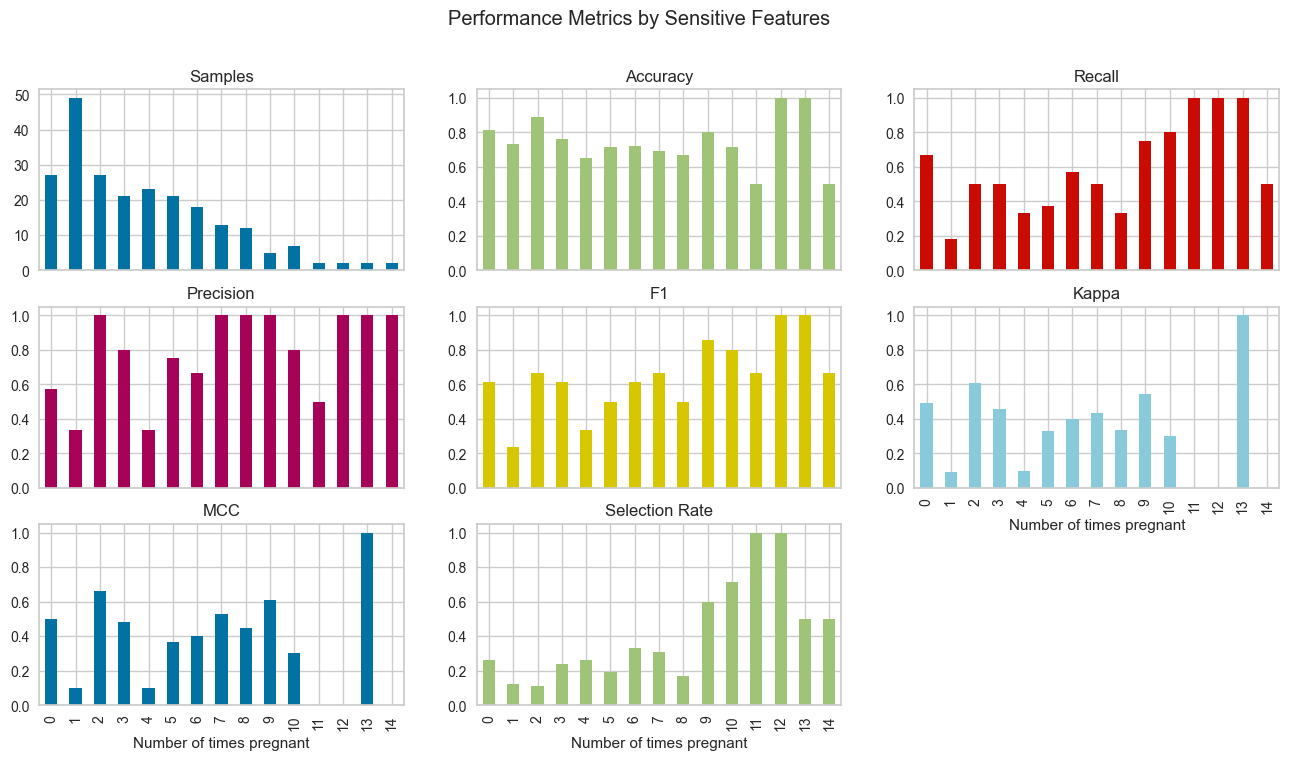
✅ Check Fairness
有许多方法可以将公平概念化。check_fairness函数遵循称为组公平性的方法,该方法要求:哪些群体的个人有遭受伤害的风险。check_fairness提供不同组(也称为子群体)之间的公平性相关度量。
# check fairness
check_fairness(best, sensitive_features = ['Number of times pregnant'])

✅ Dashboard
仪表板功能为训练模型生成交互式仪表板。仪表板使用ExplainerDashboard实现。
# dashboard function
dashboard(dt, display_format ='inline')

'''
Note: model_output=='probability', so assuming that raw shap output of DecisionTreeClassifier is in probability space...
Generating self.shap_explainer = shap.TreeExplainer(model)
Building ExplainerDashboard..
The explainer object has no decision_trees property. so setting decision_trees=False...
Warning: calculating shap interaction values can be slow! Pass shap_interaction=False to remove interactions tab.
Generating layout...
Calculating shap values...
Calculating prediction probabilities...
Calculating metrics...
Calculating confusion matrices...
Calculating classification_dfs...
Calculating roc auc curves...
Calculating pr auc curves...
Calculating liftcurve_dfs...
Calculating shap interaction values... (this may take a while)
Reminder: TreeShap computational complexity is O(TLD^2), where T is the number of trees, L is the maximum number of leaves in any tree and D the maximal depth of any tree. So reducing these will speed up the calculation.
Calculating dependencies...
Calculating permutation importances (if slow, try setting n_jobs parameter)...
Calculating predictions...
Calculating pred_percentiles...
Reminder: you can store the explainer (including calculated dependencies) with explainer.dump('explainer.joblib') and reload with e.g. ClassifierExplainer.from_file('explainer.joblib')
Registering callbacks...
Starting ExplainerDashboard inline (terminate it with ExplainerDashboard.terminate(8050))
'''
✅ EDA
此功能使用AutoViz库生成自动探索性数据分析(EDA)。您必须单独安装Autoviz pip install autoviz才能使用此功能。
# eda function
eda()

'''
Imported v0.1.58. After importing, execute '%matplotlib inline' to display charts in Jupyter.
    AV = AutoViz_Class()
    dfte = AV.AutoViz(filename, sep=',', depVar='', dfte=None, header=0, verbose=1, lowess=False,
               chart_format='svg',max_rows_analyzed=150000,max_cols_analyzed=30, save_plot_dir=None)
Update: verbose=0 displays charts in your local Jupyter notebook.
        verbose=1 additionally provides EDA data cleaning suggestions. It also displays charts.
        verbose=2 does not display charts but saves them in AutoViz_Plots folder in local machine.
        chart_format='bokeh' displays charts in your local Jupyter notebook.
        chart_format='server' displays charts in your browser: one tab for each chart type
        chart_format='html' silently saves interactive HTML files in your local machine
Shape of your Data Set loaded: (768, 9)
#######################################################################################
######################## C L A S S I F Y I N G  V A R I A B L E S  ####################
#######################################################################################
Classifying variables in data set...
Data cleaning improvement suggestions. Complete them before proceeding to ML modeling.
'''

✅Create App
# create gradio app
create_app(best)

'''
Running on local URL:  http://127.0.0.1:7860

To create a public link, set `share=True` in `launch()`.
'''
✅ Finalize Model
该函数在整个数据集上训练给定模型,包括留出集。
final_best = finalize_model(best)
final_best

'''
Pipeline(memory=FastMemory(location=C:\Users\owner\AppData\Local\Temp\joblib),
         steps=[('clean_column_names',
                 TransformerWrapper(exclude=None, include=None,
                                    transformer=CleanColumnNames(match='[\\]\\[\\,\\{\\}\\"\\:]+'))),
                ('numerical_imputer',
                 TransformerWrapper(exclude=None,
                                    include=['Number of times pregnant',
                                             'Plasma glucose concentration a 2 '
                                             'hours in an oral glu...
                                                              verbose='deprecated'))),
                ('normalize',
                 TransformerWrapper(exclude=None, include=None,
                                    transformer=MinMaxScaler(clip=False,
                                                             copy=True,
                                                             feature_range=(0,
                                                                            1)))),
                ('actual_estimator',
                 RidgeClassifier(alpha=1.0, class_weight=None, copy_X=True,
                                 fit_intercept=True, max_iter=None,
                                 normalize='deprecated', positive=False,
                                 random_state=123, solver='auto', tol=0.001))],
         verbose=False)
'''
✅ Convert Model
此函数将训练好的机器学习模型的决策函数转换为不同的编程语言,如Python、C、Java、Go、C#等。如果您想将模型部署到无法安装正常Python堆栈以支持模型推理的环境中,则此函数非常有用。
# transpiles learned function to java
print(convert_model(best, language = 'java'))

'''
public class Model {
    public static double score(double[] input) {
        return -2.4222329408494767 + input[0] * 0.5943492729771869 + input[1] * 2.3273354603187455 + input[2] * -0.41637843900032867 + input[3] * 0.10259178891131746 + input[4] * -0.3134524281639536 + input[5] * 1.4903417391961826 + input[6] * 0.5019685413792472 + input[7] * 0.12389520576261319;
    }
}

'''
✅ Save / Load Model
# save model
save_model(best, 'my_first_model')

'''
Transformation Pipeline and Model Successfully Saved
(Pipeline(memory=FastMemory(location=C:\Users\owner\AppData\Local\Temp\joblib),
          steps=[('clean_column_names',
                  TransformerWrapper(exclude=None, include=None,
                                     transformer=CleanColumnNames(match='[\\]\\[\\,\\{\\}\\"\\:]+'))),
                 ('numerical_imputer',
                  TransformerWrapper(exclude=None,
                                     include=['Number of times pregnant',
                                              'Plasma glucose concentration a 2 '
                                              'hours in an oral glu...
                                                               verbose='deprecated'))),
                 ('normalize',
                  TransformerWrapper(exclude=None, include=None,
                                     transformer=MinMaxScaler(clip=False,
                                                              copy=True,
                                                              feature_range=(0,
                                                                             1)))),
                 ('trained_model',
                  RidgeClassifier(alpha=1.0, class_weight=None, copy_X=True,
                                  fit_intercept=True, max_iter=None,
                                  normalize='deprecated', positive=False,
                                  random_state=123, solver='auto', tol=0.001))],
          verbose=False),
 'my_first_model.pkl')
'''

# load model
loaded_from_disk = load_model('my_first_model')
loaded_from_disk
✅ Save / Load Experiment
此功能将所有实验变量保存在磁盘上,允许稍后恢复而无需重新运行设置功能。
# save experiment
save_experiment('my_experiment')
# load experiment from disk
exp_from_disk = load_experiment('my_experiment', data=data)


 4471
4471


 被折叠的 条评论
为什么被折叠?
被折叠的 条评论
为什么被折叠?
 到【灌水乐园】发言


