


文章目录
项目要求
创建一个网页,要求注册用户,整体架构为
- 1.创建一个
note项目 - 2.在项目中创建一个
user应用,负责管理用户的注册、登录等活动 - 3.
user应用中包括完整的templates*.html以及models等管理
1.创建项目和应用
django-admin startproject note # 创建note项目
cd note
python manage.py startapp user # 创建user app
2.修改setting.py
- INSTALLED_APPS增加新的app名称
user - MIDDLEWARE 注释掉CSRF,一面请求403
"""
Django settings for note project.

Generated by 'django-admin startproject' using Django 3.0.8.

For more information on this file, see
https://docs.djangoproject.com/en/3.0/topics/settings/

For the full list of settings and their values, see
https://docs.djangoproject.com/en/3.0/ref/settings/
"""

import os

# Build paths inside the project like this: os.path.join(BASE_DIR, ...)
BASE_DIR = os.path.dirname(os.path.dirname(os.path.abspath(__file__)))


# Quick-start development settings - unsuitable for production
# See https://docs.djangoproject.com/en/3.0/howto/deployment/checklist/

# SECURITY WARNING: keep the secret key used in production secret!
SECRET_KEY = 'e6#)(dq*75g&vzg=19x!^21n1s+6iw9*h42dfix4y%8*q_e0e9'

# SECURITY WARNING: don't run with debug turned on in production!
DEBUG = True

ALLOWED_HOSTS = []


# Application definition

INSTALLED_APPS = [
    'django.contrib.admin',
    'django.contrib.auth',
    'django.contrib.contenttypes',
    'django.contrib.sessions',
    'django.contrib.messages',
    'django.contrib.staticfiles',
    'user',  # 新增的应用
]

MIDDLEWARE = [
    'django.middleware.security.SecurityMiddleware',
    'django.contrib.sessions.middleware.SessionMiddleware',
    'django.middleware.common.CommonMiddleware',
    # 暂时禁用,否则会在点击提交之后Forbidden (403) CSRF verification failed. Request aborted.
    # 'django.middleware.csrf.CsrfViewMiddleware',
    'django.contrib.auth.middleware.AuthenticationMiddleware',
    'django.contrib.messages.middleware.MessageMiddleware',
    'django.middleware.clickjacking.XFrameOptionsMiddleware',
]

ROOT_URLCONF = 'note.urls'

TEMPLATES = [
    {
        'BACKEND': 'django.template.backends.django.DjangoTemplates',
        'DIRS': [], #这里不用动,具体的模板在app里面创建
        'APP_DIRS': True,
        'OPTIONS': {
            'context_processors': [
                'django.template.context_processors.debug',
                'django.template.context_processors.request',
                'django.contrib.auth.context_processors.auth',
                'django.contrib.messages.context_processors.messages',
            ],
        },
    },
]

WSGI_APPLICATION = 'note.wsgi.application'


# Database
# https://docs.djangoproject.com/en/3.0/ref/settings/#databases

DATABASES = {
    'default': {
        'ENGINE': 'django.db.backends.sqlite3',
        'NAME': os.path.join(BASE_DIR, 'db.sqlite3'),
    }
}


# Password validation
# https://docs.djangoproject.com/en/3.0/ref/settings/#auth-password-validators

AUTH_PASSWORD_VALIDATORS = [
    {
        'NAME': 'django.contrib.auth.password_validation.UserAttributeSimilarityValidator',
    },
    {
        'NAME': 'django.contrib.auth.password_validation.MinimumLengthValidator',
    },
    {
        'NAME': 'django.contrib.auth.password_validation.CommonPasswordValidator',
    },
    {
        'NAME': 'django.contrib.auth.password_validation.NumericPasswordValidator',
    },
]


# Internationalization
# https://docs.djangoproject.com/en/3.0/topics/i18n/

LANGUAGE_CODE = 'en-us'

TIME_ZONE = 'UTC'

USE_I18N = True

USE_L10N = True

USE_TZ = True


# Static files (CSS, JavaScript, Images)
# https://docs.djangoproject.com/en/3.0/howto/static-files/

STATIC_URL = '/static/'
3.在userapp中创建注册和登录网页
- 创建
user/templates/user/reg.html和user/templates/user/login.html,注意一定是应用目录下创建一个名为templates的目录,再创建一个与应用名一样的user的目录,最后才是具体的网页模板。最终在视图函数中render(request, 'user/reg.html')或者render(request, 'user/login.html')来调用模板文件 user/templates/user/reg.html
<!DOCTYPE html>
<html lang="en">

<head>
    <meta charset="UTF-8">
    <meta http-equiv="X-UA-Compatible" content="IE=edge">
    <meta name="viewport" content="width=device-width, initial-scale=1.0">
    <title>Document</title>
    <!--通过link标签导入semantic ui css样式-->
    <link rel="stylesheet" href="https://cdn.jsdelivr.net/npm/semantic-ui@2.4.2/dist/semantic.min.css" />
    <!-- 通过script导入jquery和semantic ui.js-->
    <script src="https://cdn.bootcdn.net/ajax/libs/jquery/3.6.0/jquery.min.js"></script>
    <script src="https://cdn.jsdelivr.net/npm/semantic-ui@2.4.2/dist/semantic.min.js"></script>

</head>

<body>
    <!-- 注册页面 -->
    <div class="ui blue menu">

    </div>
    <div class="ui center aligned container">
        <form action="/user/reg" method="post">
            <div class="ui left icon input">
                <i class="ui user icon"></i>
                <!-- 注意input标签中的name属性将会在试图函数中通过request.POST[name]获得对应的值 -->
                <input type="text" name="user" placeholder="User name">
            </div>
            <br>
            <div class="ui left icon input">
                <i class="ui key icon"></i>
                <input type="text" name="passwd1" placeholder="Password">
            </div>
            <br>
            <div class="ui left icon input">
                <i class="ui key icon"></i>
                <input type="text" name="passwd2" placeholder="Ensure password">
            </div>
            <br>
            <br>
            <!-- 提交按钮是input中的submit type,点击此按钮即可跳转到form中的action网址  -->
            <input class='ui input' type="submit" value="Submit">
            <br>
        </form>
        <a href="/user/login">Back to login page</a>
    </div>
</body>

</html>
*user/templates/user/login.html
<!DOCTYPE html>
<html lang="en">

<head>
    <meta charset="UTF-8">
    <meta http-equiv="X-UA-Compatible" content="IE=edge">
    <meta name="viewport" content="width=device-width, initial-scale=1.0">
    <title>Document</title>
    <!--通过link标签导入semantic ui css样式-->
    <link rel="stylesheet" href="https://cdn.jsdelivr.net/npm/semantic-ui@2.4.2/dist/semantic.min.css" />
    <!-- 通过script导入jquery和semantic ui.js-->
    <script src="https://cdn.bootcdn.net/ajax/libs/jquery/3.6.0/jquery.min.js"></script>
    <script src="https://cdn.jsdelivr.net/npm/semantic-ui@2.4.2/dist/semantic.min.js"></script>

</head>

<body>
    <!-- 登录页面 -->
    <div class="ui blue menu">

    </div>
    <div class="ui center aligned container">
        <form action="/user/login" method="post">
            <div class="ui left icon input">
                <i class="ui user icon"></i>
                <input type="text" name="user" placeholder="User name">
            </div>
            <br>
            <div class="ui left icon input">
                <i class="ui key icon"></i>
                <input type="text" name="passwd" placeholder="Password">
            </div>
            <br>
            <br>
            <!-- 提交按钮是input中的submit type,点击此按钮即可跳转到form中的action网址,该网址需要使用同样的方法去配置路由和试图函数  -->
            <input class='ui input' type="submit" value="Login">
            <br>
        </form>
        <a href="/user/reg">Back to regisiter page</a>
    </div>
</body>

</html>
4.在userapp中创建数据表并迁移数据
在user/models.py中创建数据表
from email.policy import default
from enum import _auto_null, auto
from django.db import models

# Create your models here.


class User(models.Model):
    user = models.CharField('name', max_length=10)  # 用户名称
    passwd = models.CharField('password', max_length=32)  # 用户密码,这里暂时设置明文
    created_time = models.DateTimeField(
        'created_time', auto_now_add=True)  # 创建时间
    updated_time = models.DateTimeField('updated_time', auto_now=True)  # 修改时间

    def __str__(self):
        return 'username' + self.user
- 创建一个超级用户,便于管理数据
python manage.py createsuperuser
- 注册应用中的数据库
user/admin.py
from django.contrib import admin
from .models import User #导入自己创建的数据库
# Register your models here.
admin.site.register(User) #注册数据库
- 迁移数据
python manage.py makemigrations
python manage.py migrate
5.视图函数
user/views.py
from django.http import HttpResponse
from django.shortcuts import render
from .models import *  # 从models中导入所有表格
# Create your views here.

# 注册函数
# 点击/user/reg页面即是注册页面,判断是get/post请求


def reg(request):
    if request.method == 'GET':  # get请求表示访问/user/reg时直接显示注册页面
        # user app下的template/user/reg.html
        return render(request, 'user/reg.html')  # 注意这里的路径
    if request.method == 'POST':  # POST请求时,表明用户已经输入好数据点击提交按钮了,需要将用户的数据存储到数据库中
        # 1.用户不存在,2.密码一致
        user = request.POST['user']  # 拿到用户从前端POST提交的输入,这里的user即是用户在input框中输入的值
        passwd1 = request.POST['passwd1']  # 用户输入的密码1
        passwd2 = request.POST['passwd2']   # 用户输入的密码2
        if passwd1 != passwd2:  # 两次输入密码不一致的时候返回错误提示
            return HttpResponse('Password not consistent!')
        # 按照当前用户输入的名称查询数据库,判断用户是否已经注册过
        old_users = User.objects.filter(user=user)
        if old_users:  # 如果非空则表示在数据库中查到该用户,需要返回提示信息
            return HttpResponse('current user name has been used, please rename')
        # 否则可以向数据库增加这行数据
        User.objects.create(
            user=user, passwd=passwd1,
        )
        # 最后返回成功创建提示以及回到登录页面链接
        return HttpResponse('%s successfully added!\n<br><a href="/user/login">Back to login page</a>' % user)

# 登录页面视图
# 同上面一样,这里暂时不处理POST请求


def login(request):
    if request.method == 'GET':
        return render(request, 'user/login.html')
6.启动服务,查看效果
python manage.py runserver

7.常见错误
invalid literal for int() with base 10: b’09 14:53:49.437358’
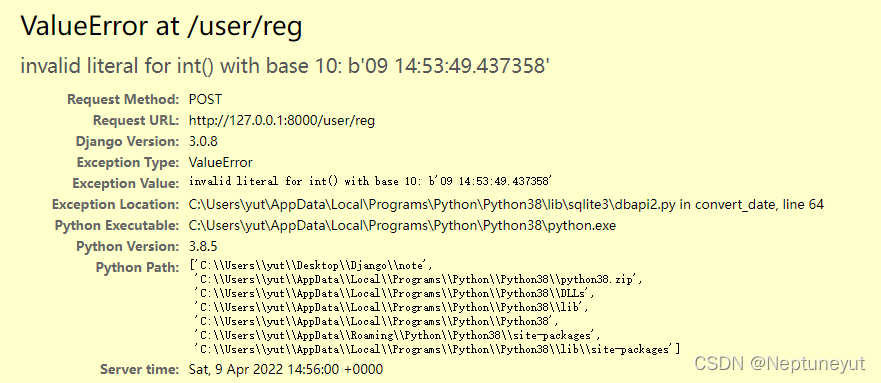
- 错误原因:数据库出现新增字段,之前的数据无法处理新增字段的类型
- 解决办法:将
db.sqlite3文件删除,重新执行迁移命令和超级用户命令


 1374
1374

 被折叠的 条评论
为什么被折叠?
被折叠的 条评论
为什么被折叠?
 到【灌水乐园】发言


