Pytorch快速入门系列---(十五)Pytorch实现图像风格迁移(一)

图像风格迁移是图像纹理迁移研究的进一步拓展,可以理解为针对一张风格图像和一张内容图像,通过将风格图像的风格添加到内容图像上,从而对内容图像进行进一步创作,获得具有不同风格的目标图像。基于深度学习网络的图像风格迁移主要有三种类型,分别为固定风格固定内容的风格迁移、固定风格任意内容的快速风格迁移和任意风格任意内容的极速风格迁移。

图像风格迁移主要任务是将图像的风格迁移到内容图像上,使得内容图像也具有一定的风格。其中风格图像通常可以是艺术家的一些作品,如画家梵高的《向日葵》《星月夜》,日本浮世绘的《神奈川冲浪里》等经典的画作,这些图像通常包含一些经典的艺术家风格。风格图像也可以是经典的具有特色的照片,如夕阳下的照片、城市的夜景等,图像具有鲜明色彩图像。而内容图像则通常来自现实世界,可以是自拍照、户外摄影等。利用图像风格迁移则可以将内容图像处理为想要的风格。

1.固定风格固定内容的普通风格迁移

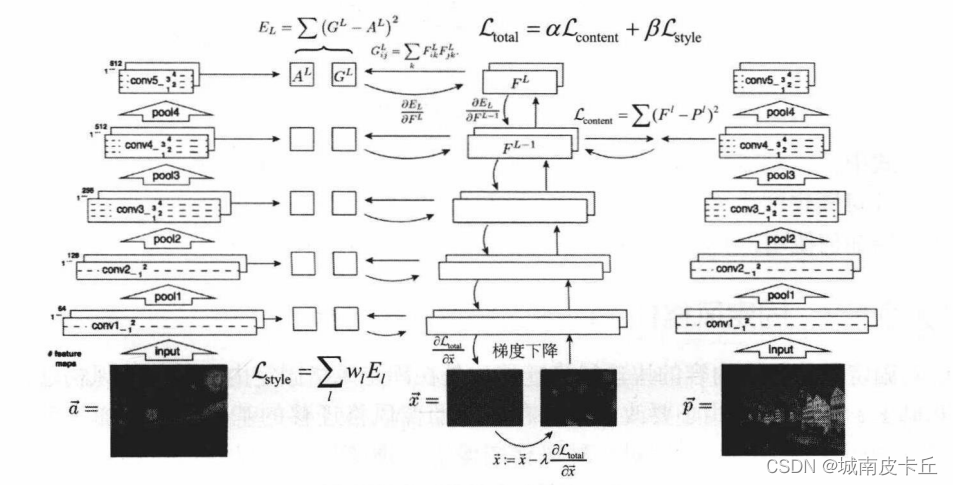
固定风格固定内容的风格迁移方法,也可以称为普通图像风格迁移方法,也是最早的基于深度卷积神经网络的图像风格迁移方法。针对每张固定内容图像和风格图像,普通图像风格迁移方法都需要重新经过长时间的训练,这是最慢的方法,也是最经典的方法。固定风格固定内容的风格迁移方法思路很简单,就是把图片当作可以训练的变量,通过不断优化图片的像素值,降低其与内容图片的内容差异,并降低其与风格图片的风格差异,通过对卷积网络的多次迭代训练,能够生成一幅具有特定风格的图像,并且内容与内容图片的内容一致,生成图片风格与风格图片的风格一致。

  • 3
    点赞
  • 13
    收藏
    觉得还不错? 一键收藏
  • 打赏
    打赏
  • 3
    评论
以下是一个简单的图像风格迁移代码,使用PyTorch实现: ```python import torch import torch.nn as nn import torch.nn.functional as F import torch.optim as optim import torchvision.transforms as transforms import torchvision.models as models import torchvision.datasets as datasets import matplotlib.pyplot as plt # 定义图像处理的转换 transform = transforms.Compose([ transforms.Resize(256), transforms.CenterCrop(224), transforms.ToTensor(), transforms.Normalize(mean=[0.485, 0.456, 0.406], std=[0.229, 0.224, 0.225]) ]) # 加载图像数据集 content_dataset = datasets.ImageFolder('content_images_folder_path', transform=transform) style_dataset = datasets.ImageFolder('style_images_folder_path', transform=transform) # 创建数据加载器 content_loader = torch.utils.data.DataLoader(content_dataset, batch_size=1, shuffle=True) style_loader = torch.utils.data.DataLoader(style_dataset, batch_size=1, shuffle=True) # 加载预训练的VGG19模型 vgg = models.vgg19(pretrained=True).features for param in vgg.parameters(): param.requires_grad_(False) # 将模型移至GPU device = torch.device("cuda" if torch.cuda.is_available() else "cpu") vgg.to(device) # 定义内容损失函数 def content_loss(content_features, target_features): return torch.mean((content_features - target_features)**2) # 定义风格损失函数 def gram_matrix(input): a, b, c, d = input.size() features = input.view(a * b, c * d) G = torch.mm(features, features.t()) return G.div(a * b * c * d) def style_loss(style_features, target_features): style_gram = gram_matrix(style_features) target_gram = gram_matrix(target_features) return torch.mean((style_gram - target_gram)**2) # 定义优化器 optimizer = optim.Adam([target], lr=0.01) # 迭代次数 epochs = 500 # 定义目标图像 target = torch.randn(content_dataset[0][0].shape, requires_grad=True).to(device) # 迭代训练 for epoch in range(epochs): for content, style in zip(content_loader, style_loader): # 将内容图像和风格图像传入模型 content_features = vgg(content[0].to(device)) style_features = vgg(style[0].to(device)) target_features = vgg(target) # 计算损失函数 content_loss_value = content_loss(content_features, target_features) style_loss_value = style_loss(style_features, target_features) loss = content_loss_value + style_loss_value # 反向传播优化 optimizer.zero_grad() loss.backward() optimizer.step() # 打印损失函数和目标图像 if epoch % 100 == 0: print(f"Epoch {epoch}, Content Loss: {content_loss_value.item()}, Style Loss: {style_loss_value.item()}") plt.imshow(target.detach().cpu().squeeze().permute(1, 2, 0).numpy()) plt.show() ``` 需要将代码中的`content_images_folder_path`和`style_images_folder_path`修改为实际的内容图像和风格图像所在的文件夹路径。

“相关推荐”对你有帮助么?

  • 非常没帮助
  • 没帮助
  • 一般
  • 有帮助
  • 非常有帮助
提交
评论 3
添加红包

请填写红包祝福语或标题

红包个数最小为10个

红包金额最低5元

当前余额3.43前往充值 >
需支付:10.00
成就一亿技术人!
领取后你会自动成为博主和红包主的粉丝 规则
hope_wisdom
发出的红包

打赏作者

城南皮卡丘

你的鼓励将是我创作的最大动力

¥1 ¥2 ¥4 ¥6 ¥10 ¥20
扫码支付:¥1
获取中
扫码支付

您的余额不足,请更换扫码支付或充值

打赏作者

实付
使用余额支付
点击重新获取
扫码支付
钱包余额 0

抵扣说明:

1.余额是钱包充值的虚拟货币,按照1:1的比例进行支付金额的抵扣。
2.余额无法直接购买下载,可以购买VIP、付费专栏及课程。

余额充值