


AP3216C
本章是 AP3216C 实验,介绍如何在 Qt 应用上获取正点原子嵌入式 I.MX6ULL Linux 开发
板上的三合一环境传感器的数据。注意,既然是从开发板上获取数据,那么需要使用开发板,
在正点原子 I.MX6ULL ALPHA 开发板上有这个 AP3216C 传感器,MINI 底板没有这个 AP3216C
传 感 器 。 不 过 本 章 实 验 程 序 在 没 有 传 感 器 的 情 况 下 也 是 可 以 运 行 的 , 可 以 在
Window/Ubuntu/ARM Linux 上运行看看界面效果,也可以直接看第 22.3 小节的程序运行后的效
果图。获取数据的原理和第十五章 LED 章节原理一样都是从开发板获取数据,不同的是第十五
章使用 QFile 这个类直接访问文件,本例介绍另外一种方法,就是使用 C 语言的 open()方法访
问数据。本章没有使用很多新的知识,笔者于是花时间设计一个新界面,将界面拆分成一段段
小知识。让读者明白要设计这么一个界面需要经过哪些步骤。
更多 AP3216C 的信息请看【正点原子】I.MX6U 用户快速体验 V1.x.pdf 的第 3.20 小节。
资源简介
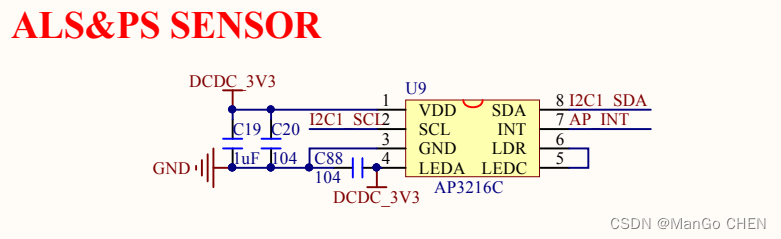
在正点原子 I.MX6ULL ALPHA 开发板底板上有一个三合一环境传感器,也就是在拔码开
关旁边的传感器,采用的是 I2C 接口。(注意:I.MX6ULL MINI 开发板没有这个传感器)。下图
为 I.MX6ULL ALPHA 开发板的三合一环境传感器原理图。
开发板实物图位置。

应用实例
在正点原子 I.MX6U 出厂系统里,已经编写了 AP3216C 的驱动,并注册成了杂项设备,可
以在/sys/class/misc 下找到 ap3216c 节点。我们直接用 Qt 通过访问节点文件的方式来获取
AP3216C 的传感器数据。读取数据流程解释:数据由驱动层传到 Linux 应用层,Qt 应用程序从
应用层读取传感器数据。
项目简介:Qt 读取三合一环境传感器的数据。
例 08_ii2c_ap3216c_sensor,读取三合一环境传感器的数据(难度:一般)。项目路径为
Qt/3/08_ii2c_ap3216c_sensor。
项目文件 08_ii2c_ap3216c_sensor.pro 文件如下。
1 QT += core gui

2

3 greaterThan(QT_MAJOR_VERSION, 4): QT += widgets

4

5 CONFIG += c++11

6

7 # The following define makes your compiler emit warnings if you use

8 # any Qt feature that has been marked deprecated (the exact warnings
9 # depend on your compiler). Please consult the documentation of the

10 # deprecated API in order to know how to port your code away from it.

11 DEFINES += QT_DEPRECATED_WARNINGS

12

13 # You can also make your code fail to compile if it uses deprecated APIs.

14 # In order to do so, uncomment the following line.

15 # You can also select to disable deprecated APIs only up to a certain
version of Qt.

16 #DEFINES += QT_DISABLE_DEPRECATED_BEFORE=0x060000 # disables all the
APIs deprecated before Qt 6.0.0

17

18 SOURCES += \

19 ap3216c.cpp \

20 arcgraph.cpp \

21 glowtext.cpp \

22 main.cpp \

23 mainwindow.cpp

24

25 HEADERS += \

26 ap3216c.h \

27 arcgraph.h \

28 glowtext.h \

29 mainwindow.h

30

31 # Default rules for deployment.

32 qnx: target.path = /tmp/$${TARGET}/bin

33 else: unix:!android: target.path = /opt/$${TARGET}/bin

34 !isEmpty(target.path): INSTALLS += target

35

36 include(headview/headview.pri)
从上面的项目 pro 文件可以看出,本例使用的文件比较多。
第 36 行,使用到 pri 文件,pri 文件的语法和 pro 文件相同,通常它是由 pro 文件改写得到
的,该类型文件类似于 C++中的头文件,可以在 pro 文件中使用 include 将其包含进来,相当
于文件引入,当一个项目文件非常多时,或有些项目文件需要重复使用,为了方便管理就可以
使用此方法。
项 目 里 文 件 很 多 , 我 们 一 个 一 个 分 析 , 最 终 我 们 只 需 关 注 “ mainwindow.h ” 和
“mainwindow.cpp”文件,程序的主要流程都在这两个文件里。分析完了这两个文件再到其他
文件。
在源文件“mainwindow.h”的代码如下。
 /******************************************************************
 Copyright © Deng Zhimao Co., Ltd. 1990-2021. All rights reserved.
 * @projectName 08_spi_sensor
 * * @brief mainwindow.h
 * @author Deng Zhimao
 * @email 1252699831@qq.com
 * @net www.openedv.com
 * @date 2021-05-21
 *******************************************************************/

1 #ifndef MAINWINDOW_H

2 #define MAINWINDOW_H

3

4 #include <QMainWindow>

5 #include <QLabel>

6 #include <QVBoxLayout>

7 #include <QHBoxLayout>

8 #include "arcgraph.h"

9 #include "glowtext.h"

10 #include "ap3216c.h"

11 #include "headview/headview.h"

12 class ArcGraph;

13 class GlowText;

14 class Ap3216c;

15 class HeadView;

16

17 class MainWindow : public QMainWindow

18 {

19 Q_OBJECT

20

21 public:

22 MainWindow(QWidget *parent = nullptr);

23 ~MainWindow();

24

25 private:

26 ArcGraph *arcGraph[3];

27 GlowText *glowText[3];

28

29 QVBoxLayout *vBoxLayout;

30 QHBoxLayout *hBoxLayout[5];

31

32 GlowText *test;

33

34 /* 容器作用,用于布局 */

35 QWidget *widget[6];

36

37 /* 标签文本 */

38 QLabel *label[3];

39

40 /* i2C 传感器类 */

41 Ap3216c *ap3216c;

42

43 /* 视图表头 */

44 HeadView *headView;

45

46 private slots:

47 /* 获取 ap3216 传感器数据 */

48 void getAp3216cData();

49 };

50 #endif // MAINWINDOW_H
在“mainwindow.h”的头文件里,我们看到使用了 ArcGraph、GlowText、Ap3216c 和 HeadView
自定义的类。它们是蓝色科技弧形视图、发光文本、Ap3216c 类和视图表头。不同的类分开来
写这样可以很方便地管理我们的项目。这些类在后面已经贴上代码和图加上一些解释方便给读
者查阅。“mainwindow.h”头文件的解释就到这里了。
“mainwindow.cpp”文件主要承担着布局及数据显示的功能。
 /******************************************************************
 Copyright © Deng Zhimao Co., Ltd. 1990-2021. All rights reserved.
 * @projectName 08_spi_sensor
 * @brief mainwindow.cpp
 * @author Deng Zhimao
 * @email 1252699831@qq.com
 * @net www.openedv.com
 * @date 2021-05-21
 *******************************************************************/

1 #include "mainwindow.h"

2 #include <QDebug>

3 MainWindow::MainWindow(QWidget *parent)

4 : QMainWindow(parent)

5 {

6 this->resize(800, 480);

7 this->setStyleSheet("background:#011753");

8

9 for (int i = 0; i < 6; i++)

10 widget[i] = new QWidget();

11

12 for (int i = 0; i < 3; i++)

13 arcGraph[i] = new ArcGraph();

14

15 for (int i = 0; i < 5; i++)

16 hBoxLayout[i] = new QHBoxLayout();

17

18 headView = new HeadView();

19

20 QFont font;

21 font.setPixelSize(18);

22

23 QPalette pal;

24 pal.setColor(QPalette::WindowText, Qt::white);

25

26 QStringList list;

27 list<<"环境光强度:"<<"接近距离:"<<"红外强度:";

28 for (int i = 0; i < 3; i++) {

29 label[i] = new QLabel();

30 glowText[i] = new GlowText();

31 glowText[i]->setMinimumWidth(30);

32 label[i]->setText(list[i]);

33 label[i]->setFont(font);

34 label[i]->setPalette(pal);

35 label[i]->adjustSize();

36 }

37

38 vBoxLayout = new QVBoxLayout();

39

40 /* 垂直布局,将主窗体为上下两部分,方便布局 */

41 vBoxLayout->addWidget(headView);

42 vBoxLayout->addWidget(widget[1]);

43 vBoxLayout->addWidget(widget[2]);

44 widget[0]->setLayout(vBoxLayout);

45

46 /* 主布局设置为 widget[0] */

47 setCentralWidget(widget[0]);

48

49 /* 设置 widget[1]的高度,不会随界面的大小而变化 */

50 widget[2]->setFixedHeight(150);

51

52 /* 三个蓝色科技感弧形图布局,采用水平布局 */

53 hBoxLayout[0]->addWidget(arcGraph[0]);

54 hBoxLayout[0]->addWidget(arcGraph[1]);

55 hBoxLayout[0]->addWidget(arcGraph[2]);

56 widget[1]->setLayout(hBoxLayout[0]);

57

58 /* 数据文字容器水平布局, */

59 hBoxLayout[1]->addWidget(widget[3]);

60 hBoxLayout[1]->addWidget(widget[4]);

61 hBoxLayout[1]->addWidget(widget[5]);

62 hBoxLayout[1]->setContentsMargins(0, 40, 0, 0);

63

64 widget[2]->setLayout(hBoxLayout[1]);

65

66 /* als 布局 */

67 hBoxLayout[2]->addWidget(label[0]);

68 hBoxLayout[2]->addWidget(glowText[0]);

69 hBoxLayout[2]->setAlignment(Qt::AlignTop | Qt::AlignHCenter);

70 widget[3]->setLayout(hBoxLayout[2]);

71

72 /* ps 布局 */

73 hBoxLayout[3]->addWidget(label[1]);

74 hBoxLayout[3]->addWidget(glowText[1]);

75 hBoxLayout[3]->setAlignment(Qt::AlignTop | Qt::AlignHCenter);

76 widget[4]->setLayout(hBoxLayout[3]);

77

78 /* ir 布局 */

79 hBoxLayout[4]->addWidget(label[2]);

80 hBoxLayout[4]->addWidget(glowText[2]);

81 hBoxLayout[4]->setAlignment(Qt::AlignTop | Qt::AlignHCenter);

82 widget[5]->setLayout(hBoxLayout[4]);

83

84 ap3216c = new Ap3216c(this);

85 /* 只能在开发板上开启获取数据,Ubuntu 上是没有 ap3216c 传感器的 */

86 #if __arm__

87 ap3216c->setCapture(true);

88 #endif

89

90 connect(ap3216c, SIGNAL(ap3216cDataChanged()),

91 this, SLOT(getAp3216cData()));

92 }

93

94 MainWindow::~MainWindow()

95 {

96 }

97

98 void MainWindow::getAp3216cData()

99 {

100 static QString als = ap3216c->alsData();

101 if (als != ap3216c->alsData()) {

102 als = ap3216c->alsData();

103 arcGraph[0]->setangleLength(als.toUInt() * 360 / 65535);

104 }

105

106 static QString ps = ap3216c->psData();

107 if (ps != ap3216c->psData()) {

108 ps = ap3216c->psData();

109 arcGraph[1]->setangleLength(ps.toUInt() * 360 / 1023);

110 }

111

112 static QString ir = ap3216c->irData();

113 if (ir != ap3216c->irData()) {

114 ir = ap3216c->irData();

115 arcGraph[2]->setangleLength(ir.toUInt() * 360 / 1023);

116 }

117

118 glowText[0]->setTextData(als);

119 glowText[1]->setTextData(ps);

120 glowText[2]->setTextData(ir);

121 }
第 98 行之前都是一些布局及变量声明使用的内容。
第 98~121 行,若收到 Ap3216c 类发送过来的信号,则显示数据。显示在发数据在 ArcGraph
和 GlowText 类上。其中 ArcGraph 是一个弧形视图,通过 setangleLength()方法,设置传入弧的
角度大小,就可以画出一段弧,用图形的方式显示给用户看,比数字更直观。其中 65535 和 1023
数值的由来是环境光传感器具有 16 位的分辨率,接近传感器和红外传感器具有 10 位分辨率。
也就是 2 的 16 次方减一,与 2 的 10 次方减一。
主要的流程基本介绍完,我们开始分步介绍 ArcGraph、GlowText、Ap3216c 和 HeadView
类。
HeadView 类主要功能是显示如下的一个表头。可以很方便地移植到其他项目里用。下图的
背景颜色可忽略。实际这个类的背景颜色是透明的。

“headview.h”头文件内容如下。文件比较简单,不再解释。
 /******************************************************************
 Copyright © Deng Zhimao Co., Ltd. 1990-2021. All rights reserved.
 * @projectName headview
 * @brief headview.h
 * @author Deng Zhimao
 * @email 1252699831@qq.com
 * @net www.openedv.com
 * @date 2021-05-22
 *******************************************************************/

1 #ifndef HEADVIEW_H

2 #define HEADVIEW_H

3

4 #include <QWidget>

5 #include <QLabel>

6 #include <QVBoxLayout>

7 #include <QHBoxLayout>

8

9

10 class HeadView : public QWidget

11 {

12 Q_OBJECT

13

14 public:

15 HeadView(QWidget *parent = nullptr);

16 ~HeadView();

17

18 private:

19 QWidget *widget;

20 QLabel *textLabel;

21 QWidget *iconWidget;

22 QWidget *lineWidget;

23

24 QHBoxLayout *hBoxLayout;

25 QVBoxLayout *vBoxLayout;

26 };

27 #endif // HEADVIEW_H
“headview.cpp”源文件内容如下。
 /******************************************************************
 Copyright © Deng Zhimao Co., Ltd. 1990-2021. All rights reserved.
 * @projectName headview
 * @brief headview.cpp
 * @author Deng Zhimao
 * @email 1252699831@qq.com
 * @net www.openedv.com
 * @date 2021-05-22
 *******************************************************************/

1 #include "headview.h"

2

3 HeadView::HeadView(QWidget *parent)

4 : QWidget(parent)

5 {

6 this->setAttribute(Qt::WA_TranslucentBackground, true);

7 widget = new QWidget();

8

9 iconWidget = new QWidget(this);

10 iconWidget->setFixedSize(48, 48);

11
iconWidget->setStyleSheet("background:url(:/images/dataviewicon.png)");

12

13 textLabel = new QLabel(this);

14 textLabel->setFixedSize(200, 48);

15 textLabel->setText("数据可视化情况");

16 textLabel->setStyleSheet("QLabel {font-size: 20px; color: white}");

17

18 lineWidget = new QWidget(this);

19 lineWidget->setFixedHeight(2);

20 lineWidget->setStyleSheet("QWidget {background: #eeeeeeee}");

21

22 vBoxLayout = new QVBoxLayout();

23 vBoxLayout->addWidget(widget);

24 vBoxLayout->addWidget(lineWidget);

25 vBoxLayout->setContentsMargins(0, 0, 0, 0);

26

27 hBoxLayout = new QHBoxLayout();

28 hBoxLayout->addWidget(iconWidget);

29 hBoxLayout->addWidget(textLabel);

30 hBoxLayout->setContentsMargins(0, 0, 0, 0);

31 hBoxLayout->setAlignment(Qt::AlignLeft);

32 widget->setLayout(hBoxLayout);

33

34 this->setLayout(vBoxLayout);

35 this->adjustSize();

36 this->setMaximumHeight(48);

37 }

38

39 HeadView::~HeadView()

40 {

41 }
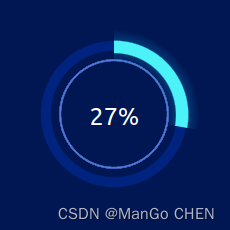
ArcGraph 类是一个蓝色科技感弧形视图,这里运用了 QPainter 为画图,在第九章画图章节
我们已经了解过 QPainter 的内容了。不详细解释。ArcGraph 类实现的效果如下。(注背景实际
上是透明的)。
“arcgraph.h”头文件内容如下。
 /******************************************************************
 Copyright © Deng Zhimao Co., Ltd. 1990-2021. All rights reserved.
 * @projectName 08_spi_sensor
 * @brief arcgraph.h
 * @author Deng Zhimao
 * @email 1252699831@qq.com
 * @net www.openedv.com
 * @date 2021-05-21
 *******************************************************************/

1 #ifndef ARCGRAPH_H

2 #define ARCGRAPH_H

3

4 #include <QWidget>

5 #include <QPainter>

6 #include <QPaintEvent>

7

8 /* 蓝色科技感弧形视图 */

9 class ArcGraph : public QWidget

10 {

11 Q_OBJECT

12

13 public:

14 ArcGraph(QWidget *parent = nullptr);

15 ~ArcGraph();

16

17 void setstartAngle(int);

18 void setangleLength(int);

19

20 private:

21 void paintEvent(QPaintEvent *event);

22 int startAngle;

23 int angleLength;

24 };

25 #endif // ARCGRAPH_H
“arcgraph.cpp”源文件内容如下。
 /******************************************************************
 Copyright © Deng Zhimao Co., Ltd. 1990-2021. All rights reserved.
 * @projectName 08_ii2_ap3216c_sensor
 * @brief arcgraph.cpp
 * @author Deng Zhimao
 * @email 1252699831@qq.com
 * @net www.openedv.com
 * @date 2021-05-22
 *******************************************************************/

1 #include "arcgraph.h"

2

3 ArcGraph::ArcGraph(QWidget *parent)

4 : QWidget(parent),

5 startAngle(90),

6 angleLength(100)

7 {

8 this->setMinimumSize(100, 100);

9 setAttribute(Qt::WA_TranslucentBackground, true);

10 }

11

12 ArcGraph::~ArcGraph()

13 {

14 }

15

16 void ArcGraph::setstartAngle(int angle)

17 {

18 startAngle = angle;

19 this->repaint();

20 }

21

22 void ArcGraph::setangleLength(int length)

23 {

24 angleLength = length;

25 this->repaint();

26 }

27

28 void ArcGraph::paintEvent(QPaintEvent *event)

29 {

30 QPainter painter(this);

31

32 /* 保存状态 */

33 painter.save();

34

35 /* 设置抗锯齿 */

36 painter.setRenderHints(QPainter::Antialiasing, true);

37

38 /* 最外层的圆 */

39 QRect drawRect = event->rect();

40 QRadialGradient gradient1(drawRect.center(),

41 drawRect.width() / 2,

42 drawRect.center());

43 gradient1.setColorAt(0, Qt::transparent);

44 gradient1.setColorAt(0.5, Qt::transparent);

45 gradient1.setColorAt(0.51, QColor("#00237f"));

46 gradient1.setColorAt(0.58, QColor("#00237f"));

47 gradient1.setColorAt(0.59, Qt::transparent);

48 gradient1.setColorAt(1, Qt::transparent);

49 painter.setBrush(gradient1);

50 painter.setPen(Qt::NoPen);

51 painter.drawEllipse(drawRect);

52

53 /* 里层的圆 */

54 QRadialGradient gradient2(drawRect.center(),

55 drawRect.width() / 2,

56 drawRect.center());

57 gradient2.setColorAt(0, Qt::transparent);

58 gradient2.setColorAt(0.420, Qt::transparent);

59 gradient2.setColorAt(0.421, QColor("#885881e3"));

60 gradient2.setColorAt(0.430, QColor("#5881e3"));

61 gradient2.setColorAt(0.440, QColor("#885881e3"));

62 gradient2.setColorAt(0.441, Qt::transparent);

63 gradient2.setColorAt(1, Qt::transparent);

64 painter.setBrush(gradient2);

65 painter.setPen(Qt::NoPen);

66 painter.drawEllipse(drawRect);

67

68 /* 数字 */

69 QFont font;

70 font.setPixelSize(drawRect.width() / 10);

71 painter.setPen(Qt::white);

72 painter.setFont(font);

73 painter.drawText(drawRect, Qt::AlignCenter,

74 QString::number(angleLength * 100 / 360) + "%");

75

76 /* 发光背景圆 */

77 painter.translate(drawRect.width() >> 1, drawRect.height() >> 1);

78 int radius = drawRect.width() / 2;

79 /* radius<< 1(左移 1 位)相当于 radius*2 */

80 QRectF rect(-radius, -radius, radius << 1, radius << 1);

81

82 QRadialGradient gradient3(0, 0, radius);

83 gradient3.setColorAt(0, Qt::transparent);

84 gradient3.setColorAt(0.42, Qt::transparent);

85 gradient3.setColorAt(0.51, QColor("#500194d3"));

86 gradient3.setColorAt(0.55, QColor("#22c1f3f9"));

87 gradient3.setColorAt(0.58, QColor("#500194d3"));

88 gradient3.setColorAt(0.68, Qt::transparent);

89 gradient3.setColorAt(1.0, Qt::transparent);

90 painter.setBrush(gradient3);

91 QPainterPath path1;

92 path1.arcTo(rect, startAngle, -angleLength);

93 painter.setPen(Qt::NoPen);

94 painter.drawPath(path1);

95

96 /* 发光圆/弧 */

97 QRadialGradient gradient4(0, 0, radius);

98 gradient4.setColorAt(0, Qt::transparent);

99 gradient4.setColorAt(0.49, Qt::transparent);

100 gradient4.setColorAt(0.50, QColor("#4bf3f9"));

101 gradient4.setColorAt(0.59, QColor("#4bf3f9"));

102 gradient4.setColorAt(0.60, Qt::transparent);

103 gradient4.setColorAt(1.0, Qt::transparent);

104 painter.setBrush(gradient4);

105 QPainterPath path2;

106 path2.arcTo(rect, startAngle, -angleLength);

107 painter.setPen(Qt::NoPen);

108 painter.drawPath(path2);

109

110 /* 恢复状态 */

111 painter.restore();

112

113 /* 设置事件对象的 accept 标志 */

114 event->accept();

115 }
GlowText 类是发光文字效果类,模拟出文字发光效果。可以看到下图的数字 100 微微发着
青色的光,(文档可能效果不是很明显)在 Qt C++里想要实现这种效果需要自己实现。通过重
写类或者自己设计程序实现。GlowText 是笔者设计发光效果的类。

“glowtext.h”头文件内容如下。
 /******************************************************************
 Copyright © Deng Zhimao Co., Ltd. 1990-2021. All rights reserved.
 * @projectName GlowText
 * @brief glowtext.h
 * @author Deng Zhimao
 * @email 1252699831@qq.com
 * @net www.openedv.com
 * @date 2021-05-21
 *******************************************************************/

1 #ifndef GLOWTEXT_H

2 #define GLOWTEXT_H

3

4 #include <QWidget>

5 #include <QLabel>

6

7 class GlowText : public QWidget

8 {

9 Q_OBJECT

10

11 public:

12 GlowText(QWidget *parent = nullptr);

13 ~GlowText();

14

15 void setTextColor(QColor);

16 void setFontSize(int);

17 void setTextData(QString);

18

19 private:

20 /* 文本背景 */

21 QLabel *textLabelbg;

22

23 /* 文本标签 */

24 QLabel *textLabel;

25

26 /* 字体颜色 */

27 QColor textColor;

28

29 /* 文本字体大小 */

30 int fontSize;

31

32 /* 文本内容 */

33 QString textData;

34 };

35 #endif // GLOWTEXT_H
“glowtext.cpp”源文件内容如下。
 /******************************************************************
 Copyright © Deng Zhimao Co., Ltd. 1990-2021. All rights reserved.
 * @projectName GlowText
 * @brief glowtext.cpp
 * @author Deng Zhimao
 * @email 1252699831@qq.com
 * @net www.openedv.com
 * @date 2021-05-21
 *******************************************************************/

1 #include "glowtext.h"

2 #include <QDebug>

3 #include <QGraphicsBlurEffect>

4

5 GlowText::GlowText(QWidget *parent)

6 : QWidget(parent),

7 textColor("#4bf3f9"),

8 fontSize(18),

9 textData("100")

10 {

11 QFont font;

12 font.setPixelSize(fontSize);

13 QPalette pal;

14 pal.setColor(QPalette::WindowText, textColor);

15 textLabelbg = new QLabel(this);

16 textLabelbg->setAttribute(Qt::WA_TranslucentBackground, true);

17 textLabelbg->setPalette(pal);

18 textLabelbg->setFont(font);

19 textLabelbg->setText(textData);

20 textLabelbg->setAlignment(Qt::AlignCenter);

21

22 /* 设置模糊特效 */
23 QGraphicsBlurEffect *ef = new QGraphicsBlurEffect();

24 ef->setBlurRadius(25);

25 ef->setBlurHints(QGraphicsBlurEffect::QualityHint);

26 textLabelbg->setGraphicsEffect(ef);

27

28 textLabel = new QLabel(this);

29 textLabel->setAttribute(Qt::WA_TranslucentBackground, true);

30 textLabel->setPalette(pal);

31 textLabel->setFont(font);

32 textLabel->setText(textData);

33 textLabel->setAlignment(Qt::AlignCenter);

34 textLabelbg->adjustSize();

35 textLabel->adjustSize();

36

37 this->resize(textLabel->size().width() + 10,

38 textLabel->size().height() + 10);

39 /* 背景透明化 */

40 this->setAttribute(Qt::WA_TranslucentBackground, true);

41 }

42

43 GlowText::~GlowText()

44 {

45 }

46

47 void GlowText::setTextColor(QColor color)

48 {

49 QPalette pal;

50 pal.setColor(QPalette::WindowText, color);

51 textLabelbg->setPalette(pal);

52 textLabel->setPalette(pal);

53 }

54

55 void GlowText::setFontSize(int size)

56 {

57 QFont font;

58 font.setPixelSize(size);

59

60 textLabelbg->setFont(font);

61 textLabel->setFont(font);

62

63 textLabel->adjustSize();

64 textLabelbg->adjustSize();

65 this->resize(textLabel->size().width() + 10,

66 textLabel->size().height() + 10);

67 }

68

69 void GlowText::setTextData(QString text)

70 {

71 textLabelbg->setText(text);

72 textLabel->setText(text);

73

74 textLabel->adjustSize();

75 textLabelbg->adjustSize();

76 this->resize(textLabel->size().width() + 10,

77 textLabel->size().height() + 10);

78 }
Ap3216c 类的作用就是从驱动层提供给 Linux 应用层的接口获取数据。
“ap3216c.h”头文件内容如下。
 /******************************************************************
 Copyright © Deng Zhimao Co., Ltd. 1990-2021. All rights reserved.
 * @projectName sensor
 * @brief ap3216c.h
 * @author Deng Zhimao
 * @email 1252699831@qq.com
 * @net www.openedv.com
 * @date 2020-07-10
 *******************************************************************/

1 #ifndef AP3216C_H

2 #define AP3216C_H

3

4 #include <QObject>

5 #include <QTimer>

6

7 class Ap3216c : public QObject

8 {

9 Q_OBJECT

10

11 public:

12 explicit Ap3216c(QObject *parent = 0);

13 ~Ap3216c();

14

15 Q_INVOKABLE void setCapture(bool str);

16

17 QString alsData();

18 QString psData();

19 QString irData();

20

21 private:

22 QTimer *timer;

23 QString alsdata;

24 QString psdata;

25 QString irdata;

26

27 QString readAlsData();

28 QString readPsData();

29 QString readIrData();

30

31 Q_PROPERTY(QString alsData READ alsData NOTIFY ap3216cDataChanged)

32 Q_PROPERTY(QString psData READ psData NOTIFY ap3216cDataChanged)

33 Q_PROPERTY(QString irData READ irData NOTIFY ap3216cDataChanged)

34

35 public slots:

36 void timer_timeout();

37

38 signals:

39 void ap3216cDataChanged();

40

41 };

42

43 #endif // AP3216C_H
“ap3216c.cpp”源文件内容如下。
 /******************************************************************
 Copyright © Deng Zhimao Co., Ltd. 1990-2021. All rights reserved.
 * @projectName sensor
 * @brief ap3216c.cpp
 * @author Deng Zhimao
 * @email 1252699831@qq.com
 * @net www.openedv.com
 * @date 2020-07-10
 *******************************************************************/

1 #include "ap3216c.h"

2 #include <stdio.h>

3 #include <string.h>

4 #include <sys/types.h>

5 #include <sys/stat.h>

6 #include <fcntl.h>

7 #include <unistd.h>

8 #include <QDebug>

9

10 Ap3216c::Ap3216c(QObject *parent) : QObject (parent)

11 {

12 timer = new QTimer();

13 connect(timer, SIGNAL(timeout()), this, SLOT(timer_timeout()));

14 }

15

16 Ap3216c::~Ap3216c()

17 {

18

19 }

20

21 void Ap3216c::timer_timeout()

22 {

23 alsdata = readAlsData();

24 psdata = readPsData();

25 irdata = readIrData();

26 emit ap3216cDataChanged();

27 }

28

29 QString Ap3216c::readIrData()

30 {

31 char const *filename = "/sys/class/misc/ap3216c/ir";

32 int err = 0;

33 int fd;

34 char buf[10];

35

36 fd = open(filename, O_RDONLY);

37 if(fd < 0) {

38 close(fd);

39 return "open file error!";

40 }

41

42 err = read(fd, buf, sizeof(buf));

43 if (err < 0) {

44 close(fd);

45 return "read data error!";

46 }

47 close(fd);

48

49 QString irValue = buf;

50 QStringList list = irValue.split("\n");

51 return list[0];

52 }

53

54 QString Ap3216c::readPsData()

55 {

56 char const *filename = "/sys/class/misc/ap3216c/ps";


57 int err = 0;

58 int fd;

59 char buf[10];

60

61 fd = open(filename, O_RDONLY);

62 if(fd < 0) {

63 close(fd);

64 return "open file error!";

65 }

66

67 err = read(fd, buf, sizeof(buf));

68 if (err < 0) {

69 close(fd);

70 return "read data error!";

71 }

72 close(fd);

73

74 QString psValue = buf;

75 QStringList list = psValue.split("\n");

76 return list[0];

77 }

78

79 QString Ap3216c::readAlsData()

80 {

81 char const *filename = "/sys/class/misc/ap3216c/als";

82 int err = 0;

83 int fd;

84 char buf[10];

85

86 fd = open(filename, O_RDONLY);

87 if(fd < 0) {

88 close(fd);

89 return "open file error!";

90 }

91

92 err = read(fd, buf, sizeof(buf));

93 if (err < 0) {

94 close(fd);

95 return "read data error!";

96 }

97 close(fd);

98

99 QString alsValue = buf;

100 QStringList list = alsValue.split("\n");

101 return list[0];

102 }

103

104 QString Ap3216c::alsData()

105 {

106 return alsdata;

107 }

108

109 QString Ap3216c::irData()

110 {

111 return irdata;

112 }

113

114 QString Ap3216c::psData()

115 {

116 return psdata;

117 }

118

119 void Ap3216c::setCapture(bool str)

120 {

121 if(str)

122 timer->start(500);

123 else

124 timer->stop();

125 }
上面通过 C 语言的接口访问节点文件的方法来获取数据。需要包含 C 语言的头文件,如第
1~7 行。
总结,从上面来看,设计一个界面的代码往往比实现这个读取数据的功能复杂多。所以还
是印证了那句笔者说的话,“美化界面比功能实现要耗时”!
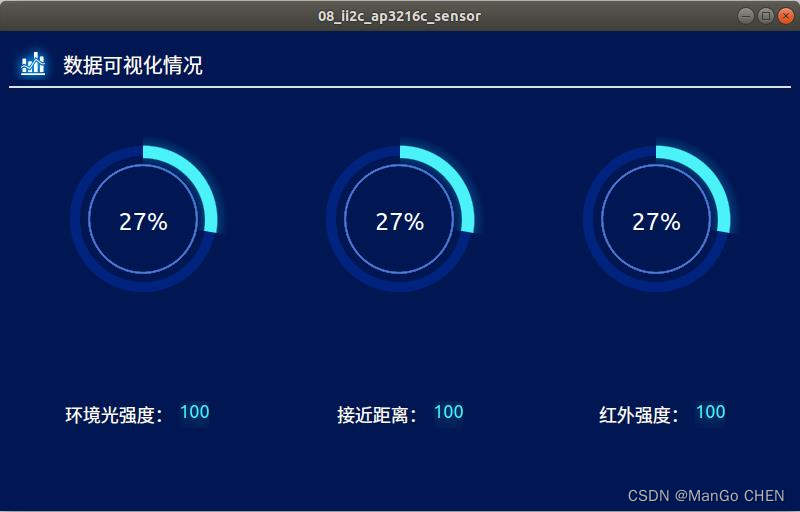
程序运行效果
Ubuntu 运行效果图如下(下图为初始化数据)。要想获取传感器数据必须使用正点原子
I.MX6ULL APLPA 开发板,交叉编译到开发板上运行!
在正点原子 I.MX6ULL APLPA 开发板上运行的情况时,当我们用手接近三合一环境传感器
时,界面上的数据会发生变化,数据默认设置为 500ms 采集一次。


 9222
9222


 被折叠的 条评论
为什么被折叠?
被折叠的 条评论
为什么被折叠?
 到【灌水乐园】发言


