


1.下载8.x版本的mysql
MySQL :: Download MySQL Community Server (Archived Versions)
2.安装linux
我安装的是Rocky Linux8.6

3.设置ip地址,方便远程连接
使用nmcli或者nmtui设置或修改ip地址
4.使用远程连接工具MobaXterm操作:

(1)将mysql8版本的压缩包上传到mybaxterm
(2)解压缩
tar -Jxvf mysql-8.0.25-linux-glibc2.12-x86_64.tar.xz
(3)移动压缩后的目录到/usr/local/,并改名为mysql
注意:修改权限mysql:mysql
mv mysql-8.0.25-linux-glibc2.12-x86_64 /usr/local/mysql
useradd mysql -s /sbin/nologin
chown -R mysql.mysql /usr/local/mysql
(4)cd /usr/local/mysql
创建配置文件/etc/my.cnf
[root@localhost bin]# vim /etc/my.cnf
[mysqld]
log-error=/usr/local/mysql/log/mysql.err
basedir=/usr/local/mysql
datadir=/usr/local/mysql/data
socket=/tmp/mysql.sock
character-set-server=UTF8MB4
创建必要的文件目录:
mkdir /usr/local/mysql/{binlog,data,log,tmpdir,conf} -p
利用配置文件初始化mysql
[root@localhost mysql]# bin/mysqld \
--defaults-file=/etc/my.cnf \
--user=mysql \
--initialize
初始化数据库,它会给出一个临时密码,记住它,后面要用,如果找不到了,需要走忘记密码流程

(5)启动mysql
[root@localhost mysql]# support-files/mysql.server start

如果是开启中的,启动需要重启mysql
[root@localhost mysql]# support-files/mysql.server restart

(6)处理报错
当执行bin/mysql -u root -p命令时,出现以下报错:
mysql: error while loading shared libraries: libtinfo.so.5: cannot open shared object file: No such file or directory

解决办法:
[root@localhost mysql]# find  / -name 'libtinfo.*'
/usr/lib64/libtinfo.so.6
/usr/lib64/libtinfo.so.6.1

[root@localhost mysql]# ln -s /usr/lib64/libtinfo.so.6.1 /usr/lib64/libtinfo.so.5
(7)如果想要service控制它的开启和关闭
[root@localhost mysql]# ls
bin  data  docs  include  lib  LICENSE  man  README  share  support-files
[root@localhost mysql]# cp -a ./support-files/mysql.server /etc/init.d/mysql
#chkconfig --add mysql 这条命令的作用是将 mysql 服务添加到系统的服务管理列表中,使得系统能够通过 chkconfig 工具来管理该服务的启动级别。
[root@localhost mysql]# chkconfig --add mysql
[root@localhost mysql]# service mysql restart
Shutting down MySQL.. SUCCESS!
Starting MySQL. SUCCESS!
[root@localhost mysql]# service mysql status
 SUCCESS! MySQL running (26540)
[root@localhost mysql]# ln -s /usr/local/mysql/bin/mysql /usr/bin
(8)使用临时密码登录验证mysql
[root@localhost mysql]# mysql -uroot -p"is/BIErGB051"
mysql: [Warning] Using a password on the command line interface can be insecure.
Welcome to the MySQL monitor.  Commands end with ; or \g.
Your MySQL connection id is 11
Server version: 8.0.25

Copyright (c) 2000, 2021, Oracle and/or its affiliates.

Oracle is a registered trademark of Oracle Corporation and/or its
affiliates. Other names may be trademarks of their respective
owners.

Type 'help;' or '\h' for help. Type '\c' to clear the current input statement.

mysql>
(9)修改密码
mysql> alter user root@"localhost" identified by "123456"(10)exit退出,使用新密码登录
[root@localhost mysql]# mysql -uroot -p123456
mysql: [Warning] Using a password on the command line interface can be insecure.
Welcome to the MySQL monitor.  Commands end with ; or \g.
Your MySQL connection id is 12
Server version: 8.0.25 MySQL Community Server - GPL

Copyright (c) 2000, 2021, Oracle and/or its affiliates.

Oracle is a registered trademark of Oracle Corporation and/or its
affiliates. Other names may be trademarks of their respective
owners.

Type 'help;' or '\h' for help. Type '\c' to clear the current input statement.

mysql>
(11)使用systemctl控制mysql
• systemd一个更高效的系统&服务管理器
– 开机服务并行启动,各系统服务间的精确依赖
– 服务目录:/usr/lib/systemd/system/
– 主要管理工具:systemctl
systemd方式:
注意: 为了和yum下载的情况一致,设置文件名称为mysqld.service,使用systemctl命令可以省略".service后缀"
systemctl start mysqld #启动mysqld
systemctl stop mysqld #停止mysqld
systemd管理方式思路:
用户--systemctl--》systemd--服务启动配置文件--》mysqld启动
•管理员服务文件默认路径
–/usr/lib/systemd/system/
•重新加载服务启动配置文件(每次修改mysqld.service文件都要执行这个命令一次)
systemctl daemon-reload
再启动mysqld:
systemctl start mysqld
[root@localhost system]# cd   /usr/lib/systemd/system
[root@localhost system]# vim mysqld.service
[Unit]
Description=MySQL Server
After=network.target

[Service]
Type=forking

PIDFile=/usr/local/mysql/data/mysql1.pid
ExecStart=/usr/local/mysql/support-files/mysql.server start
ExecStop=/usr/local/mysql/support-files/mysql.server stop

[Install]
WantedBy=multi-user.target


[root@localhost system]# systemctl daemon-reload

[root@localhost system]# systemctl stop mysqld
[root@localhost system]# systemctl status mysqld
[root@localhost system]# systemctl start mysqld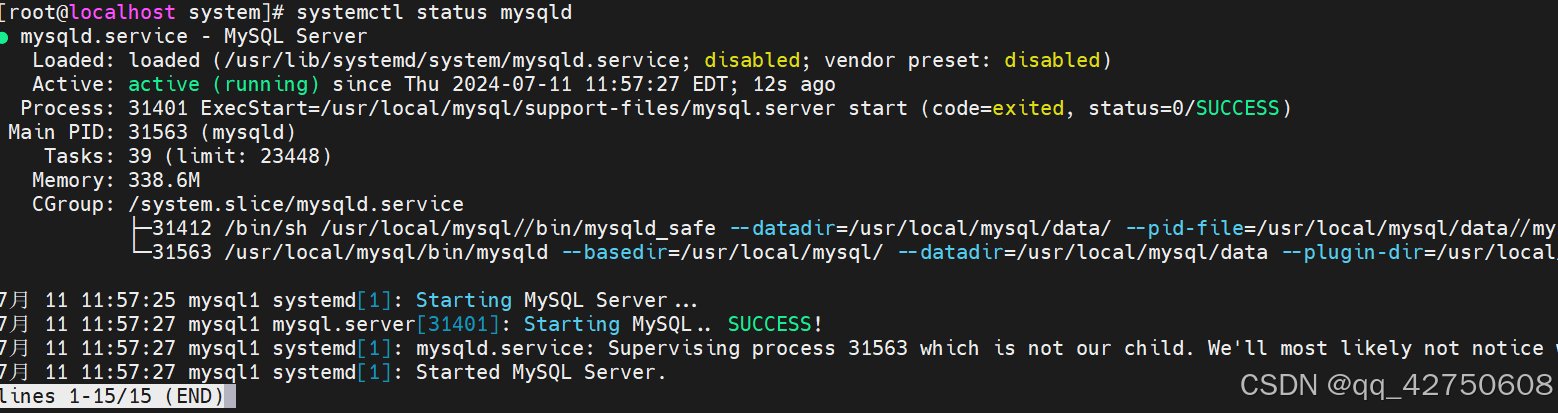
5.使用shell脚本安装,mysql并启动:
为了更好的效果,新建一个Linux虚拟机处理:
(1) 设置hostname,方便查看pid文件(因为pid的文件名称与hostname有关):
就设置为mysql1
(2) 准备/etc/my.cnf文件(为了方便使用之前的同名文件也可)
[mysqld]
log-error=/usr/local/mysql/log/mysql.err
basedir=/usr/local/mysql
datadir=/usr/local/mysql/data
socket=/tmp/mysql.sock
character-set-server=UTF8MB4
(3)shell脚本文件install_mysql.sh
#!/bin/bash

if [ -d "/usr/local/mysql" ];then
	echo "/usr/local/mysql文件夹已经存在,请确认是否安装了mysql"
	exit
fi
echo "正在解压压缩包"
tar -Jxf mysql-8.0.25-linux-glibc2.12-x86_64.tar.xz
mv mysql-8.0.25-linux-glibc2.12-x86_64 /usr/local/mysql

#创建一些必要的文件夹
mkdir /usr/local/mysql/{binlog,data,log,tmpdir,conf} -p

#检查mysql进程
mysql_pid=`ps -ef | grep mysqld | wc -l`
if [ $mysql_pid -eq 1 ];then
	echo "mysql进程没有运行"
else
	echo "有mysql进程运行,请检查"
fi

#检查mysql用户
mysql_user=`cat /etc/passwd | grep -w mysql | wc -l`
if [ $mysql_user -eq 1 ];then
	echo "mysql用户已经存在"
else
	echo "mysql用户不存在,开始添加mysql用户"
	useradd mysql -s /sbin/nologin
	echo "添加mysql用户成功"
fi

#处理libtinfo.so.5报错
ln -s /usr/lib64/libtinfo.so.6.1 /usr/lib64/libtinfo.so.5

#修改目录权限
chown -R mysql.mysql /usr/local/mysql

#增加配置文件
if [ -f "/etc/my.cnf" ];then
	echo "/etc/my.cnf文件存在"
else
	echo "/etc/my.cnf文件不存在"
	exit
fi

#初始化
echo "开始初始化"
/usr/local/mysql/bin/mysqld \
--defaults-file=/etc/my.cnf \
--user=mysql \
--initialize
#判断初始化是否成功
mysql_init=`cat /usr/local/mysql/log/mysql.err | grep -i "root@localhost:" | wc -l`
if [ $mysql_init -eq 1 ];then
	echo "mysql初始化成功"
else
	echo "mysql初始化失败"
	exit
fi

#获取临时密码
temp_pwd=$(grep 'temporary password' /usr/local/mysql/log/mysql.err)
pwd=${temp_pwd##* }
echo "临时密码是: ${pwd}"

#配置启动脚本
if [ ! -f "/etc/init.d/mysql.server" ];then
	cp /usr/local/mysql/support-files/mysql.server /etc/init.d/ -rf
	chmod 700 /etc/init.d/mysql.server
fi

#启动mysql
/etc/init.d/mysql.server start

#增加家环境变量
mysql_path=`grep 'export PATH=$PATH:/usr/local/mysql/bin' /etc/profile | wc -l`
if [ $mysql_path -eq 0 ];then
	echo "export PATH=\$PATH:/usr/local/mysql/bin" >> /etc/profile
	source /etc/profile
fi

#通过临时密码登录mysql,并修改密码
mysql -uroot -p${pwd} --connect-expired-password -e 'alter user root@"localhost" identified by "123456"'
echo "mysql8.0.25安装完成!"
(4)给脚本添加执行权限
chomod +x install_mysql.sh(5)执行脚本
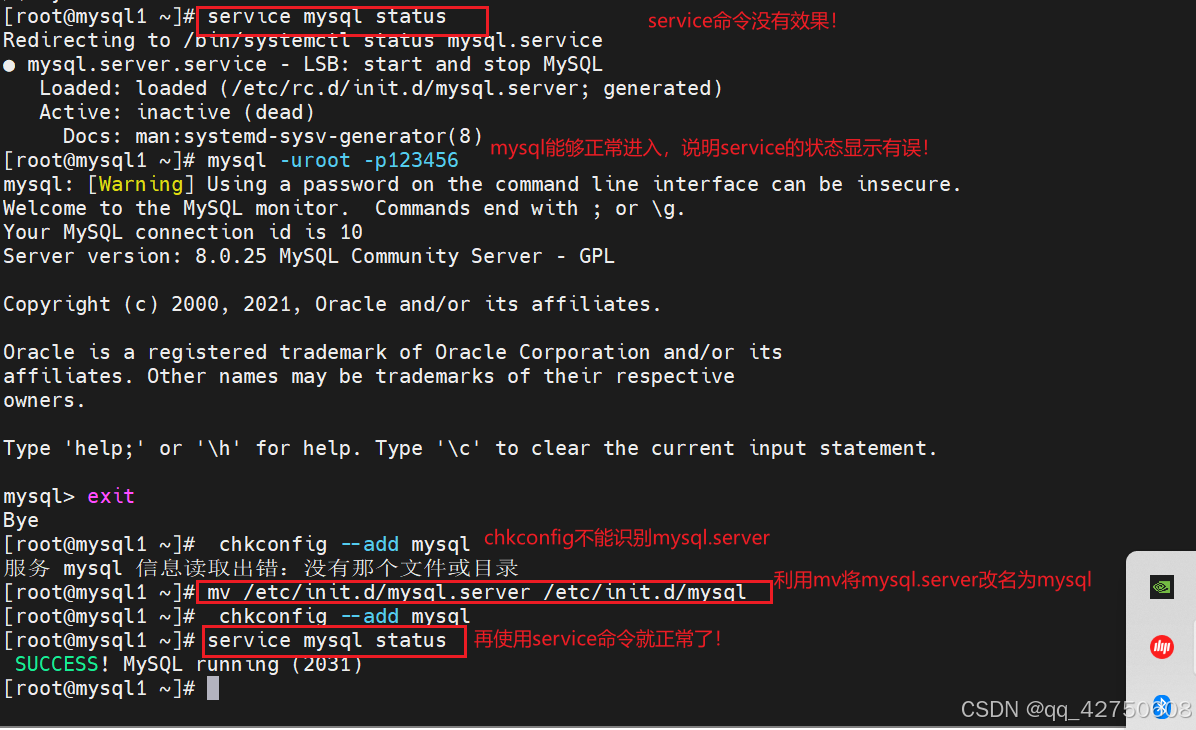
./install_mysql.sh注意:如果要使用service命令处理mysql,需要再将/etc/init.d/mysql.server改为/etc/init.d/mysql,如下图所示,也可以直接到脚本文件相应的位置修改代码!


 277
277

 被折叠的 条评论
为什么被折叠?
被折叠的 条评论
为什么被折叠?
 到【灌水乐园】发言


