


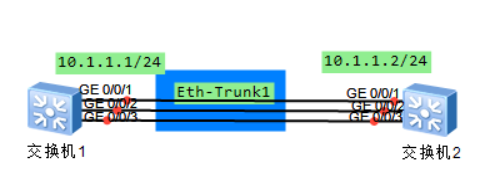
交换机1和交换机2之间通过三个三层千兆端口互联。用户希望再交换机1和交换机2之间配置链路聚合,实现交换机1和交换机2的互通,并增加链路带宽,提高链路可靠性。
交换机配置
1.交换机1的配置
<Huawei>system-view                               #进入系统视图
[Huawei]sysname  Switch1                          #配置交换机的名称为Switch
[Switch1]interface  Eth-Trunk  1                  #创建聚合口Eth-Trunk 1
[Switch1-Eth-Trunk1]quit                          #退出聚合口
[Switch1]interface  GigabitEthernet  0/0/1        #进入千兆以太网端口 0/0/1
[Switch1-GigabitEthernet0/0/1]eth-trunk  1        #加入聚合端口 Eth-Trunk 1
[Switch1-GigabitEthernet0/0/1]quit                #退出千兆以太网端口 0/0/1
[Switch1]interface GigabitEthernet 0/0/2          #进入千兆以太网端口 0/0/2
[Switch1-GigabitEthernet0/0/2]eth-trunk 1         #加入聚合端口 Eth-Trunk 1
[Switch1-GigabitEthernet0/0/2]quit                #退出千兆以太网端口 0/0/2
[Switch1]interface GigabitEthernet 0/0/3          #进入千兆以太网端口 0/0/3
[Switch1-GigabitEthernet0/0/3]eth-trunk 1         #加入聚合端口 Eth-Trunk 1
[Switch1-GigabitEthernet0/0/3]quit                #退出千兆以太网端口 0/0/3
[Switch1]interface  Vlanif  1                     #进入三层VLAN接口 VLANIF 1
[Switch1-Vlanif1]ip address 10.1.1.1 24           #配置IP地址为10.1.1.1 子网掩码长度为24位
[Switch1-Vlanif1]quit                             #退出三层VLAN接口 VLANIF 1
[Switch1]interface  Eth-Trunk   1                 #进入聚合口Eth-Trunk 1
[Switch1-Eth-Trunk1]port link-type  access        #配置端口类型为ACCESS
[Switch1-Eth-Trunk1]port default  vlan  1         #配置端口的默认vlan为1
- 交换机2的配置
<Huawei>system-view                               #进入系统视图
[Huawei]sysname  Switch2                          #配置交换机的名称为Switch
[Switch2]interface  Eth-Trunk  1                  #创建聚合口Eth-Trunk 1
[Switch2-Eth-Trunk1]quit                          #退出聚合口
[Switch2]interface  GigabitEthernet  0/0/1        #进入千兆以太网端口 0/0/1
[Switch2-GigabitEthernet0/0/1]eth-trunk  1        #加入聚合端口 Eth-Trunk 1
[Switch2-GigabitEthernet0/0/1]quit                #退出千兆以太网端口 0/0/1
[Switch2]interface GigabitEthernet 0/0/2          #进入千兆以太网端口 0/0/2
[Switch2-GigabitEthernet0/0/2]eth-trunk 1         #加入聚合端口 Eth-Trunk 1
[Switch2-GigabitEthernet0/0/2]quit                #退出千兆以太网端口 0/0/2
[Switch2]interface GigabitEthernet 0/0/3          #进入千兆以太网端口 0/0/3
[Switch2-GigabitEthernet0/0/3]eth-trunk 1         #加入聚合端口 Eth-Trunk 1
[Switch2-GigabitEthernet0/0/3]quit                #退出千兆以太网端口 0/0/3
[Switch2]interface  Vlanif  1                     #进入三层VLAN接口 VLANIF 1
[Switch2-Vlanif1]ip address 10.1.1.2 24           #配置IP地址为10.1.1.2 子网掩码长度为24位
[Switch2-Vlanif1]quit                             #退出三层VLAN接口 VLANIF 1
[Switch2]interface  Eth-Trunk   1                 #进入聚合口Eth-Trunk 1
[Switch2-Eth-Trunk1]port link-type  access        #配置端口类型为ACCESS
[Switch2-Eth-Trunk1]port default  vlan  1         #配置端口的默认vlan为1
验证配置结果
1.在交换机1和交换机2上执行display eth-trunk命令,显示GE0/0/1~GE0/0/3加入到Eth-Trunk 1中。
交换机1上查看
[Switch1]display  eth-trunk
Eth-Trunk1's state information is:
WorkingMode: NORMAL         Hash arithmetic: According to SIP-XOR-DIP
Least Active-linknumber: 1  Max Bandwidth-affected-linknumber: 8
Operate status: up          Number Of Up Port In Trunk: 3
--------------------------------------------------------------------------------
PortName                      Status      Weight
GigabitEthernet0/0/1          Up          1
GigabitEthernet0/0/2          Up          1
GigabitEthernet0/0/3          Up          1

[Switch1]
交换机2上查看
[Switch2]display  eth-trunk
Eth-Trunk1's state information is:
WorkingMode: NORMAL         Hash arithmetic: According to SIP-XOR-DIP
Least Active-linknumber: 1  Max Bandwidth-affected-linknumber: 8
Operate status: up          Number Of Up Port In Trunk: 3
--------------------------------------------------------------------------------
PortName                      Status      Weight
GigabitEthernet0/0/1          Up          1
GigabitEthernet0/0/2          Up          1
GigabitEthernet0/0/3          Up          1

[Switch2]
- 交换机1和交换机2能互相ping通
交换机1PING交换机2地址10.1.1.2
[Switch1]ping 10.1.1.2
  PING 10.1.1.2: 56  data bytes, press CTRL_C to break
    Reply from 10.1.1.2: bytes=56 Sequence=1 ttl=255 time=30 ms
    Reply from 10.1.1.2: bytes=56 Sequence=2 ttl=255 time=30 ms
    Reply from 10.1.1.2: bytes=56 Sequence=3 ttl=255 time=30 ms
    Reply from 10.1.1.2: bytes=56 Sequence=4 ttl=255 time=30 ms
    Reply from 10.1.1.2: bytes=56 Sequence=5 ttl=255 time=30 ms

  --- 10.1.1.2 ping statistics ---
    5 packet(s) transmitted
    5 packet(s) received
    0.00% packet loss
    round-trip min/avg/max = 30/30/30 ms

[Switch1]
交换机2PING交换机1地址10.1.1.1
[Switch2]ping 10.1.1.1
  PING 10.1.1.1: 56  data bytes, press CTRL_C to break
    Reply from 10.1.1.1: bytes=56 Sequence=1 ttl=255 time=30 ms
    Reply from 10.1.1.1: bytes=56 Sequence=2 ttl=255 time=30 ms
    Reply from 10.1.1.1: bytes=56 Sequence=3 ttl=255 time=30 ms
    Reply from 10.1.1.1: bytes=56 Sequence=4 ttl=255 time=30 ms
    Reply from 10.1.1.1: bytes=56 Sequence=5 ttl=255 time=30 ms

  --- 10.1.1.1 ping statistics ---
    5 packet(s) transmitted
    5 packet(s) received
    0.00% packet loss
    round-trip min/avg/max = 30/30/30 ms

[Switch2]


 6967
6967


 被折叠的 条评论
为什么被折叠?
被折叠的 条评论
为什么被折叠?
 到【灌水乐园】发言


