


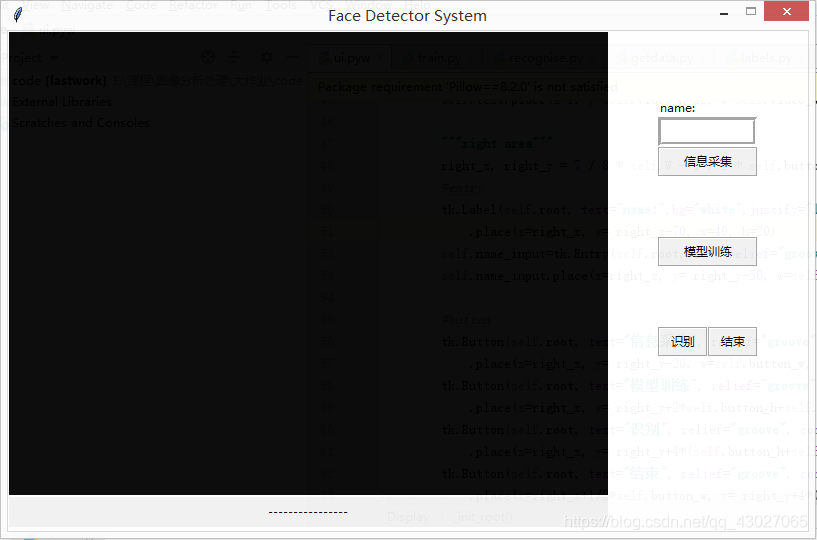
一、UI界面
训练:
1.输入姓名,点击“信息采集”,等待采集100张图片后自动关闭,可以再次输入姓名,再次采集其他人的面部信息,图片保存在 facedata 目录下
2.点击模型训练,训练完成后下方状态栏会出现提示“{0} faces trained”
使用:
1.点击“识别”
2.关闭时点击“结束”
# ui.pyw
import tkinter as tk
import cv2,os,time
from PIL import ImageTk,Image
import getdata,train,recognise
class Display():
def __init__(self,wide=800, height=500):
self.W, self.H = wide, height
self.button_w, self.button_h = 100, 30
#button stretch
self.button_hstretch=10
self.button_wstretch = 10
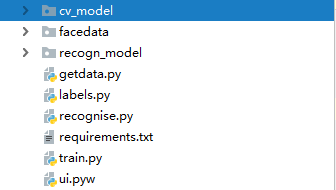
self.samlpe_path="facedata"
self.cv_model='cv_model'
self.recognition_model_path='recogn_model'
self.show_state=False
self.video_source=None
self._init_root()
def run(self):
self.root.mainloop()
def _init_root(self,):
#creat window
self.root=tk.Tk()
self.root.title("Face Detector System")
self.root.config(background="white")
self.root.geometry(str(self.W) + "x" + str(self.H) + "-500-200")
self.root.resizable(0, 0)
#self.root.iconbitmap("./image/icon.ico")
self.root.attributes("-alpha", 0.95)
"""left area"""
# creat video area
self.video_w, self.video_h= int(3 / 4 * self.W) - 1, int(self.H) - 2
self.video = tk.Label(self.root, bg="black", fg="green",cursor="cross")
self.video.place(x=1, y=1, w=self.video_w, h=self.video_h-35)
#state area
self.text = tk.Label(self.root, text="----------------")
self.text.place(x=1, y=self.video_h-32, w=self.video_w, h=30)
"""right area"""
right_x, right_y = 7 / 8 * self.W - 1 / 2 * self.button_w, 3 / 11 * self.H
#entry
tk.Label(self.root, text="name:",bg="white",justify="left")\
.place(x=right_x, y= right_y-70, w=40, h=20)
self.name_input=tk.Entry(self.root,bd=5, relief="groove")
self.name_input.place(x=right_x, y= right_y-50, w=self.button_w, h=self.button_h)
#button
tk.Button(self.root, text="信息采集", relief="groove", command=self._sample_collect)\
.place(x=right_x, y= right_y-20, w=self.button_w, h=self.button_h)
tk.Button(self.root, text="模型训练", relief="groove", command=self._train)\
.place(x=right_x, y= right_y+2*self.button_h+self.button_hstretch, w=self.button_w, h=self.button_h)
tk.Button(self.root, text="识别", relief="groove", command=self._detect_start)\
.place(x=right_x, y= right_y+4*(self.button_h+self.button_hstretch), w=1/2*self.button_w, h=self.button_h)
tk.Button(self.root, text="结束", relief="groove", command=self._detect_end)\
.place(x=right_x+1/2*self.button_w, y= right_y+4*(self.button_h+self.button_hstretch), w=1/2*self.button_w, h=self.button_h)
def _sample_collect(self):
self.text.config(text='Collect Object: '+"")
self.text.update()
face_id = len(self._load_labels())
# 生成器
self.video_source=getdata.getdata(face_id,self.video_w,self.cv_model)
for img in self.video_source:
self.video.config(image=img)
self.video.update()
# names save all name,and face_id is id of the name
self._save_labels()
def _train(self):
self.text.config(text="training...")
self.text.update()
info=train.train(datapath = self.samlpe_path)
self.text.config(text=info)
self.text.update()
def _detect_start(self):
# 生成器
self.video_source=recognise.recognise( names =self._load_labels(),video_w=self.video_w,cv_model=self.cv_model)
for img,id,confidence in self.video_source:
self.video.config(image=img)
self.video.update()
self.text.config(text='Object: '+id+" confidence:"+confidence)
self.text.update()
def _detect_end(self):
if self.video_source is not None:
self.video_source.close()
#save name
def _save_labels(self):
new_label=self.name_input.get()
import labels
names=labels.names
if new_label not in names and new_label!="":
names.append(new_label)
with open("labels.py","w",encoding="utf-8") as f:
f.write("#coding=utf-8\n")
f.write("names="+str(names))
def _load_labels(self):
import labels
return labels.names
if __name__=="__main__":
ds=Display()
ds.run()
二、Labels
模型预测出列表names的index,根据index得到人名
# labels.py
#coding=utf-8
names=['unknow', ]
三、数据采集
使用CascadeClassifier级联分类器获取视频流中人脸位置,将人脸图像帧保存到本地供训练使用,默认采集100张。
CascadeClassifier使用opencv已训练好的模型,copy python\Lib\site-packages\cv2\data到当前目录,命名为cv_model
# getdata.py
import cv2,os
from PIL import Image,ImageTk

def getdata(face_id,video_w,cv_model="cv_model"):
    face_detector = cv2.CascadeClassifier(os.path.join(cv_model, 'haarcascade_frontalface_default.xml'))

    cap = cv2.VideoCapture(0, cv2.CAP_DSHOW)
    count = 0
    while True:
        sucess, img = cap.read()
        if sucess:
            img = cv2.cvtColor(img, cv2.COLOR_BGR2RGB)
            gray = cv2.cvtColor(img, cv2.COLOR_BGR2GRAY)
            faces = face_detector.detectMultiScale(gray, 1.3, 5)

            if len(faces) != 0:
                x, y, w, h = faces[0]
                cv2.rectangle(img, (x, y), (x + w, y + w), (255, 0, 0))
                cv2.imwrite("facedata/User." + str(face_id) + '.' + str(count) + '.jpg', gray[y: y + h, x: x + w])
                count += 1

            h, w, _ = img.shape
        	wc ,hc= video_w,int(h * (video_w / w))
            current_image = Image.fromarray(img,"RGB").resize((wc,hc),Image.ANTIALIAS)
            img= ImageTk.PhotoImage(image=current_image)
            yield img

        cv2.waitKey(10)
        if count >= 100:
            break
    cap.release()
    cv2.destroyAllWindows()


if __name__=="__main__":
    images=getdata(face_id=0)
    cv2.namedWindow("show",0)
    # for i in range(100):
        # cv2.imshow("show",images.__next__())
    # for i in images:
    #     cv2.imshow("show",i)
四、识别模型训
检测模型使用opencv训练好的参数,见上一部分
用采集的数据训练自己的识别模型,训练完成后模型保存在recogn_model
使用LBPH算法:将图像划分区域,计算每个像素点的LBP特征,计算每个区域的特征直方图得特征向量,所有区域特征向量拼接,相似度函数对比。
# train.py
import numpy as np
from PIL import Image
import os
import cv2

def train(datapath = 'facedata'):

    #pip install opencv-contrib-python,if not install :AttributeError: module 'cv2.cv2' has no attribute 'face'
    recognizer = cv2.face.LBPHFaceRecognizer_create()

    #load data
    detector = cv2.CascadeClassifier("cv_model/haarcascade_frontalface_default.xml")
    faces, ids = getImagesAndLabels(datapath,detector)

    #train recogn model
    recognizer.train(faces, np.array(ids))

    #save model
    recognizer.write(r'recogn_model\trainer.yml')

    return "{0} faces trained.".format(len(np.unique(ids)))

def getImagesAndLabels(path,detector=None):
    imagePaths = [os.path.join(path, f) for f in os.listdir(path)]  # join函数的作用?
    faceSamples = []
    ids = []
    for imagePath in imagePaths:
        PIL_img = Image.open(imagePath).convert('L')   # convert it to grayscale
        img_numpy = np.array(PIL_img, 'uint8')
        id = int(os.path.split(imagePath)[-1].split(".")[1])
        faces = detector.detectMultiScale(img_numpy)

        for (x, y, w, h) in faces:
            faceSamples.append(img_numpy[y:y + h, x: x + w])
            ids.append(id)
    return faceSamples, ids

if __name__=="__main__":
    info=train()
    print(info)
五、使用
# recognise.py
import cv2,os
from PIL import ImageTk,Image

def recognise(names,video_w,cv_model="cv_model"):
    recognizer = cv2.face.LBPHFaceRecognizer_create()
    recognizer.read('recogn_model/trainer.yml')

    faceCascade = cv2.CascadeClassifier(os.path.join(cv_model,"haarcascade_frontalface_default.xml"))

    cam = cv2.VideoCapture(0, cv2.CAP_DSHOW)
    minW = 0.1 * cam.get(3)
    minH = 0.1 * cam.get(4)

    while True:
        ret, img = cam.read()
        img = cv2.cvtColor(img, cv2.COLOR_BGR2RGB)
        gray = cv2.cvtColor(img, cv2.COLOR_BGR2GRAY)

        faces = faceCascade.detectMultiScale(
            gray,
            scaleFactor=1.2,
            minNeighbors=5,
            minSize=(int(minW), int(minH))
        )

        ###
        idnum = "unknown"
        confidence="0%"
        if faces!=():
            x, y, w, h = faces[0]
            cv2.rectangle(img, (x, y), (x + w, y + h), (0, 255, 0), 2)
            idnum, confidence = recognizer.predict(gray[y:y + h, x:x + w])
            print(idnum,confidence)
            if confidence < 100 and idnum < len(names):
                idnum = names[idnum]
                confidence = "{0}%".format( confidence)
            else:
                idnum = "unknown"
                confidence = "{0}%".format( confidence)

        h, w, _ = img.shape
        wc ,hc= video_w,int(h * (video_w / w))
        current_image = Image.fromarray(img, "RGB").resize((wc, hc), Image.ANTIALIAS)
        img = ImageTk.PhotoImage(image=current_image)

        yield img, str(idnum), str(confidence)

        cv2.waitKey(10)
    cam.release()
    cv2.destroyAllWindows()

if __name__=="__main__":
    recognise(    names = ['jim', 'Bob'])


 3万+
3万+


 被折叠的 条评论
为什么被折叠?
被折叠的 条评论
为什么被折叠?
 到【灌水乐园】发言


