


前言
写文章的目的是想通过记录自己的学习过程,以便以后使用到相关的知识点可以回顾和参考。
u-boot的编译流程
1、make distclean --------- //先清理一下工程
2、make xxx_config ------ //配置uboot(xxx为开发板的名字)
3、make all ------------------ //最终编译生成我们所需要的uboot.bin
通过以上三条命令,uboot的编译就完成了,接下来分析一下这三个命令是怎样个工作流程来实现我们最终的目的
一、u-boot清理工程过程分析
make distclean命令的作用是清理工程,把以前编译生成的文件清理掉。打开顶层Makefile,搜索distclean定位到以下代码段
# distclean
#
PHONY += distclean

distclean: mrproper
	@find $(srctree) $(RCS_FIND_IGNORE) \
		\( -name '*.orig' -o -name '*.rej' -o -name '*~' \
		-o -name '*.bak' -o -name '#*#' -o -name '.*.orig' \
		-o -name '.*.rej' -o -name '*%' -o -name 'core' \
		-o -name '*.pyc' \) \
		-type f -print | xargs rm -f
“|”表示管道,即左边的输出作为右边的输入,实现删除编辑器备份文件,修补遗留文件等。同时发现依赖mrproper,接着搜索mrproper
# mrproper - Delete all generated files, including .config
#
# Directories & files removed with 'make mrproper'
MRPROPER_DIRS  += include/config include/generated          \
		  .tmp_objdiff
MRPROPER_FILES += .config .config.old \
		  tags TAGS cscope* GPATH GTAGS GRTAGS GSYMS \
		  include/config.h include/config.mk

mrproper: rm-dirs  := $(wildcard $(MRPROPER_DIRS))
mrproper: rm-files := $(wildcard $(MRPROPER_FILES))
mrproper-dirs      := $(addprefix _mrproper_,scripts)

PHONY += $(mrproper-dirs) mrproper archmrproper
$(mrproper-dirs):
	$(Q)$(MAKE) $(clean)=$(patsubst _mrproper_%,%,$@)

mrproper: clobber $(mrproper-dirs)
	$(call cmd,rmdirs)
	$(call cmd,rmfiles)
	@rm -f arch/*/include/asm/arch
这里删除所有生成的文件,包括配置文件,同时依赖clobber,搜索clobber
clobber: clean tidy
	$(call cmd,rmdirs)
	$(call cmd,rmfiles)
看到依赖clean和tidy,接着搜索clean和tidy
clean: $(clean-dirs)
	$(call cmd,rmdirs)
	$(call cmd,rmfiles)
	@find $(if $(KBUILD_EXTMOD), $(KBUILD_EXTMOD), .) $(RCS_FIND_IGNORE) \
		\( -name '*.[oas]' -o -name '*.ko' -o -name '.*.cmd' \
		-o -name '*.ko.*' -o -name '*.su' -o -name '*.cfgtmp' \
		-o -name '.*.d' -o -name '.*.tmp' -o -name '*.mod.c' \
		-o -name '*.symtypes' -o -name 'modules.order' \
		-o -name modules.builtin -o -name '.tmp_*.o.*' \
		-o -name '*.gcno' \) -type f -print | xargs rm -f

tidy:
	@find $(OBJTREE) -type f \( -name '*.depend*' \) -print | xargs rm -f
clean和dity也是清除生成的文件,不过是一大部分,不是全部。
所以总结得:
make clean:主要删除.o以及可执行文件
make mrproper:在clean的基础上删除配置生成文件
make distclean:删除所有生成的文件
二、u-boot配置过程分析
make xxx_config命令的作用是配置uboot,每个开发板厂家都会提供这个配置文件,通常以板子的名字来命名,我使用的是6818开发板,则使用命令make x6818_config。打开顶层Makefile
,搜索%_config
%_config:: outputmakefile
	@$(MKCONFIG) -A $(@:_config=)
$(@:_config=)意思是把目标x6818_config的_config替换为空,得到x6818。结合上下文展开得:
@./mkconfig -A x6818
再次搜索依赖outputmakefile
outputmakefile:
ifneq ($(KBUILD_SRC),)
	$(Q)ln -fsn $(srctree) source
	$(Q)$(CONFIG_SHELL) $(srctree)/scripts/mkmakefile \
	    $(srctree) $(objtree) $(VERSION) $(PATCHLEVEL)
endif
因为KBUILD_SRC为空,所以条件不成立,不会进入执行下面的命令,那么只需要去分析@./mkconfig -A x6818这一条命令就可以,可以看出使用到了mkconfig,则打开mkconfig进行分析
if [ \( $# -eq 2 \) -a \( "$1" = "-A" \) ] ; then
	# Automatic mode
	line=`awk '($0 !~ /^#/ && $7 ~ /^'"$2"'$/) { print $1, $2, $3, $4, $5, $6, $7, $8 }' $srctree/boards.cfg`
	if [ -z "$line" ] ; then
		echo "make: *** No rule to make target \`$2_config'.  Stop." >&2
		exit 1
	fi

	set ${line}
	# add default board name if needed
	[ $# = 3 ] && set ${line} ${1}
fi
@./mkconfig -A x6818命令的参数有两个且第一个参数为-A,条件成立,则进入判断执行下面代码,
line=awk '($0 !~ /^#/ && $7 ~ /^'"$2"'$/) { print $1, $2, $3, $4, $5, $6, $7, $8 }' $srctree/boards.cfg,使用到awk命令,把boards.cfg里面匹配到的信息提取到line中,打开配置文件boards.cfg

展开得
line= Active arm slsiap s5p6818 s5p6818 x6818 x6818 -
set ${line}作用是为了后面方便使用line中的数据,比如
$1:Active,
$2:arm,
$3:slsiap,
$4:s5p6818,
$5:s5p6818,
$6:x6818,
$7:x6818,
$8:-
继续分析mkconfig
CONFIG_NAME="${7%_config}"

[ "${BOARD_NAME}" ] || BOARD_NAME="${7%_config}"

arch="$2"
cpu=`echo $3 | awk 'BEGIN {FS = ":"} ; {print $1}'`
spl_cpu=`echo $3 | awk 'BEGIN {FS = ":"} ; {print $2}'`
展开得:
CONFIG_NAME=x6818_config
arch=arm
cpu=slsiap
继续分析
if [ -n "$KBUILD_SRC" ] ; then
	mkdir -p ${objtree}/include
	LNPREFIX=${srctree}/arch/${arch}/include/asm/
	cd ${objtree}/include
	mkdir -p asm
else
	cd arch/${arch}/include
fi

rm -f asm/arch

if [ "${soc}" ] ; then
	ln -s ${LNPREFIX}arch-${soc} asm/arch
elif [ "${cpu}" ] ; then
	ln -s ${LNPREFIX}arch-${cpu} asm/arch
fi
在Makifile中知道KBUILD_SRC为空,返回1,条件成立,执行下面语句,又soc=s5p6818,不为空,则创建头文件链接,展开得
mkdir -p ./include
LNPREFIX=./arch/arm/include/asm/
cd ./include
mkdir -p asm
ln -s ./arch/arm/include/asm/arch-s5p6818 asm/arch
继续分析
# Create include file for Make
#
( echo "ARCH   = ${arch}"
    if [ ! -z "$spl_cpu" ] ; then
	echo 'ifeq ($(CONFIG_SPL_BUILD),y)'
	echo "CPU    = ${spl_cpu}"
	echo "else"
	echo "CPU    = ${cpu}"
	echo "endif"
    else
	echo "CPU    = ${cpu}"
    fi
    echo "BOARD  = ${board}"

    [ "${vendor}" ] && echo "VENDOR = ${vendor}"
    [ "${soc}"    ] && echo "SOC    = ${soc}"
    exit 0 ) > config.mk
这里创建了include/config.mk
ARCH = arm
CPU = slsiap
BOARD = x6818
VENDOR = s5p6818
SOC = s5p6818
继续分析
# Create board specific header file
#
if [ "$APPEND" = "yes" ]	# Append to existing config file
then
	echo >> config.h
else
	> config.h		# Create new config file
fi
echo "/* Automatically generated - do not edit */" >>config.h

for i in ${TARGETS} ; do
	i="`echo ${i} | sed '/=/ {s/=/	/;q; } ; { s/$/	1/; }'`"
	echo "#define CONFIG_${i}" >>config.h ;
done

echo "#define CONFIG_SYS_ARCH  \"${arch}\""  >> config.h
echo "#define CONFIG_SYS_CPU   \"${cpu}\""   >> config.h
echo "#define CONFIG_SYS_BOARD \"${board}\"" >> config.h

[ "${vendor}" ] && echo "#define CONFIG_SYS_VENDOR \"${vendor}\"" >> config.h

[ "${soc}"    ] && echo "#define CONFIG_SYS_SOC    \"${soc}\""    >> config.h

[ "${board}"  ] && echo "#define CONFIG_BOARDDIR board/$BOARDDIR" >> config.h
cat << EOF >> config.h
#include <config_cmd_defaults.h>
#include <config_defaults.h>
#include <configs/${CONFIG_NAME}.h>
#include <asm/config.h>
#include <config_fallbacks.h>
#include <config_uncmd_spl.h>
EOF
这里创建了开发板相关头文件include/config.h
/* Automatically generated - do not edit */
#define CONFIG_SYS_ARCH “arm”
#define CONFIG_SYS_CPU “slsiap”
#define CONFIG_SYS_BOARD “x6818”
#define CONFIG_SYS_VENDOR “s5p6818”
#define CONFIG_SYS_SOC “s5p6818”
#define CONFIG_BOARDDIR board/s5p6818/x6818
#include <config_cmd_defaults.h>
#include <config_defaults.h>
#include <configs/x6818.h>
#include <asm/config.h>
#include <config_fallbacks.h>
#include <config_uncmd_spl.h>
从config.h中,我们可以得出:如果要在board目录下新建一个开发板的目录,则在include/configs目录下也要建立一个文件<board_name.h>,里面存放的就是<board_name>的配置信息。
记得以前在学校中老师也教过使用make menuconfig来配置,它是一种类似Linux一样的可视化配置界面,要手动修改配置文件include/configs/<board_name>.h 来裁减、设置uboot。
三、u-boot编译过程分析
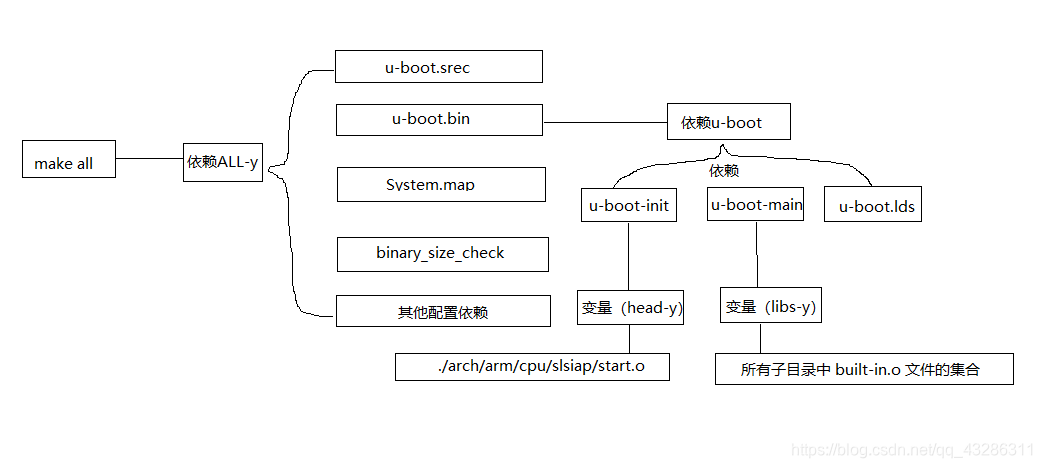
make all命令就是编译uboot了,生成我们最终需要的u-boot.bin,接下来分析下编译的过程,在顶层Makefile中搜索all
all: $(ALL-y)
可以看到all依赖$(ALL-y),在顶层Makefile中,ALL-y如下:
# Always append ALL so that arch config.mk's can add custom ones
ALL-y += u-boot.srec u-boot.bin System.map binary_size_check

ALL-$(CONFIG_ONENAND_U_BOOT) += u-boot-onenand.bin
ifeq ($(CONFIG_SPL_FSL_PBL),y)
ALL-$(CONFIG_RAMBOOT_PBL) += u-boot-with-spl-pbl.bin
else
ALL-$(CONFIG_RAMBOOT_PBL) += u-boot.pbl
endif
ALL-$(CONFIG_SPL) += spl/u-boot-spl.bin
ALL-$(CONFIG_SPL_FRAMEWORK) += u-boot.img
ALL-$(CONFIG_TPL) += tpl/u-boot-tpl.bin
ALL-$(CONFIG_OF_SEPARATE) += u-boot.dtb u-boot-dtb.bin
ifeq ($(CONFIG_SPL_FRAMEWORK),y)
ALL-$(CONFIG_OF_SEPARATE) += u-boot-dtb.img
endif
ALL-$(CONFIG_OF_HOSTFILE) += u-boot.dtb
ifneq ($(CONFIG_SPL_TARGET),)
ALL-$(CONFIG_SPL) += $(CONFIG_SPL_TARGET:"%"=%)
endif
ALL-$(CONFIG_REMAKE_ELF) += u-boot.elf

# enable combined SPL/u-boot/dtb rules for tegra
ifneq ($(CONFIG_TEGRA),)
ifeq ($(CONFIG_SPL),y)
ifeq ($(CONFIG_OF_SEPARATE),y)
ALL-y += u-boot-dtb-tegra.bin
else
ALL-y += u-boot-nodtb-tegra.bin
endif
endif
endif
可以看出ALL-y包含了u-boot.srec,u-boot.bin,System.map,binary_size_check这几个文件,当然也会包含其他文件,比如下面的u-boot-onenand.bin等,这取决去在上面配置uboot时生成的./include/config.h里面包含了.h头文件里面有没有定义CONFIG_ONENAND_U_BOOT这些变量值是否为“y”,例如CONFIG_ONENAND_U_BOOT=y,那么u-boot-onenand.bin就会生成。
ALL-y里面有个u-boot.bin,这个就是我们最终需要的 uboot 二进制可执行文件,所作的所有工作就是为了它。在顶层 Makefile 中找到 u-boot.bin 目标对应的规则:
u-boot.bin: u-boot FORCE
	$(call if_changed,objcopy)
	$(call DO_STATIC_RELA,$<,$@,$(CONFIG_SYS_TEXT_BASE))
	$(BOARD_SIZE_CHECK)
	#./tools/mk6818 x6818u-boot.bin nsih.txt 2ndboot u-boot.bin
看出目标u-boot.bin依赖于u-boot,搜索u-boot相关规则:
u-boot:	$(u-boot-init) $(u-boot-main) u-boot.lds
	$(call if_changed,u-boot__)
ifeq ($(CONFIG_KALLSYMS),y)
	smap=`$(call SYSTEM_MAP,u-boot) | \
		awk '$$2 ~ /[tTwW]/ {printf $$1 $$3 "\\\\000"}'` ; \
	$(CC) $(c_flags) -DSYSTEM_MAP="\"$${smap}\"" \
		-c $(srctree)/common/system_map.c -o common/system_map.o
	$(call cmd,u-boot__) common/system_map.o
endif
u-boot又依赖于u-boot-init,u-boot-main ,u-boot.lds。u-boot.lds 是链接文件,而 u-boot-init 和 u-boot-main 是两个变量,在顶层Makefile中的定义如下:
u-boot-init := $(head-y)
u-boot-main := $(libs-y)
$(head-y)在顶层Makefile中定义:
head-y := $(CPUDIR)/start.o
因为 (head-y) 跟 CPU 架构有关,我们使用的是 ARM 芯片,在./config.mk中 CPUDIR=arch/$(ARCH)/cpu$(if $(CPU),/$(CPU),)
,所以$(CPUDIR)的路径是./arch/arm/cpu/slsiap,因此展开得:
u-boot-init = ./arch/arm/cpu/slsiap/start.o
。
接着在顶层Makefile中搜索$(libs-y)
libs-y += lib/
libs-$(HAVE_VENDOR_COMMON_LIB) += board/$(VENDOR)/common/
libs-y += $(CPUDIR)/
ifdef SOC
libs-y += $(CPUDIR)/$(SOC)/
endif
libs-$(CONFIG_OF_EMBED) += dts/
libs-y += arch/$(ARCH)/lib/
libs-y += fs/
libs-y += net/
libs-y += disk/
libs-y += drivers/
libs-$(CONFIG_DM) += drivers/core/
libs-y += drivers/dma/
libs-y += drivers/gpio/
libs-y += drivers/i2c/
libs-y += drivers/input/
libs-y += drivers/mmc/
ifdef CONFIG_NAND_MTD
libs-y += drivers/mtd/
libs-y += drivers/mtd/nand/
libs-y += drivers/mtd/onenand/
libs-y += drivers/mtd/spi/
libs-$(CONFIG_CMD_UBI) += drivers/mtd/ubi/
endif
libs-y += drivers/net/
libs-y += drivers/net/phy/
libs-y += drivers/pci/
libs-y += drivers/power/ \
	drivers/power/fuel_gauge/ \
	drivers/power/mfd/ \
	drivers/power/pmic/ \
	drivers/power/battery/
libs-y += drivers/spi/
libs-$(CONFIG_FMAN_ENET) += drivers/net/fm/
libs-$(CONFIG_SYS_FSL_DDR) += drivers/ddr/fsl/
libs-y += drivers/serial/
libs-y += drivers/usb/eth/
libs-y += drivers/usb/gadget/
libs-y += drivers/usb/host/
libs-y += drivers/usb/musb/
libs-y += drivers/usb/musb-new/
libs-y += drivers/usb/phy/
libs-y += drivers/usb/ulpi/
libs-y += common/
libs-y += lib/libfdt/
libs-$(CONFIG_API) += api/
libs-$(CONFIG_HAS_POST) += post/
libs-y += test/
libs-y += test/dm/
libs-$(CONFIG_DM_DEMO) += drivers/demo/

ifneq (,$(filter $(SOC), mx25 mx27 mx5 mx6 mx31 mx35 mxs vf610))
libs-y += arch/$(ARCH)/imx-common/
endif

libs-$(CONFIG_ARM) += arch/arm/cpu/
libs-$(CONFIG_PPC) += arch/powerpc/cpu/

libs-y += $(if $(BOARDDIR),board/$(BOARDDIR)/)

libs-y := $(sort $(libs-y))

u-boot-dirs	:= $(patsubst %/,%,$(filter %/, $(libs-y))) tools examples

u-boot-alldirs	:= $(sort $(u-boot-dirs) $(patsubst %/,%,$(filter %/, $(libs-))))

libs-y		:= $(patsubst %/, %/built-in.o, $(libs-y))
可以看出$(head-y)是 uboot 各子目录的集合,然后通过 libs-y := $(patsubst %/, %/built-in.o, $(libs-y)) 把 “/" 替换为 “/built-in.o” ,相当于将 libs-y 改为所有子目录中 built-in.o 文件的集合。那么
u-boot-main 就等于所有子目录中 built-in.o 的集合。
这个规则就相当于将以 u-boot.lds 为链接脚本,将 ./arch/arm/cpu/slsiap/start.o 和各个子目录
下的 built-in.o 链接在一起生成 u-boot。
总结一下make all编译过程,如下图:


 941
941


 被折叠的 条评论
为什么被折叠?
被折叠的 条评论
为什么被折叠?
 到【灌水乐园】发言


