


前言
写文章的目的是想通过记录自己的学习过程,以便以后使用到相关的知识点可以回顾和参考。
一、在链接脚本中找程序入口
在arch\arm\cpu\slsiap中找到u-boot.lds,里面可以看到ENTRY(_stext),即程序入口就是_stext了。
OUTPUT_FORMAT("elf32-littlearm", "elf32-littlearm", "elf32-littlearm")
OUTPUT_ARCH(arm)
ENTRY(_stext)
SECTIONS
{
	. = 0x00000000;

	. = ALIGN(4);
	.text :
	{
		*(.__image_copy_start)
		SOCDIR/start.o (.text*)
		SOCDIR/vectors.o (.text*)
		*(.text*)
	}
不过可以看到链接的地址是0x00000000,可在SecureCRT中显示uboot启动地址在0x43C00000

那么可以在ubuntu命令行输入grep -nR “0x43C00000”,就定位到0x43C00000的位置了,在
include\configs\x6818.h这个配置.h文件中:
#define CONFIG_RELOC_TO_TEXT_BASE												/* Relocate u-boot code to TEXT_BASE */

#define	CONFIG_SYS_TEXT_BASE 			0x43C00000
#define	CONFIG_SYS_INIT_SP_ADDR			CONFIG_SYS_TEXT_BASE					/* init and run stack pointer */

/* malloc() pool */
#define	CONFIG_MEM_MALLOC_START			0x44000000
#define CONFIG_MEM_MALLOC_LENGTH		32*1024*1024							/* more than 2M for ubifs: MAX 16M */

/* when CONFIG_LCD */
#define CONFIG_FB_ADDR					0x46000000
#define CONFIG_BMP_ADDR					0x47000000

/* Download OFFSET */
#define CONFIG_MEM_LOAD_ADDR			0x48000000
在后面拷贝u-boot到SDRAM会使用到CONFIG_SYS_TEXT_BASE 这个宏定义,即u-boot会在0x43C00000开始执行。
二、分析Start.S
在arch\arm\cpu\slsiap\s5p6818里面找到Start.S,打开可以看到:
	.globl	_stext
_stext:
	b 	reset
	ldr	pc, _undefined_instruction
	ldr	pc, _software_interrupt
	ldr	pc, _prefetch_abort
	ldr	pc, _data_abort
	ldr	pc, _not_used
	ldr	pc, _irq
	ldr	pc, _fiq

_undefined_instruction:	.word undefined_instruction
_software_interrupt:	.word software_interrupt
_prefetch_abort:	.word prefetch_abort
_data_abort:		.word data_abort
_not_used:		.word not_used
_irq:			.word irq
_fiq:			.word fiq
在_stext中执行的第一条代码是 b reset,那么先跳转到reset看看做了什么事情。
	.globl reset

reset:
	/*
	 * set the cpu to SVC32 mode
	 */
	mrs	r0, cpsr
	bic	r0, r0, #0x1f
	orr	r0, r0, #0xd3
	msr	cpsr,r0

	/* disable watchdog */
	ldr	r0, =0xC0019000
	mov	r1, #0
	str	r1, [r0]

	/* the mask ROM code should have PLL and others stable */
#ifndef CONFIG_SKIP_LOWLEVEL_INIT
	bl	cpu_init_cp15
	bl	cpu_init_crit
#endif
可以看到做的工作有:进入SVC32管理模式,关闭看门狗,然后进入cpu_init_cp15和cpu_init_crit。其中跳转到cpu_init_cp15代码,在下图:
ENTRY(cpu_init_cp15)
	/*
	 * Invalidate L1 I/D
	 */
	mov	r0, #0			@ set up for MCR
	mcr	p15, 0, r0, c8, c7, 0	@ invalidate TLBs
	mcr	p15, 0, r0, c7, c5, 0	@ invalidate icache
	mcr	p15, 0, r0, c7, c5, 6	@ invalidate BP array
#ifndef CONFIG_MACH_S5P6818
	mcr p15, 0, r0, c7, c10, 4	@ DSB
	mcr p15, 0, r0, c7, c5, 4	@ ISB
#endif

	/*
	 * disable MMU stuff and caches
	 */
	mrc	p15, 0, r0, c1, c0, 0
	bic	r0, r0, #0x00002000	@ clear bits 13 (--V-)
	bic	r0, r0, #0x00000007	@ clear bits 2:0 (-CAM)
	orr	r0, r0, #0x00000002	@ set bit 1 (--A-) Align
	orr	r0, r0, #0x00000800	@ set bit 11 (Z---) BTB
#ifdef CONFIG_SYS_ICACHE_OFF
	bic	r0, r0, #0x00001000	@ clear bit 12 (I) I-cache
#else
	orr	r0, r0, #0x00001000	@ set bit 12 (I) I-cache
#endif
	mcr	p15, 0, r0, c1, c0, 0
	mov	pc, lr			@ back to my caller
ENDPROC(cpu_init_cp15)
里面主要做的工作是:通过访问cp15协处理器有关寄存器关闭I/D cache,关闭TLB,关闭MMU。
接入跳转到cpu_init_crit看看里面做了什么,代码如下图:
ENTRY(cpu_init_crit)
	/*
	 * Jump to board specific initialization...
	 * The Mask ROM will have already initialized
	 * basic memory. Go here to bump up clock rate and handle
	 * wake up conditions.
	 */
	b	lowlevel_init		@ go setup pll,mux,memory
ENDPROC(cpu_init_crit)
#endif
继续跳转到lowlevel_init ,它定义在arch\arm\cpu\slsiap\s5p6818\low_init.S里
	.globl lowlevel_init
lowlevel_init:

	/* get cpu id */
  	mrc     p15, 0, r0, c0, c0, 5     	@ Read CPU ID register
  	ands    r0, r0, #0x03             	@ Mask off, leaving the CPU ID field
  	mov     r1, #0xF                  	@ Move 0xF (represents all four ways) into r1

	/* join SMP */
  	mrc     p15, 0, r0, c1, c0, 1   	@ Read ACTLR
  	mov     r1, r0
  	orr     r0, r0, #0x040          	@ Set bit 6
  	cmp     r0, r1
  	mcrne   p15, 0, r0, c1, c0, 1   	@ Write ACTLR

	/* enable maintenance broadcast */
	mrc     p15, 0, r0, c1, c0, 1      	@ Read Aux Ctrl register
	mov     r1, r0
    orr     r0, r0, #0x01              	@ Set the FW bit (bit 0)
	cmp     r0, r1
    mcrne   p15, 0, r0, c1, c0, 1      	@ Write Aux Ctrl register

	mov	 pc, lr							@ back to caller

#endif /* CONFIG_SKIP_LOWLEVEL_INIT */
里面好像是做了获取cpu ID,加入SMP,启用维护广播,貌似不是重点,那么reset就执行完成了,返回Start.S中继续分析。
reset之后的代码如下图:
#ifdef CONFIG_RELOC_TO_TEXT_BASE
relocate_to_text:
	/*
	 * relocate u-boot code on memory to text base
	 * for nexell arm core (add by jhkim)
	 */
	adr	r0, _stext				/* r0 <- current position of code   */
	ldr	r1, TEXT_BASE			/* test if we run from flash or RAM */
	cmp r0, r1              	/* don't reloc during debug         */
	beq clear_bss

	ldr	r2, _bss_start_ofs
	add	r2, r0, r2				/* r2 <- source end address         */

copy_loop_text:
	ldmia	r0!, {r3-r10}		/* copy from source address [r0]    */
	stmia	r1!, {r3-r10}		/* copy to   target address [r1]    */
	cmp	r0, r2					/* until source end addreee [r2]    */
	ble	copy_loop_text

	ldr	r1, TEXT_BASE			/* restart at text base */
	mov pc, r1

clear_bss:
#ifdef CONFIG_MMU_ENABLE
	bl	mmu_turn_on
#endif
	ldr	r0, _bss_start_ofs
	ldr	r1, _bss_end_ofs
	ldr	r4, TEXT_BASE			/* text addr */
	add	r0, r0, r4
	add	r1, r1, r4
	mov	r2, #0x00000000			/* clear */

clbss_l:str	r2, [r0]			/* clear loop... */
	add	r0, r0, #4
	cmp	r0, r1
	bne	clbss_l

	ldr	sp, =(CONFIG_SYS_INIT_SP_ADDR)
	bic	sp, sp, #7					/* 8-byte alignment for ABI compliance */
	sub	sp, #GD_SIZE				/* allocate one GD above SP */
	bic	sp, sp, #7					/* 8-byte alignment for ABI compliance */
	mov	r9, sp						/* GD is above SP */
	mov	r0, #0
	bl	board_init_f

	mov	sp, r9						/* SP is GD's base address */
	bic	sp, sp, #7					/* 8-byte alignment for ABI compliance */
	sub	sp, #GENERATED_BD_INFO_SIZE	/* allocate one BD above SP */
	bic	sp, sp, #7					/* 8-byte alignment for ABI compliance */

	mov	r0, r9						/* gd_t *gd */
	ldr r1, TEXT_BASE				/* ulong text */
	mov r2, sp						/* ulong sp */
	bl	gdt_reset

	/* call board_init_r(gd_t *id, ulong dest_addr) */
	mov	r0, r9							/* gd_t */
	ldr	r1,  =(CONFIG_SYS_MALLOC_END)	/* dest_addr for malloc heap end */
	/* call board_init_r */
	ldr	pc, =board_init_r				/* this is auto-relocated! */

#else	/* CONFIG_RELOC_TO_TEXT_BASE */

	bl	_main
#endif
因为x6818.h配置文件中有定义CONFIG_RELOC_TO_TEXT_BASE,则接下来就是代码重定位了。
TEXT_BASE 是上面提到的宏,即0x43C00000,先判断代码是否运行在0x43C00000,即SDRAM中,如果不是就需要代码重定位,拷贝结束后pc跳转到TEXT_BASE ,重新执行代码。重新运行到重定位的位置时,判断到
_stext = TEXT_BASE 不需要再重定位了,执行清BSS段:
clear_bss:
#ifdef CONFIG_MMU_ENABLE
	bl	mmu_turn_on
#endif
	ldr	r0, _bss_start_ofs
	ldr	r1, _bss_end_ofs
	ldr	r4, TEXT_BASE			/* text addr */
	add	r0, r0, r4
	add	r1, r1, r4
	mov	r2, #0x00000000			/* clear */

clbss_l:str	r2, [r0]			/* clear loop... */
	add	r0, r0, #4
	cmp	r0, r1
	bne	clbss_l
清BSS段结束后,代码如下:
ldr	sp, =(CONFIG_SYS_INIT_SP_ADDR)
	bic	sp, sp, #7					/* 8-byte alignment for ABI compliance */
	sub	sp, #GD_SIZE				/* allocate one GD above SP */
	bic	sp, sp, #7					/* 8-byte alignment for ABI compliance */
	mov	r9, sp						/* GD is above SP */
	mov	r0, #0
	bl	board_init_f

	mov	sp, r9						/* SP is GD's base address */
	bic	sp, sp, #7					/* 8-byte alignment for ABI compliance */
	sub	sp, #GENERATED_BD_INFO_SIZE	/* allocate one BD above SP */
	bic	sp, sp, #7					/* 8-byte alignment for ABI compliance */

	mov	r0, r9						/* gd_t *gd */
	ldr r1, TEXT_BASE				/* ulong text */
	mov r2, sp						/* ulong sp */
	bl	gdt_reset

	/* call board_init_r(gd_t *id, ulong dest_addr) */
	mov	r0, r9							/* gd_t */
	ldr	r1,  =(CONFIG_SYS_MALLOC_END)	/* dest_addr for malloc heap end */
	/* call board_init_r */
	ldr	pc, =board_init_r				/* this is auto-relocated! */
从代码中可以看出,在_stext 下面开辟了gd数据区,然后调用board_init_f 函数,board_init_f 定义在common\board_f.c中,代码如下:
void board_init_f(ulong boot_flags)
{
#ifdef CONFIG_SYS_GENERIC_GLOBAL_DATA
	/*
	 * For some archtectures, global data is initialized and used before
	 * calling this function. The data should be preserved. For others,
	 * CONFIG_SYS_GENERIC_GLOBAL_DATA should be defined and use the stack
	 * here to host global data until relocation.
	 */
	gd_t data;

	gd = &data;

	/*
	 * Clear global data before it is accessed at debug print
	 * in initcall_run_list. Otherwise the debug print probably
	 * get the wrong vaule of gd->have_console.
	 */
	zero_global_data();
#endif

	gd->flags = boot_flags;
	gd->have_console = 0;

	if (initcall_run_list(init_sequence_f))
		hang();

#if !defined(CONFIG_ARM) && !defined(CONFIG_SANDBOX)
	/* NOTREACHED - jump_to_copy() does not return */
	hang();
#endif
}
board_init_f 进行了清global_data空间,初始化外设,init_sequence_f是一系列的初始化函数,通过配置文件的宏(条件判断)来调用这些函数。
接着再往下分析,在gd数据区下面又开辟了bd数据区,然后调用gdt_reset函数,定义在arch\arm\cpu\slsiap\s5p6818\cpu.c中,代码如下:
void gdt_reset(gd_t *gd, ulong text, ulong sp)
{
	ulong text_start, text_end, heap_end;
	ulong bd;

	/* for smp cores */
	global_descriptor = gd;

	/* reconfig stack info */
	gd->relocaddr = text;
	gd->start_addr_sp = sp;
	gd->reloc_off = 0;

	/* copy bd info  */
	bd = (unsigned int)gd - sizeof(bd_t);
	memcpy((void *)bd, (void *)gd->bd, sizeof(bd_t));

	/* reset gd->bd */
	gd->bd = (bd_t *)bd;

	/* prevent dataabort, when access enva_addr + data (0x04) */
	gd->env_addr = (ulong)default_environment;

	/* get cpu info */
	text_start = (unsigned int)(gd->relocaddr);
	text_end = (unsigned int)(gd->relocaddr + _bss_end_ofs);
	heap_end = CONFIG_SYS_MALLOC_END;

#if defined(CONFIG_SYS_GENERIC_BOARD)
	/* refer initr_malloc (common/board_r.c) */
	gd->relocaddr = heap_end;
#endif
	flush_dcache_all();

#if defined(CONFIG_DISPLAY_CPUINFO)
	ulong pc;

	asm("mov %0, pc":"=r" (pc));
	asm("mov %0, sp":"=r" (sp));

	printf("Heap = 0x%08lx~0x%08lx\n", heap_end-TOTAL_MALLOC_LEN, heap_end);
	printf("Code = 0x%08lx~0x%08lx\n", text_start, text_end);
	printf("GLD  = 0x%08lx\n", (ulong)gd);
	printf("GLBD = 0x%08lx\n", (ulong)gd->bd);
	printf("SP   = 0x%08lx,0x%08lx(CURR)\n", gd->start_addr_sp, sp);
	printf("PC   = 0x%08lx\n", pc);

	printf("TAGS = 0x%08lx \n", gd->bd->bi_boot_params);
	#ifdef CONFIG_MMU_ENABLE
	ulong page_tlb =  (text_end & 0xffff0000) + 0x10000;
	printf("PAGE = 0x%08lx~0x%08lx\n", page_tlb, page_tlb + 0xc000 );
	#endif
	#ifdef CONFIG_SMP
	printf("SMPSP= 0x%08x (-0x%08x)\n", CONFIG_SYS_SMP_SP_ADDR, CONFIG_SYS_SMP_SP_SIZE*(NR_CPUS-1));
	#endif
	printf("MACH = [%ld]   \n", gd->bd->bi_arch_number);
	printf("VER  = %u      \n", nxp_cpu_version());
	printf("BOARD= [%s]    \n", CONFIG_SYS_BOARD);
#endif
}
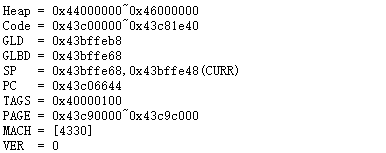
可以看到里面对gd结构体的成员变量进行初始化,并打印出SDRAM的内存分配信息,即在SecureCRT中,启动u-boot时看到的信息:
接着继续在Start.S往下分析,看到调用了board_init_r函数,board_init_r定义正在common\board_r.c中,代码如下:
void board_init_r(gd_t *new_gd, ulong dest_addr)
{
#ifdef CONFIG_NEEDS_MANUAL_RELOC
	int i;
#endif

#ifndef CONFIG_X86
	gd = new_gd;
#endif

#ifdef CONFIG_NEEDS_MANUAL_RELOC
	for (i = 0; i < ARRAY_SIZE(init_sequence_r); i++)
		init_sequence_r[i] += gd->reloc_off;
#endif

	if (initcall_run_list(init_sequence_r))
		hang();

	/* NOTREACHED - run_main_loop() does not return */
	hang();
}
init_sequence_r也是一系列函数的集合,跟init_sequence_f差不多,进一步对外设进行初始化,里面最后一个函数是run_main_loop:
static int run_main_loop(void)
{
#ifdef CONFIG_SANDBOX
	sandbox_main_loop_init();
#endif
	/* main_loop() can return to retry autoboot, if so just run it again */
	for (;;)
		main_loop();
	return 0;
}
for (;;)是一个死循环,表示一直执行main_loop(),main_loop代码如下:
void main_loop(void)
{
	const char *s;

	bootstage_mark_name(BOOTSTAGE_ID_MAIN_LOOP, "main_loop");

#ifndef CONFIG_SYS_GENERIC_BOARD
	puts("Warning: Your board does not use generic board. Please read\n");
	puts("doc/README.generic-board and take action. Boards not\n");
	puts("upgraded by the late 2014 may break or be removed.\n");
#endif

	modem_init();
#ifdef CONFIG_VERSION_VARIABLE
	setenv("ver", version_string);  /* set version variable */
#endif /* CONFIG_VERSION_VARIABLE */

	cli_init();

	run_preboot_environment_command();

#if defined(CONFIG_UPDATE_TFTP)
	update_tftp(0UL);
#endif /* CONFIG_UPDATE_TFTP */

	s = bootdelay_process();
	if (cli_process_fdt(&s))
		cli_secure_boot_cmd(s);

	autoboot_command(s);

	cli_loop();
}
其中
->bootstage_mark_name是打印启动进度
->setenv(“ver”, version_string)是设置版本号环境变量
-> cli_init()跟命令初始化有关,初始化 hushshell 相关的变量
->run_preboot_environment_command()获取环境变量 perboot 的内容
->bootdelay_process 函数,此函数会读取环境变量 bootdelay 和 bootcmd 的内容, 然后将 bootdelay 的值赋值给全局变量stored_bootdelay,返回值为环境变量 bootcmd 的值
->autoboot_command 函数,此函数就是检查倒计时是否结束?倒计时结束之前有
没有被打断?,3秒倒计时后启动Linux内核的功能就是这里实现的,参数s保存着bootcmd 的值,即启动Linux命令,如果倒计时结束就会执行这个命令。如果在倒计时按下键盘上的按键,命令就不会执行,autoboot_command相当于一个空函数。
->cli_loop(),这个就是命令处理函数,负责接收好处理输入的命令,从此进入了u-boot的命令行。
cli_loop函数定义在common\cli.c,代码如下:
void cli_loop(void)
{
#ifdef CONFIG_SYS_HUSH_PARSER
	parse_file_outer();
	/* This point is never reached */
	for (;;);
#else
	cli_simple_loop();
#endif /*CONFIG_SYS_HUSH_PARSER*/
}
在x6818.h中定义了CONFIG_SYS_HUSH_PARSER,即执行parse_file_outer()函数,parse_file_outer定义在common\cli_hush.c中,代码如下:
#ifndef __U_BOOT__
static int parse_file_outer(FILE *f)
#else
int parse_file_outer(void)
#endif
{
	int rcode;
	struct in_str input;
#ifndef __U_BOOT__
	setup_file_in_str(&input, f);
#else
	setup_file_in_str(&input);
#endif
	rcode = parse_stream_outer(&input, FLAG_PARSE_SEMICOLON);
	return rcode;
}
其中parse_stream_outer函数的作用是负责接收命令行输入,然后解析并执行相应的命令,它定义在common\cli_hush.c中,代码如下:
static int parse_stream_outer(struct in_str *inp, int flag)
{

	struct p_context ctx;
	o_string temp=NULL_O_STRING;
	int rcode;
#ifdef __U_BOOT__
	int code = 0;
#endif
	do {
		ctx.type = flag;
		initialize_context(&ctx);
		update_ifs_map();
		if (!(flag & FLAG_PARSE_SEMICOLON) || (flag & FLAG_REPARSING)) mapset((uchar *)";$&|", 0);
		inp->promptmode=1;
		rcode = parse_stream(&temp, &ctx, inp, '\n');
#ifdef __U_BOOT__
		if (rcode == 1) flag_repeat = 0;
#endif
		if (rcode != 1 && ctx.old_flag != 0) {
			syntax();
#ifdef __U_BOOT__
			flag_repeat = 0;
#endif
		}
		if (rcode != 1 && ctx.old_flag == 0) {
			done_word(&temp, &ctx);
			done_pipe(&ctx,PIPE_SEQ);
#ifndef __U_BOOT__
			run_list(ctx.list_head);
#else
			code = run_list(ctx.list_head);
			if (code == -2) {	/* exit */
				b_free(&temp);
				code = 0;
				/* XXX hackish way to not allow exit from main loop */
				if (inp->peek == file_peek) {
					printf("exit not allowed from main input shell.\n");
					continue;
				}
				break;
			}
			if (code == -1)
			    flag_repeat = 0;
#endif
		} else {
			if (ctx.old_flag != 0) {
				free(ctx.stack);
				b_reset(&temp);
			}
#ifdef __U_BOOT__
			if (inp->__promptme == 0) printf("<INTERRUPT>\n");
			inp->__promptme = 1;
#endif
			temp.nonnull = 0;
			temp.quote = 0;
			inp->p = NULL;
			free_pipe_list(ctx.list_head,0);
		}
		b_free(&temp);
	/* loop on syntax errors, return on EOF */
	} while (rcode != -1 && !(flag & FLAG_EXIT_FROM_LOOP) &&
		(inp->peek != static_peek || b_peek(inp)));
#ifndef __U_BOOT__
	return 0;
#else
	return (code != 0) ? 1 : 0;
#endif /* __U_BOOT__ */
}
里面的do-while循环就是处理输入命令的:
->函数 parse_stream 进行命令解析
->调用 run_list 函数来执行解析出来的命令
->函数 run_list 会经过一系列的函数调用,最终通过调用 cmd_process 函数来处理命令
cmd_process函数 定义在common\command.c中,代码如下:
enum command_ret_t cmd_process(int flag, int argc, char * const argv[],
			       int *repeatable, ulong *ticks)
{
	enum command_ret_t rc = CMD_RET_SUCCESS;
	cmd_tbl_t *cmdtp;

	/* Look up command in command table */
	cmdtp = find_cmd(argv[0]);
	if (cmdtp == NULL) {
		printf("Unknown command '%s' - try 'help'\n", argv[0]);
		return 1;
	}

	/* found - check max args */
	if (argc > cmdtp->maxargs)
		rc = CMD_RET_USAGE;

#if defined(CONFIG_CMD_BOOTD)
	/* avoid "bootd" recursion */
	else if (cmdtp->cmd == do_bootd) {
		if (flag & CMD_FLAG_BOOTD) {
			puts("'bootd' recursion detected\n");
			rc = CMD_RET_FAILURE;
		} else {
			flag |= CMD_FLAG_BOOTD;
		}
	}
#endif

	/* If OK so far, then do the command */
	if (!rc) {
		if (ticks)
			*ticks = get_timer(0);
		rc = cmd_call(cmdtp, flag, argc, argv);
		if (ticks)
			*ticks = get_timer(*ticks);
		*repeatable &= cmdtp->repeatable;
	}
	if (rc == CMD_RET_USAGE)
		rc = cmd_usage(cmdtp);
	return rc;
}
首先通过调用函数 find_cmd 在命令表中找到指定的命令,命令表其实是cmd_tbl_t 结构体数组,在下一篇博客如何自定义命令会提及到。然后调用 cmd_call 函数执行具体的命令,cmd_call 函数其实就是调用cmd_tbl_t 结构体的 cmd成员——do_xxx命令函数,最终执行这个命令。


 1361
1361


 被折叠的 条评论
为什么被折叠?
被折叠的 条评论
为什么被折叠?
 到【灌水乐园】发言


