


来试试强大的Stable Diffusion吧,基于Stable Diffusion的pipeline,进一步了解Stable Diffusion的结构~
Diffusion实战篇:
【Diffusion实战】训练一个diffusion模型生成S曲线(Pytorch代码详解)
【Diffusion实战】训练一个diffusion模型生成蝴蝶图像(Pytorch代码详解)
【Diffusion实战】引导一个diffusion模型根据文字生成图像(Pytorch代码详解)
【Diffusion实战】训练一个类别引导diffusion模型(Pytorch代码详解)
Diffusion综述篇:
【Diffusion综述】医学图像分析中的扩散模型(一)
【Diffusion综述】医学图像分析中的扩散模型(二)
1、Stable Diffusion初探:从文本生成图像
首先,得看看Stable Diffusion用起来是个什么效果。
预训练pipeline下载:stabilityai/stable-diffusion-2-1-base(模型有点多,要下老半天…)
import torch
import requests
from PIL import Image
from io import BytesIO
from matplotlib import pyplot as plt
from diffusers import StableDiffusionPipeline
device = torch.device("cuda" if torch.cuda.is_available() else "cpu")
# pipeline加载
model_id = "E:/Code/kuosan/stable-diffusion-2-1-base"
pipe = StableDiffusionPipeline.from_pretrained(model_id).to(device)
# 为生成器设置一个随机种子, 使结果可重复
generator = torch.Generator(device=device).manual_seed(42)
# 运行pipeline
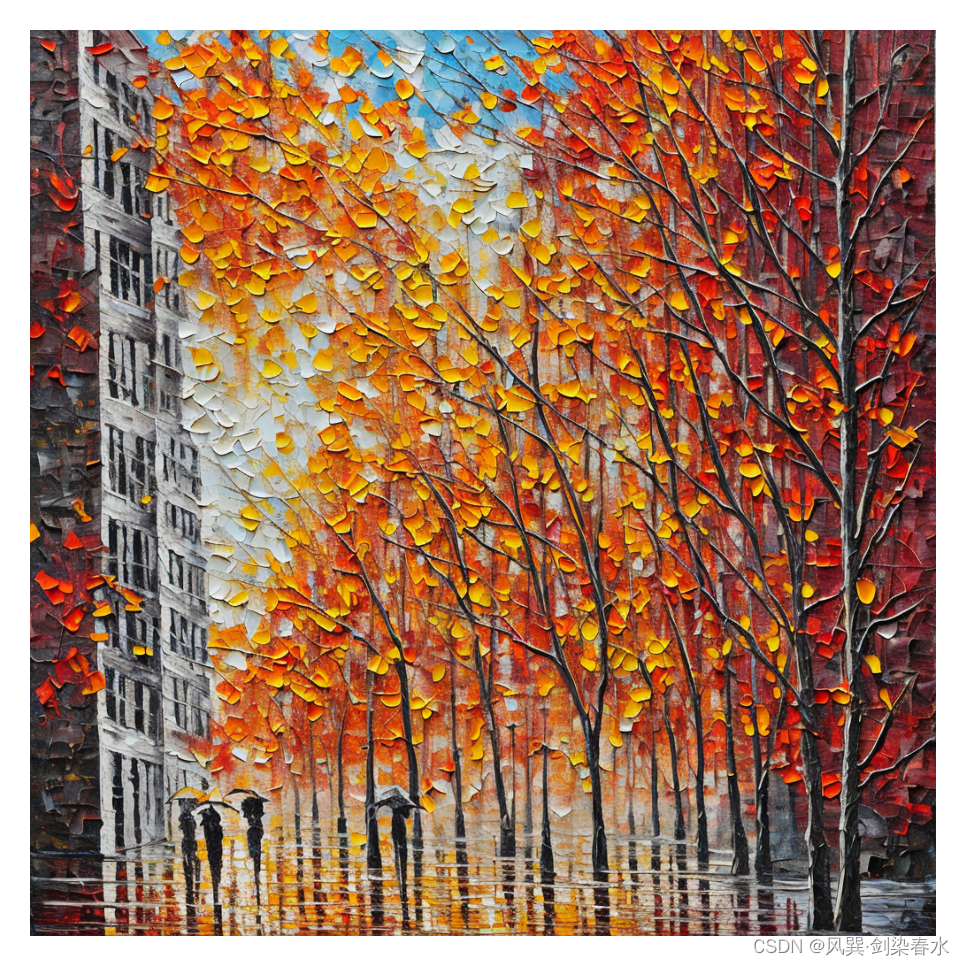
pipe_output = pipe(
prompt="Palette knife painting of an autumn cityscape", # 提示文字:需要生成的
negative_prompt="Oversaturated, blurry, low quality", # 提示文字:不需要生成的
height=1024, width=1024, # 定义生成图像尺寸大小
guidance_scale=10, # 提示文字的影响程度
num_inference_steps=50, # 一次生成需要的推理步骤
generator=generator # 设置随机数种子生成器
)
# 查看生成结果
plt.figure(dpi=300)
plt.imshow(pipe_output.images[0])
plt.axis('off')
plt.show()
输出图像为:
修改文字prompt可生成不同风格和内容的图像:
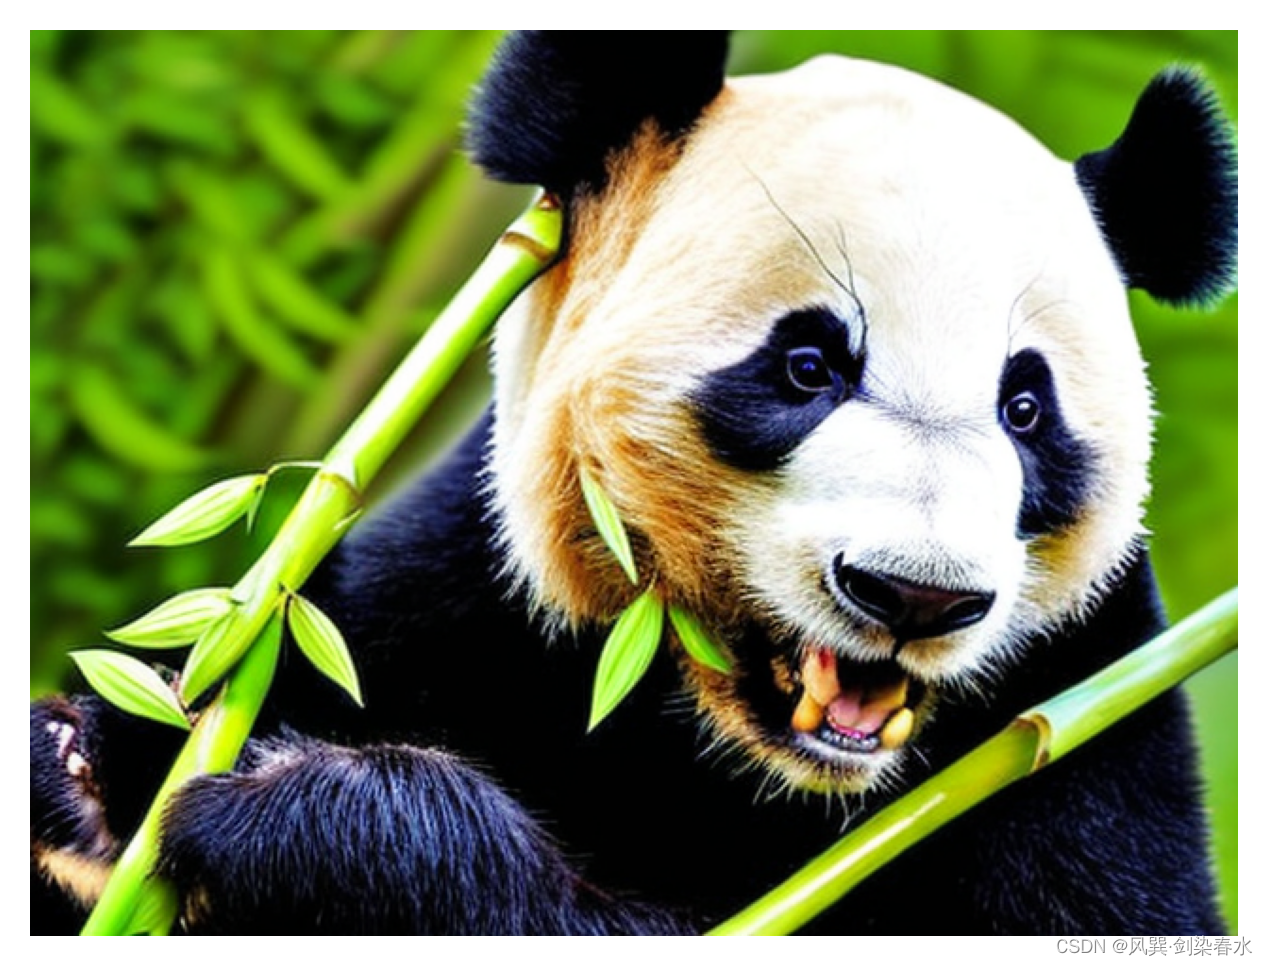
pipe_output = pipe(
    prompt="A realistic photo of a cute giant panda eating fresh green bamboo", # 提示文字:需要生成的
    negative_prompt="Oversaturated, blurry, low quality", # 提示文字:不需要生成的
    height=480, width=640,     # 定义生成图像尺寸大小
    guidance_scale=10,          # 提示文字的影响程度
    num_inference_steps=50,    # 一次生成需要的推理步骤
    generator=generator        # 设置随机数种子生成器
)
生成图像如下所示,赞叹一句,真强啊!连牙都没少啊!
探索guidance_scale参数对图像的影响:guidance_scale决定了无分类器引导的影响强度,增大该参数可以使生成的内容更接近给出的文本prompt,若该参数过大,则会导致图像过饱和,视觉不太美观。
cfg_scales = [2, 5, 8, 11, 14]
prompt = "A cute kitten sleeping in a pile of flower petals"
fig, axs = plt.subplots(1, len(cfg_scales), figsize=(16, 5))
for i, ax in enumerate(axs):
  im = pipe(prompt, height=480, width=480,
    guidance_scale=cfg_scales[i], num_inference_steps=35,
    generator=torch.Generator(device=device).manual_seed(42)).images[0]
  ax.imshow(im)
  ax.axis('off')
  ax.set_title(f'CFG Scale {cfg_scales[i]}')
狸奴小睡不知愁,忙添落花作锦裘~
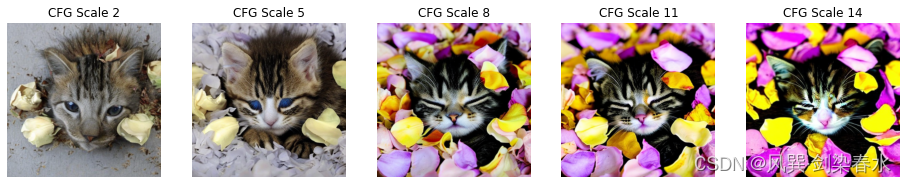
一般来说,guidance_scale的值设置为8~12,当然,视觉判断也是比较主观的。
2、Stable Diffusion深入:结构解析
Stable Diffusion的pipeline中有哪些结构呢,可以打印查看一下:
print(list(pipe.components.keys()))
['vae', 'text_encoder', 'tokenizer', 'unet', 'scheduler', 'safety_checker', 'feature_extractor', 'image_encoder']
Latent Diffusion Models结构图:
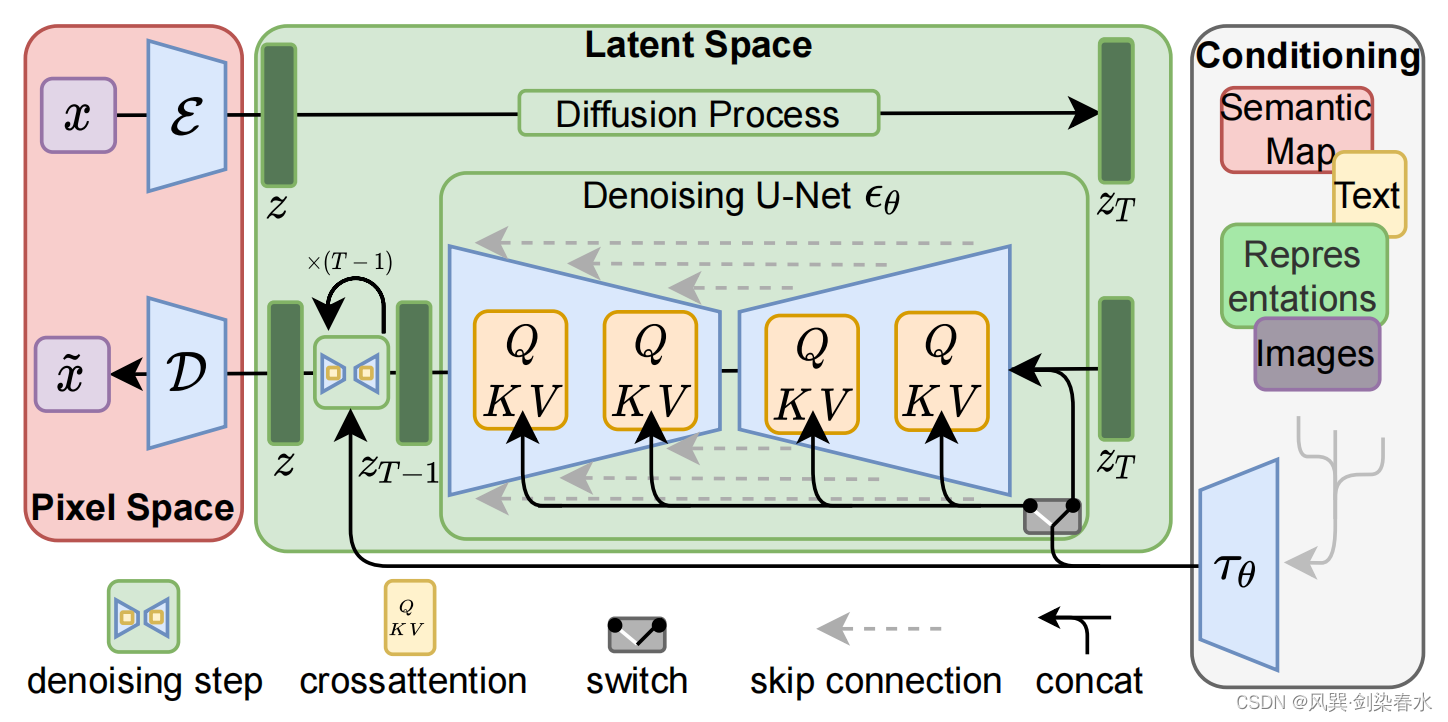
2.1 变分自编码器(VAE)
VAE的作用是对输入图像进行压缩,其编码器完成从像素空间(Pixel space)到隐空间(Latent space)的编码,扩散过程在隐空间的图像特征中完成,VAE解码器实现从隐空间再到像素空间的转换。
# 创建测试图像, 取值范围为(-1,1)
images = torch.rand(1, 3, 512, 512).to(device) * 2 - 1
print("Input images shape:", images.shape)

# 编码到隐空间
with torch.no_grad():
  latents = 0.18215 * pipe.vae.encode(images).latent_dist.mean
print("Encoded latents shape:", latents.shape)

# 从隐空间解码
with torch.no_grad():
  decoded_images = pipe.vae.decode(latents / 0.18215).sample
print("Decoded images shape:", decoded_images.shape)
打印为:
Input images shape: torch.Size([1, 3, 512, 512])
Encoded latents shape: torch.Size([1, 4, 64, 64])
Decoded images shape: torch.Size([1, 3, 512, 512])
可以看到,原本512×512大小的图像,被压缩成64×64的隐式表达,隐编码可使扩散模型运行更快,更高效~
这里其实有一个疑惑,隐空间图像特征维度通道为什么设置为4而不是3呢?
2.2 分词器与文本编码器
文本编码器的作用是将输入字符串转换成数值形式,以便作为UNet的输入。输入的文字prompt先进行词嵌入,然后送入文本编码器进行特征映射。
知识传送:【中文编码】利用bert-base-chinese中的Tokenizer实现中文编码嵌入
# 对输入文字进行分词
input_ids = pipe.tokenizer(["A painting of a flooble"])['input_ids']
print("Input ID -> decoded token")
for input_id in input_ids[0]:
  print(f"{input_id} -> {pipe.tokenizer.decode(input_id)}")

# 将分词结果输入CLIP文本编码器
input_ids = torch.tensor(input_ids).to(device)
with torch.no_grad():
  text_embeddings = pipe.text_encoder(input_ids)['last_hidden_state']
print("Text embeddings shape:", text_embeddings.shape)

text_embeddings = pipe.encode_prompt("A painting of a flooble", device, 1, False, '')
print(text_embeddings[0].shape)
输出为:
Input ID -> decoded token
49406 -> <|startoftext|>
320 -> a
3086 -> painting
539 -> of
320 -> a
4062 -> floo
1059 -> ble
49407 -> <|endoftext|>
Text embeddings shape: torch.Size([1, 8, 1024])
torch.Size([1, 77, 1024])
输出维度为77,包含75词以内的文本prompt,以及一个开始符和终止符。
2.3 UNet网络
UNet网络的作用是接收带噪输入并预测噪声,实现去噪。UNet的输入有大小为 [ 1 , 77 , 1024 ] {[1, 77, 1024]} [1,77,1024] 的文本嵌入、大小为 [ 4 , 64 , 64 ] {[4, 64, 64]} [4,64,64] 的图像隐特征,以及时间步。
# 创建输入
timestep = pipe.scheduler.timesteps[0]
latents = torch.randn(1, 4, 64, 64).to(device)
text_embeddings = torch.randn(1, 77, 1024).to(device)

# 模型预测:
with torch.no_grad():
  unet_output = pipe.unet(latents, timestep, text_embeddings).sample
print('UNet output shape:', unet_output.shape)
输出为:
UNet output shape: torch.Size([1, 4, 64, 64])
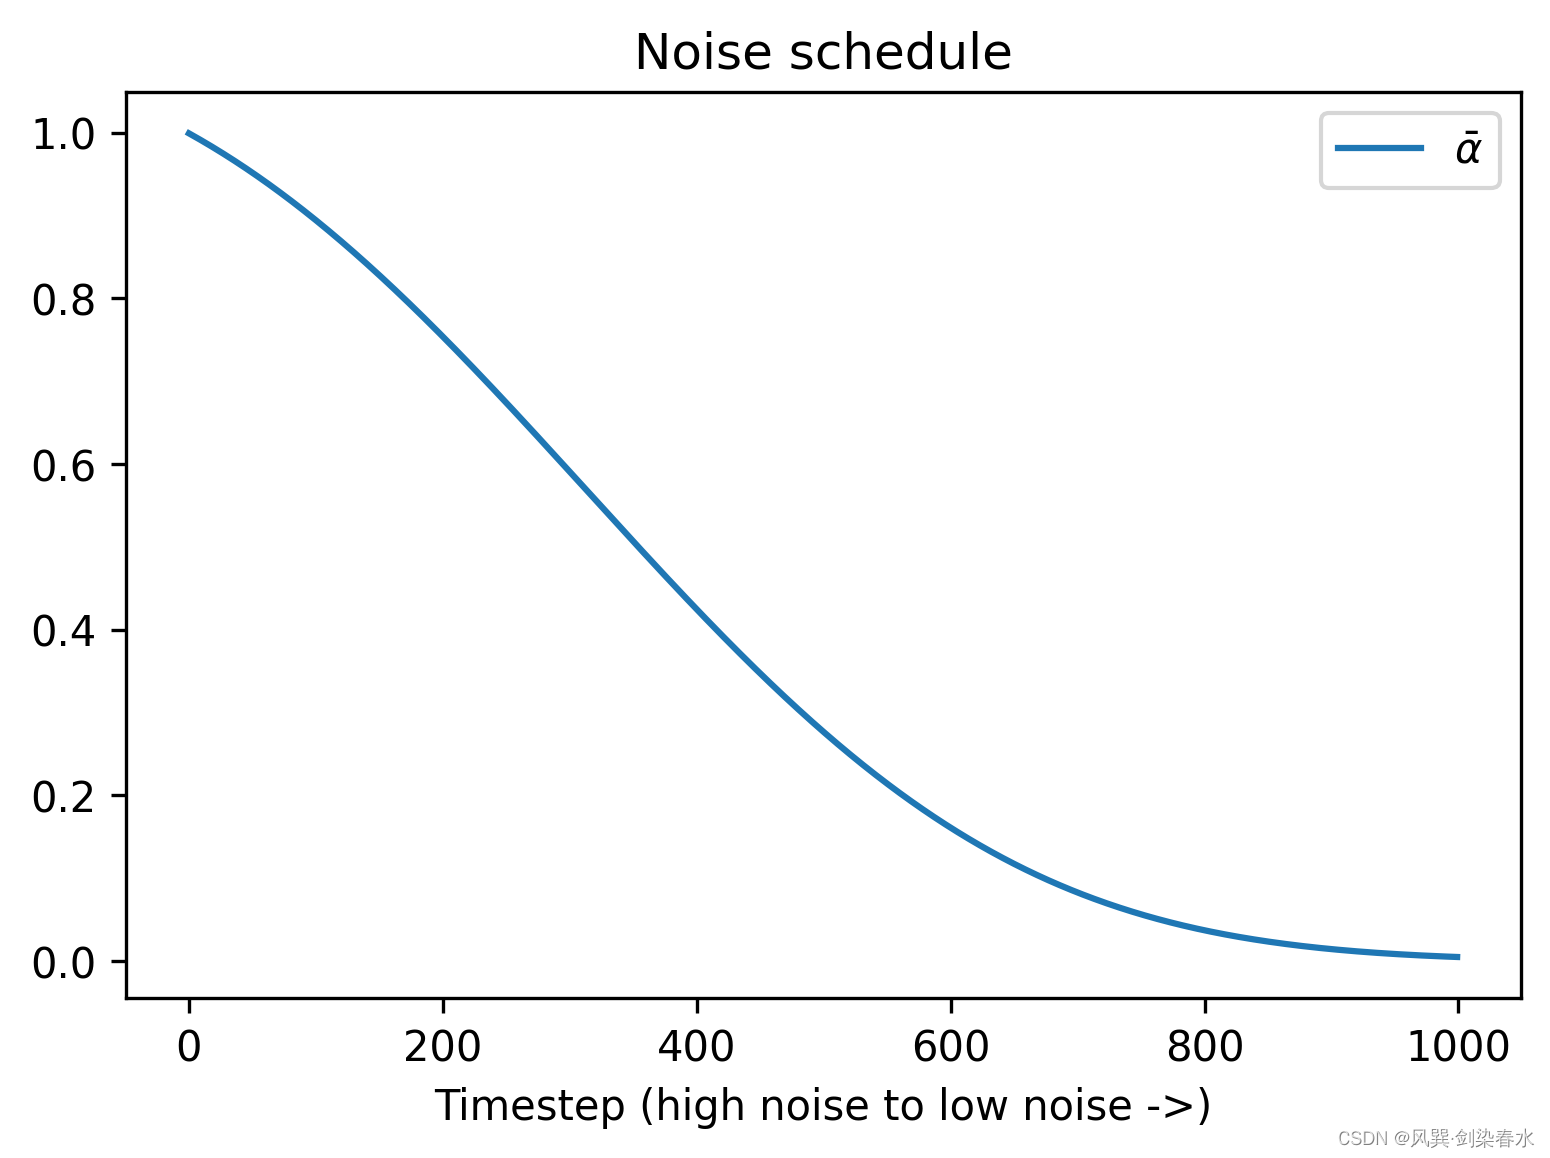
2.4 调度器
调度器保存了如何添加噪声的信息,默认调度器为PNDMScheduler。
前向加噪过程:
x
t
=
α
ˉ
t
x
0
+
1
−
α
ˉ
t
ε
{{x_t} = \sqrt {{{\bar \alpha }_t}} {x_0} + \sqrt {1 - {{\bar \alpha }_t}} \varepsilon }
xt=αˉtx0+1−αˉtε
plt.figure(dpi=300)
plt.plot(pipe.scheduler.alphas_cumprod, label=r'$\bar{\alpha}$')
plt.xlabel('Timestep (high noise to low noise ->)')
plt.title('Noise schedule')
plt.legend()
画图为:
from diffusers import LMSDiscreteScheduler
# 更换调度器
pipe.scheduler = LMSDiscreteScheduler.from_config(pipe.scheduler.config)
# 输出配置参数
print('Scheduler config:', pipe.scheduler)
# 用新的调度器生成图像
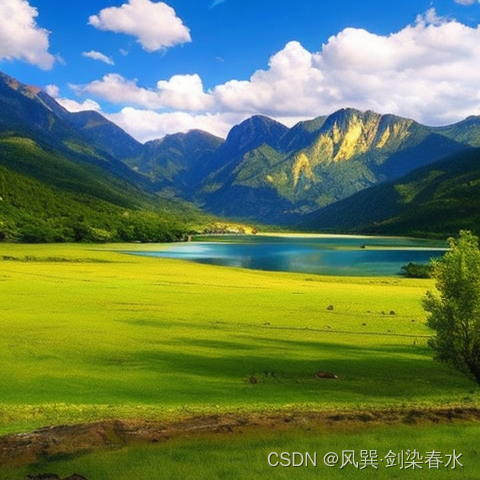
pipe(prompt="Beautiful pastoral scenery, beautiful mountains and waters",
height=480, width=480, num_inference_steps=50,
generator=torch.Generator(device=device).manual_seed(42)).images[0]
输出设置有:
Scheduler config: LMSDiscreteScheduler {
  "_class_name": "LMSDiscreteScheduler",
  "_diffusers_version": "0.26.3",
  "beta_end": 0.012,
  "beta_schedule": "scaled_linear",
  "beta_start": 0.00085,
  "clip_sample": false,
  "num_train_timesteps": 1000,
  "prediction_type": "epsilon",
  "set_alpha_to_one": false,
  "skip_prk_steps": true,
  "steps_offset": 1,
  "timestep_spacing": "linspace",
  "trained_betas": null,
  "use_karras_sigmas": false
}
生成图像:
2.5 自定义循环采样
探索了Stable Diffusion的各个组件,就可以自定义循环采样过程,将其组装起来实现文生图:
guidance_scale = 8
num_inference_steps = 60
prompt = "A cute little monkey is standing on a tree"
negative_prompt = "zoomed in, blurry, oversaturated, warped"

# 文本编码
text_embeddings = pipe._encode_prompt(prompt, device, 1, True, negative_prompt)

# 创建随机噪声作为起点
latents = torch.randn((1, 4, 64, 64), device=device, generator=generator)
latents *= pipe.scheduler.init_noise_sigma

# 准备调度器
pipe.scheduler.set_timesteps(num_inference_steps, device=device)

# 循环采样
for i, t in enumerate(pipe.scheduler.timesteps):
    # 分类引导扩大隐特征
    latent_model_input = torch.cat([latents] * 2)

    # 应用调度器
    latent_model_input = pipe.scheduler.scale_model_input(latent_model_input, t)

    # 噪声预测
    with torch.no_grad():
        noise_pred = pipe.unet(latent_model_input, t, encoder_hidden_states=text_embeddings).sample

    # 进行引导
    noise_pred_uncond, noise_pred_text = noise_pred.chunk(2)
    noise_pred = noise_pred_uncond + guidance_scale * (noise_pred_text - noise_pred_uncond)

    # 去噪计算前一个样本 x_t -> x_t-1
    latents = pipe.scheduler.step(noise_pred, t, latents).prev_sample

# 将隐特征转换到像素域
with torch.no_grad():
    image = pipe.decode_latents(latents.detach())

# 可视化
final_image = pipe.numpy_to_pil(image)[0]
plt.figure(dpi=300)
plt.imshow(final_image)
plt.axis('off')
plt.show()
生成图像:
3、代码汇总
import torch
import requests
from PIL import Image
from io import BytesIO
from matplotlib import pyplot as plt
from diffusers import StableDiffusionPipeline

# =============================================================================
# Stable Diffusion初探
device = torch.device("cuda" if torch.cuda.is_available() else "cpu")

# pipeline加载
model_id = "E:/Code/kuosan/stable-diffusion-2-1-base"
pipe = StableDiffusionPipeline.from_pretrained(model_id).to(device)

# 为生成器设置一个随机种子, 使结果可重复
generator = torch.Generator(device=device).manual_seed(42)

# 运行pipeline
pipe_output = pipe(
    prompt="A realistic photo of a cute giant panda eating fresh green bamboo",  # 提示文字:需要生成的
    negative_prompt="Oversaturated, blurry, low quality",  # 提示文字:不需要生成的
    height=480, width=640,  # 定义生成图像尺寸大小
    guidance_scale=10,  # 提示文字的影响程度
    num_inference_steps=50,  # 一次生成需要的推理步骤
    generator=generator  # 设置随机数种子生成器
)

# 查看生成结果
plt.figure(dpi=300)
plt.imshow(pipe_output.images[0])
plt.axis('off')
plt.show()

# 探索guidance_scale的影响
cfg_scales = [2, 5, 8, 11, 14]
prompt = "A cute kitten sleeping in a pile of flower petals"
fig, axs = plt.subplots(1, len(cfg_scales), figsize=(16, 5))
for i, ax in enumerate(axs):
  im = pipe(prompt, height=480, width=480,
    guidance_scale=cfg_scales[i], num_inference_steps=35,
    generator=torch.Generator(device=device).manual_seed(42)).images[0]
  ax.imshow(im)
  ax.axis('off')
  ax.set_title(f'CFG Scale {cfg_scales[i]}')

# =============================================================================

# Stable Diffusion结构探索
# VAE -------------------------------------------------------------------------
print(list(pipe.components.keys()))

# 创建测试图像, 取值范围为(-1,1)
images = torch.rand(1, 3, 512, 512).to(device) * 2 - 1
print("Input images shape:", images.shape)

# 编码到隐空间
with torch.no_grad():
  latents = 0.18215 * pipe.vae.encode(images).latent_dist.mean
print("Encoded latents shape:", latents.shape)

# 从隐空间解码
with torch.no_grad():
  decoded_images = pipe.vae.decode(latents / 0.18215).sample
print("Decoded images shape:", decoded_images.shape)

# 分词与编码器 ------------------------------------------------------------------
# 对输入文字进行分词
input_ids = pipe.tokenizer(["A painting of a flooble"])['input_ids']
print("Input ID -> decoded token")
for input_id in input_ids[0]:
  print(f"{input_id} -> {pipe.tokenizer.decode(input_id)}")

# 将分词结果输入CLIP文本编码器
input_ids = torch.tensor(input_ids).to(device)
with torch.no_grad():
  text_embeddings = pipe.text_encoder(input_ids)['last_hidden_state']
print("Text embeddings shape:", text_embeddings.shape)

text_embeddings = pipe.encode_prompt("A painting of a flooble", device, 1, False, '')
print(text_embeddings.shape)

# UNet ------------------------------------------------------------------------
# 创建输入
timestep = pipe.scheduler.timesteps[0]
latents = torch.randn(1, 4, 64, 64).to(device)
text_embeddings = torch.randn(1, 77, 1024).to(device)

# 模型预测:
with torch.no_grad():
  unet_output = pipe.unet(latents, timestep, text_embeddings).sample
print('UNet output shape:', unet_output.shape)

# 调度器 -----------------------------------------------------------------------
plt.figure(dpi=300)
plt.plot(pipe.scheduler.alphas_cumprod, label=r'$\bar{\alpha}$')
plt.xlabel('Timestep (high noise to low noise ->)')
plt.title('Noise schedule')
plt.legend()

from diffusers import LMSDiscreteScheduler

# 更换调度器
pipe.scheduler = LMSDiscreteScheduler.from_config(pipe.scheduler.config)

# 输出配置参数
print('Scheduler config:', pipe.scheduler)

# 用新的调度器生成图像
pipe(prompt="Beautiful pastoral scenery, beautiful mountains and waters",
      height=480, width=480, num_inference_steps=50,
      generator=torch.Generator(device=device).manual_seed(42)).images[0]

# 自制循环采样 ------------------------------------------------------------------
guidance_scale = 8
num_inference_steps = 60
prompt = "A cute little monkey is standing on a tree"
negative_prompt = "zoomed in, blurry, oversaturated, warped"

# 文本编码
text_embeddings = pipe._encode_prompt(prompt, device, 1, True, negative_prompt)

# 创建随机噪声作为起点
latents = torch.randn((1, 4, 64, 64), device=device, generator=generator)
latents *= pipe.scheduler.init_noise_sigma

# 准备调度器
pipe.scheduler.set_timesteps(num_inference_steps, device=device)

# 循环采样
for i, t in enumerate(pipe.scheduler.timesteps):
    # 分类引导扩大隐特征
    latent_model_input = torch.cat([latents] * 2)

    # 应用调度器
    latent_model_input = pipe.scheduler.scale_model_input(latent_model_input, t)

    # 噪声预测
    with torch.no_grad():
        noise_pred = pipe.unet(latent_model_input, t, encoder_hidden_states=text_embeddings).sample

    # 进行引导
    noise_pred_uncond, noise_pred_text = noise_pred.chunk(2)
    noise_pred = noise_pred_uncond + guidance_scale * (noise_pred_text - noise_pred_uncond)

    # 去噪计算前一个样本 x_t -> x_t-1
    latents = pipe.scheduler.step(noise_pred, t, latents).prev_sample

# 将隐特征转换到像素域
with torch.no_grad():
    image = pipe.decode_latents(latents.detach())

# 可视化
final_image = pipe.numpy_to_pil(image)[0]
plt.figure(dpi=300)
plt.imshow(final_image)
plt.axis('off')
plt.show()
要不说AI绘画有意思呢,我能玩儿一个晚上…


 1215
1215


 被折叠的 条评论
为什么被折叠?
被折叠的 条评论
为什么被折叠?
 到【灌水乐园】发言


