


ColumnLayout 列布局
一、概述
ColumnLayout 其实就是 GridLayout 的一个很方便的类,推荐看完 GridLayout 再看看这个,这个使用也是非常的简单,
就是把需要布局的元素放置到 这个里面就好,只是这些被布局的元素的 长、宽度这些要注意一下,而且绑定也要注意一下,具体的注意事项在我博客专栏的 Layout 里面也说了的。
二、attached 属性介绍一下
attached 属性就是放在布局元素里面的,在布局器里面的元素的长宽这些是 用 这些 attached 属性确定,不能用 width 之类的哈。
这里都是 一下尺寸属性
- Layout.minimumWidth
- Layout.minimumHeight
- Layout.preferredWidth
- Layout.preferredHeight
- Layout.maximumWidth
- Layout.maximumHeight
- Layout.fillWidth
- Layout.fillHeight
下面就是一些对齐或者边距的属性
- Layout.alignment
- Layout.margins
- Layout.leftMargin
- Layout.rightMargin
- Layout.topMargin
- Layout.bottomMargin
三、例子
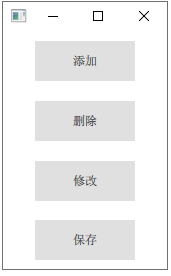
1. 按钮组布局
效果
import QtQuick 2.0
import QtQuick.Layouts 1.3
import QtQuick.Window 2.3
import QtQuick.Controls 2.5

Window{
    ColumnLayout{
        spacing: 2

        anchors.fill: parent

        Button{
            text: "添加"

            Layout.alignment: Qt.AlignHCenter
        }


        Button{
            text: "删除"

            Layout.alignment: Qt.AlignHCenter
        }

        Button{
            text: "修改"

            Layout.alignment: Qt.AlignHCenter
        }

        Button{
            text: "保存"

            Layout.alignment: Qt.AlignHCenter
        }
    }
}
2. 官方排列

代码
import QtQuick 2.0
import QtQuick.Layouts 1.3
import QtQuick.Window 2.3

Window{
    ColumnLayout{
        spacing: 2

        anchors.fill: parent

        Rectangle {
            Layout.alignment: Qt.AlignCenter
            color: "red"
            Layout.preferredWidth: 40
            Layout.preferredHeight: 40
        }

        Rectangle {
            Layout.alignment: Qt.AlignRight
            color: "green"
            Layout.preferredWidth: 40
            Layout.preferredHeight: 70
        }

        Rectangle {
            Layout.alignment: Qt.AlignBottom
            Layout.fillHeight: true
            color: "blue"
            Layout.preferredWidth: 70
            Layout.preferredHeight: 40
        }
    }

}


 1万+
1万+

 被折叠的 条评论
为什么被折叠?
被折叠的 条评论
为什么被折叠?
 到【灌水乐园】发言


