


文章目录

摘要
上一篇主要是对灰色图像间修改,那么此篇进行改动,加入通道信息,实现彩色水印嵌入与提取。数字水印技术是一种保护图像版权的方式。LSB(Least Significant Bits, 最低有效位)技术是空域水印嵌入的一种方式。本文以彩色图像为对象,使用Python实现了任意长度位平面的水印嵌入方式,并且可以提取出水印对应的彩色图像。
1. 方法
1.1 步骤
- 读取图像(background、watermark)
- 对读取的图像进行嵌入
2.1 划分对应的位平面(对每个通道进行位平面划分)
2.2 将background的低位位平面替换为watermark的高位位平面(逐通道)
2.3 合成图像(synthesis) ,实现嵌入(逐通道) - 进行提取并绘制结果(逐通道)
本实验选择的嵌入位数是2
1.2 代码
喜欢的东西都在码里,可以不用本地配置环境,使用百度的飞浆平台进行在线运行。
开源这个代码不求赞,只求你们可以注册帮我拿点算力,或者fork一下项目,我真的很需要算力,所以希望我劝各位年轻人,要讲武德,耗子尾汁,不要白嫖。好卑微的博主呜呜呜。下面第一个Link给的算力多,注册之后点第二个link可以在线运行
百度飞浆邀请注册地址
import numpy as np
import matplotlib.pyplot as plt
import cv2


# =====================================
# 进行彩色水印的嵌入
# =====================================
class LSB_Embed():
    def __init__(self):
        pass

    @staticmethod
    def get_bitPlane(img):
        """
        获取彩色图像的8个位平面
        :param img: 彩色图像
        :return: 8个位平面的张量shape=(h, w, 8, c)
        """
        # w, h, c = img.shape
        h, w, c = img.shape
        bitPlane = np.zeros(shape=(h, w, 8, c))
        for c_id in range(c):
            flag = 0b00000001
            for bit_i in range(bitPlane.shape[-2]):
                bitplane = img[..., c_id] & flag  # 获取图像的某一位,从最后一位开始处理
                bitplane[bitplane != 0] = 1  # 阈值处理 非0即1
                bitPlane[..., bit_i, c_id] = bitplane  # 处理后的数据载入到某个位平面
                flag <<= 1  # 获取下一个位的信息
        return bitPlane.astype(np.uint8)

    @staticmethod
    def lsb_embed(background, watermark, embed_bit=3):
        """
        在background的低三位进行嵌入水印,具体为将watermark的高三位信息替换掉background的低三位信息
        :param background: 背景图像(彩色)
        :param watermark: 水印图像(彩色)
        :return: 嵌入水印的图像
        """
        # 1. 判断是否满足可嵌入的条件
        w_h, w_w,w_c = watermark.shape
        b_h,b_w, b_c = background.shape
        assert w_w < b_w and w_h < b_h, "请保证watermark尺寸小于background尺寸\r\n当前尺寸watermark:{}, background:{}".format(
            watermark.shape, background.shape)

        # 2. 获取位平面
        bitPlane_background = lsb.get_bitPlane(
            background)  # 获取的平面顺序是从低位到高位的 [(0 1 2 3 4 5 6 7),(0 1 2 3 4 5 6 7),(0 1 2 3 4 5 6 7)]
        bitPlane_watermark = lsb.get_bitPlane(watermark)

        # 3. 在位平面嵌入信息
        for c_i in range(b_c):
            for i in range(embed_bit):
                # 信息主要集中在高位,此处将watermark的高三位信息 放置在 background低三位信息中
                bitPlane_background[0:w_h, 0:w_w, i, c_i] = bitPlane_watermark[0:w_h, 0:w_w, (8 - embed_bit) + i, c_i]

        # 4. 得到watermark_img 水印嵌入图像
        synthesis = np.zeros_like(background)
        for c_i in range(b_c):
            for i in range(8):
                synthesis[..., c_i] += bitPlane_background[..., i, c_i] * np.power(2, i)
        return synthesis.astype(np.uint8)

    @staticmethod
    def lsb_extract(synthesis, embed_bit=3):
        bitPlane_synthesis = lsb.get_bitPlane(synthesis)
        extract_watermark = np.zeros_like(synthesis)
        extract_background = np.zeros_like(synthesis)
        for c_i in range(3):
            for i in range(8):
                if i < embed_bit:
                    extract_watermark[..., c_i] += bitPlane_synthesis[..., i, c_i] * np.power(2, (8 - embed_bit) + i)
                else:
                    extract_background[..., c_i] += bitPlane_synthesis[..., i, c_i] * np.power(2, i)
        return extract_watermark.astype(np.uint8), extract_background.astype(np.uint8)


if __name__ == '__main__':
    root = ".."
    lsb = LSB_Embed()
    # 1. 获取背景和水印
    background = cv2.imread(r"{}/datasets/background/dog1.png".format(root))
    watermark = cv2.imread(r"{}/datasets/watermark/swjtu2.png".format(root))

    background = cv2.cvtColor(background, cv2.COLOR_BGR2RGB)
    watermark = cv2.cvtColor(watermark, cv2.COLOR_BGR2RGB)
    background_backup = background.copy()
    watermark_backup = watermark.copy()
    # 2. 进行水印嵌入
    embed_bit = 2
    synthesis = lsb.lsb_embed(background, watermark, embed_bit)
    # 3. 进行水印提取
    extract_watermark, extract_background = lsb.lsb_extract(synthesis, embed_bit)
    imgs = [background_backup, watermark_backup, synthesis, extract_watermark, extract_background]
    title = ["background", "watermark", "synthesis", "extract_watermark", "extract_background"]
    for i in range(len(imgs)):
        plt.subplot(2, 3, i + 1)
        plt.imshow(imgs[i])
        plt.axis("off")
        plt.title(title[i])
    plt.show()
1.3 embed_bit=2(低2位嵌入) 实验现象
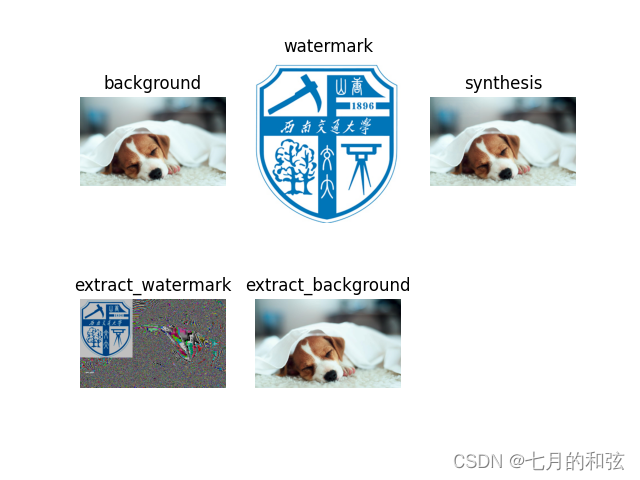
实现了彩色水印嵌入与提前,与上一篇灰度图像的区别就在,加入了对每个通道进行处理的操作。


 831
831


 被折叠的 条评论
为什么被折叠?
被折叠的 条评论
为什么被折叠?
 到【灌水乐园】发言


