


记录ros自带标定源码的实现过程
ros标定源码:ros标定源码
运行命令行
rosrun camera_calibration cameracalibrator.py --size 6x7 --square 0.043 image:=/camera_image
lvfu@lvfu-ThinkPad-E14:~/Project_of_calibration0325/Project_of_calibration/image_pipeline-melodic$ rosrun camera_calibration cameracalibrator.py --size 6x7 --square 0.043 image:=/camera_image
Gtk-Message: 10:02:14.031: Failed to load module "canberra-gtk-module"
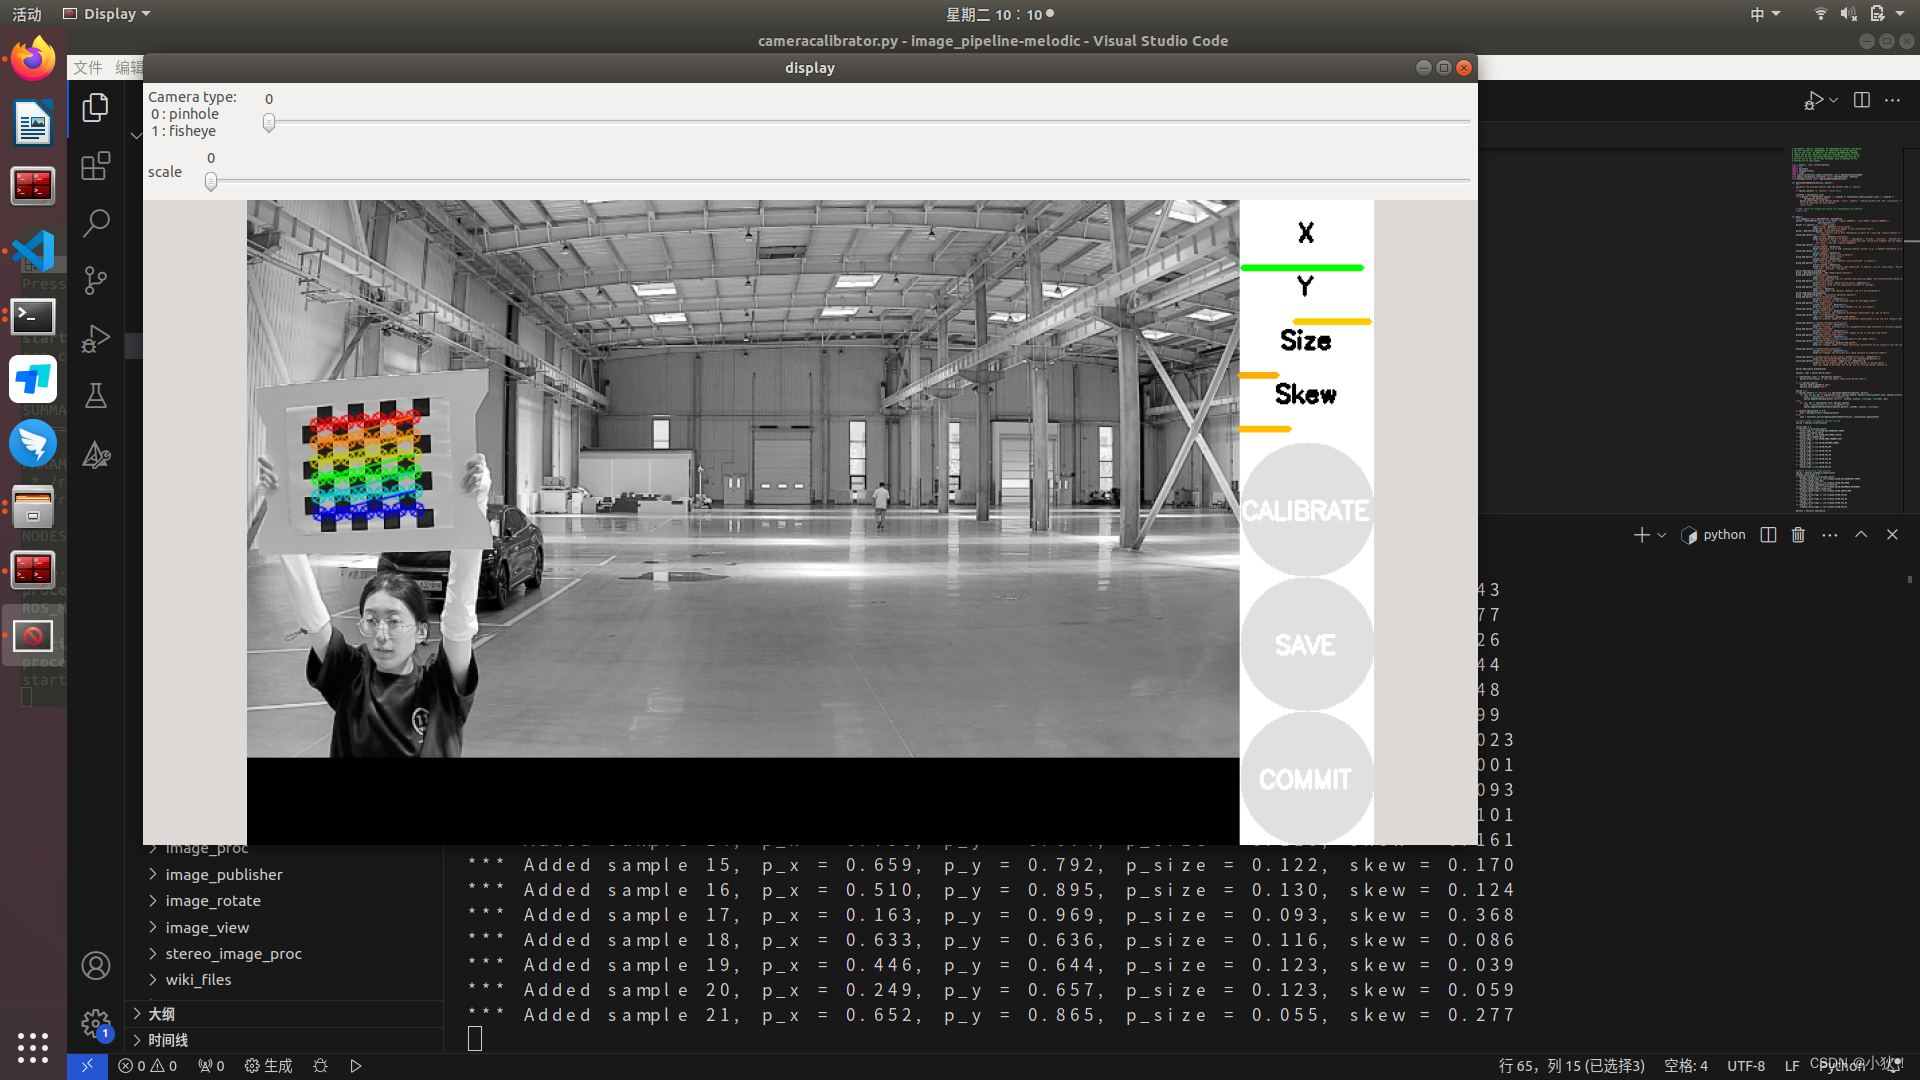
*** Added sample 1, p_x = 0.641, p_y = 0.446, p_size = 0.109, skew = 0.018
*** Added sample 2, p_x = 0.427, p_y = 0.452, p_size = 0.111, skew = 0.023
*** Added sample 3, p_x = 0.176, p_y = 0.479, p_size = 0.102, skew = 0.023
*** Added sample 4, p_x = 0.044, p_y = 0.461, p_size = 0.134, skew = 0.143
*** Added sample 5, p_x = 0.129, p_y = 0.428, p_size = 0.264, skew = 0.077
*** Added sample 6, p_x = 0.348, p_y = 0.416, p_size = 0.274, skew = 0.026
*** Added sample 7, p_x = 0.553, p_y = 0.417, p_size = 0.264, skew = 0.044
*** Added sample 8, p_x = 0.700, p_y = 0.479, p_size = 0.251, skew = 0.048
*** Added sample 9, p_x = 0.908, p_y = 0.510, p_size = 0.200, skew = 0.099
*** Added sample 10, p_x = 0.295, p_y = 0.521, p_size = 0.163, skew = 0.023
*** Added sample 11, p_x = 0.024, p_y = 0.532, p_size = 0.116, skew = 0.001
*** Added sample 12, p_x = 0.105, p_y = 0.561, p_size = 0.114, skew = 0.093
*** Added sample 13, p_x = 0.281, p_y = 0.551, p_size = 0.075, skew = 0.101
*** Added sample 14, p_x = 0.758, p_y = 0.674, p_size = 0.110, skew = 0.161
*** Added sample 15, p_x = 0.659, p_y = 0.792, p_size = 0.122, skew = 0.170
*** Added sample 16, p_x = 0.510, p_y = 0.895, p_size = 0.130, skew = 0.124
在有bag包运行的情况下对应的运行结果输出如上,记录四个参数分别为p_x, p_y, p_size, skew(翻转程度),一行代表捕获到的一张图片,如:
 一些参数编辑的地方,以及对参数的解释。
--size : 标定版点的个数:NxM
--square : 标定版小格子以米为单位的大小:0.043
image : 话题名
camera_calibration cameracalibrator.py
 group.add_option("-s", "--size",
                     action="append", default=[],
                     help="chessboard size as NxM, counting interior corners (e.g. a standard chessboard is 7x7)")
 group.add_option("-q", "--square",
                     action="append", default=[],
                     help="chessboard square size in meters")
此node的定义在camera_calibration/src/camera_calibration/camera_calibrator.py
node入口的定义在此文件内,如下:
class OpenCVCalibrationNode(CalibrationNode):
    """ Calibration node with an OpenCV Gui """
此文件中的CalibrationNode类别调用camera_calibration/src/camera_calibration/calibrator.py里的class MonoCalibrator(Calibrator):类别,也就是下面这个部分,来检测输入的图片里面是否有棋盘格,并用色彩显示角点。
下采样输入图片
使用OpenCV库来对输入图像进行下采样(downsampling)到近似VGA分辨率(通常为640x480像素),并在缩小后的图像上检测棋盘格标定目标(calibration target)的角点。之后,我们可以将这些角点坐标按照下采样的比例放大回原始图像尺寸。
/camera_calibration/calibrator.py
当图像尺寸(总像素个数)大于VGA时,将图像缩放到近似VGA(像素个数比率的平方根),并以浮点数记录x和y方向的缩放scale。此后利用
get_coners()成员函数检查角点。get_coners()函数进一步调用_get_corners()私有函数。在
_get_corners()函数中,使用cv2.findChessboardCorners()函数进行棋盘格的检测。棋盘格的patternSize是(columns, rows)次序,和其他OpenCV函数一致。在用户指定的flag基础上,增加了cv2.CALIB_CB_ADAPTIVE_THRESH和cv2.CALIB_CB_NORMALIZE_IMAGE。棋盘格检测之后,在当前downsample过的image内查看检查出的角点是否远离图像边缘,默认的最小距离是8
pixels。对于行列数量不一致的棋盘格,检查检测到的棋盘格是不是从上至下的方向。此后找到所有角点之间的相对距离的最小值,利用这个最小值的一半(强制转换为int)作为refine radius. 使用cv2.cornerSubPix()函数进行refine。所用的criteria是( cv2.TERM_CRITERIA_EPS + cv2.TERM_CRITERIA_MAX_ITER, 30, 0.1 )返回到
downsample_and_detect()函数,将在小尺寸上detect到的角点重新映射到原始图像尺寸上。使用之前downsample的scale作为radius再次进行refine,criteria不变。
        # Scale the input image down to ~VGA size 将输入图像降成640*480
        height = img.shape[0]
        width = img.shape[1]
        scale = math.sqrt( (width*height) / (640.*480.) )
        if scale > 1.0:
            scrib = cv2.resize(img, (int(width / scale), int(height / scale)))
        else:
            scrib = img
        # Due to rounding, actual horizontal/vertical scaling may differ slightly
        x_scale = float(width) / scrib.shape[1]
        y_scale = float(height) / scrib.shape[0]
棋盘格检测
if self.pattern == Patterns.Chessboard:
    # Detect checkerboard 进行标定板的检测。
    (ok, downsampled_corners, ids, board) = self.get_corners(scrib, refine = True)
使用 cvFindChessboardCorners 函数在图像中查找棋盘格的角点。检查所有棋盘格。如果给定多个尺寸的棋盘格,则返回检测到的第一个棋盘格的角点。如果使用的是ChArUco棋盘格,还会返回标记ID,否则 ids 为 None。返回 (ok, corners, ids, board)
    def get_corners(self, img, refine = True):
        """
        Use cvFindChessboardCorners to find corners of chessboard in image.

        Check all boards. Return corners for first chessboard that it detects
        if given multiple size chessboards.

        If a ChArUco board is used, the marker IDs are also returned, otherwise
        ids is None.

        Returns (ok, corners, ids, board)
        """

        for b in self._boards:
            if self.pattern == Patterns.Chessboard: # 如果
                (ok, corners) = _get_corners(img, b, refine, self.checkerboard_flags) # 调用 _get_corners 函数获取棋盘格的角点。
                ids = None
            '''
            如果 self.pattern 是 Patterns.Chessboard(棋盘格):
				调用 _get_corners 函数获取棋盘格的角点。
				ids 被设置为 None,因为棋盘格没有标记ID。

            '''
            elif self.pattern == Patterns.ChArUco:
                (ok, corners, ids) = _get_charuco_corners(img, b, refine)
            else:
                (ok, corners) = _get_circles(img, b, self.pattern)
                ids = None
            if ok:
                return (ok, corners, ids, b)
		 '''
    	如果成功检测到角点(即 ok 为 True),则返回 (ok, corners, ids, b)。
    	如果遍历完所有棋盘格或标记后仍未找到角点,则返回 (False, None, None, None)。
		'''
        return (False, None, None, None)
检测角点
得到一张图片中特定棋盘格的角点。
-
函数定义:
_get_corners(img, board, refine = True, checkerboard_flags=0):这个函数接受一个图像 img、一个棋盘对象 board、一个可选的 refine 参数(用于决定是否细化角点)和一个可选的 checkerboard_flags 参数(用于 cv2.findChessboardCorners 的额外标志)。 -
图像预处理:
首先,它检查图像 img 的形状,如果图像是彩色图像(具有三个通道),则将其转换为灰度图像 mono。如果已经是灰度图像,则直接使用。 -
寻找棋盘角点:
使用 OpenCV 的cv2.findChessboardCorners函数在灰度图像 mono 上寻找棋盘角点。棋盘的大小(行数和列数)由 board 对象的 n_cols 和 n_rows 属性提供。
checkerboard_flags 参数可以传递额外的标志给 findChessboardCorners 函数,用于控制角点检测的行为。 -
检查角点位置:
如果 ok 为 False(即没有找到角点),则直接返回 (ok, corners)。
如果找到了角点,则检查它们是否都位于图像边框内(距离图像边缘大于 BORDER 个像素)。如果不是,则将 ok 设置为 False。 -
检查棋盘是否是正方形:
如果棋盘的行数(board.n_rows)不等于列数(board.n_cols),则棋盘不是正方形。
对于非正方形棋盘:
检查第一个角点(corners[0, 0, 1])的y坐标是否大于最后一个角点(corners[-1, 0, 1])的y坐标。如果是,说明角点数组是从下到上的顺序,因此使用numpy.flipud将其翻转为从上到下的顺序。
对于正方形棋盘:
计算从第一个角点到最后一个角点的向量(direction_corners)。 如果这个向量的任何分量(在这里是x和y分量)都不是非负的,那么角点数组的顺序可能需要调整。
@ 如果向量的所有分量都是0(numpy.all(direction_corners)返回False并且numpy.any(direction_corners)也返回False),则表明角点可能在一个直线上,这通常是不正确的。在这种情况下,简单地使用numpy.flipud将角点数组上下翻转。
@ 如果向量的x分量是正数(direction_corners[0][0]为True),说明角点是从左到右、从上到下的顺序,但可能需要旋转90度以匹配通常的从上到下、从左到右的顺序。使用numpy.rot90进行旋转,并将结果重新整形为正确的形状。
@ 如果向量的x分量不是正数(即y分量可能是负数或0),则角点可能是从上到下、从右到左的顺序,需要旋转270度(或等价地,先旋转90度,然后旋转180度,或旋转3次90度)。同样使用numpy.rot90进行旋转,并将结果重新整形。 -
细化通过 cv2.findChessboardCorners 检测到的棋盘角点
使用角点之间最小距离的一半作为半径。这个半径应该足够大以能够捕捉到正确的角点,但又不能太大以至于在搜索窗口中包含了错误的角点。计算角点之间的最小距离来确定细化搜索的半径,并使用cv2.cornerSubPix来细化角点位置。
@ 函数返回 (ok, corners),其中 ok 是一个布尔值,表示是否成功找到并细化了角点,corners 是细化后的角点坐标。
def _get_corners(img, board, refine = True, checkerboard_flags=0):
    """
    Get corners for a particular chessboard for an image
    """
    h = img.shape[0]
    w = img.shape[1]
    if len(img.shape) == 3 and img.shape[2] == 3:
        mono = cv2.cvtColor(img, cv2.COLOR_BGR2GRAY)
    else:
        mono = img
    (ok, corners) = cv2.findChessboardCorners(mono, (board.n_cols, board.n_rows), flags = cv2.CALIB_CB_ADAPTIVE_THRESH |
                                              cv2.CALIB_CB_NORMALIZE_IMAGE | checkerboard_flags)
    if not ok:
        return (ok, corners)

    # If any corners are within BORDER pixels of the screen edge, reject the detection by setting ok to false
    # NOTE: This may cause problems with very low-resolution cameras, where 8 pixels is a non-negligible fraction
    # of the image size. See http://answers.ros.org/question/3155/how-can-i-calibrate-low-resolution-cameras
    BORDER = 8
    if not all([(BORDER < corners[i, 0, 0] < (w - BORDER)) and (BORDER < corners[i, 0, 1] < (h - BORDER)) for i in range(corners.shape[0])]):
        ok = False

    # Ensure that all corner-arrays are going from top to bottom.
    if board.n_rows!=board.n_cols:
        if corners[0, 0, 1] > corners[-1, 0, 1]:
            corners = numpy.copy(numpy.flipud(corners))
    else:
        direction_corners=(corners[-1]-corners[0])>=numpy.array([[0.0,0.0]])

        if not numpy.all(direction_corners):
            if not numpy.any(direction_corners):
                corners = numpy.copy(numpy.flipud(corners))
            elif direction_corners[0][0]:
                corners=numpy.rot90(corners.reshape(board.n_rows,board.n_cols,2)).reshape(board.n_cols*board.n_rows,1,2)
            else:
                corners=numpy.rot90(corners.reshape(board.n_rows,board.n_cols,2),3).reshape(board.n_cols*board.n_rows,1,2)

    if refine and ok:
        # Use a radius of half the minimum distance between corners. This should be large enough to snap to the
        # correct corner, but not so large as to include a wrong corner in the search window.
        min_distance = float("inf")
        for row in range(board.n_rows):
            for col in range(board.n_cols - 1):
                index = row*board.n_rows + col
                min_distance = min(min_distance, _pdist(corners[index, 0], corners[index + 1, 0]))
        for row in range(board.n_rows - 1):
            for col in range(board.n_cols):
                index = row*board.n_rows + col
                min_distance = min(min_distance, _pdist(corners[index, 0], corners[index + board.n_cols, 0]))
        radius = int(math.ceil(min_distance * 0.5))
        cv2.cornerSubPix(mono, corners, (radius,radius), (-1,-1),
                                      ( cv2.TERM_CRITERIA_EPS + cv2.TERM_CRITERIA_MAX_ITER, 30, 0.1 ))

    return (ok, corners)
重映射原尺寸
将上面的角点位置返回到downsample_and_detect()函数,将在小尺寸上detect到的角点重新映射到原始图像尺寸上。使用之前downsample的scale作为radius再次进行refine,criteria不变。
# Scale corners back to full size image
            corners = None
            if ok:
                if scale > 1.0:
                    # Refine up-scaled corners in the original full-res image
                    # TODO Does this really make a difference in practice?
                    corners_unrefined = downsampled_corners.copy()
                    corners_unrefined[:, :, 0] *= x_scale
                    corners_unrefined[:, :, 1] *= y_scale
                    radius = int(math.ceil(scale))
                    if len(img.shape) == 3 and img.shape[2] == 3:
                        mono = cv2.cvtColor(img, cv2.COLOR_BGR2GRAY)
                    else:
                        mono = img
                    cv2.cornerSubPix(mono, corners_unrefined, (radius,radius), (-1,-1),
                                                  ( cv2.TERM_CRITERIA_EPS + cv2.TERM_CRITERIA_MAX_ITER, 30, 0.1 ))
                    corners = corners_unrefined
                else:
                    corners = downsampled_corners
得到db数据(X,Y,Size,Skew)
在camera_calibration/src/camera_calibration/calibrator.py文件中的class Calibrator(object):类别中统计每个X,Y,Size,Skew,这些数据由self.db记录, self.db(parameters, image) 是一个存储了图像样本及其对应参数的列表,这些参数用于某种形式的校准或分析。这里的 parameters 是一个包含四个元素的元组 (X, Y, size, skew),每个元素都已经被归一化到 [0, 1] 的范围内。
        # self.db is list of (parameters, image) samples for use in calibration. parameters has form
        # (X, Y, size, skew) all normalized to [0,1], to keep track of what sort of samples we've taken
        # and ensure enough variety.
        self.db = []
获取参数代码如下(第一个函数,下面是调用的函数):
提取棋盘格角点的 x 和 y 坐标。
根据棋盘类型,找到棋盘的外围角点。
计算棋盘的外围面积和倾斜度(或偏斜度)。
计算归一化的 X、Y 坐标、归一化的尺寸和倾斜度,这些值将作为描述棋盘格视图的参数。
   def get_parameters(self, corners, ids, board, size):
        """
        Return list of parameters [X, Y, size, skew] describing the checkerboard view.
        """
        (width, height) = size
        Xs = corners[:,:,0]
        Ys = corners[:,:,1]
        if board.pattern == 'charuco':
            outside_corners = _get_largest_rectangle_corners(corners, ids, board)
        else:
            outside_corners = _get_outside_corners(corners, board)
        area = _calculate_area(outside_corners)
        skew = _calculate_skew(outside_corners)
        border = math.sqrt(area)
        # For X and Y, we "shrink" the image all around by approx. half the board size.
        # Otherwise large boards are penalized because you can't get much X/Y variation.
        #计算归一化的 X 和 Y 坐标(p_x 和 p_y)。这些坐标通过从平均 x 和 y 坐标中减去棋盘“边界”的一半,并除
        #以棋盘的实际尺寸(减去边界)来得到。这样可以确保即使对于大型棋盘,X 和 Y 坐标也不会因为角点位置的
        #变化范围大而受到惩罚。
        p_x = min(1.0, max(0.0, (numpy.mean(Xs) - border / 2) / (width  - border)))
        p_y = min(1.0, max(0.0, (numpy.mean(Ys) - border / 2) / (height - border)))
        p_size = math.sqrt(area / (width * height))
        # 计算归一化的尺寸(p_size)。这是通过计算实际面积与棋盘面积的比例的平方根来得到的。
        params = [p_x, p_y, p_size, skew]
        # 将归一化的 X、Y 坐标、归一化的尺寸和倾斜度组合成一个列表(params),并返回它。
        return params

# 下面是上面函数调用的函数

def _get_outside_corners(corners, board):
    """
    Return the four corners of the board as a whole, as (up_left, up_right, down_right, down_left).
    """
    xdim = board.n_cols
    ydim = board.n_rows

    if board.pattern != "charuco" and corners.shape[1] * corners.shape[0] != xdim * ydim:
        raise Exception("Invalid number of corners! %d corners. X: %d, Y: %d" % (corners.shape[1] * corners.shape[0],
                                                                                xdim, ydim))
    if board.pattern == "charuco" and corners.shape[1] * corners.shape[0] != (xdim-1) * (ydim-1):
        raise Exception(("Invalid number of corners! %d corners. X: %d, Y: %d\n  for ChArUco boards, " +
                "_get_largest_rectangle_corners handles partial views of the target") % (corners.shape[1] *
                    corners.shape[0], xdim-1, ydim-1))

    up_left    = corners[0,0]
    up_right   = corners[xdim - 1,0]
    down_right = corners[-1,0]
    down_left  = corners[-xdim,0]

    return (up_left, up_right, down_right, down_left)

#计算面积大小
def _calculate_area(corners):
    """
    Get 2d image area of the detected checkerboard.
    The projected checkerboard is assumed to be a convex quadrilateral, and the area computed as
    |p X q|/2; see http://mathworld.wolfram.com/Quadrilateral.html.
    """
    (up_left, up_right, down_right, down_left) = corners
    a = up_right - up_left
    b = down_right - up_right
    c = down_left - down_right
    p = b + c
    q = a + b
    return abs(p[0]*q[1] - p[1]*q[0]) / 2.

# 计算扭转角度大小
def _calculate_skew(corners):
    """
    Get skew for given checkerboard detection.
    Scaled to [0,1], which 0 = no skew, 1 = high skew
    Skew is proportional to the divergence of three outside corners from 90 degrees.
    """
    # TODO Using three nearby interior corners might be more robust, outside corners occasionally
    # get mis-detected
    up_left, up_right, down_right, _ = corners

    def angle(a, b, c):
        """
        Return angle between lines ab, bc
        """
        ab = a - b
        cb = c - b
        return math.acos(numpy.dot(ab,cb) / (numpy.linalg.norm(ab) * numpy.linalg.norm(cb)))

    skew = min(1.0, 2. * abs((math.pi / 2.) - angle(up_left, up_right, down_right)))
    return skew
用以下函数进行判断基于给定参数的棋盘检测是否应该被添加到self.db数据库中。
    def is_good_sample(self, params, corners, ids, last_frame_corners, last_frame_ids):
        """
        Returns true if the checkerboard detection described by params should be added to the database.
        """
        if not self.db: #如果数据库是空的,则直接加入数据库中。
            return True

        def param_distance(p1, p2):
            return sum([abs(a-b) for (a,b) in zip(p1, p2)])

        db_params = [sample[0] for sample in self.db]
        d = min([param_distance(params, p) for p in db_params])
        # 从数据库中提取所有样本的参数(db_params)。
        # 计算当前参数与数据库中每个样本参数之间的距离,并找到最小值 d。
        #print "d = %.3f" % d #DEBUG
        # TODO What's a good threshold here? Should it be configurable?
        if d <= 0.2: # 如果距离小于0.2的话,就不要这个了
            return False

        if self.max_chessboard_speed > 0:
            if not self.is_slow_moving(corners, ids, last_frame_corners, last_frame_ids):
                return False # 如果不是慢慢的移动的话也不要
        # 不然就是要的。
        # All tests passed, image should be good for calibration
        return True
判断样本是否足够
-
检查数据库是否存在:
如果 self.db 为空(即没有样本),则方法返回 None。 -
计算参数范围:
遍历 self.db 中的所有样本,提取每个样本的参数,并计算这些参数的最小值和最大值。这是通过 lmin 和 lmax 函数实现的,这两个函数分别计算两个序列的逐元素最小值和最大值。 -
忽略尺寸和倾斜的最小值:
由于可能不想基于棋盘的最小尺寸或最小倾斜度来判断是否足够好,因此将 min_params 中的 size 和 skew 设置为0。这意味着在评估参数多样性时,不会考虑这些参数的最小值。 -
计算每个参数的进度:
对于每个参数,它计算参数范围(由 self.param_ranges 指定,self.param_ranges = [0.7, 0.7, 0.4, 0.5])与当前观察到的最小和最大参数值之间的“进度”。这个“进度”是基于参数实际覆盖的范围与所需覆盖范围的比率来计算的。如果参数覆盖了所需范围的全部或大部分,则进度为1.0。 -
判断样本是否足够好:
如果数据库中的样本数量达到或超过40个,或者所有参数的进度都为1.0(即所有参数都达到了足够的覆盖范围),则设置 self.goodenough 为 True。这意味着有足够的样本多样性来进行校准。 -
返回参数信息:
方法返回一个列表,其中包含参数名(self._param_names,尽管在给出的代码片段中未定义)、最小参数值、最大参数值和每个参数的进度。这可以用于调试或可视化目的,以了解哪些参数已经得到了足够的覆盖,哪些还需要更多的样本。
    def compute_goodenough(self): #########
        if not self.db:
            return None

        # Find range of checkerboard poses covered by samples in database
        all_params = [sample[0] for sample in self.db]
        min_params = all_params[0]
        max_params = all_params[0]
        for params in all_params[1:]:
            min_params = lmin(min_params, params)
            max_params = lmax(max_params, params)
        # Don't reward small size or skew
        min_params = [min_params[0], min_params[1], 0., 0.]

        # For each parameter, judge how much progress has been made toward adequate variation
        progress = [min((hi - lo) / r, 1.0) for (lo, hi, r) in zip(min_params, max_params, self.param_ranges)]
        # If we have lots of samples, allow calibration even if not all parameters are green
        # TODO Awkward that we update self.goodenough instead of returning it
        self.goodenough = (len(self.db) >= 40) or all([p == 1.0 for p in progress])

        return list(zip(self._param_names, min_params, max_params, progress))

	def lmin(seq1, seq2):
    	""" Pairwise minimum of two sequences """
    	return [min(a, b) for (a, b) in zip(seq1, seq2)]

	def lmax(seq1, seq2):
    	""" Pairwise maximum of two sequences """
    	return [max(a, b) for (a, b) in zip(seq1, seq2)]
camera_calibration/src/camera_calibration/camera_calibrator.py
按钮变化代码
    def button(self, dst, label, enable):
        dst.fill(255)
        size = (dst.shape[1], dst.shape[0])
        if enable:
            color = (155, 155, 80)
        else:
            color = (224, 224, 224)
        cv2.circle(dst, (size[0] // 2, size[1] // 2), min(size) // 2, color, -1)
        (w, h) = self.getTextSize(label)
        self.putText(dst, label, ((size[0] - w) // 2, (size[1] + h) // 2), (255,255,255))

    def buttons(self, display):
        x = self.displaywidth
        self.button(display[180:280,x:x+100], "CALIBRATE", self.c.goodenough)
        self.button(display[280:380,x:x+100], "SAVE", self.c.calibrated)
        self.button(display[380:480,x:x+100], "COMMIT", self.c.calibrated)
绘制线条颜色变化
def redraw_monocular(self, drawable):
        height = drawable.scrib.shape[0]
        width = drawable.scrib.shape[1]

        display = numpy.zeros((max(480, height), width + 100, 3), dtype=numpy.uint8)
        display[0:height, 0:width,:] = drawable.scrib
        display[0:height, width:width+100,:].fill(255)

        self.buttons(display)############################
        if not self.c.calibrated:
            if drawable.params:
                 for i, (label, lo, hi, progress) in enumerate(drawable.params):
                    (w,_) = self.getTextSize(label)
                    self.putText(display, label, (width + (100 - w) // 2, self.y(i)))
                    color = (0,255,0)
                    if progress < 1.0:
                        color = (0, int(progress*255.), 255)
                    cv2.line(display,
                            (int(width + lo * 100), self.y(i) + 20),
                            (int(width + hi * 100), self.y(i) + 20),
                            color, 4)

        else:
            self.putText(display, "lin.", (width, self.y(0)))
            linerror = drawable.linear_error
            if linerror < 0:
                msg = "?"
            else:
                msg = "%.2f" % linerror
                #print "linear", linerror
            self.putText(display, msg, (width, self.y(1)))

        self._last_display = display
        self.queue_display.put(display)
这段代码定义了一个名为 redraw_monocular 的方法,它用于重新绘制一个单目视觉界面
获取图像尺寸:
从 drawable 对象的 scrib 属性中获取图像的高度和宽度。
height = drawable.scrib.shape[0]
width = drawable.scrib.shape[1]
创建新的显示窗口:
创建一个新的 NumPy 数组 display,用于显示。这个数组比原始图像稍大,宽度增加了 100 像素,高度则确保至少为 480 像素(如果原始图像高度小于 480 像素的话)。这个额外的空间可能是为了添加一些文本或按钮。
display = numpy.zeros((max(480, height), width + 100, 3), dtype=numpy.uint8)
复制图像到显示窗口:
将原始图像 drawable.scrib 复制到 display 数组的相应位置。
display[0:height, 0:width,:] = drawable.scrib
在右侧添加白色条带:
在 display 数组的右侧(即原始图像的右侧)添加一个 100 像素宽的白色条带。
display[0:height, width:width+100,:].fill(255)
调用按钮绘制方法(注释标记部分):
调用 buttons 方法(也即右下角三个按钮)来在 display 上绘制按钮或其他控件。
self.buttons(display)
如果尚未校准:
如果 self.c.calibrated 为 False(即尚未进行校准),则根据 drawable.params(可能包含校准进度信息)在右侧白色条带上绘制文本和线条。线条的长度和颜色表示每个校准参数的进度。
if not self.c.calibrated:
# ... (绘制校准进度的文本和线条)
如果已校准:
如果已进行校准,则绘制“lin.”和线性误差(可能是校准结果的某种度量)。如果 linear_error 小于 0,则显示“?”,否则显示线性误差的值。
else:
    # ... (绘制“lin.”和线性误差)
更新显示并排队:
将 display 数组保存到 self._last_display 属性中,并将其放入 self.queue_display 队列中。这个队列可能用于在其他线程或进程中更新实际的显示窗口。
self._last_display = display
self.queue_display.put(display)
详细解释线条绘制部分:
检查是否已校准:
这行代码检查是否已经完成校准。如果没有,它将进入以下的校准进度绘制代码块。
if not self.c.calibrated:
检查是否存在校准参数:确保 drawable.params 列表(或其他数据结构)不为空,即存在要显示的校准参数。
if drawable.params:
遍历校准参数:
for i, (label, lo, hi, progress) in enumerate(drawable.params):
遍历 drawable.params 列表中的每个元素。每个元素都是一个四元组,包含:
label:参数的标签(如 "X", "Y", "Size", "Skew" 等)。
lo 和 hi:表示参数范围的最低和最高值(已归一化到 [0, 1])。
progress:表示该参数校准进度的浮点数(范围在 0.0 到 1.0 之间)。
获取文本标签的宽度:
使用 self.getTextSize 方法(该方法未在提供的代码段中定义)来获取文本标签的宽度,以便在界面上正确放置它。
(w,_) = self.getTextSize(label)
绘制文本标签:
使用 self.putText 方法(该方法也未在提供的代码段中定义)在界面上绘制文本标签。文本被放置在右侧白色条带的中心位置,垂直位置由 self.y(i) 确定(可能是根据索引 i 计算的垂直坐标)。
self.putText(display, label, (width + (100 - w) // 2, self.y(i)))
设置线条颜色:
线条的颜色根据校准进度 progress 来设置。如果进度为 1.0(即完全校准),则线条为绿色;否则,线条颜色将从绿色渐变到蓝色,渐变程度取决于 progress 的值。
color = (0,255,0)  # 默认绿色
if progress < 1.0:
    color = (0, int(progress*255.), 255)  # 渐变到蓝色
绘制表示参数范围的线条:
使用 OpenCV 的 cv2.line 函数在界面上绘制一条表示参数范围的线条。线条的起始和结束位置根据归一化的 lo 和 hi 值计算,垂直位置与文本标签相同但稍微下移一些(通过 + 20 实现)。线条的颜色和宽度也根据之前的设置确定。
cv2.line(display,
         (int(width + lo * 100), self.y(i) + 20),
         (int(width + hi * 100), self.y(i) + 20),
         color, 4)


 118
118


 被折叠的 条评论
为什么被折叠?
被折叠的 条评论
为什么被折叠?
 到【灌水乐园】发言


