import cv2
import numpy as np
import requests
import io
url = 'https://th.bing.com/th/id/OIP.2MaWvr94eGVEN1yLHBltqgHaE7?pid=ImgDet&rs=1'
response = requests.get( url)
image = np.asarray( bytearray( response.content) , dtype = "uint8" )
image = cv2.imdecode( image, cv2.IMREAD_GRAYSCALE)
cv2.imwrite( 'image.jpg' , image)
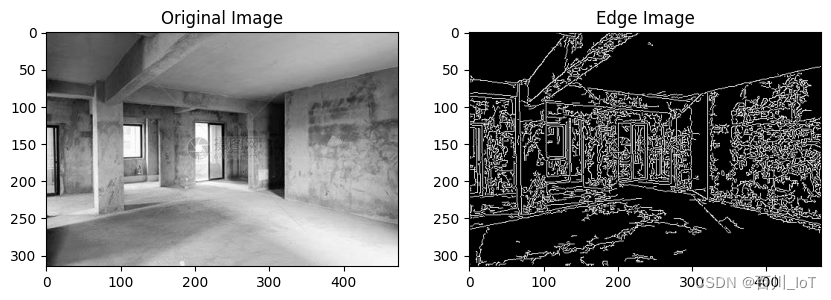
edges = cv2.Canny( image, threshold1 = 30 , threshold2 = 100 )
cv2.imwrite( 'edges.jpg' , edges)
import matplotlib.pyplot as plt
original = cv2.imread( 'image.jpg' , cv2.IMREAD_COLOR)
edges = cv2.imread( 'edges.jpg' , cv2.IMREAD_COLOR)
original = cv2.cvtColor( original, cv2.COLOR_BGR2RGB)
edges = cv2.cvtColor( edges, cv2.COLOR_BGR2RGB)
fig, axs = plt.subplots( 1 , 2 , figsize = ( 10 , 5 ))
axs[ 0 ] .imshow( original, cmap = 'gray' )
axs[ 0 ] .set_title( 'Original Image' )
axs[ 1 ] .imshow( edges, cmap = 'gray' )
axs[ 1 ] .set_title( 'Edge Image' )
plt.show( )
! pip3 install openmim
! mim install 'mmcv>=2.0.0'
! mim install 'mmengine'
! git clone https://github.com/open-mmlab/mmagic.git
%cd mmagic
! pip3 install -e .
import cv2
import numpy as np
import mmcv
from mmengine import Config
from PIL import Image
from mmagic.registry import MODELS
from mmagic.utils import register_all_modules
register_all_modules( )
cfg = Config.fromfile( 'configs/controlnet/controlnet-canny.py' )
controlnet = MODELS.build( cfg.model) .cuda( )
control_img = mmcv.imread( '/content/edges.jpg' )
control = cv2.Canny( control_img, 100 , 200 )
control = control[ :, :, None]
control = np.concatenate( [ control] * 3 , axis = 2 )
control = Image.fromarray( control)
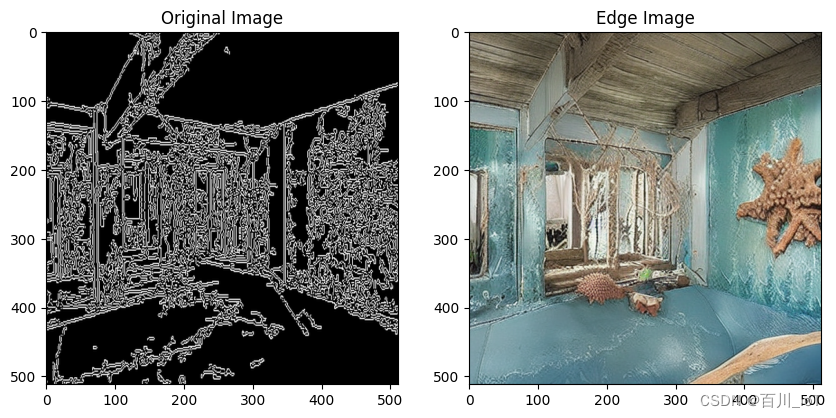
prompt = 'Please decorate my cottage in a pale blue marine style, with walls painted with lifelike sea creatures!'
output_dict = controlnet.infer( prompt, control = control)
samples = output_dict[ 'samples' ]
for idx, sample in enumerate( samples) :
sample.save( f'sample_{idx}.png' )
controls = output_dict[ 'controls' ]
for idx, control in enumerate( controls) :
control.save( f'control_{idx}.png' )
import matplotlib.pyplot as plt
import cv2
original = cv2.imread( '/content/mmagic/control_0.png' , cv2.IMREAD_COLOR)
edges = cv2.imread( '/content/mmagic/sample_0.png' , cv2.IMREAD_COLOR)
original = cv2.cvtColor( original, cv2.COLOR_BGR2RGB)
edges = cv2.cvtColor( edges, cv2.COLOR_BGR2RGB)
fig, axs = plt.subplots( 1 , 2 , figsize = ( 10 , 5 ))
axs[ 0 ] .imshow( original)
axs[ 0 ] .set_title( 'Original Image' )
axs[ 1 ] .imshow( edges)
axs[ 1 ] .set_title( 'Edge Image' )
plt.show( )


 288
288


 被折叠的 条评论
为什么被折叠?
被折叠的 条评论
为什么被折叠?
 到【灌水乐园】发言


