


目录
4.3 save_predictions_as_imgs 函数
项目下载地址:unet 网络基于 CARVANA 数据集的分割
1. 介绍
项目的目录结构如下:
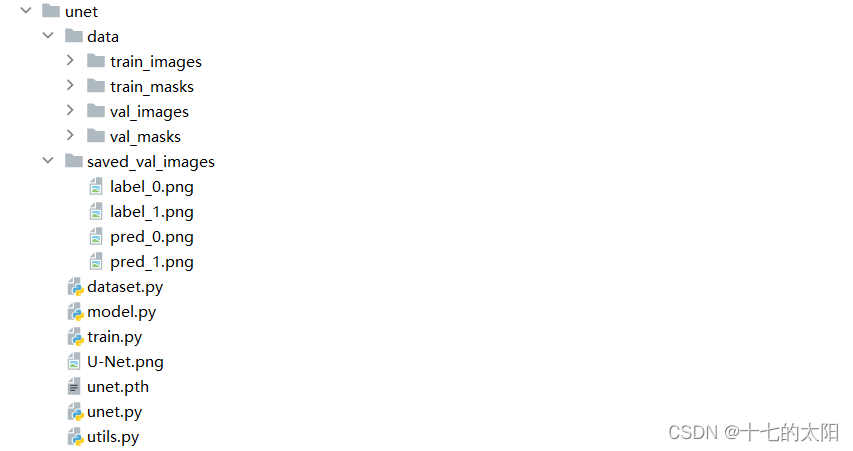
- data 里面存放训练数据(5056) + 验证数据 (32)
- saved_val_images 存放网络分割验证集的结果
CARVANA 数据:

对应的分割label:

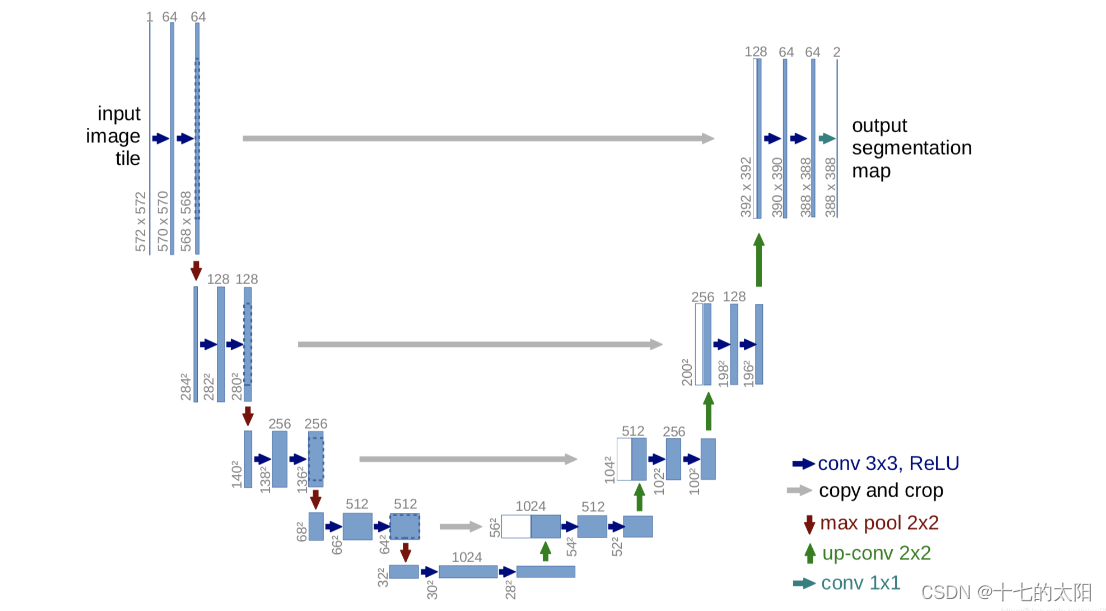
2. UNET 网络
UNET 因为网络的外型是一个U字型因此命名,网络的左边是下采样部分,右边是上采样的部分
具体的可以参考以往的文章:UNET
这里 unet 网络的搭建和之前有区别,都是实现unet,只是方法不同而已,都可以使用
import torch.nn as nn
import torch
import torchvision.transforms.functional as TF


# 搭建 unet 网络
class DoubleConv(nn.Module):  # 连续两次卷积
    def __init__(self, in_channels, out_channels):
        super(DoubleConv, self).__init__()
        self.double_conv = nn.Sequential(
            nn.Conv2d(in_channels, out_channels, kernel_size=3, padding=1,stride=1, bias=False),
            nn.BatchNorm2d(out_channels),
            nn.ReLU(inplace=True),

            nn.Conv2d(out_channels, out_channels, kernel_size=3, padding=1, stride=1,bias=False),
            nn.BatchNorm2d(out_channels),
            nn.ReLU(inplace=True)
        )

    def forward(self, x):
        x = self.double_conv(x)
        return x


class UNet(nn.Module):
    def __init__(self,in_channels=3,out_channels=1,features=[64,128,256,512]): # features 存放channel数
        super(UNet, self).__init__()
        self.ups = nn.ModuleList()
        self.downs = nn.ModuleList()
        self.pool = nn.MaxPool2d(kernel_size=2,stride=2)

        # down sampling part of unet
        for feature in features:
            self.downs.append(DoubleConv(in_channels,feature))
            in_channels = feature

        # up sampling part of unet
        for feature in reversed(features):
            self.ups.append(
                nn.ConvTranspose2d(feature*2,feature,kernel_size=2,stride=2)
            )
            self.ups.append(DoubleConv(feature*2,feature))

        # bottom part of unet
        self.bottleneck = DoubleConv(features[-1],features[-1]*2)

        # out layer part of unet
        self.final_conv = nn.Conv2d(features[0],out_channels,kernel_size=1)

    def forward(self,x):
        skip_connections = []       # 尺度融合

        # down sampling
        for down in self.downs:
            x = down(x)
            skip_connections.append(x)
            x = self.pool(x)

        x = self.bottleneck(x)
        skip_connections = skip_connections[::-1]

        # down sampling
        for idx in range(0,len(self.ups),2):   # self.ups 包含了转置卷积 + DoubleConv
            x = self.ups[idx](x)
            skip_connection = skip_connections[idx //2]

            if x.shape != skip_connection.shape:   # 保证任意输入size
                x = TF.resize(x,size = skip_connection.shape[2:])

            concat_skip = torch.cat((skip_connection,x),dim = 1)   # 转置卷积
            x = self.ups[idx+1](concat_skip)                        # DoubleConv

        x = self.final_conv(x)
        return x


# if __name__ == '__main__':
#     x = torch.rand((3,1,159,159))
#     model = UNet(in_channels=1,out_channels=1)
#     out = model(x)
#     assert x.shape == out.shape
3. dataset 数据加载
和之前的dataset 类似,只是有些小的差距
具体的可以参考之前的文章:dataset
这里展示 dataset 的代码:
import os
from PIL import Image
from torch.utils.data import Dataset
import numpy as np


# 数据加载
class CarvanaDataset(Dataset):
    def __init__(self,image_dir,mask_dir,transform = None):
        self.image_dir = image_dir  # 训练数据的路径
        self.mask_dir = mask_dir    # label 的路径
        self.transform = transform
        self.images = os.listdir(image_dir)     # 文件夹中的所有文件

    def __len__(self):
        return len(self.images)

    def __getitem__(self, index):
        img_path = os.path.join(self.image_dir,self.images[index])  # 拼接成各个数据的路径
        mask_path = os.path.join(self.mask_dir,self.images[index].replace('.jpg','_mask.gif'))  # label只是后缀的名字不同,替换掉即可

        image = np.array(Image.open(img_path).convert('RGB'))
        mask = np.array(Image.open(mask_path).convert("L"),dtype=np.float32)  # 'L' 为灰度图
        mask[mask == 255.0] = 1.0       # 变成二值图

        if self.transform is not None:
            augmentations = self.transform(image = image,mask = mask)
            image = augmentations['image']
            mask = augmentations['mask']

        return image,mask
需要注意的是,这里要将label设置为二值图像
这里的label是二值图像,前景像素点为255,背景为0
之前产生过疑问,为什么label是灰度图像,不是二值图像,就像这样
后来发现可能是显示的问题,放大之后发现label就是二值图像


4. utils 工具模块
为了避免主程序的代码太复杂,这里将需要的重复部分封装到utils模块里,这里主要实现下面三个部分
- get_loaders # 加载数据的函数
- check_accuracy # 验证模型的精度
- save_predictions_as_imgs # 保存模型在验证集上的分割图片
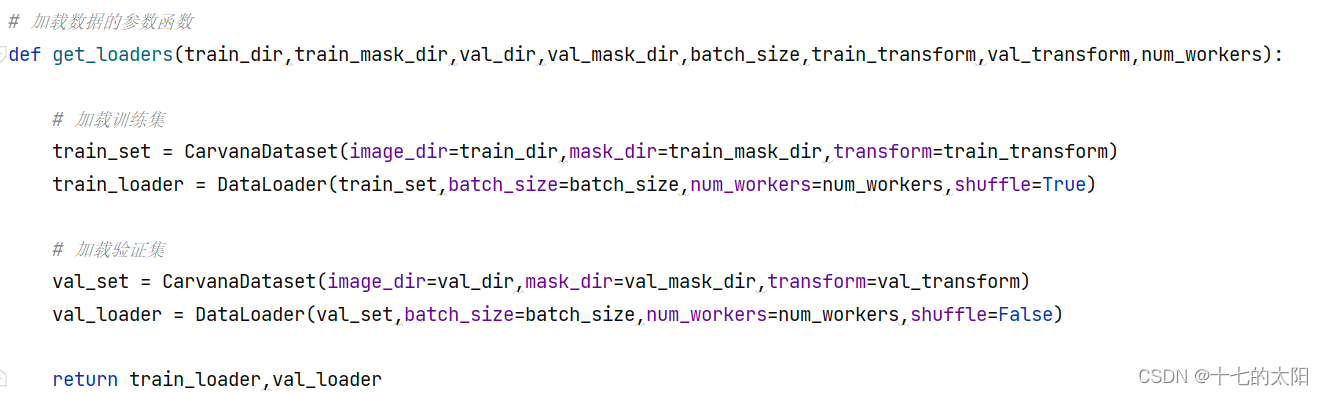
4.1 get_loaders 函数
加载数据的部分较为简单,和之前的没有区别,这里只是进行了简单的封装
get_loader 需要传递的参数:
- train_dir :训练集的 image 地址
- train_mask_dir : 训练集的 mask 地址
- val_dir :验证集的 image 地址
- val_mask_dir : 验证集的 mask 地址
- batch_size :batch的size
- transform :预处理
- num_workser : 线程数,windows 需要设置成0,或者需要(if __name__ == '__main__': # 这样num_workers != 0 才可以通过)
get_loader 的返回值就是训练的image和label,以及验证的image和label
4.2 check_accuracy 函数
check_accuracy 是验证模型精度的函数,需要传入loader 验证集的image和label ,model 用于验证的网络 ,device 网络运行的设备
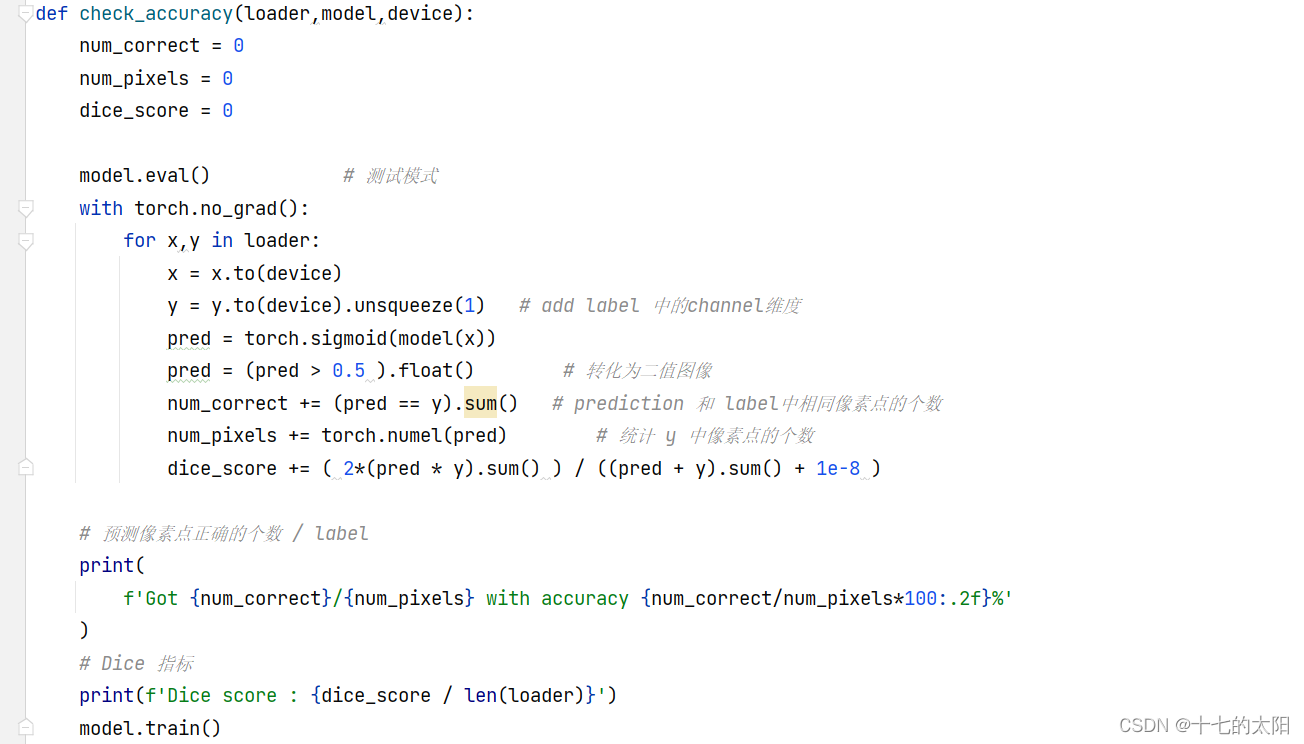
因为二值图像没有channel维度,所以需要将label增加一个维度
网络的输出经过sigmoid函数,将大于0.5的映射为前景像素点,小于0.5的映射为背景像素点
DICE 的定义如下:

dice_score += ( 2*(pred * y).sum() ) / ((pred + y).sum() + 1e-8 )4.3 save_predictions_as_imgs 函数
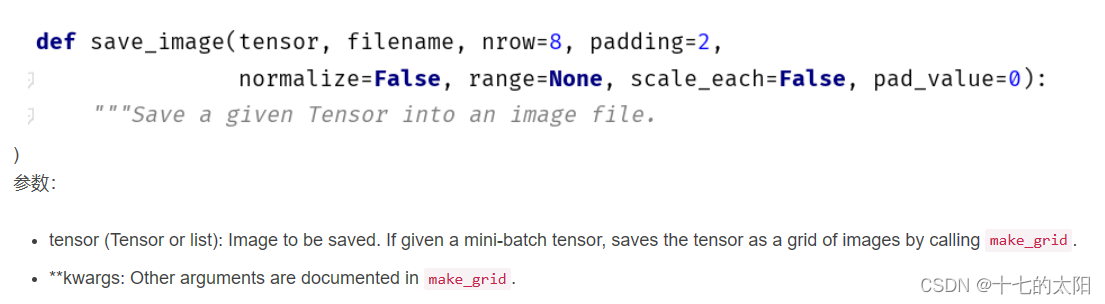
保存图像的函数如图:
- tensor 转变为 numpy 类型的数组从而保存图片,这样的过程比较繁琐,Pytorch提供了save_image()函数,可直接将tensor保存为图片,若tensor在cuda上也会移到CPU中进行保存。
- 深度学习模型中,一般使用如下 torchvision.utils中的save_image()函数 进行图像保存,但是这种方式只能保存RGB彩色图像,如果网络的输出是单通道灰度图像,则该函数依然会输出三个通道,每个通道的数值都是相同的,即“伪灰度图像”,视觉上看不出区别,但是图像所占内存比正常情况大了两倍。
4.4 完整代码
utils 如下:
import torch
import torchvision
from dataset import CarvanaDataset
from torch.utils.data import DataLoader
# 加载数据的参数函数
def get_loaders(train_dir,train_mask_dir,val_dir,val_mask_dir,batch_size,train_transform,val_transform,num_workers):
# 加载训练集
train_set = CarvanaDataset(image_dir=train_dir,mask_dir=train_mask_dir,transform=train_transform)
train_loader = DataLoader(train_set,batch_size=batch_size,num_workers=num_workers,shuffle=True)
# 加载验证集
val_set = CarvanaDataset(image_dir=val_dir,mask_dir=val_mask_dir,transform=val_transform)
val_loader = DataLoader(val_set,batch_size=batch_size,num_workers=num_workers,shuffle=False)
return train_loader,val_loader
# 检验精度
def check_accuracy(loader,model,device):
num_correct = 0
num_pixels = 0
dice_score = 0
model.eval() # 测试模式
with torch.no_grad():
for x,y in loader:
x = x.to(device)
y = y.to(device).unsqueeze(1) # add label 中的channel维度
pred = torch.sigmoid(model(x))
pred = (pred > 0.5 ).float() # 转化为二值图像
num_correct += (pred == y).sum() # prediction 和 label中相同像素点的个数
num_pixels += torch.numel(pred) # 统计 y 中像素点的个数
dice_score += ( 2*(pred * y).sum() ) / ((pred + y).sum() + 1e-8 )
# 预测像素点正确的个数 / label
print(
f'Got {num_correct}/{num_pixels} with accuracy {num_correct/num_pixels*100:.2f}%'
)
# Dice 指标
print(f'Dice score : {dice_score / len(loader)}')
model.train()
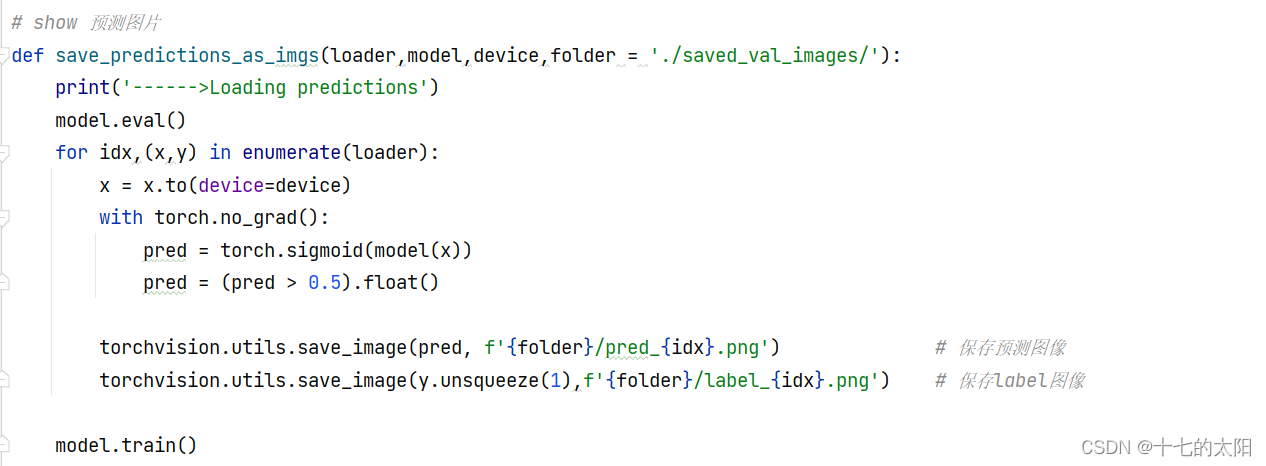
# show 预测图片
def save_predictions_as_imgs(loader,model,device,folder = './saved_val_images/'):
print('------>Loading predictions')
model.eval()
for idx,(x,y) in enumerate(loader):
x = x.to(device=device)
with torch.no_grad():
pred = torch.sigmoid(model(x))
pred = (pred > 0.5).float()
torchvision.utils.save_image(pred, f'{folder}/pred_{idx}.png') # 保存预测图像
torchvision.utils.save_image(y.unsqueeze(1),f'{folder}/label_{idx}.png') # 保存label图像
model.train()
5. train 函数
train 函数用于训练网络的主体函数
OMP: Error #15: Initializing libiomp5md.dll, but found libiomp5md.dll already initialized.
OMP: Hint This means that multiple copies of the OpenMP runtime have been linked into the program. That is dangerous, since it can degrade performance or cause incorrect results. The best thing to do is to ensure that only a single OpenMP runtime is linked into the process, e.g. by avoiding static linking of the OpenMP runtime in any library. As an unsafe, unsupported, undocumented workaround you can set the environment variable KMP_DUPLICATE_LIB_OK=TRUE to allow the program to continue to execute, but that may cause crashes or silently produce incorrect results. For more information, please see http://www.intel.com/software/products/support/.
这里运行train函数的时候,会报这样的错误,简单的方法就是在代码的前端加一下这个:
import os
os.environ['KMP_DUPLICATE_LIB_OK']='True'
5.1 关于导入的库文件
import torch
import albumentations as A      # 图像增强库
from albumentations.pytorch import ToTensorV2   # 只会[h, w, c] -> [c, h, w],不会将数据归一化到[0, 1]
from tqdm import tqdm       # 进度条提示模块
import torch.nn as nn
from unet import UNet
import torch.optim as optim
# 自定义的模块
from utils import (
get_loaders,                # 加载数据
check_accuracy,             # 验证准确率
save_predictions_as_imgs,   # 预测图片
)
这里有的库文件和以往的有所区别,都做了注释
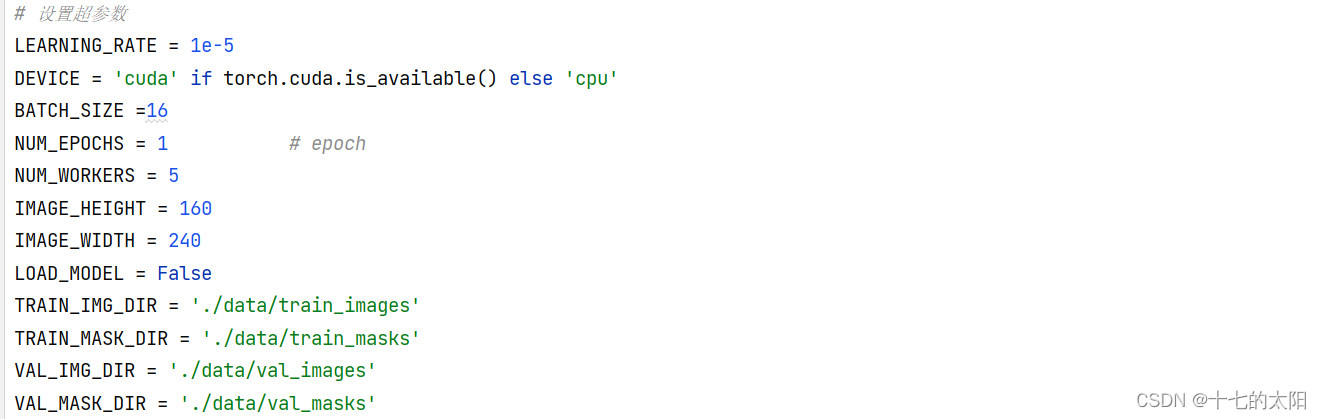
5.2 设置超参数
这里需要注意的就是LOAD_MODEL,可以认为是否使用预训练权重的一个开关
如果网络之前训练过,有保存的权重文件,当LOAD_MODEL 设置为TRUE的时候,就会加载之前训练好的权重文件,然后可以适当调整学习率继续训练
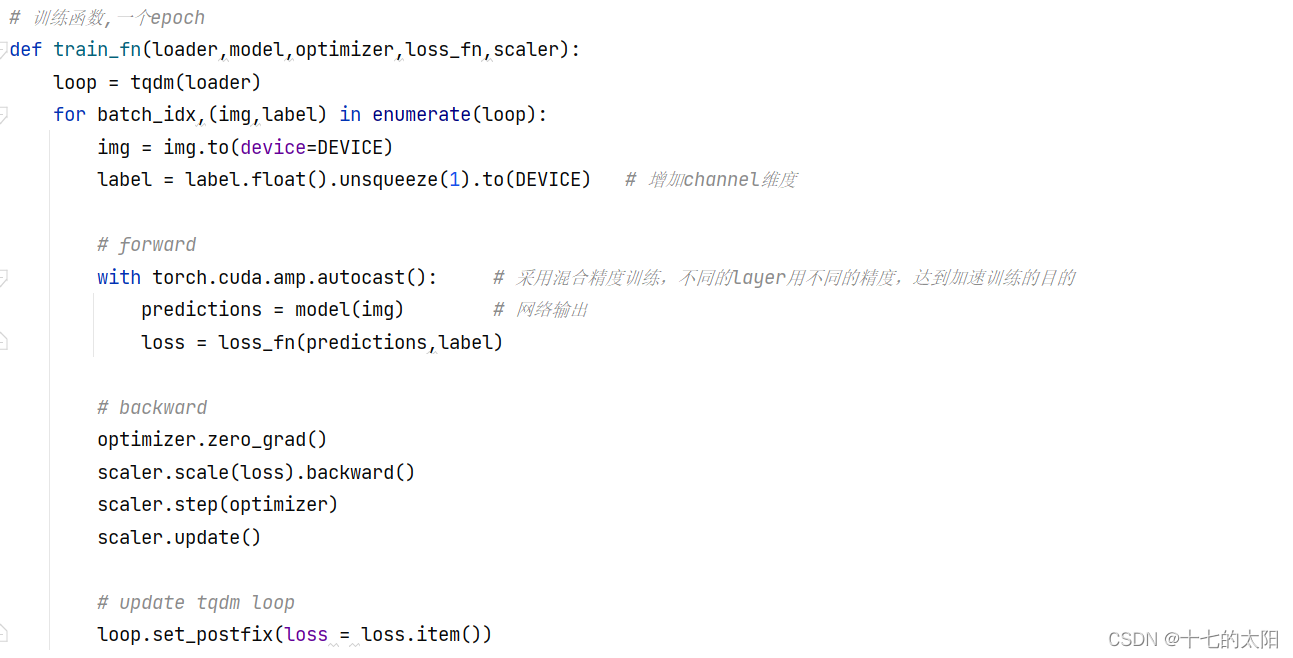
5.3 train_fn 训练一个epoch函数
代码如下
5.4 main 函数
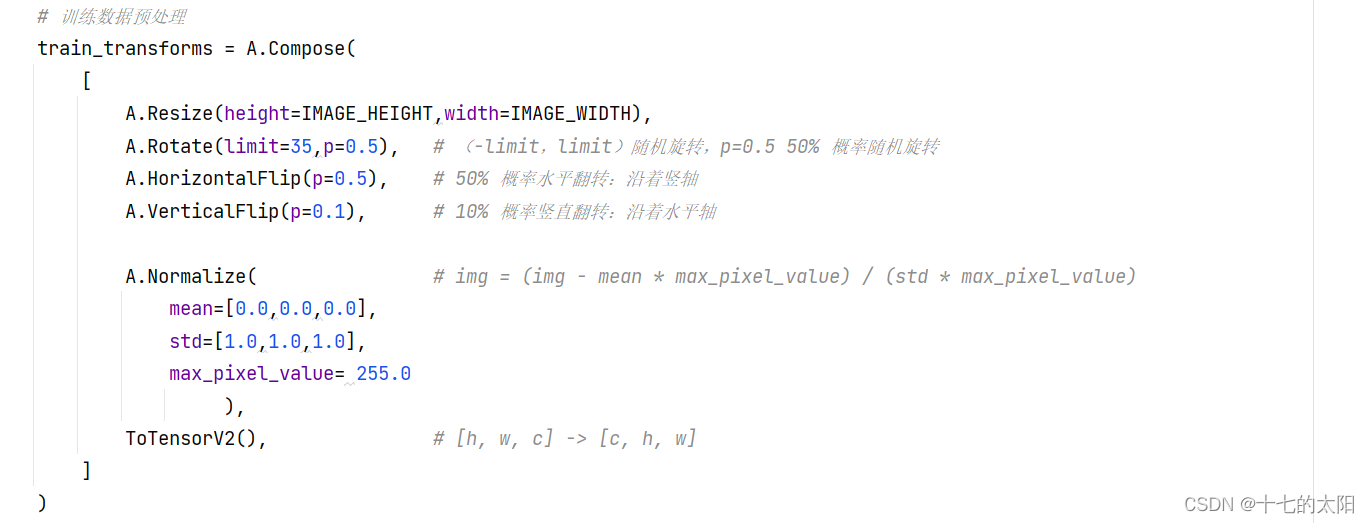
定义训练数据的预处理:
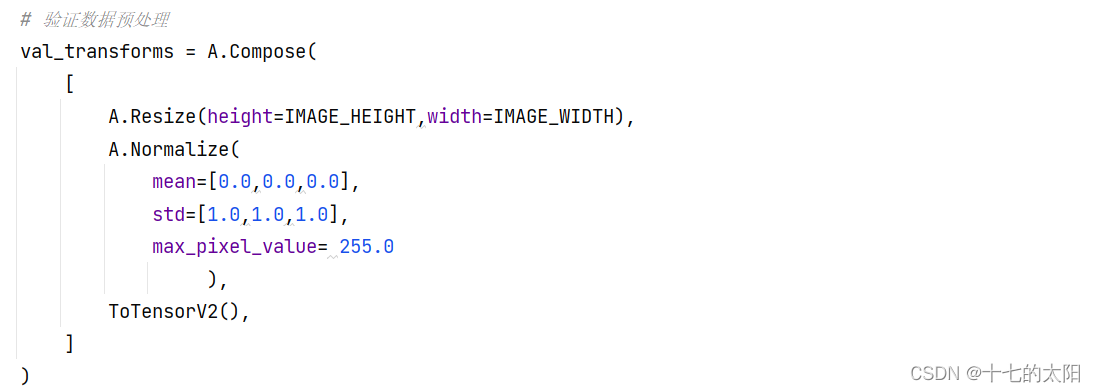
定义验证数据的预处理:
创建模型:

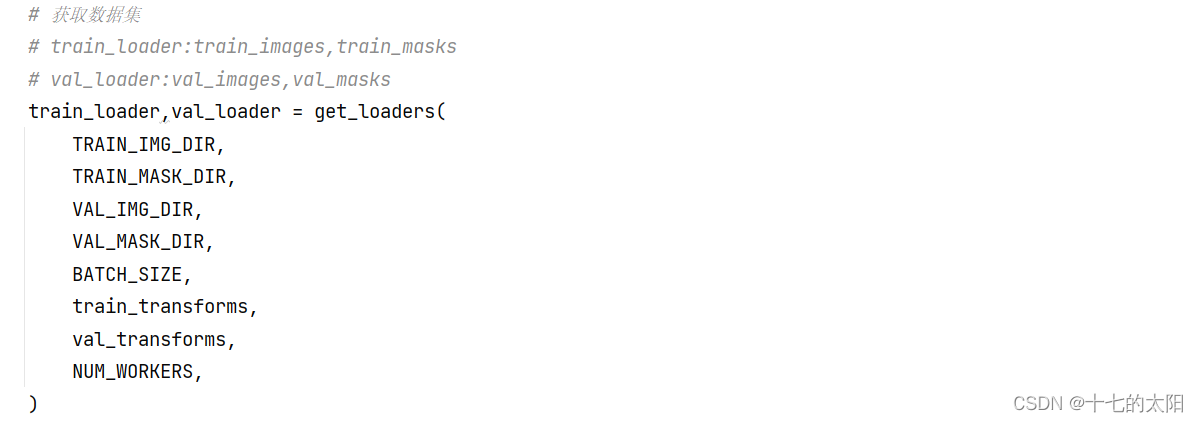
从 get_loader 函数获取训练数据和验证数据:
是否加载预训练模型:

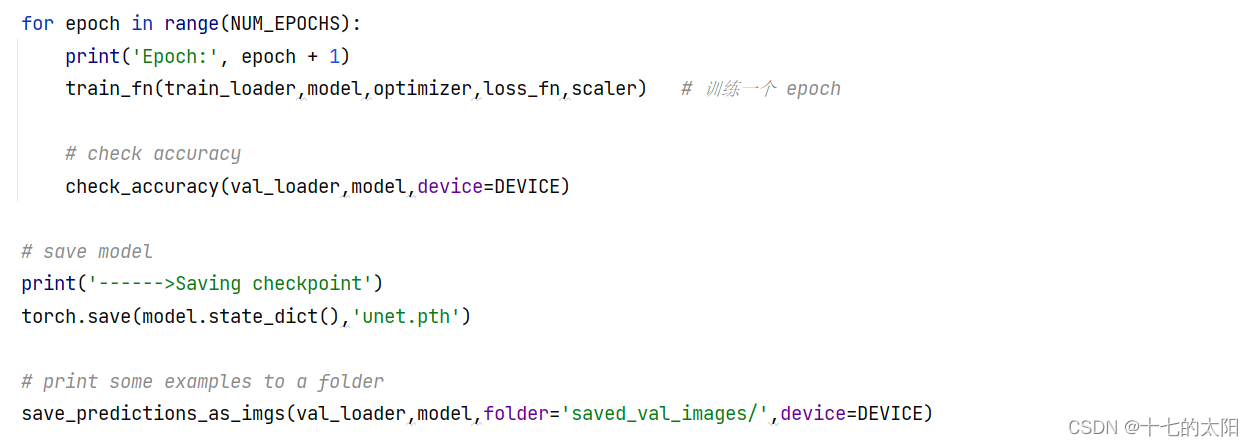
训练模型+保存参数+显示预测结果:
5.5 完整代码
如下:
import os
os.environ['KMP_DUPLICATE_LIB_OK']='True'


import torch
import albumentations as A      # 图像增强库
from albumentations.pytorch import ToTensorV2   # 只会[h, w, c] -> [c, h, w],不会将数据归一化到[0, 1]
from tqdm import tqdm       # 进度条提示模块
import torch.nn as nn
from unet import UNet
import torch.optim as optim
# 自定义的模块
from utils import (
get_loaders,                # 加载数据
check_accuracy,             # 验证准确率
save_predictions_as_imgs,   # 预测图片
)


# 设置超参数
LEARNING_RATE = 1e-4
DEVICE = 'cuda' if torch.cuda.is_available() else 'cpu'
BATCH_SIZE =16
NUM_EPOCHS = 2           # epoch
NUM_WORKERS = 5
IMAGE_HEIGHT = 160
IMAGE_WIDTH = 240
LOAD_MODEL = False
TRAIN_IMG_DIR = './data/train_images'
TRAIN_MASK_DIR = './data/train_masks'
VAL_IMG_DIR = './data/val_images'
VAL_MASK_DIR = './data/val_masks'


# 训练函数,一个epoch
def train_fn(loader,model,optimizer,loss_fn,scaler):
    loop = tqdm(loader)
    for batch_idx,(img,label) in enumerate(loop):
        img = img.to(device=DEVICE)
        label = label.float().unsqueeze(1).to(DEVICE)   # 增加channel维度

        # forward
        with torch.cuda.amp.autocast():     # 采用混合精度训练,不同的layer用不同的精度,达到加速训练的目的
            predictions = model(img)        # 网络输出
            loss = loss_fn(predictions,label)

        # backward
        optimizer.zero_grad()
        scaler.scale(loss).backward()
        scaler.step(optimizer)
        scaler.update()

        # update tqdm loop
        loop.set_postfix(loss = loss.item())


def main():
    # 训练数据预处理
    train_transforms = A.Compose(
        [
            A.Resize(height=IMAGE_HEIGHT,width=IMAGE_WIDTH),
            A.Rotate(limit=35,p=0.5),   # (-limit,limit)随机旋转,p=0.5 50% 概率随机旋转
            A.HorizontalFlip(p=0.5),    # 50% 概率水平翻转:沿着竖轴
            A.VerticalFlip(p=0.1),      # 10% 概率竖直翻转:沿着水平轴

            A.Normalize(                # img = (img - mean * max_pixel_value) / (std * max_pixel_value)
                mean=[0.0,0.0,0.0],
                std=[1.0,1.0,1.0],
                max_pixel_value= 255.0
                     ),
            ToTensorV2(),               # [h, w, c] -> [c, h, w]
        ]
    )
    # 验证数据预处理
    val_transforms = A.Compose(
        [
            A.Resize(height=IMAGE_HEIGHT,width=IMAGE_WIDTH),
            A.Normalize(
                mean=[0.0,0.0,0.0],
                std=[1.0,1.0,1.0],
                max_pixel_value= 255.0
                     ),
            ToTensorV2(),
        ]
    )
    # 实例化 UNet 模型 + loss + optimizer
    model = UNet(in_channels=3,out_channels=1).to(DEVICE)
    loss_fn = nn.BCEWithLogitsLoss()            # 二元交叉熵 + sigmoid
    optimizer = optim.Adam(model.parameters(),lr=LEARNING_RATE)

    # 获取数据集
    # train_loader:train_images,train_masks
    # val_loader:val_images,val_masks
    train_loader,val_loader = get_loaders(
        TRAIN_IMG_DIR,
        TRAIN_MASK_DIR,
        VAL_IMG_DIR,
        VAL_MASK_DIR,
        BATCH_SIZE,
        train_transforms,
        val_transforms,
        NUM_WORKERS,
    )

    # 加载预训练权重
    if LOAD_MODEL:
        print('Pretrained:')
        model.load_state_dict(torch.load('unet.pth'))
        check_accuracy(val_loader,model,device=DEVICE)
        print('------>Loading pretrained model successfully!!')

    scaler = torch.cuda.amp.GradScaler()        # 采用混合精度,加速训练

    for epoch in range(NUM_EPOCHS):
        print('Epoch:', epoch + 1)
        train_fn(train_loader,model,optimizer,loss_fn,scaler)   # 训练一个 epoch

        # check accuracy
        check_accuracy(val_loader,model,device=DEVICE)

    # save model
    print('------>Saving checkpoint')
    torch.save(model.state_dict(),'unet.pth')

    # print some examples to a folder
    save_predictions_as_imgs(val_loader,model,folder='saved_val_images/',device=DEVICE)


if __name__ == '__main__':      # 这样num_workers != 0 才可以通过
    main()
    print(' training over!!!! ')
6. 展示
6.1 网络训练
网络训练了两个epoch结果
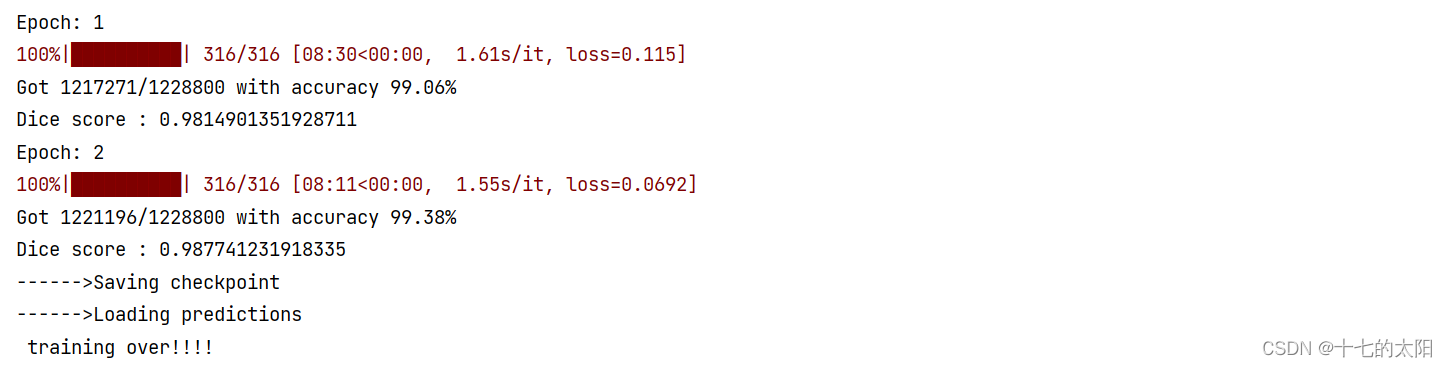
这里316是因为样本 / batch_size : 5056 / 16 = 316
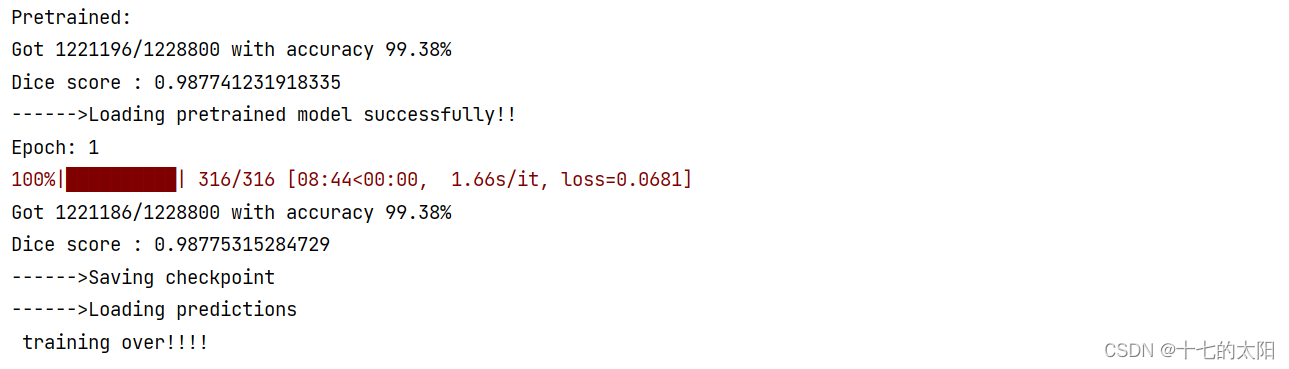
6.2 加载预训练权重训练
LOAD_MODEL = True
6.3 结果显示
网络预测:

真实label:

网络预测:

真实label:


 659
659

 被折叠的 条评论
为什么被折叠?
被折叠的 条评论
为什么被折叠?
 到【灌水乐园】发言


