


 本文介绍了如何使用深度学习中的Unet网络对图像进行去雨去雾处理,同时展示了如何将此模型与PyQt5界面集成,实现实时图像处理功能。作者还提供了Resnet18、SEnet、UAFM等模块的代码实现和预处理方法的示例。
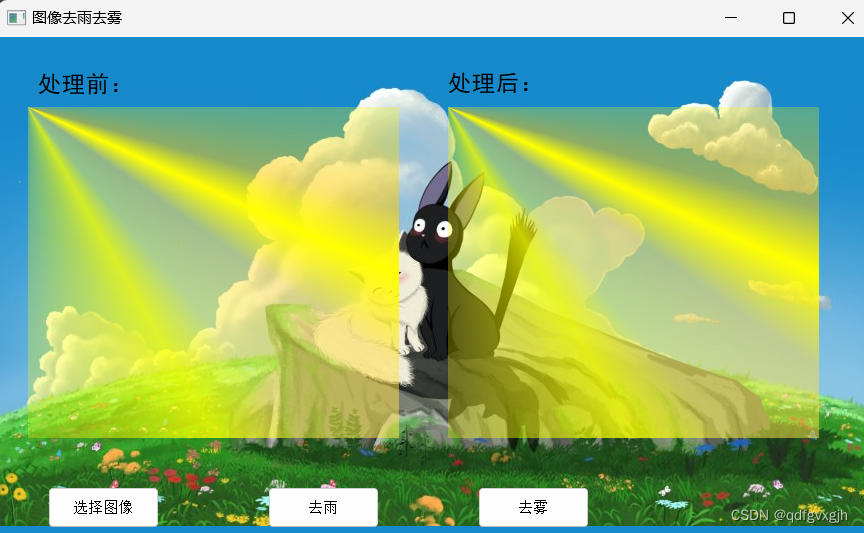
基于深度学习的图像去雨去雾
文末附有源码下载地址
b站视频地址: https://www.bilibili.com/video/BV1Jr421p7cT/
基于深度学习的图像去雨去雾,使用的网络为unet,
网络代码:
import torch
import torch.nn as nn
from torchsummary import summary
from torchvision import models
from torchvision.models.feature_extraction import create_feature_extractor
import torch.nn.functional as F
from torchstat import stat

class Resnet18(nn.Module):
    def __init__(self):
        super(Resnet18, self).__init__()
        self.resnet = models.resnet18(pretrained=False)
        # self.resnet = create_feature_extractor(self.resnet, {'relu': 'feat320', 'layer1': 'feat160', 'layer2': 'feat80',
        #                                                'layer3': 'feat40'})

    def forward(self,x):
        for name,m in self.resnet._modules.items():

            x=m(x)
            if name=='relu':
                x1=x
            elif name=='layer1':
                x2=x
            elif name=='layer2':
                x3=x
            elif name=='layer3':
                x4=x
                break
        # x=self.resnet(x)
        return x1,x2,x3,x4
class Linears(nn.Module):
    def __init__(self,a,b):
        super(Linears, self).__init__()
        self.linear1=nn.Linear(a,b)
        self.relu1=nn.LeakyReLU()
        self.linear2 = nn.Linear(b, a)
        self.sigmoid=nn.Sigmoid()
    def forward(self,x):
        x=self.linear1(x)
        x=self.relu1(x)
        x=self.linear2(x)
        x=self.sigmoid(x)
        return x
class DenseNetBlock(nn.Module):
    def __init__(self,inplanes=1,planes=1,stride=1):
        super(DenseNetBlock,self).__init__()
        self.conv1=nn.Conv2d(inplanes,planes,3,stride,1)
        self.bn1 = nn.BatchNorm2d(planes)
        self.relu1=nn.LeakyReLU()

        self.conv2 = nn.Conv2d(inplanes, planes, 3,stride,1)
        self.bn2 = nn.BatchNorm2d(planes)
        self.relu2 = nn.LeakyReLU()

        self.conv3 = nn.Conv2d(inplanes, planes, 3,stride,1)
        self.bn3 = nn.BatchNorm2d(planes)
        self.relu3 = nn.LeakyReLU()
    def forward(self,x):
        ins=x
        x=self.conv1(x)
        x=self.bn1(x)
        x=self.relu1(x)
        x = self.conv2(x)
        x = self.bn2(x)
        x = self.relu2(x)
        x=x+ins

        x2=self.conv3(x)
        x2 = self.bn3(x2)
        x2=self.relu3(x2)

        out=ins+x+x2
        return out
class SEnet(nn.Module):
    def __init__(self,chs,reduction=4):
        super(SEnet,self).__init__()
        self.average_pooling = nn.AdaptiveAvgPool2d(output_size=(1, 1))
        self.fc = nn.Sequential(
            # First reduce dimension, then raise dimension.
            # Add nonlinear processing to fit the correlation between channels
            nn.Linear(chs, chs // reduction),
            nn.LeakyReLU(inplace=True),
            nn.Linear(chs // reduction, chs)
        )
        self.activation = nn.Sigmoid()
    def forward(self,x):
        ins=x
        batch_size, chs, h, w = x.shape
        x=self.average_pooling(x)
        x = x.view(batch_size, chs)
        x=self.fc(x)
        x = x.view(batch_size,chs,1,1)
        return x*ins
class UAFM(nn.Module):
    def __init__(self):
        super(UAFM, self).__init__()
        # self.meanPool_C=torch.max()

        self.attention=nn.Sequential(
            nn.Conv2d(4, 8, 3, 1,1),
            nn.LeakyReLU(),
            nn.Conv2d(8, 1, 1, 1),
            nn.Sigmoid()
        )


    def forward(self,x1,x2):
        x1_mean_pool=torch.mean(x1,dim=1)
        x1_max_pool,_=torch.max(x1,dim=1)
        x2_mean_pool = torch.mean(x2, dim=1)
        x2_max_pool,_ = torch.max(x2, dim=1)

        x1_mean_pool=torch.unsqueeze(x1_mean_pool,dim=1)
        x1_max_pool=torch.unsqueeze(x1_max_pool,dim=1)
        x2_mean_pool=torch.unsqueeze(x2_mean_pool,dim=1)
        x2_max_pool=torch.unsqueeze(x2_max_pool,dim=1)

        cat=torch.cat((x1_mean_pool,x1_max_pool,x2_mean_pool,x2_max_pool),dim=1)
        a=self.attention(cat)
        out=x1*a+x2*(1-a)
        return out

class Net(nn.Module):
    def __init__(self):
        super(Net, self).__init__()
        self.resnet18=Resnet18()
        self.SENet=SEnet(chs=256)
        self.UAFM=UAFM()
        self.DenseNet1=DenseNetBlock(inplanes=256,planes=256)
        self.transConv1=nn.ConvTranspose2d(256,128,3,2,1,output_padding=1)

        self.DenseNet2 = DenseNetBlock(inplanes=128, planes=128)
        self.transConv2 = nn.ConvTranspose2d(128, 64, 3, 2, 1, output_padding=1)

        self.DenseNet3 = DenseNetBlock(inplanes=64, planes=64)
        self.transConv3 = nn.ConvTranspose2d(64, 64, 3, 2, 1, output_padding=1)

        self.transConv4 = nn.ConvTranspose2d(64, 32, 3, 2, 1, output_padding=1)
        self.DenseNet4=DenseNetBlock(inplanes=32,planes=32)
        self.out=nn.Sequential(
            nn.Conv2d(32,3,1,1),
            nn.Sigmoid()
        )

    def forward(self,x):
        """
        下采样部分
        """
        x1,x2,x3,x4=self.resnet18(x)
        # feat320=features['feat320']
        # feat160=features['feat160']
        # feat80=features['feat80']
        # feat40=features['feat40']
        feat320=x1
        feat160=x2
        feat80=x3
        feat40=x4
        """
        上采样部分
        """
        x=self.SENet(feat40)
        x=self.DenseNet1(x)
        x=self.transConv1(x)
        x=self.UAFM(x,feat80)

        x=self.DenseNet2(x)
        x=self.transConv2(x)
        x=self.UAFM(x,feat160)

        x = self.DenseNet3(x)
        x = self.transConv3(x)
        x = self.UAFM(x, feat320)

        x=self.transConv4(x)
        x=self.DenseNet4(x)
        out=self.out(x)

        # out=torch.concat((out,out,out),dim=1)*255.

        return out

    def freeze_backbone(self):
        for param in self.resnet18.parameters():
            param.requires_grad = False

    def unfreeze_backbone(self):
        for param in self.resnet18.parameters():
            param.requires_grad = True


if __name__ == '__main__':

    net=Net()
    print(net)
    # stat(net,(3,640,640))

    summary(net,input_size=(3,512,512),device='cpu')

    aa=torch.ones((6,3,512,512))
    out=net(aa)
    print(out.shape)
    # ii=torch.zeros((1,3,640,640))
    # outs=net(ii)
    # print(outs.shape)
主题界面显示及代码:
from PyQt5.QtGui import *
from PyQt5.QtWidgets import *
from untitled import Ui_Form
import sys
import cv2 as cv
from PyQt5.QtCore import QCoreApplication
import numpy as np
from PyQt5 import QtCore,QtGui
from PIL import Image
from predict import *

class My(QMainWindow,Ui_Form):
    def __init__(self):
        super(My,self).__init__()
        self.setupUi(self)
        self.setWindowTitle('图像去雨去雾')
        self.setIcon()
        self.pushButton.clicked.connect(self.pic)
        self.pushButton_2.clicked.connect(self.pre)
        self.pushButton_3.clicked.connect(self.pre2)
    def setIcon(self):
       palette1 = QPalette()
       # palette1.setColor(self.backgroundRole(), QColor(192,253,123))   # 设置背景颜色
       palette1.setBrush(self.backgroundRole(), QBrush(QPixmap('back.png')))  # 设置背景图片
       self.setPalette(palette1)
    def pre(self):
        out=pre(self.img,0)
        out=self.cv_qt(out)
        self.label_2.setPixmap(QPixmap.fromImage(out).scaled(self.label.width(),self.label.height(),QtCore.Qt.KeepAspectRatio))
    def pre2(self):
        out=pre(self.img,1)
        out=self.cv_qt(out)
        self.label_2.setPixmap(QPixmap.fromImage(out).scaled(self.label.width(),self.label.height(),QtCore.Qt.KeepAspectRatio))

    def pic(self):
        imgName, imgType = QFileDialog.getOpenFileName(self,
                                                       "打开图片",
                                                       "",
                                                       " *.png;;*.jpg;;*.jpeg;;*.bmp;;All Files (*)")
        #KeepAspectRatio
        png = QtGui.QPixmap(imgName).scaled(self.label.width(),self.label.height(),QtCore.Qt.KeepAspectRatio)  # 适应设计label时的大小
        self.label.setPixmap(png)

        self.img=Image.open(imgName)
        self.img=np.array(self.img)
    def cv_qt(self, src):
        #src必须为bgr格式图像
        #src必须为bgr格式图像
        #src必须为bgr格式图像
        if len(src.shape)==2:
            src=np.expand_dims(src,axis=-1)
            src=np.tile(src,(1,1,3))
            h, w, d = src.shape
        else:h, w, d = src.shape


        bytesperline = d * w
        # self.src=cv.cvtColor(self.src,cv.COLOR_BGR2RGB)
        qt_image = QImage(src.data, w, h, bytesperline, QImage.Format_RGB888).rgbSwapped()
        return qt_image

if __name__ == '__main__':
    QCoreApplication.setAttribute(QtCore.Qt.AA_EnableHighDpiScaling)
    app=QApplication(sys.argv)
    my=My()
    my.show()
    sys.exit(app.exec_())
项目结构:
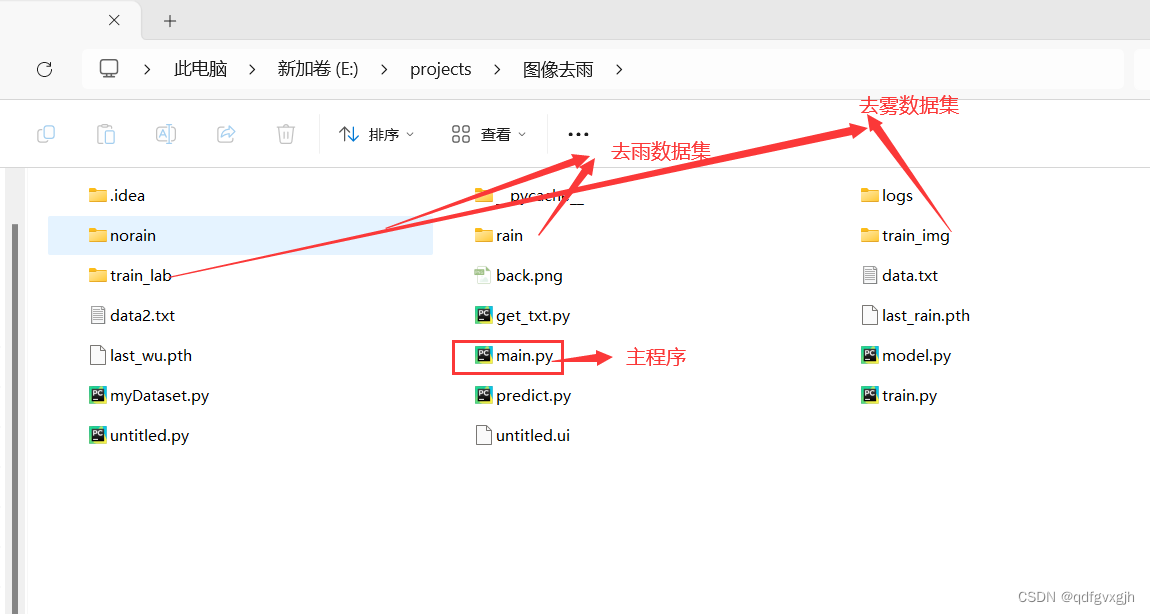
直接运行main.py即可弹出交互界面。
项目下载地址:下载地址-列表第19


 2475
2475


 被折叠的 条评论
为什么被折叠?
被折叠的 条评论
为什么被折叠?
 到【灌水乐园】发言


