


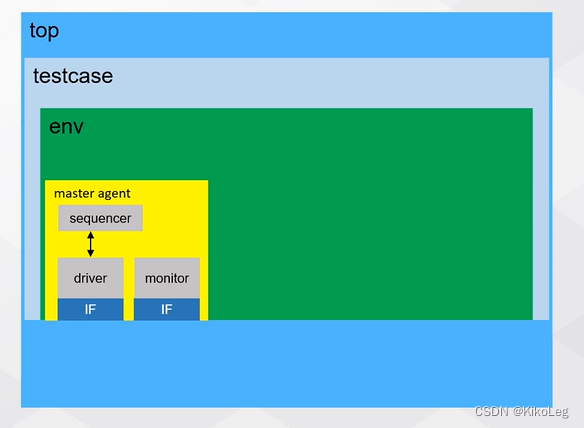
继上一章,仅使用了driver对DUT进行驱动,这一章将加入interface、env、agent、sequencer、sequence、driver等,如下图所示。
1.top.sv 需要包含所有子文件,并对DUT进行例化,interface的输入,以及在顶层通过config_db设置好interface,以便在下面的组件中获取interface
`include "./rtl/defines.v"
 `include "./rtl/dual_port_dram.v"
`include "./rtl/ASFIFO.v"
import uvm_pkg::*;
`include "uvm_macros.svh"
`include "agent_config.sv"
`include "env_config.sv"
`include "dut_interface.sv"
`include "my_transaction.sv"
`include "my_sequence.sv"
`include "my_sequencer.sv"
`include "my_driver.sv"
`include "my_monitor.sv"
`include "master_agent.sv"
`include "my_env.sv"
`include "my_test.sv"

module top_tb;
  parameter WIDTH = 16;
  parameter PTR   = 4 ;


bit wrclk_sys,rdclk_sys;
dut_interface inf(wrclk_sys,rdclk_sys);

ASFIFO
  uASFIFO
  (
  .wrclk(inf.wrclk),
  .rdclk(inf.rdclk),
  .rd_rst_n(inf.rd_rst_n),
  .wr_rst_n(inf.wr_rst_n),
  .wr_en(inf.wr_en),
  .rd_en(inf.rd_en),
  .wr_data(inf.wr_data),
  .rd_data(inf.rd_data),
  .wr_full(inf.wr_full),
  .rd_empty(inf.rd_empty)
  );

  initial begin
    wrclk_sys = 0;
	forever begin
	  #2 wrclk_sys= ~wrclk_sys;
	end
  end

  initial begin
   rdclk_sys = 0;
	forever begin
	  #4 rdclk_sys = ~rdclk_sys;
	end
  end


initial begin
 uvm_config_db#(virtual dut_interface)::set(null,"uvm_test_top","top_if",inf);
run_test("my_test");
end

initial begin

end

endmodule
top的下一层为testcase
2.my_test.sv代码如下,需要在其中例化env和env的配置参数。在build_phase 中创建、获取并配置相关资源:获取top层中的interface到m_env_cfg.m_agent_cfg.m_vif中,使用了default sequence方法调用sequence
//testcase的两个作用:
//testcase实例化和配置env
//指定需要启动的sequence
class my_test extends uvm_test;
`uvm_component_utils(my_test)
my_env m_env;
env_config m_env_cfg;
function new(string name = "my_test", uvm_component parent = null);
super.new(name,parent);
m_env_cfg=new("m_env_cfg");
endfunction
virtual function void build_phase(uvm_phase phase);
super.build_phase(phase);
m_env = my_env::type_id::create("m_env",this);
uvm_config_db#(uvm_object_wrapper)::set(this,
"*.m_seqr.run_phase",
"default_sequence",
my_sequence::get_type());
//使用uvm_config机制配置agent_sequencer的default_sequence
uvm_config_db#(int)::set(this,"*.m_seqr","item_num",100);
m_env_cfg.is_coverage=0;
m_env_cfg.is_check=0;
m_env_cfg.m_agent_cfg.is_active=UVM_ACTIVE;
if(!uvm_config_db#(virtual dut_interface)::get(this,"","top_if",m_env_cfg.m_agent_cfg.m_vif)) begin
`uvm_fatal("CONFIG_EFFOR","test can not get the interface")
end
uvm_config_db#(env_config)::set(this,"m_env","env_cfg",m_env_cfg);
endfunction
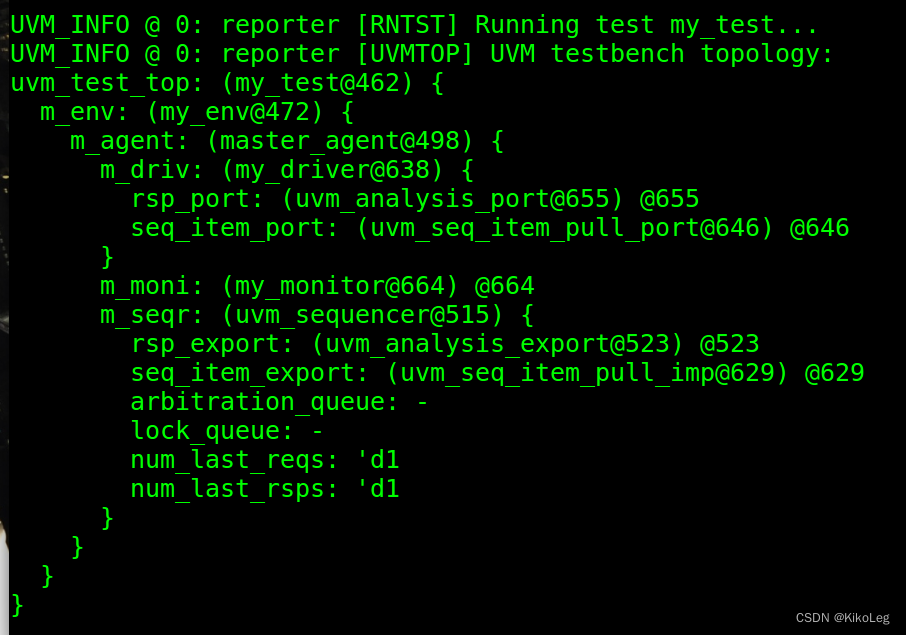
virtual function void start_of_simulation_phase(uvm_phase phase);
super.start_of_simulation_phase(phase);
uvm_top.print_topology(uvm_default_tree_printer);
//在start_of_simulation_phase中打印出本平台的结构
endfunction
endclass
3.my_env.sv
env中需要例化agent,以及env的配置参数,其中env中的配置参数中也包含了agent的配置参数,在factory中注册。在build_phase 中获取、配置相关资源
typedef class env_config;
class my_env extends uvm_env;
  `uvm_component_utils(my_env)
  master_agent m_agent;
  env_config m_env_cfg;


 function new (string name="" ,uvm_component parent);
  super.new(name,parent);

endfunction

 virtual function void build_phase(uvm_phase phase);
  super.build_phase(phase);

  if(!uvm_config_db#(env_config)::get(this,"","env_cfg",m_env_cfg)) begin
`uvm_fatal("CONFIG_FATAL","ENV can not get the configuration")
end

  uvm_config_db#(agent_config)::set(this,"m_agent","m_agent_cfg",m_env_cfg.m_agent_cfg);

  if(m_env_cfg.is_coverage) begin
`uvm_info("COVERAGE_ENABLE","The function coverage is enable for this testcase",UVM_MEDIUM)
end

  if(m_env_cfg.is_check) begin
`uvm_info("CHECK_ENABLE","The check function is enable for this testcase",UVM_MEDIUM)

end

  m_agent=master_agent::type_id::create("m_agent",this);


endfunction

endclass
4.agent的配置资源,包含了interface 和is_active ,is_active用与判断agent是passive模式还是active模式,在passive模式中只包含monitor
class agent_config extends uvm_object;
uvm_active_passive_enum is_active=UVM_ACTIVE;
virtual dut_interface m_vif;

`uvm_object_utils_begin(agent_config)
 `uvm_field_enum(uvm_active_passive_enum,is_active,UVM_ALL_ON)
`uvm_object_utils_end

function new(string name="agent_config");
 super.new(name);
endfunction
endclass
5.env的配置资源,agent的配置资源包含在env中
class env_config extends uvm_object;
 int is_coverage=0;
 int is_check=0;

 agent_config m_agent_cfg;

`uvm_object_utils_begin(env_config)
 `uvm_field_int(is_check,UVM_ALL_ON)
 `uvm_field_int(is_coverage,UVM_ALL_ON)
 `uvm_field_object(m_agent_cfg,UVM_ALL_ON)
`uvm_object_utils_end

function new(string name="env_config");
 super.new(name);
m_agent_cfg=new("m_agent_cfg");
endfunction
endclass
6.interface.sv
设置了时钟blocking ,分为了读driver,读monitor,写driver,写monitor
interface dut_interface(input bit wrclk,input rdclk);

//write interface
logic wr_rst_n;
logic [`WIDTH-1:0] wr_data;
logic wr_en;
logic wr_full;

//read interface

logic rd_rst_n;
logic rd_en;
logic [`WIDTH-1:0] rd_data;
logic rd_empty;

   //write clocking
    clocking drv_wr_cb@(posedge wrclk);
       default input #1 output #0;
       output wr_data;
       output wr_en;
       output wr_rst_n;
       input wr_full;
    endclocking

    clocking mon_wr_cb@(posedge wrclk);
       default input #1 output #0;
       input wr_data;
       input wr_en;
       input wr_full;
    endclocking

   //read clocking
    clocking drv_rd_cb@(posedge rdclk);
       default input #1 output #0;
       input rd_data;
       input rd_empty;
       output rd_en;
    endclocking

    clocking mon_rd_cb@(posedge rdclk);
       default input #1 output #0;
       input rd_data;
       input rd_empty;
       input rd_en;
    endclocking


  reg init_done;
 initial begin
    wr_rst_n = 1;
	rd_rst_n = 1;
	wr_en    = 0;
	rd_en    = 0;
	wr_data  = 'b0;
	init_done= 0;

	#3 wr_rst_n = 0;
	    rd_rst_n = 0;
	#3 wr_rst_n = 1;
	    rd_rst_n = 1;

	#3 init_done = 1;
  end

  always@(*)begin
	if(init_done)begin
	  if(wr_full) wr_en = 0;
      else        wr_en = 1;
	end
  end

  always@(*)begin
    if(init_done)begin
	  if(rd_empty) rd_en = 0;
	  else		   rd_en = 1;
	end
  end

endinterface
7.master_agent
例化了sequencer,driver,monitor以及相关配置文件。在build_phase中获取配置资源,以及interface,用factory机制创建相关组件。并在agent环境中连接sequencer与driver。事务在他们之间传递。
在sequencer中内建了一个export(实际是import) seq_item_export,在driver中内建了seq_item_port。在master中连接m_driv.seq_item_port.connect(seq_item_export)
typedef class agent_config;
class master_agent extends uvm_agent;
   `uvm_component_utils(master_agent)

   my_sequencer m_seqr;
   my_driver    m_driv;
   my_monitor   m_moni;
   agent_config m_agent_cfg;


 function new(string name="",uvm_component parent);
  super.new(name,parent);

endfunction

 virtual function void build_phase(uvm_phase phase);
 super.build_phase(phase);


 if(!uvm_config_db#(agent_config)::get(this,"","m_agent_cfg",m_agent_cfg)) begin
`uvm_fatal("CONFIG_FATAL","master_agent can not get the configuration")
end

is_active=m_agent_cfg.is_active;

uvm_config_db#(virtual dut_interface)::set(this,"m_driv","vif",m_agent_cfg.m_vif);
uvm_config_db#(virtual dut_interface)::set(this,"m_moni","vif",m_agent_cfg.m_vif);
 if(is_active==UVM_ACTIVE) begin
    m_seqr=my_sequencer::type_id::create("m_seqr",this);
    m_driv=my_driver::type_id::create("m_driv",this);
end
m_moni=my_monitor::type_id::create("m_moni",this);
endfunction

virtual function void connect_phase(uvm_phase phase);
  if(is_active==UVM_ACTIVE)
    m_driv.seq_item_port.connect(m_seqr.seq_item_export);
endfunction
endclass
8.my_driver.sv
例化interface,获取interface,driver一直向sequencer获取数据,采用seq_item_port.get_next_item(req)。 在m_vif.init_done=1后开始赋值,因为init_done是代表着初始化完毕可以开始赋值的标志,因为我们FIFO的地址是自动增加的,所以需要在此之后才能进行地址自增。在非满,且能写的情况下对interface中的wr_data进行赋值,赋的值为req.data,这个是在事务transaction中定义的,req相当于一个数据包。
class my_driver extends uvm_driver#(my_transaction);
 `uvm_component_utils(my_driver)
virtual dut_interface m_vif;


function new (string name="my_driver",uvm_component parent);
super.new(name,parent);
endfunction

virtual function void build_phase(uvm_phase phase);
   super.build_phase(phase);
  if(!uvm_config_db#(virtual dut_interface)::get(this,"","vif",m_vif)) begin
`uvm_fatal("CONFIG_FATAL","driver can not get the interface")
end


endfunction


virtual task configure_phase(uvm_phase phase);
phase.raise_objection(this);
`uvm_info("DRV_CONFIGURE_PHASE", "Now driver config the DUT...", UVM_MEDIUM)
phase.drop_objection(this);
endtask


virtual task run_phase(uvm_phase phase);
#10;
forever begin
 seq_item_port.get_next_item(req);//transaction request,blocking until get
`uvm_info("DRV_RUN_PHASE", {"\n",req.sprint()}, UVM_MEDIUM)


//send data
      if(m_vif.init_done == 0)begin
	  m_vif.wr_data <= 'b0;
	end

	else begin
	    if(m_vif.wr_full == 0 && m_vif.wr_en==1)begin
	      m_vif.wr_data <= req.data;
	      `uvm_info("my_driver",$sformatf("%0d is driverd at %0t",m_vif.wr_data,$time),UVM_LOW)
	    end
	    else begin
	      m_vif.wr_data <= m_vif.wr_data;
	      `uvm_info("my_driver","fifo is full",UVM_LOW)
	    end
	  end


  `uvm_info("fifo_driver","drive is finished",UVM_LOW)
$display("wr_data=%0d",m_vif.wr_data );
seq_item_port.item_done();//return done to sqr
@(m_vif.drv_wr_cb);

end
endtask
endclass
9.my_transaction.sv
在这里只进行data的随机化,只定义随机数data,使用uvm_field机制进行注册,赋予值打印、复制等属性。可以用constraint对随机数进行约束
class my_transaction extends uvm_sequence_item;

	rand bit [`WIDTH-1:0] data;//

	`uvm_object_utils_begin(my_transaction)
		`uvm_field_int(data,UVM_ALL_ON)
	`uvm_object_utils_end

	constraint Limit{
		data inside {[0:65535]};

	}

	function new(string name = "my_transaction");
		super.new(name);
	endfunction

endclass
10.my_sequence.sv
task phase都需要raise_obiection() 和drop_obiection(), 同一个phase会运行相同的时间,运行结束后才运行下一个phase,具体可参考平台组件phase的运行图。sequence的作用就是发送事务,使用uvm_do宏发送事务。
class my_sequence extends uvm_sequence #(my_transaction);
`uvm_object_utils(my_sequence)

int item_num=3;
function new (string name ="my_sequence");
super.new(name);
endfunction

function void pre_randomize();
 uvm_config_db#(int)::get(m_sequencer,"","item_num",item_num);
endfunction


virtual task body();
 if(starting_phase !=null)
    starting_phase.raise_objection(this);
$display("item_num=%0d",item_num);
repeat(item_num) begin

`uvm_do(req)// generate/wait for finish,uvm_do_with/uvm_do_on,req=handle
end

#500;
if(starting_phase !=null)
  starting_phase.drop_objection(this);
endtask
endclass
11.my_sequencer.sv
之间从uvm_sequencer继承就行,transaction相当于子弹,sequence相当于弹夹,sequencer相当于枪。seuqnce与外界的通信都需通过sequencer进行。
typedef uvm_sequencer #(my_transaction) my_sequencer;
12.my_monitor.sv
一直发送检测到的data值就行。
class my_monitor extends uvm_monitor;
`uvm_component_utils(my_monitor)
virtual dut_interface m_vif;
function new (string name="my_monitor",uvm_component parent);
super.new(name,parent);
endfunction

virtual function void build_phase(uvm_phase phase);
super.build_phase(phase);
if(!uvm_config_db#(virtual dut_interface)::get(this,"","vif",m_vif)) begin
`uvm_fatal("Monitor","Monitor don't get the interface")
end
endfunction

virtual task run_phase (uvm_phase phase);
forever begin
`uvm_info("Monitor",{"\n",$sformatf("monitor get the data %0d",m_vif.wr_data)},UVM_MEDIUM)
#10;
end
endtask

endclass
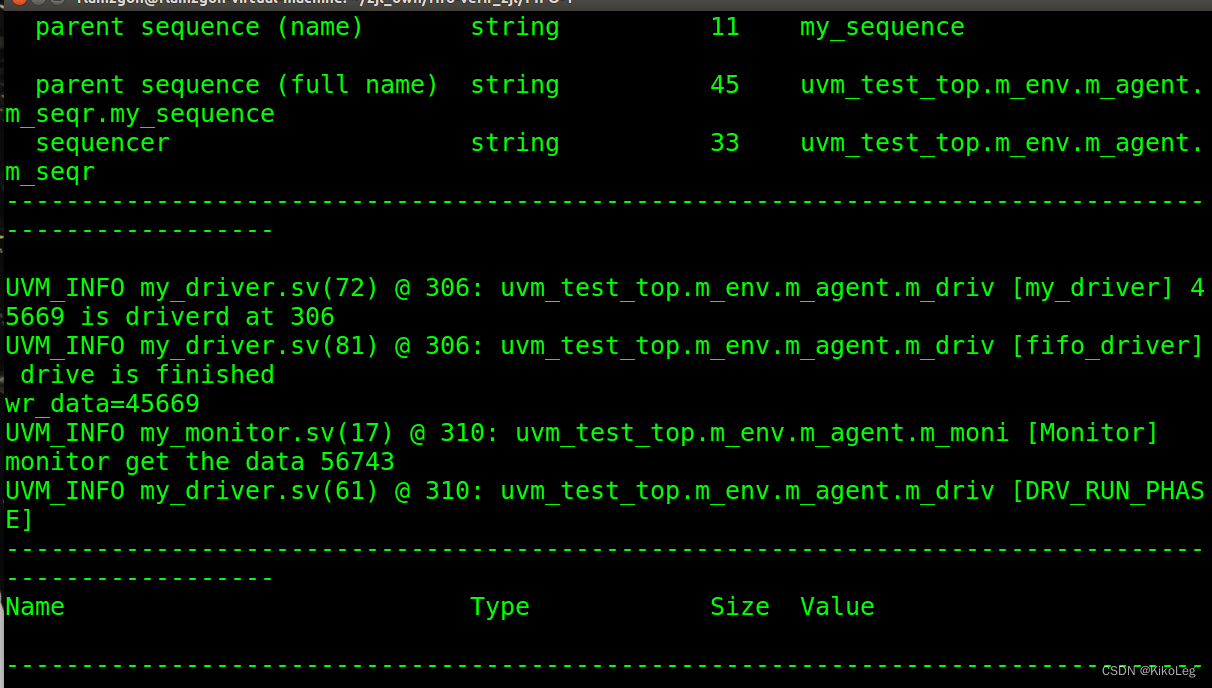
结果如下:UVM平台如下
phase机制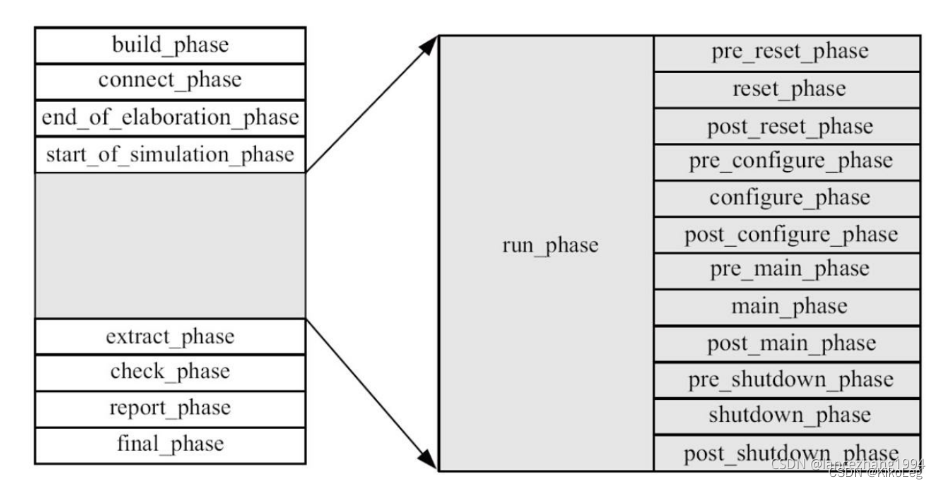
结果波形图
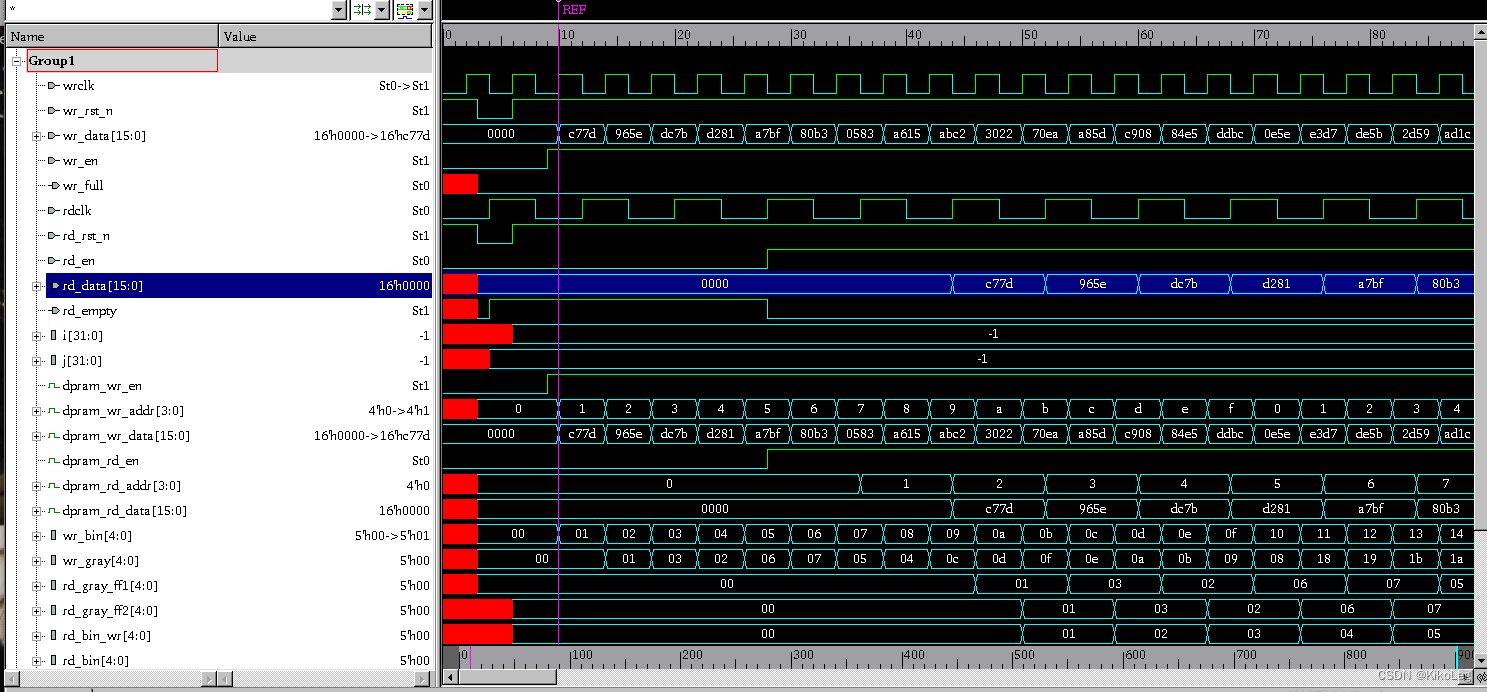
monitor输出


 1709
1709

 被折叠的 条评论
为什么被折叠?
被折叠的 条评论
为什么被折叠?
 到【灌水乐园】发言


