


在这个信息爆炸的时代,拥有一个属于自己的高级个人博客,不仅能展示你的个性与才华,还能为你提供一个分享见解、记录生活的平台。下面就为大家详细介绍如何用 WordPress 搭建一个高级个人博客,主要分为域名购买、服务器购买、Ubuntu 服务器配置、WordPress 安装以及 WordPress 使用几个部分。
一、域名
- 选择一个好的域名是搭建博客的第一步。域名具体可以在阿里云,腾讯云,百度云等平台查询选择,可以选择一个.top或者.xyz域名,不贵比较便宜。
二、服务器
- 对于个人博客,推荐选择云服务器,如阿里云的 ECS、腾讯云的 CVM 等。根据自己的预算和需求选择合适的配置。阿里云,腾讯云的轻量型应用服务器,也可以,只不过相对来说,运行速度方面比较慢。
目前购买服务器还有优惠,现在阿里云购买ESC服务器,有个99元一年的活动,比较合适,没有什么限制。腾讯云也有对应的99元购买一年的活动,原价我记得是600多,是非常合适的!当然,相对来说,如果你是学生的话,优惠力度更大!其他服务器也有对应的活动,如果感兴趣的话,可以去探索一下!
活动链接如下:
阿里云99元活动:https://www.aliyun.com/daily-act/ecs/activity_selection?userCode=vinoz5wj
阿里云学生活动:https://university.aliyun.com/mobile?userCode=vinoz5wj
腾讯云99元服务器:【腾讯云】2核2G云服务器新老同享 99元/年,续费同价,云服务器3年机/5年机限时抢购,低至 2.5折
腾讯云福利:【腾讯云】云服务器、云数据库、COS、CDN、短信等云产品特惠热卖中
腾讯云轻量型服务器:【腾讯云】Lighthouse助力跨境电商业务扬帆出海
腾讯云学生优惠:https://cloud.tencent.com/act/cps/redirect?redirect=10004&cps_key=c846cee9af190f6b8c7d83357182e4ea
- 服务器的选择要考虑地域、带宽、存储等因素。如果你的目标读者主要在国内,选择国内的服务器可能会有更好的访问速度。
- 服务器在选择购买时,一定要选择ubuntu或者CentOS操作系统的服务器,当然如果你要是了解专门的wordpress服务器的话,也可以使用,但是如果选择专门的wordpress服务器,可能无法使用其他功能了,比如部署一个网站什么的。
三、LNMP安装
LNMP包括Linux,Nginx,MySQL,PHP这四个,要搭建Wordpres首先要把这四个搭建好,才能让wordpress在服务器中运行起来。LAMP也可以作为Wordpress的运行容器。本文先分享一下使用LNMP搭建整个服务器的方法。
(一)安装 Nginx
- CentOS 7 系统
-
- 安装必要的编译依赖:
yum install -y gcc-c++ pcre-devel zlib-devel make - 下载 Nginx 源码包:
wget http://nginx.org/download/nginx-1.22.0.tar.gz - 解压源码包:
tar zxvf nginx-1.22.0.tar.gz - 进入解压后的目录:
cd nginx-1.22.0 - 配置编译选项(这里只列出了一部分常用选项):
./configure --prefix=/usr/local/nginx --with-http_ssl_module - 编译和安装:
make && make install - 启动 Nginx:
/usr/local/nginx/sbin/nginx
- 安装必要的编译依赖:
yum install -y gcc-c++ pcre-devel zlib-devel make
wget http://nginx.org/download/nginx-1.22.0.tar.gz
tar zxvf nginx-1.22.0.tar.gz
cd nginx-1.22.0
./configure --prefix=/usr/local/nginx --with-http_ssl_module
make && make install
Nginx:/usr/local/nginx/sbin/nginx- Ubuntu 21.04 系统
-
- 更新系统软件包:
sudo apt update - 安装 Nginx:
sudo apt-get install nginx - 查看 Nginx 版本:
sudo nginx -v,例如返回nginx version: nginx/1.18.0 (Ubuntu)表示安装成功。
- 更新系统软件包:
sudo apt update
Nginx:sudo apt-get install nginx
sudo nginx -v
(二)安装 MySQL
- CentOS 7 系统
-
- 部署 Mariadb 数据库:
yum -y install mysql-server,然后systemctl enable --now mysql.service - 创建 WordPress 数据库和用户并授权
- 部署 Mariadb 数据库:
-
-
- 进入 MySQL 命令行:
mysql - 创建数据库:
create database wordpress; - 创建用户并设置密码:
create user wordpress@'192.168.26.%' identified by '123456'; - 授权用户对数据库的操作权限:
grant all on wordpress.* to wordpress@'192.168.26.%';
- 进入 MySQL 命令行:
-
yum -y install mariadb-server
systemctl enable --now mariadb.service
mysql
create database wordpress;
create user wordpress@'192.168.26.%' identified by '123456';
grant all on wordpress.* to wordpress@'192.168.26.%';- Ubuntu 21.04 系统
-
- 安装 MySQL:
sudo apt -y install mysql-server - 查看 MySQL 版本:
sudo mysql -V,例如返回mysql Ver 8.0.27-0ubuntu0.20.04.1 for Linux on x86_64 ((Ubuntu))表示安装成功。
- 安装 MySQL:
sudo apt -y install mysql-server
sudo mysql -V
sudo mysql_secure_installation-
- 对 MySQL 进行安全性配置
-
-
- 运行
sudo mysql_secure_installation - 输入Y使用MySQL自带的密码安全校验工具。
- 本教程中,输入
1使用较安全的MEDIUM等级。您可以根据实际业务需求选择适用的密码强度,建议您使用较高的密码强度,增强对数据安全的保护。 - 设置MySQL的密码。 在输入密码时,系统为了最大限度的保证数据安全,命令行将不做任何回显。您只需要输入正确的密码信息,然后按Enter键即可。
- 输入Y确认使用已设置的密码。
- 输入Y删除MySQL自带的匿名用户。
- 输入Y禁止MySQL的root用户的远程登录权限。
- 输入Y删除MySQL中test库以及用户对test库的访问权限。
- 输入Y重新加载授权表。
- 运行
-
VALIDATE PASSWORD COMPONENT can be used to test passwords and improve security. It checks the strength of password and allows the users tosetonly those passwords which are secure enough. Would you liketo setup VALIDATE PASSWORD component? Press y|Y for Yes, any other key forNo: Y There are three levels of password validation policy: LOW Length >=8 MEDIUM Length >=8, numeric, mixed case, and special characters STRONG Length >=8, numeric, mixed case, special characters and dictionary file Please enter 0= LOW, 1= MEDIUM and2= STRONG: 1Pleasesetthepasswordforroothere.New password:Re-enter new password:Estimated strength of the password:100Do you wish to continuewith the password provided?(Press y|Y forYes, any other key forNo) : YBydefault, a MySQL installation has an anonymous user, allowing anyone to log into MySQL withouthavingto have a user account created for them. This is intended onlyfor testing, andto make the installation go a bit smoother. You should remove them before moving into a production environment. Remove anonymous users? (Press y|Y for Yes, any other key forNo) : YNormally, root should only be allowed toconnectfrom'localhost'. This ensures that someone cannot guess at the root password from the network. Disallow root login remotely? (Press y|Y for Yes, any other key forNo) : YBydefault, MySQL comes with a database named 'test' that anyone can access. This is also intended onlyfor testing, and should be removed before moving into a production environment. Remove test database and access to it? (Press y|Y for Yes, any other key forNo) : YReloadingtheprivilegetableswillensurethatallchangesmadesofarwilltakeeffectimmediately.Reloadprivilegetablesnow?(Pressy|YforYes,anyotherkeyforNo):Y-
- 运行以下命令,登录MySQL数据库。
sudo mysql -uroot -p-
-
- 创建数据库:
create database wordpress; - 创建用户并设置密码:
create user wordpress@'192.168.26.%' identified by '123456'; - 授权用户对数据库的操作权限:
grant all on wordpress.* to wordpress@'192.168.26.%';
- 创建数据库:
-
-
- 运行以下命令,退出MySQL数据库。
exit;(三)安装 PHP
- CentOS 7 系统
-
- 安装编译所需的依赖包:
yum -y install gcc openssl-devel libxml2-devel bzip2-devel libmcrypt-devel sqlite-devel oniguruma-devel - 下载 PHP 源码包:
cd /usr/local/src,wget https://www.php.net/distributions/php-7.4.11.tar.xz - 解压源码包:
tar xf php-7.4.11.tar.xz - 进入解压后的目录:
cd php-7.4.11/ - 配置编译选项,例如:
./configure --prefix=/usr/local/php74 --enable-mysqlnd --with-mysqli=mysqlnd --with-pdo-mysql=mysqlnd --with-openssl --with-zlib --with-config-file-path=/etc --with-config-file-scan-dir=/etc/php.d --enable-mbstring --enable-xml --enable-sockets --enable-fpm --enable-maintainer-zts --disable-fileinfo - 编译并安装:
make -j 8 && make install - 准备 PHP 配置文件
- 安装编译所需的依赖包:
-
-
- 复制
php.ini-production文件为php.ini:cp /usr/local/src/php-7.4.11/php.ini-production /etc/php.ini - 复制
php-fpm.conf.default文件为php-fpm.conf:cd /usr/local/php74/etc/,cp php-fpm.conf.default php-fpm.conf - 复制
www.conf.default文件为www.conf并编辑相关参数:cd php-fpm.d/,cp www.conf.default www.conf,vim www.conf,可设置如user = nginx,group = nginx,listen = 127.0.0.1:9000等参数。
- 复制
-
-
- 启动并验证
php-fpm服务
- 启动并验证
-
-
- 测试配置文件:
/usr/local/php74/sbin/php-fpm -t - 启动服务:
/usr/local/php74/sbin/php-fpm - 查看服务状态,如使用
ss -ntl查看监听端口,pstree -p |grep php和ps -ef |grep php查看进程。
- 测试配置文件:
-
yum -y install gcc openssl-devel libxml2-devel bzip2-devel libmcrypt-devel sqlite-devel oniguruma-devel
cd /usr/local/src,wget https://www.php.net/distributions/php-7.4.11.tar.xz
tar xf php-7.4.11.tar.xz
cd php-7.4.11/
##配置编译选项,例如:
./configure --prefix=/usr/local/php74 --enable-mysqlnd --with-mysqli=mysqlnd --with-pdo-mysql=mysqlnd --with-openssl --with-zlib --with-config-file-path=/etc --with-config-file-scan-dir=/etc/php.d --enable-mbstring --enable-xml --enable-sockets --enable-fpm --enable-maintainer-zts --disable-fileinfo

make -j 8 && make install
cp /usr/local/src/php-7.4.11/php.ini-production /etc/php.ini
cd /usr/local/php74/etc/,cp php-fpm.conf.default php-fpm.conf
cd php-fpm.d/,cp www.conf.default www.conf,vim www.conf
##可设置如user = nginx,group = nginx,listen = 127.0.0.1:9000等参数。
/usr/local/php74/sbin/php-fpm -t
/usr/local/php74/sbin/php-fpm
pstree -p |grep php
ps -ef |grep php- Ubuntu 21.04 系统
-
- 安装 PHP:
sudo apt -y install php-fpm - 查看 PHP 版本:
sudo php -v,例如返回PHP 7.4.3 (cli) (built: Nov 25 2021 23:16:22) (NTS)表示安装成功。
- 安装 PHP:
sudo apt -y install php-fpm
sudo php -v
(四)配置 Nginx 支持 PHP
CentOS 7 系统
-
- 编辑
/usr/local/nginx/conf/nginx.conf文件
- 编辑
-
-
- 在
http模块中,确保包含mime.types,设置default_type,开启sendfile和keepalive_timeout等参数。将第30-36行(含36行)前面表示注释的“#”号去掉(除非你不想使用PHP)。 - 在
server模块中,设置listen端口(如80)和server_name(如localhost,如果有服务器的话,直接设置为你的服务器的ip,如果你的服务器已经绑定了域名,可以直接设置为域名),设置root为html,index添加index.php,配置error_page,并对.php文件进行配置,如location ~ \.php$中设置root为html,fastcgi_pass为127.0.0.1:9000,fastcgi_index为index.php,fastcgi_param为SCRIPT_FILENAME $document_root$fastcgi_script_name,并包含fastcgi_params。
- 在
-
[root@web ~]#vim /usr/local/nginx/conf/nginx.conf

[root@web ~]#grep -Ev '#|^$' vim /usr/local/nginx/conf/nginx.conf
 worker_processes  1;

events {

worker_connections  1024;

}

http {
include       mime.types;
default_type  application/octet-stream;

sendfile        on;

keepalive_timeout  65;
server {

listen       80;

server_name  localhost;

location / {

root   html;

index  index.php index.html index.htm;

}

error_page   500 502 503 504  /50x.html;

location = /50x.html { root   html;

}

location ~ \.php$ {

root           html;

fastcgi_pass   127.0.0.1:9000;

fastcgi_index  index.php;
fastcgi_param  SCRIPT_FILENAME $document_root$fastcgi_script_name;

include        fastcgi_params;
          }

}
 }
[root@web ~]# /usr/local/nginx/sbin/nginx-
- 重启 Nginx:
/usr/local/nginx/sbin/nginx
- 重启 Nginx:
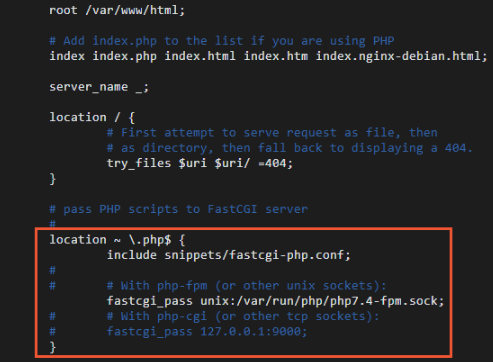
- Ubuntu 21.04 系统
-
- 编辑
/etc/nginx/sites-enabled/default文件
- 编辑
-
-
- 按
i进入编辑模式,在index开头的配置行中添加index.php。 - 找到
location ~ \.php$ {},去除相关配置行的注释符号,设置fastcgi_pass为unix:/var/run/php/php7.4-fpm.sock。
- 按
-
-
- 保存并退出文件(按
Esc键,输入:wq并回车)。 - 重启 Nginx 服务:
sudo systemctl restart nginx -
- 保存并退出文件(按
sudo vim /etc/nginx/sites-enabled/default
location ~ \.php$ {
include snippets/fastcgi-php.conf;
fastcgi_pass unix:/var/run/php/php7.4-fpm.sock; }
sudo systemctl restart nginx.service
四、WordPress 部署
(一)准备 WordPress 文件
- CentOS 7 系统
-
- 下载 WordPress 中文压缩包(以 6.0.1 版本为例):
wget https://cn.wordpress.org/wordpress-6.0.1-zh_CN.tar.gz - 解压压缩包:
tar xf wordpress-6.0.1-zh_CN.tar.gz - 将文件复制到 Nginx 的
html目录:cp -r wordpress/* /usr/local/nginx/html,也可以把nginx.conf文件中的root后面的内容改成nginx的具体路径。 - 复制并编辑
wp-config.php文件(留存备份)
- 下载 WordPress 中文压缩包(以 6.0.1 版本为例):
-
-
cp wp-config-sample.php wp-config.php- 编辑
wp-config.php,设置DB_NAME为wordpress,DB_USER为你构建的数据库用户的名字,DB_PASSWORD为数据库密码,DB_HOST为你的服务器密码。
-
-
- 设置文件权限:
chown -R nginx.nginx.
- 设置文件权限:
[root@web ~]# wget https://cn.wordpress.org/wordpress-6.0.1-zh_CN.tar.gz
[root@web ~]# tar xf wordpress-6.0.1-zh_CN.tar.gz
[root@web ~]#cp -r wordpress/* /usr/local/nginx/html
[root@web html]# cp wp-config-sample.php wp-config.php
[root@web html]# vim wp-config.php
define( 'DB_NAME', 'wordpress' );
/** Database username */
define( 'DB_USER', 'wordpress' );
/** Database password */
define( 'DB_PASSWORD', '123456' );
/** Database hostname */
define( 'DB_HOST', '192.168.26.202' );
[root@web html]# chown -R nginx.nginx .- Ubuntu 21.04 系统
-
- 进入 Nginx 网站根目录(本教程为
/var/www/html/),下载 WordPress 压缩包:cd /var/www/html/,wget https://wordpress.org/wordpress-5.4.2.zip,
- 进入 Nginx 网站根目录(本教程为
如果需要中文版本,可下载https://cn.wordpress.org/latest-zh_CN.zip。
-
- 解压压缩包:
unzip wordpress-5.4.2.zip - 将
wp-config-sample.php文件复制为wp-config.php并编辑
- 解压压缩包:
-
-
cd /var/www/html/wordpress,cp wp-config-sample.php wp-config.php- 编辑
wp-config.php,设置DB_NAME为wordpress,DB_USER为user,DB_PASSWORD为PASSword123.,DB_HOST为localhost。
-
-
- 最后把
nginx文件中的root后面的内容改为/var/www/html/nginx即可,
- 最后把
最后配置完成以后,在浏览器输入你的ip地址,即可进入wordpress后端,在后端进行配置即可!
整理不易!欢迎关注“技术小坤”gzh


 14万+
14万+

 被折叠的 条评论
为什么被折叠?
被折叠的 条评论
为什么被折叠?
 到【灌水乐园】发言


