


fastapi框架
浏览器与服务器交互过程
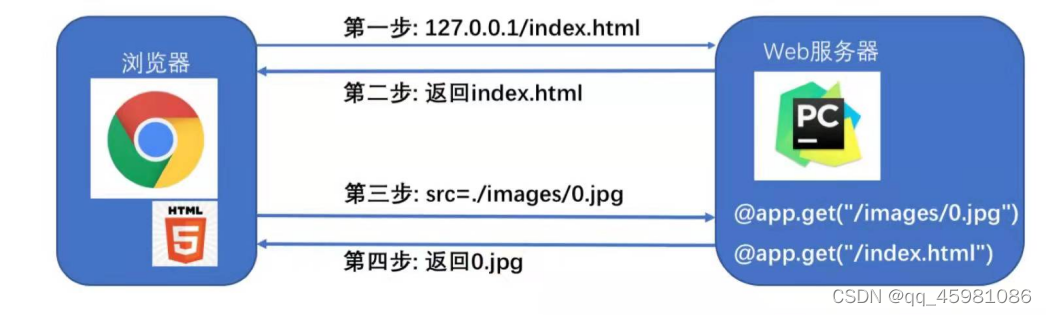
fastapi运行流程
- 第一步在浏览器上输入我们需要访问的url,浏览器会发送一个get请求给服务器;
- 第二步,服务器在接受到浏览器发来的get请求后,会被@app路由装饰器捕获并返回相应的请求资源;
- 第三步,浏览器在接收到相应的页面资源后,会根据页面内容再次请求页面所需的资源,如图片0.jpg;
- 第四步,服务器重复第二步,返回请求资源
一、安装fastapi
pip install uvicornpip install fastapi
二、fastapi框架搭建
导入模块->创建fastapp框架对象->@app路由装饰器收发数据->运行服务器from fastapi import FastAPI
from fastapi import Response
import uvicorn
#创建fastapp框架对象
app=FastAPI()
#@app路由装饰器收发数据
@app.get("/render.html")
def func01():
with open("./html/html/render.html", "rb") as f:
file_data = f.read()
return Response(content=file_data,media_type="text/html")
@app.get("/gdp.html")
def func02():
with open("./html/html/gdp.html", "rb") as f:
file_data = f.read()
return Response(content=file_data,media_type="text/html")
#运行服务器
uvicorn.run(app,host="127.0.0.1",port=8080)
三、fastapi通用配置
通用配置:(可以省去带量的重复代码的书写)from fastapi import FastAPI
from fastapi import Response
import uvicorn
#创建fastapp框架对象
app=FastAPI()
#@app路由装饰器收发数据
# path相当于一个参数 当浏览器访问服务器的时候会把响应请求路径给到path
# path==> xxx.html
@app.get("/{path}")
# 这指定了函数的参数类型为str字符串类型
def func01(path:str):
with open(f"./html/html/{path}", "rb") as f:
file_data = f.read()
return Response(content=file_data,media_type="text/html")
#path ==> xxx.jpg
@app.get("/images/{path}")
def func02(path: str):
with open(f"./images/{path}", "rb") as f:
file_data = f.read()
return Response(content=file_data,media_type="jpg")
#运行服务器
uvicorn.run(app,host="127.0.0.1",port=8080)


 1076
1076


 被折叠的 条评论
为什么被折叠?
被折叠的 条评论
为什么被折叠?
 到【灌水乐园】发言


