文章目录
10.3 类模板
10.3.1 类模板
类模板作用:
- 建立一个通用类,类中的成员,数据类型可以不具体制定,用一个虚拟的类型来代表。
语法:
template<typename T>
类
解释:
template------------声明创建模板
typename ---------表明其后面的符号是一种数据类型,可以用class 代替
T --------- 通用的数据类型,名称可以替换,通常为大写字母
示例代码:
#include<iostream>
using namespace std;
#include<string>
//类模板
template<class NameType,class AgeType>
class Person
{
public:
	Person(NameType name, AgeType age)
	{
		m_name = name;
		m_age = age;
	}

	void showPerson()
	{
		cout << this->m_name << "      " << this->m_age <<"岁"<< endl;
	}

	NameType m_name;
	AgeType m_age;
};

void test71()
{
	Person<string, int>p1("孙悟空", 99);
	p1.showPerson();
}

int main()
{
	test71();
	system("pause");
	return 0;
}
运行结果:

**总结:**类模板和函数模板语法相似,在声明模板template后面加类,此类称为类模板。
10.3.2 类模板与函数模板区别
类模糊与函数模板区别主要有两点:
- 类模板没有自动类型推导的使用方式
- 类模板在模板参数列表中可以有默认参数
示例代码:
#include<iostream>
using namespace std;
#include<string>

//类模板与函数模板区别
//template<class NameType,class AgeType>
template<class NameType,class AgeType=int> //在参数列表中指定参数AgeType默认类型为int
class Person7
{
public:
	Person7(NameType name,AgeType age)
	{
		this->m_Name = name;
		this->m_Age = age;
	}

	void showPerson7()
	{
		cout << this->m_Name << " " << this->m_Age << "岁" << endl;
	}

	NameType m_Name;
	AgeType		m_Age;
};

//1、类模板没有自动类型推导使用方式
void test81()
{
	//Person7 p("孙悟空",100);  错误,无法用自动类型推导
	Person7<string, int>p("孙悟空",100);//正确,只能用显示指定类型方式
	p.showPerson7();
}

//2、类模板在模板参数列表中可以有默认参数
void test82()
{
	Person7<string>p("猪八戒", 999);
	p.showPerson7();
}

int main()
{
	//test81();
	test82();
	system("pause");
	return 0;
}
运行结果:

总结:
- 类模板使用只能用显示指定类型方式
- 类模板中的目标参数列表可以有默认参数
10.3.3 类模板中成员函数创建时机
类模板中成员函数和普通函数中成员函数创建时机是有区别的:
- 普通类中的成员函数一开始就可以创建
- 类模板中的成员函数在调用时才开始创建
示例代码:
#include<iostream>
using namespace std;

//类模板中成员函数创建时机
//类模板中成员函数在调用时才去创建

class Person91
{
public:
	void showPerson91()
	{
		cout << "showPerson91()" << endl;
	}
};

class Person92
{
public:
	void showPerson92()
	{
		cout << "showPerson92()" << endl;
	}
};

template<class T>
class MyClass
{
public:
	T obj;
	//类模板中的成员函数,并不是一开始就创建的,而是在模板调用时再生成
	void  func1()
	{
		obj.showPerson91();
	}

	void func2()
	{
		obj.showPerson92();
	}
};

void test91()
{
	MyClass<Person92>m;
	//m.func1();		//编译会出错,什么函数调用才会去创建成员函数
	m.func2();
}

int main()
{
	test91();
	system("pause");
	return 0;
}
运行结果:
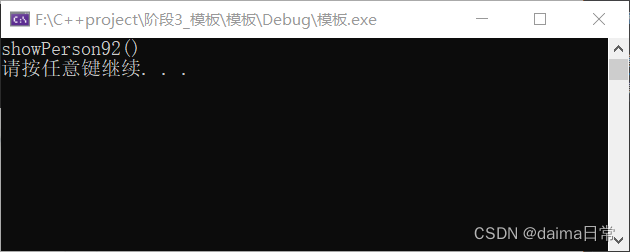
**总结:**类模板中的成员函数并不是一开始就创建的,而是在调用时才会创建。
10.3.4 类模板对象做函数参数
学习目标:
- 类模板实例化出的对象,向函数传参的方式
一共有三种传入方式:
- 指定传入的类型 ---- 直接显示对象的数据类型
- 参数模板化 -----将对象中的参数变为模板进行传递
- 整个模板 ----将这个对象类型模板化进行传递
示例代码:
#include<iostream>
using namespace std;
#include<string>

//类模板做函数参数
template<class TN,class TA>
class Person10
{
public:
	Person10(TN name, TA age)
	{
		this->m_Name = name;
		this->m_Age = age;
	}

	void showPerson10()
	{
		cout << "姓名:" << this->m_Name << "  " << "年龄:" << this->m_Age << endl;
	}

	TN m_Name;
	TA m_Age;
};

//1、指定传入类型
void printPerson1(Person10 <string, int >&p) //通过引用的方式传入
{
	p.showPerson10();
}

void test101()
{
	Person10 <string, int >p("孙悟空",9);
	printPerson1(p);
}

//2、参数模板化
template<class T1,class T2>
void printPerson2(Person10<T1, T2>&p)
{
	p.showPerson10();
	//打印T1和T2的数据类型
	cout << "T1的类型为:" << typeid(T1).name() << endl;
	cout << "T2的类型为:" << typeid(T2).name() << endl;
}
void test102()
{
	Person10<string, int>p("小猪猪", 8);
	printPerson2(p);
}

//3、整个类模板化
template<class T>
void printPerson3( T &p)
{
	p.showPerson10();
	//打印T所代表的数据类型
	cout << "T的数据类型为:" << typeid(T).name() << endl;
}
void test103()
{
	Person10<string, int>p("唐憎",10);
	printPerson3(p);
}

int main()
{
	//test101();
	//test102();
	test103();
	system("pause");
	return 0;
}
运行结果:

总结:
- 通过类模板创建的对象,可以有三种方式向函数中进行传参
- 使用比较广泛的是第一种:指定传入的类型
10.3.5 类模板与继承
当类模板碰到继承时,需要注意以下几点:
- 当子类继承的父类是一个类模板时,子类在声明的时候,要指定出父类中T的类型
- 如果不指定,编译器无法给子类分配内存
- 如果想灵活指定出父类中T的类型,子类也需变为类模板
示例代码:
#include<iostream>
using namespace std;

//类模板与继承
template<class T>
class Base
{
public:
	T m;
};

//class Son :public Base		//错误,必须知道父类中T的类型,才能继承给子类
class Son:public Base<int>
{

};

void test11()
{
	Son s1;
}

//如果想灵活指定父类中T类型,子类也需要变为类模板
template<class T1, class T2>
class Son2 :public Base<T1>
{
public:
	Son2()
	{
		cout << "T1的类型为:" << typeid(T1).name() << endl;
		cout << "T2的类型为:" << typeid(T2).name() << endl;
	}

	T2 obj;
};

void test112()
{
	Son2 <char, int>s2;
}

int main()
{
	//test11();
	test112();
	system("pause");
	return 0;
}
运行结果:
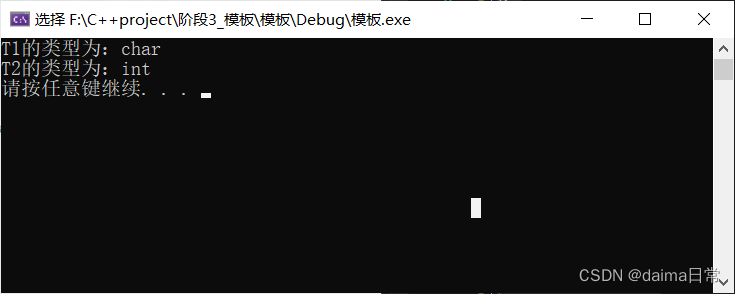
**总结:**如果父类是类模板,子类需要指定出父类中T的数据类型
10.3.6 类模板成员函数类外实现
学习目标:能够掌握类模板中的成员函数类外实现
示例代码:
#include<iostream>
using namespace std;
#include<string>

//类模板成员函数类外实现
template<class T1,class T2>
class Person12
{
public:
	Person12(T1 name, T2 age);
	//{
	//	m_Name = name;
	//	m_Age = age;
	//}
	void showPerson12();
	//{
	//	cout << "姓名:" << thiis->m_Name << " " << "年龄:" << this->m_Age << endl;
	//}

	T1 m_Name;
	T2 m_Age;
};

//构造函数类外实现
template<class T1, class T2>
Person12<T1,T2>::Person12(T1 name, T2 age)
{
	m_Name = name;
	m_Age = age;
}

//类模板中成员函数类外实现
template<class T1, class T2>
void Person12<T1, T2>::showPerson12()
{
	cout << "姓名:" << this->m_Name << " " << "年龄:" << this->m_Age << endl;
}

void test12()
{
	Person12<string, int>P("Mr.liao", 22);
	P.showPerson12();
}

int main()
{
	test12();
	system("pause");
	return 0;
}
运行结果:
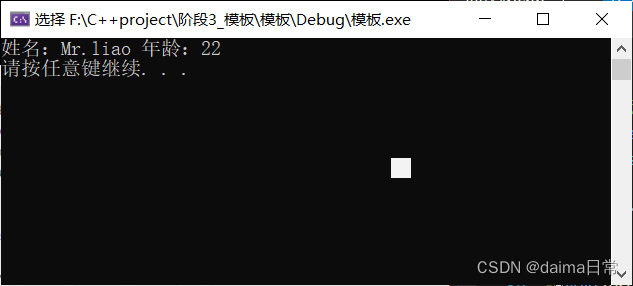
总结:;类模板中成员函数类外实现时,需要加上模板参数列表
10.3.7 类模板分文件编写
学习目标:
- 掌握类模板成员函数分文件编写产生的问题以及解决方式
问题:
- 类模板中成员函数创建时机是在调用阶段,导致分文件编写是连接不到
解决办法:
- 解决方式1:直接包含.cpp源文件
- 解决方式2:将声明和实现写到同一个文件中,并更改后缀名为.hpp,hpp是约定的名称,并不是强制。
示例代码:
person13.hpp文件
#pragma once
#include<iostream>
using namespace std;
#include<string>

//类模板分文件编写问题以及解决办法
template<class T1, class T2>
class Person13
{
public:
	Person13(T1 name, T2 age);
	void showPerson13();

	T1 m_Name;
	T2 m_Age;
};

//类模板的构造函数类外实现
template <class T1, class T2>
Person13<T1, T2>::Person13(T1 name, T2 age)
{
	this->m_Name = name;
	this->m_Age = age;
}

//类模板成员函数类外实现
template <class T1, class T2>
void Person13<T1, T2>::showPerson13()
{
	cout << "姓名:" << this->m_Name << " " << "学号:" << this->m_Age << endl;
}
main.cpp文件
#include<iostream>
using namespace std;

//第一种解决方法直接包含源文件
//#include"person13.h"
//#include"person13.cpp"

//第二种解决办法,将.h和.cpp中的内容写到一起,将后缀名改为.hpp文件
#include"person13.hpp"

类模板分文件编写问题以及解决办法
//template<class T1,class T2>
//class Person13
//{
//public:
//	Person13(T1 name, T2 age);
//	void showPerson13();
//
//	T1 m_Name;
//	T2 m_Age;
//};

类模板的构造函数类外实现
//template <class T1,class T2>
//Person13<T1,T2>::Person13(T1 name, T2 age)
//{
//	this->m_Name = name;
//	this->m_Age = age;
//}

//类模板成员函数类外实现
//template <class T1, class T2>
//void Person13<T1, T2>::showPerson13()
//{
//	cout << "姓名:" << this->m_Name << " " << "学号:" << this->m_Age << endl;
//}

void test13()
{
	Person13<string, int>p("Mr.liao",22);
	p.showPerson13();
}

int main()
{
	test13();
	system("pause");
	return 0;
}
运行结果:

**总结:**主流的解决方式是第二种,将类模板成员函数写到一起,并将后缀名改成.hpp
10.3.8 类模板与友元
学习目标:
- 掌握类模板配合友元函数的类内和类外实现
全局函数类内实现 - 直接在类内声明友元即可
全局函数类外实现 - 需要提前让编译器知道全局函数的存在
示例代码:
#include<iostream>
using namespace std;

//提前让编译器知道Person类存在
 template<class T1,class T2>
 class Person14;

//2、全局函数类外实现
template<class T1, class T2>
void showPerson2(Person14<T1, T2>p)
{
	cout << "姓名:" << p.m_Name << " " << "年龄:" << p.m_age << endl;
}

//通过全局函数 打印Person信息
template<class T1,class T2>
class Person14
{
	//1、全局函数,类内实现
	friend  void showPerson1(Person14<T1, T2>p)
	{
		cout << "姓名:" << p.m_Name << " " << "年龄:" << p.m_age << endl;
	}

	//2、全局函数类外实现
	//加空模板的参数列表
	//如果全局函数是类外实现,需要让编译器提前知道这个函数的存在
	friend void showPerson2<>(Person14<string, int>p);
public:

	Person14(T1 name, T2 age)
	{
		this->m_Name = name;
		this->m_age = age;
	}


private:
	T1 m_Name;
	T2 m_age;
};


void test141()
{
	Person14<string, int>p("Mr.liao",22);
	showPerson1(p);
}

//2、全局函数在类外实现
void test142()
{
	Person14<string, int>p2("Mr.xiong", 20);
	showPerson2(p2);
}

int main()
{
	//test141();
	test142();
	system("pause");
	return 0;
}
运行结果:

**总结:**建议全局函数类内实现,用法简单,而编译器可以直接识别
10.3.9 类模板案例
案例描述:实现一个通用的数组类,要求如下:
- 可以对内置数组类型以及自定义数据类型进行存储
- 将数组中的数据存储到堆区
- 构造函数中可以传入数组的容量
- 提高对应的拷贝函数以及operator=防止浅拷贝问题
- 可以通过下标的方式访问数组中的元素
- 可以获取数组中当前元素个数和数组的容量
示例代码–第一阶段:
MyArry.hpp文件:
#pragma once
#include<iostream>
using namespace std;

//数组模板
template<class T>
class MyArry
{
public:
	//有参构造	参数	容量
	MyArry(int capacity)
	{
		cout << "MyArry有参构造调用" << endl;
		this->m_Capacity = capacity;
		this->m_Size = 0;
		this->pAddress = new T[this->m_Capacity];
	}


	//拷贝构造
	MyArry(const MyArry& arr)
	{
		cout << "MyArry拷贝构造调用" << endl;

		this->m_Capacity = arr.m_Capacity;
		this->m_Size = arr.m_Size;
		//this->pAddress=arr.pAddress;

		//深拷贝
		this->pAddress = new T[arr.m_Capacity];

		//将arr中的数据都拷贝过来
		for (int i = 0; i < this->m_Size; i++)
		{
			this->pAddress[i] = arr.pAddress[i];
		}
	}

	//operator = 防止浅拷贝问题
	MyArry& operator=(const MyArry& arr)
	{
		cout << "MyArry的operator=调用" << endl;

		//先判断原理堆区是否有数据,如果有先释放
		if (this->pAddress != NULL)
		{
			delete[] this->pAddress;
			this->pAddress = NULL;
			this->m_Capacity = 0;
			this->m_Size = 0;
		}

		//深拷贝,把数组中的所有数据多copy过来
		this->m_Capacity = arr.m_Capacity;
		this->m_Size = arr.m_Size;
		for (int i = 0; i < this->m_Size; i++)
		{
			this->pAddress = new T[arr.pAddress[i]];
		}
		return *this;

	}

	//析构函数
	~MyArry()
	{
		cout << "MyArry析构函数调用" << endl;

		if (this->pAddress != NULL)
		{
			delete[] this->pAddress;		//释放堆区数组的内存
			this->pAddress = NULL;		//将指针置空,防止野指针出现
		}
	}

private:
	T* pAddress;		//	指针指向堆区开辟的真实数组
	int m_Capacity;		///数组的容量
	int m_Size;			//数组大小
};
main.c文件:
#include<iostream>
using namespace std;
#include"MyArry.hpp"

void test15()
{
	MyArry<int>arr1(5);
	MyArry<int>arr2(arr1);//测试拷贝构造
	MyArry<int>arr3(100);
	arr3 = arr1;
}

int main()
{
   test15();

	system("pause");
	return 0;
}
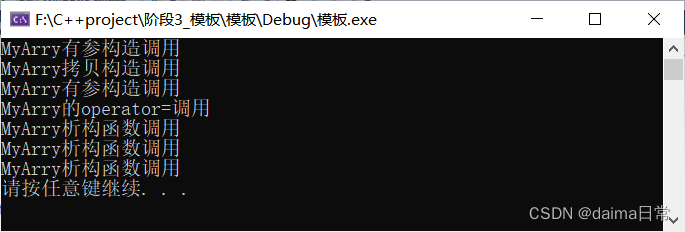
大成篇:
MyArry.hpp
#pragma once
#include<iostream>
using namespace std;

//数组模板
template<class T>
class MyArry
{
public:
	//有参构造	参数	容量
	MyArry(int capacity)
	{
		cout << "MyArry有参构造调用" << endl;
		this->m_Capacity = capacity;
		this->m_Size = 0;
		this->pAddress = new T[this->m_Capacity];
	}


	//拷贝构造
	MyArry(const MyArry& arr)
	{
		cout << "MyArry拷贝构造调用" << endl;

		this->m_Capacity = arr.m_Capacity;
		this->m_Size = arr.m_Size;
		//this->pAddress=arr.pAddress;

		//深拷贝
		this->pAddress = new T[arr.m_Capacity];

		//将arr中的数据都拷贝过来
		for (int i = 0; i < this->m_Size; i++)
		{
			this->pAddress[i] = arr.pAddress[i];
		}
	}

	//operator = 防止浅拷贝问题
	MyArry& operator=(const MyArry& arr)
	{
		cout << "MyArry的operator=调用" << endl;

		//先判断原理堆区是否有数据,如果有先释放
		if (this->pAddress != NULL)
		{
			delete[] this->pAddress;
			this->pAddress = NULL;
			this->m_Capacity = 0;
			this->m_Size = 0;
		}

		//深拷贝,把数组中的所有数据多copy过来
		this->m_Capacity = arr.m_Capacity;
		this->m_Size = arr.m_Size;
		for (int i = 0; i < this->m_Size; i++)
		{
			this->pAddress = new T[arr.pAddress[i]];
		}
		return *this;

	}

	//尾插法
	void Push_Back(const T& val)
	{
		//判断人脸是否等于大小
		if (this->m_Capacity == this->m_Size)
		{
			cout << "数组已满无法插入" << endl;
			return;
		}
		this->pAddress[this->m_Size] = val;		//在数组末尾插入数据
		this->m_Size++;

	}

	//尾删法
	void Pop_Back()
	{
		//让用户访问不到最后一个元素,即为尾删,逻辑删除
		if (this->m_Size==0)
		{
			cout << "数组为空,无法删除!" << endl;
			return;
		}
		//delete this->pAddress[this->m_Size];
		//this->pAddress[this->m_Size] = NULL;
		this->m_Size--;
	}

	//通过下标访问数组中的数据,要赋左值要返回引用而不是数值
	T& operator[] (int index)
	{
		return this->pAddress[index];
	}

	//返回数组的大小
	int getSize()
	{
		return this->m_Size;
	}

	//返回数组的容量
	int getCapacity()
	{
		return this->m_Capacity;
	}

	//析构函数
	~MyArry()
	{
		cout << "MyArry析构函数调用" << endl;

		if (this->pAddress != NULL)
		{
			delete[] this->pAddress;		//释放堆区数组的内存
			this->pAddress = NULL;		//将指针置空,防止野指针出现
		}
	}

private:
	T* pAddress;		//	指针指向堆区开辟的真实数组
	int m_Capacity;		///数组的容量
	int m_Size;			//数组大小
};
main.c
#include<iostream>
using namespace std;
#include"MyArry.hpp"

//打印数组
void printIntArray(MyArry <int>& arr)
{
	for (int i = 0; i < arr.getSize(); i++)
	{
		cout << arr[i] << endl;
	}
}

void test15()
{
	MyArry<int>arr1(5);
	//MyArry<int>arr2(arr1);//测试拷贝构造
	//MyArry<int>arr3(100);
	//arr3 = arr1;
	for (int i = 0; i < 5; i++)
	{
		arr1.Push_Back(i);
	}
	cout << "数组中的元素打印输出为:" << endl;
	printIntArray(arr1);
	cout << "arr1容量为:" <<arr1.getCapacity() <<endl;
	cout << "arr1目前大小为:" <<arr1.getSize()<< endl;

	MyArry<int>arr2(arr1);//测试拷贝构造
	cout << "数组中的元素打印输出为:" << endl;
	printIntArray(arr2);

	//尾删
	arr2.Pop_Back();
	cout << "arr2容量为:" << arr2.getCapacity() << endl;
	cout << "arr2目前大小为:" << arr2.getSize() << endl;
}


//测试自定义的数据类型
class Person
{
public:
	Person() {}
	Person(string name,int age)
	{
		this->m_name = name;
		this->m_age = age;
	}

	string m_name;
	int m_age;
};

//打印Person类
void PrintArray(MyArry <Person>& arr)
{
	for (int i = 0; i < arr.getSize(); i++)
	{
		cout << "姓名:" << arr[i].m_name << " " << "年龄:" << arr[i].m_age << endl;
	}
}

void test151()
{
	MyArry<Person>arr(10);
	Person p1("张三",16);
	Person p2("李四", 18);
	Person p3("王五", 169);
	Person p4("赵六", 11);
	Person p5("周七", 13);

	//将数据插入到数组中
	arr.Push_Back(p1);
	arr.Push_Back(p2);
	arr.Push_Back(p3);
	arr.Push_Back(p4);
	arr.Push_Back(p5);

	//打印数组
	PrintArray(arr);

	//输出数组的容量
	cout << "arr的容量:" << arr.getCapacity()<<endl;

	//输出数组的大小
	cout << "arr的大小:" << arr.getSize()<<endl;

}

int main()
{
   //test15();
	test151();
	system("pause");
	return 0;
}
运行结果:
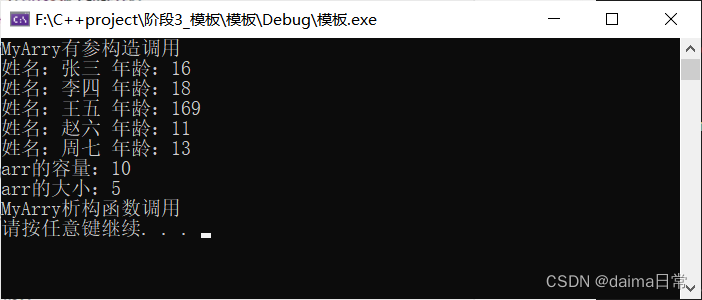
总结:
能够利用所学的知识点实现通用的数组。


 1946
1946


 被折叠的 条评论
为什么被折叠?


