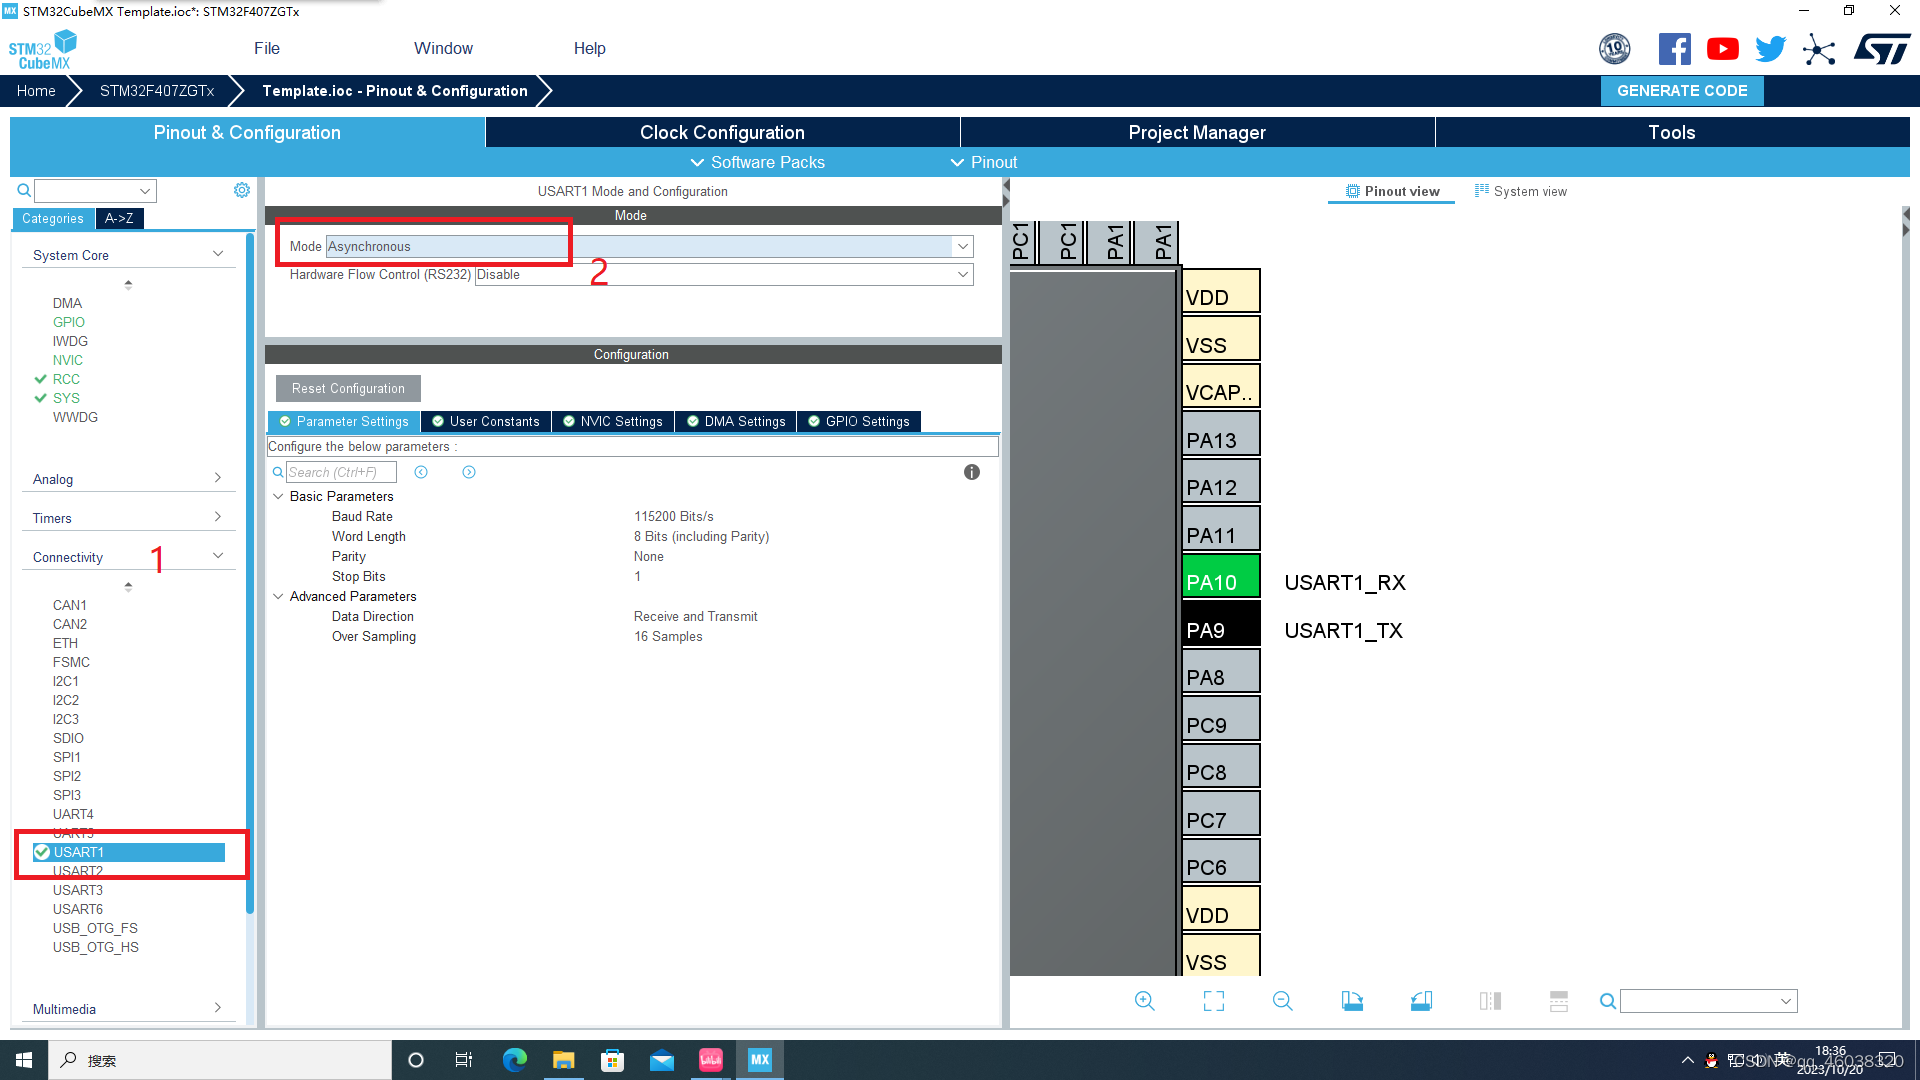
一、工程配置
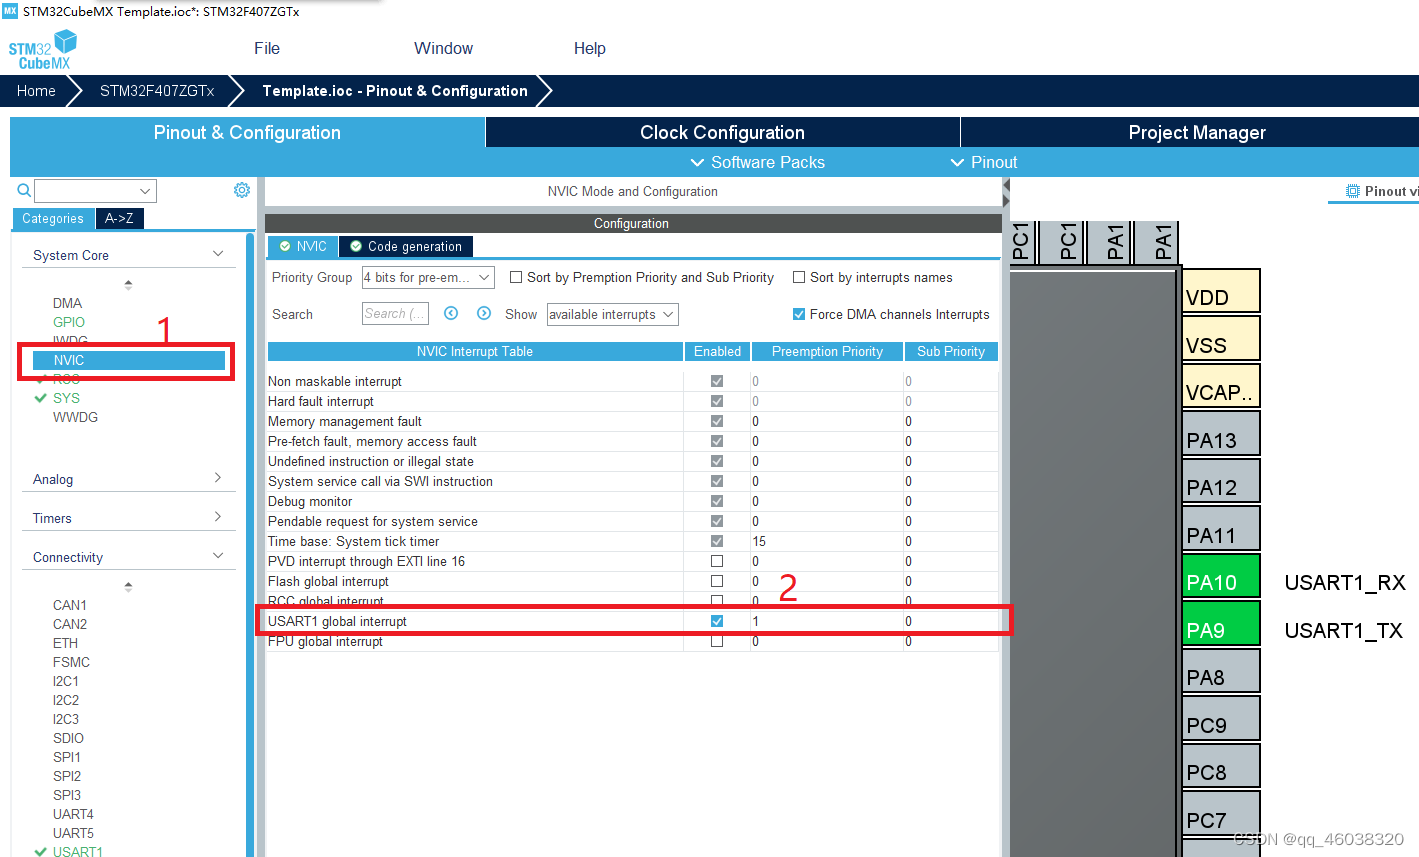
开启USART1,模式选择Asynchronous,其他选项默认即可;开启USART1中断,配置合适的中断优先级,随后生成代码。
二、编写代码
1.串口发送
在main函数中添加如下代码可实现串口发送数据到上位机,HAL_UART_Transmit函数第一个参数传入串口号,本例使用串口1(huart1),第二个参数传入要发送的数据,可通过sprintf对TxBuf数组写入数据,第三个参数表示发送数据的长度,最后一个参数表示发送的超时时间。
int main(void)
{
  /* USER CODE BEGIN 1 */

  /* USER CODE END 1 */

  /* MCU Configuration--------------------------------------------------------*/

  /* Reset of all peripherals, Initializes the Flash interface and the Systick. */
  HAL_Init();

  /* USER CODE BEGIN Init */

  /* USER CODE END Init */

  /* Configure the system clock */
  SystemClock_Config();

  /* USER CODE BEGIN SysInit */

  /* USER CODE END SysInit */

  /* Initialize all configured peripherals */
  MX_GPIO_Init();
  MX_USART1_UART_Init();
  /* USER CODE BEGIN 2 */

  /*为了观看方便,把头文件放到这里*/
    #include <stdio.h>
    #include <string.h>
    #include "usart_it.h"
    /*为了观看方便,把头文件放到这里*/
    uint8_t TxBuf[10];
    static uint16_t i=0;
  /* USER CODE END 2 */

  /* Infinite loop */
  /* USER CODE BEGIN WHILE */
  while (1)
  {
    /* USER CODE END WHILE */

    /* USER CODE BEGIN 3 */
      /**************实现串口发送数据***************/
      sprintf((char*)TxBuf,"%d\r\n",i++);
      HAL_UART_Transmit(&huart1,TxBuf,strlen((char*)TxBuf),1000);
      HAL_Delay(500);
      /**************实现串口发送数据***************/
  }
  /* USER CODE END 3 */
}
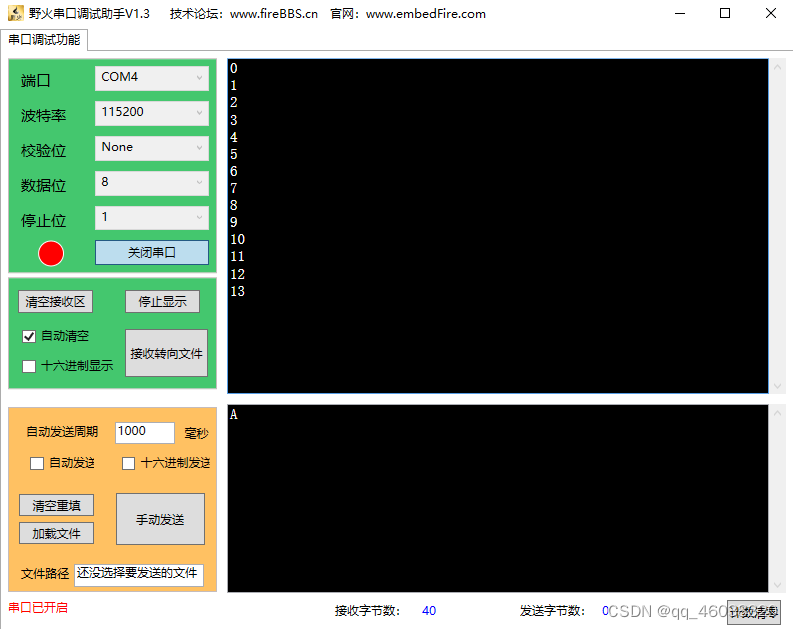
在通过串口调试助手可观察到每500ms收到一次数据
2.串口接收
在串口初始化之后开启串口接收中断,接收到数据后产生中断
int main(void)
{
  /* USER CODE BEGIN 1 */

  /* USER CODE END 1 */

  /* MCU Configuration--------------------------------------------------------*/

  /* Reset of all peripherals, Initializes the Flash interface and the Systick. */
  HAL_Init();

  /* USER CODE BEGIN Init */

  /* USER CODE END Init */

  /* Configure the system clock */
  SystemClock_Config();

  /* USER CODE BEGIN SysInit */

  /* USER CODE END SysInit */

  /* Initialize all configured peripherals */
  MX_GPIO_Init();
  MX_USART1_UART_Init();
  /* USER CODE BEGIN 2 */

  /*为了观看方便,把头文件放到这里*/
    #include <stdio.h>
    #include <string.h>
    #include "usart_it.h"
    /*为了观看方便,把头文件放到这里*/
    uint8_t TxBuf[10];
    static uint16_t i=0;

    //开启串口接收中断,接收到一个字节后中断一次
    HAL_UART_Receive_IT(&huart1,&Receive,1);
  /* USER CODE END 2 */

  /* Infinite loop */
  /* USER CODE BEGIN WHILE */
  while (1)
  {
    /* USER CODE END WHILE */

    /* USER CODE BEGIN 3 */
//      /**************实现串口发送数据***************/
//      sprintf((char*)TxBuf,"%d\r\n",i++);
//      HAL_UART_Transmit(&huart1,TxBuf,strlen((char*)TxBuf),1000);
//      HAL_Delay(500);
//      /**************实现串口发送数据***************/
  }
  /* USER CODE END 3 */
}
新建一个.c/.h文件(usart_it.c/usart_it.h),用来处理串口中断,在stm32f4xx_hal_uart.c文件中找到串口接收中断函数,复制到usart_it.c文件中重写
#include "usart_it.h"

uint8_t Receive;

void HAL_UART_RxCpltCallback(UART_HandleTypeDef *huart)
{
    if(huart==&huart1)
    {
        //将接收到的数据发送到上位机
        HAL_UART_Transmit(&huart1,&Receive,1,100);
        //需要再次开启接收中断,否则只进入一次
        HAL_UART_Receive_IT(&huart1,&Receive,1);
    }
}
中断回调函数中先判断是否是串口1产生中断(当开启多个串口的时候需要判断),将接收到的数据再发送回到上位机,每次进入回调函数都需要再次开启接收中断,否则只会接收到第一个数据。
完整代码如下:
#include "usart_it.h"

uint8_t Receive;

void HAL_UART_RxCpltCallback(UART_HandleTypeDef *huart)
{
    if(huart==&huart1)
    {
        //将接收到的数据发送到上位机
        HAL_UART_Transmit(&huart1,&Receive,1,100);
        //需要再次开启接收中断,否则只进入一次
        HAL_UART_Receive_IT(&huart1,&Receive,1);
    }
}


#ifndef _USART_IT_H
#define _USART_IT_H

#include "main.h"
#include "usart.h"


extern uint8_t Receive;


#endif


int main(void)
{
  /* USER CODE BEGIN 1 */

  /* USER CODE END 1 */

  /* MCU Configuration--------------------------------------------------------*/

  /* Reset of all peripherals, Initializes the Flash interface and the Systick. */
  HAL_Init();

  /* USER CODE BEGIN Init */

  /* USER CODE END Init */

  /* Configure the system clock */
  SystemClock_Config();

  /* USER CODE BEGIN SysInit */

  /* USER CODE END SysInit */

  /* Initialize all configured peripherals */
  MX_GPIO_Init();
  MX_USART1_UART_Init();
  /* USER CODE BEGIN 2 */

  /*为了观看方便,把头文件放到这里*/
    #include <stdio.h>
    #include <string.h>
    #include "usart_it.h"
    /*为了观看方便,把头文件放到这里*/
    uint8_t TxBuf[10];
    static uint16_t i=0;

    //开启串口接收中断,接收到一个字节后中断一次
    HAL_UART_Receive_IT(&huart1,&Receive,1);
  /* USER CODE END 2 */

  /* Infinite loop */
  /* USER CODE BEGIN WHILE */
  while (1)
  {
    /* USER CODE END WHILE */

    /* USER CODE BEGIN 3 */
//      /**************实现串口发送数据***************/
//      sprintf((char*)TxBuf,"%d\r\n",i++);
//      HAL_UART_Transmit(&huart1,TxBuf,strlen((char*)TxBuf),1000);
//      HAL_Delay(500);
//      /**************实现串口发送数据***************/
  }
  /* USER CODE END 3 */
}
三、实验效果
串口循环发送数据:

串口接收一个字节数据并回传: 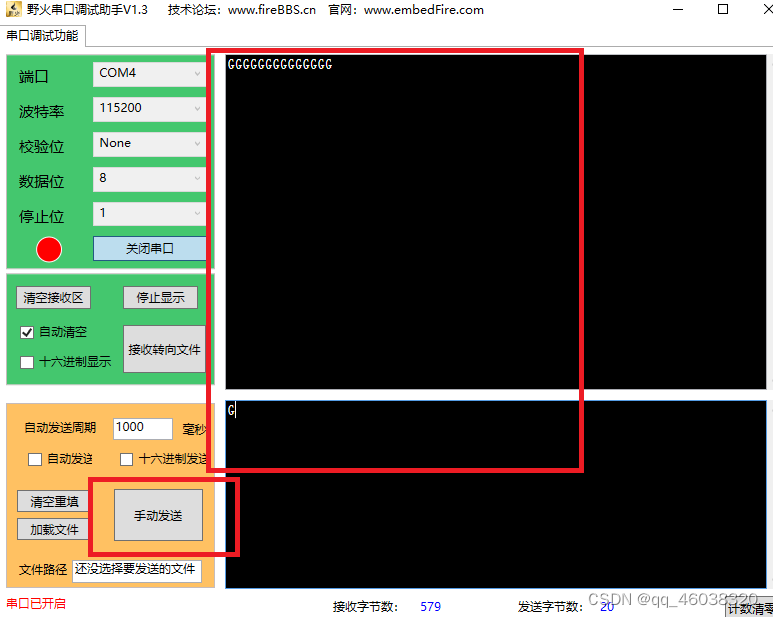
到此,实现了串口通信的基本收发功能,下期更新如何实现printf打印和特定数据包的接收。


 140
140


 被折叠的 条评论
为什么被折叠?
被折叠的 条评论
为什么被折叠?
 到【灌水乐园】发言


