


一、内存区分模型

1.1 程序运行前

#include<iostream>
using namespace std;

// 全局变量
int g_a = 10;
int g_b = 20;

// const修饰的全局变量,全局常量
const int c_g_a = 10;
const int c_g_b = 20;

int main()
{
	// 全局区

	// 全局变量、静态变量、常量


	// 创建普通局部变量
	int a = 10;
	int b = 10;

	cout << "局部变量a的地址为:" << (int)&a << endl;
	cout << "局部变量b的地址为:" << (int)&b << endl;

	cout << "局部变量g_a的地址为:" << (int)&g_a << endl;
	cout << "局部变量g_b的地址为:" << (int)&g_b << endl;

	// 静态变量,普通变量前面加static
	static int s_a = 10;
	static int s_b = 20;

	cout << "局部变量s_a的地址为:" << (int)&s_a << endl;
	cout << "局部变量s_b的地址为:" << (int)&s_b << endl;

	// 常量
	// 字符串常量
	cout << "字符串常量的地址为:" << (int)&"hello world" << endl;

	// const修饰的变量
	// const修饰的全局变量, const修饰的局部变量

	cout << "全局常量 c_g_a 的地址为: " << (int)&c_g_a << endl;
	cout << "全局常量 c_g_b 的地址为: " << (int)&c_g_b << endl;

	const int c_l_a = 10; // c - const   g - global   l - local
	const int c_l_b = 20;

	cout << "局部常量 c_l_a 的地址为: " << (int)&c_l_a << endl;
	cout << "局部常量 c_l_b 的地址为: " << (int)&c_l_b << endl;

	system("pause");

	return 0;
}


1.2 程序运行后
1.2.1 栈区
#include<iostream>
using namespace std;
// 栈区数据的注意事项 --- 不要返回局部变量的地址
// 栈区的数据由编译器管理开辟和释放
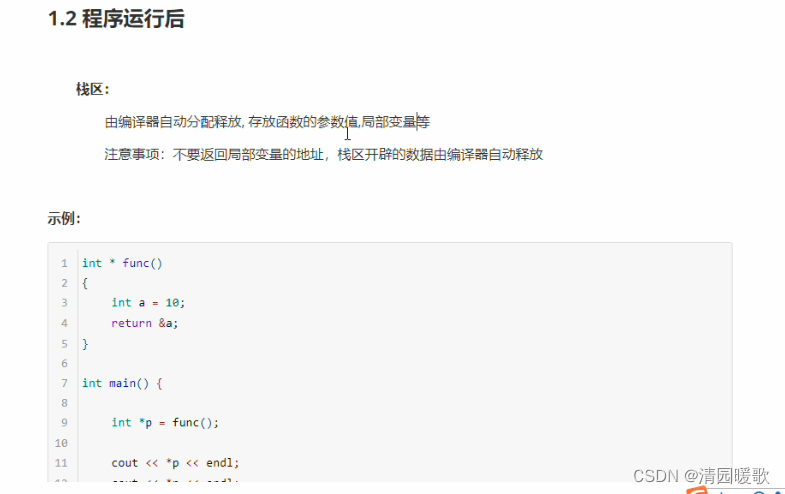
int* func()
{
int a = 10; // 局部变量 存放在栈区,栈区的数据在函数执行完后自动释放
return &a; // 返回局部变量地址
}
//int* func2(int b ) // 形参数据也会放在栈区
//{
// b = 100;
// int a = 10; // 局部变量 存放在栈区,栈区的数据在函数执行完后自动释放
// return &a; // 返回局部变量地址
//}
int main()
{
// 接受func函数的返回值
int* p = func();
// int* p2 = func2(1);
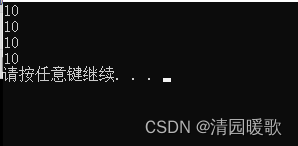
cout << *p << endl; // 10,第一次可以打印正确的数字,是因为编译器做了保留
cout << *p << endl; // 1649252744,第二次这个数据就不再保留了
system("pause");
return 0;
}
1.2.2 堆区

#include<iostream>
using namespace std;

//

int * func()
{
	// 利用new关键字  可以将数据开辟到堆区
	// 指针  本质也是局部变量,放在栈上,指针保存的数据是放在栈区
	int *p = new int(10);
	return p;
}

int main()
{
	// 在堆区开辟数据
	int* p = func();


	cout << *p << endl;  // 10
	cout << *p << endl;
	cout << *p << endl;
	cout << *p << endl;

	system("pause");

	return 0;
}

1.3 new操作符

#include<iostream>
using namespace std;

// 1、new的基本语法
int* func()
{
	// 在堆区创建一个整型的数据
	// new返回的是该数据类型的指针
	int *p = new int(10); //
	return p;
}

void test01()
{
	int* p = func();
	cout << *p << endl;
	cout << *p << endl;
	cout << *p << endl;
	// 堆区的数据 由程序员管理开辟,程序员管理释放
	// 如果想释放堆区的数据, 利用关键字delete
	delete p;
	cout << *p << endl; // 会报错,因为已经释放了,无法访问,但是前三次正常输出
	// 内存已经被释放,再次访问j就是非法操作,会报错
}

// 2、在堆区利用new开辟数组
void test02()
{
	// 创建10整型数据的数组,在堆区
	int * arr = new int[10]; // 10代表数组有10个元素

	for(int i = 0; i < 10; i++)
	{
		arr[i] = i + 100; // 给10个元素赋值  100 ~ 109
		cout << arr[i] << endl;
	}

	// 释放堆区数组
	// 释放数组的时候 要加[]才可以
	delete[] arr;
}

int main()
{
	// test01();
	test02();

	system("pause");

	return 0;
}

二、引用
2.1 引用的基本使用


#include <iostream>
using namespace std;

int main()
{
	// 引用基本语法
	// 数据类型 &别名 = 原名

	int a = 10;
	// 创建引用
	int& b = a;

	cout << "a = " << a << endl;
	cout << "b = " << b << endl;

	b = 100;
	cout << "a = " << a << endl;
	cout << "b = " << b << endl;

	system("pause");

	return 0;
}
2.2 引用注意事项
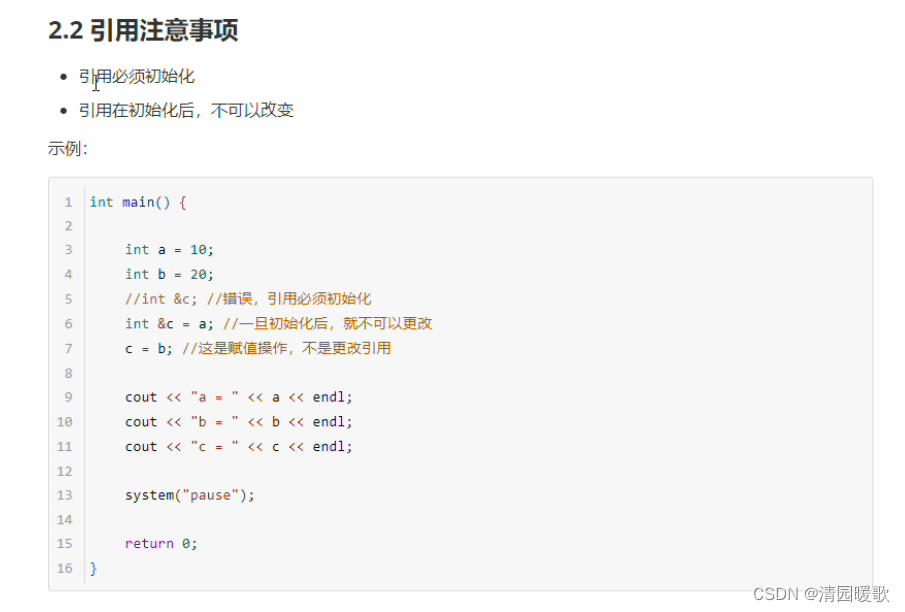
#include <iostream>
using namespace std;
int main()
{
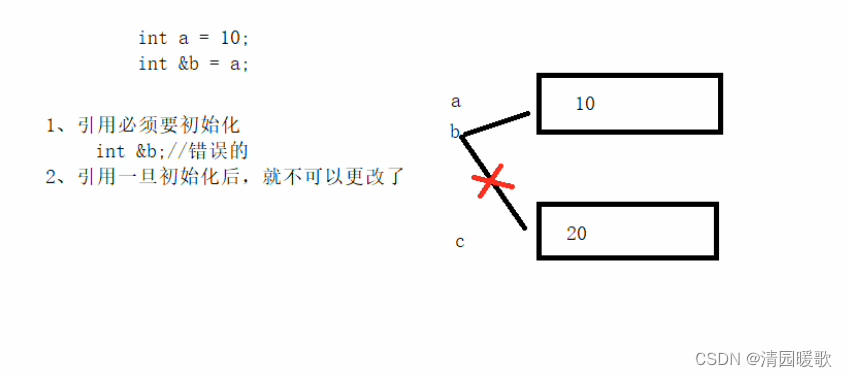
int a = 10;
// 1、引用必须初始化
// int &b; // 错误,必须要初始化
int& b = a;
// 2、引用在初始化后,不可以改变
int c = 20;
b = c; // 赋值操作,而不是更改引用
cout << "a = " << a << endl;
cout << "b = " << b << endl;
cout << "c = " << c << endl;
system("pause");
return 0;
}
2.3 引用做函数参数

#include <iostream>
using namespace std;

// 交换函数

// 1、值传递
void mySwap01(int a, int b)
{
	int temp = a;
	a = b;
	b = temp;

	cout << "swap01 a = " << a << endl;
	cout << "swap01 b = " << b << endl;
}

// 2、地址传递
void mySwap02(int *a, int *b)
{
	int temp = *a;
	*a = *b;
	*b = temp;

	cout << "swap02 a = " << *a << endl;
	cout << "swap02 b = " << *b << endl;
}

// 3、引用传递
void mySwap03(int &a, int &b)
{
	int temp = a;
	a = b;
	b = temp;

	cout << "swap03 a = " << a << endl;
	cout << "swap03 b = " << b << endl;
}

int main()
{
	int a = 10;
	int b = 20;

	mySwap01(a, b); // 值传递,形参不会修饰实参
	cout << "a = " << a << endl;
	cout << "b = " << b << endl;

	mySwap02(&a, &b); // 地址传递,形参会修饰实参
	cout << "a = " << a << endl;
	cout << "b = " << b << endl;

	mySwap03(a, b); // 引用传递,形参会修饰实参
	cout << "a = " << a << endl;
	cout << "b = " << b << endl;

	system("pause");

	return 0;
}

2.4 引用做函数返回值

#include <iostream>
using namespace std;

// 引用做函数的返回值
// 1、不要返回局部变量的引用
int& test01()
{
	int a = 10; // 局部变量存放在四区中的 栈区
	return a;
}

// 2、函数的调用可以作为左值
int& test02()
{
	static int a = 10; // 静态变量,存放在全局区,全局上的数据在程序结束后系统释放
	return a;
}

int main()
{
	int &ref = test01();

	cout << "ref = " << ref << endl; // 第一次结果正确,编译器做了保留
	cout << "ref = " << ref << endl; // 第二次结果错误,因为a的内存已经释放

	int& ref2 = test02();
	cout << "ref2 = " << ref2 << endl;
	cout << "ref2 = " << ref2 << endl;

	test02() = 1000; // 左值就是等式左边的值
					 // 如果函数的返回值是引用,这个函数调用可以作为左值

	cout << "ref2 = " << ref2 << endl;
	cout << "ref2 = " << ref2 << endl;


	system("pause");

	return 0;
}
2.5 引用的本质


#include <iostream>
using namespace std;

// 发现是引用,转换为 int* const ref = &a;
void func(int& ref) {
	ref = 100; // ref是引用,转换为*ref = 100
}

int main()
{
	int a = 10;

	// 自动转换为 int* const ref = &a; 指针常量是指针指向不可改,也说明为什么引用步可更改
	int& ref = a;
	ref = 20; // 内部发现ref是引用,自动帮我们转换为: *ref = 20;

	cout << "a = " << a << endl;
	cout << "ref = " << ref << endl;


	system("pause");

	return 0;
}
2.6 常量引用


#include <iostream>
using namespace std;

// 打印数据函数
void showValue(int &val)
{
	val = 1000;
	cout << "val = " << val << endl;
}

void showValue2(const int& val)
{
	// val = 1000; // 错误
	cout << "val = " << val << endl;
}

int main()
{
	// 常量引用
	// 使用场景:用来修饰形参,防止误操作

	/*int a = 10;
	int& ref = a;*/
	// 不允许 int& ref = 10; // 引用必须引一块合法的内存空间

	// 加上const之后 编译器将代码修改 int temp = 10;  const int & ref = temp;
	// const int& ref = 10;     // 引用必须引一块合法的内存空间
	// ref = 20; // 加入const之后变为只读,不可以修改

	int a = 100;
	showValue(a);

	cout << "a = " << a << endl;

	system("pause");

	return 0;
}
三、函数提高
3.1 函数默认参数

#include<iostream>
using namespace std;

// 函数默认参数

// 如果我们自己传入数据,就用自己的数据,如果没有,那么用默认值
// 语法:返回值类型 函数名(形参 = 默认值)
int func(int a, int b = 20, int c = 30)
{
	return a + b + c;
}

// 注意事项
// 1、如果某个位置已经有了默认参数,那么从这个位置往后,从左到右都必须有默认值
//int func2(int a, int b = 10, int c) // 会报错
//{
//	return a + b + c;
//}

// 2、如果函数声明有默认参数,函数实现就不能有默认参数
// 声明和实现只能有一个有默认参数
int func2(int a = 10, int b = 10);

int func2(int a = 10, int b = 10)
{
	return a + b;

}

// 这样写可以
//int func2(int a, int b)
//{
//	return a + b;
//
//}

int main()
{
	cout << func(10, 20, 30) << endl;
	cout << func(10) << endl;
	cout << func(10, 30) << endl;

	// cout << fun2(10, 10) << endl; // 运行会报错

	system("pause");

	return 0;
}
3.2 函数占位参数

#include<iostream>
using namespace std;

// 占位参数
// 返回值类型  函数名(数据类型){}

// 目前阶段的占位参数 还用不到,后面会用到
// 占位参数 还可以有默认参数
// void func(int a, int )
// {}
// func(10);
void func(int a, int = 10)
{
	cout << "this is func" << endl;
}

int main()
{
	func(10, 10);

	system("pause");

	return 0;
}
3.3 函数重载
3.3.1 函数重载概述

#include<iostream>
using namespace std;

// 函数重载
// 可以让函数名相同,提高复用性

// 函数重载的满足条件
// 1、同一个作用域下
// 2、函数名称相同
// 3、函数参数类型不同,或者个数不同,或者顺序不同
void func()
{
	cout << "func 的调用" << endl;
}

// 个数不同
void func(int a)
{
	cout << "func(int a) 的调用!" << endl;
}

// 类型不同
void func(double a)
{
	cout << "func(double a) 的调用!" << endl;
}

// 顺序不同
void func(int a, double b)
{
	cout << "func(int a, double b) 的调用!" << endl;
}
void func(double a, int b)
{
	cout << "func(double a, int b) 的调用!" << endl;
}

// 注意事项
// 函数的返回值不可以作为函数重载的条件
// 如下,会报错
//int func(double a, int b)
//{
//	cout << "func(double a, int b) 的调用!" << endl;
//}

int main()
{
	func();
	func(10);
	func(3.14);

	func(10, 3.14);
	func(3.14, 10);

	system("pause");

	return 0;
}
3.3.2 函数重载注意事项

#include<iostream>
using namespace std;

// 函数重载的注意事项
// 1、引用作为重载的条件
void func(int &a) // int &a = 10; 不合法的
{
	cout << "func(int &a)调用" << endl;
}

void func(const int& a) // const int &a = 10; 合法
{
	cout << "func(const int &a)调用" << endl;
}

// 2、函数重载碰到默认参数
void func2(int a, int b = 10)
{
	cout << "func2(int a, int b) 的调用" << endl;
}

void func2(int a)
{
	cout << "func2(int a) 的调用" << endl;
}

int main()
{
	int a = 10;
	func(a); // 调用的是 int &a,a是变量,加了const是只读状态就不能写,将变量传入就是可读可写的

	func(10);

	// func2(10); // 当函数重载碰到默认参数,出现二义性,此时报错,尽量避免
	func2(10, 20); // 没问题

	system("pause");

	return 0;
}
四、类和对象
4.1 封装
4.1.1 封装的意义(类)

#include<iostream>
using namespace std;

// 圆周率
const double PI = 3.14;

// 设计一个圆类,求圆的周长
// 圆求周长的公式: 2 * pi * r(半径)

// class 代表设计一个类,类后面紧跟着的就是类名称
class Circle
{
	// 访问权限
	// 公共权限
public:

	// 属性
	// 半径
	int m_r;

	// 行为
	// 获取圆的周长
	double calculateZC()
	{
		return 2 * PI * m_r;
	}
};

int main()
{
	// 通过圆类 创建具体的圆(对象)
	// 实例化  (通过一个类 创建一个对象的过程)
	Circle c1;
	// 给圆对象 的属性进行赋值
	c1.m_r = 10;

	// 2 * PI * 10 = 62.8
	cout << "圆的周长为: " << c1.calculateZC() << endl;

	system("pause");

	return 0;
}
4.1.2 示例:学生类

#include<iostream>
using namespace std;
#include<string>

// 设计一个学生类,属性有姓名和学号,I
// 可以给姓名和学号赋值,可以显示学生的姓名和学号

// 设计学生类
class Student
{
	// 访问权限
	// 公共权限
public:

	// 类中的属性和行为 我们统一称为 成员
	// 属性  成员属性 成员变量
	// 行为  成员函数 成员方法

	// 属性
	string m_name; // 姓名
	int m_id; // 学号

	// 行为
	// 显示姓名和学号
	void showStudent()
	{
		cout << "姓名: " << m_name << endl;;
		cout << "学号: " << m_id << endl;
	}

	// 给姓名赋值
	void setName(string name)
	{
		m_name = name;
	}

	// 给学号赋值
	void setid(int id)
	{
		m_id = id;
	}
};

int main()
{
	// 创建一个具体学生
	// 实例化对象  (通过一个类 创建一个对象的过程)
	Student s1;
	// 给学生对象 的属性进行赋值
	// s1.m_name = "张三";
	s1.setName("李四");
	// s1.m_id = 1;
	s1.setid(2);
	// 显示学生信息
	s1.showStudent();

	// 除了直接赋值,还可以通过行为给属性赋值

	system("pause");

	return 0;
}
self:
#include<iostream>
using namespace std;
#include<string>

// 设计一个学生类,属性有姓名和学号,I
// 可以给姓名和学号赋值,可以显示学生的姓名和学号

class Student
{
	// 访问权限
	// 公共权限
public:

	// 属性
	int xuehao;
	string name;

	void xianshi()
	{
		cout << "姓名为: " << name << endl;
		cout << "学号为: " << xuehao << endl;
	}
};

int main()
{
	Student s1;

	s1.name = "张三";
	s1.xuehao = 20010123;

	s1.xianshi();

	system("pause");

	return 0;
}
4.1.3 封装的意义(权限)

#include<iostream>
using namespace std;
#include<string>

// 访问权限
// 三种
// 公共权限 public     成员 类内可以访问  类外可以访问
// 保护权限 protected  成员 类内可以访问  类外不可以访问  儿子可以访问父亲中的保护内容
// 私有权限 private    成员 类内可以访问  类外不可以访问  儿子不可以访问父亲的私有内容
// 继承的时候 保护 和 私有就有区别了


class Person
{


public:

	// 公共权限
	string m_name; // 姓名

protected:
	// 保护权限
	string m_car;

private:
	// 私有权限
	int m_password;

private: // 这也是类内
	void func()
	{
		m_name = "张三";
		m_car = "拖拉机";
		m_password = 123456;
	}

};

int main()
{
	// 实例化具体对象
	Person p1;

	p1.m_name = "李四";
	p1.m_car = "奔驰"; // 保护权限内容,在类外访问不到
	p1.m_password = 123; // 私有权限内容,类外访问不到

	p1.func(); // 此时访问不到了,只有public访问的到

	system("pause");

	return 0;
}
4.1.4 struct 和 class 区别

#include<iostream>
using namespace std;
#include<string>

class C1
{
	int m_a; // 默认权限  是 私有
};

struct C2
{
	int m_a; // 默认权限  是 公共
};

int main()
{
	// struct 和 class 区别
	// struct 默认权限是 公共 oublic
	// class  默认权限是 私有 private
	C1 c1;
	// c1.m_a = 100; // 会报错,class默认权限是 私有,类外不可以访问

	C2 c2;
	c2.m_a = 100; // 在struct默认的权限是 共有。类外可以访问

	system("pause");

	return 0;
}
4.1.5 成员属性设置为私有

#include<iostream>
using namespace std;
#include<string>

// 成员属性设置为私有
// 1、可以自己控制读写权限
// 2、对于写可以检测数据的有效性

// 设计人 类
class Person
{
public:

	// 写姓名(设置姓名)
	void setname(string name)
	{
		m_name = name;
	}

	// 读姓名(获取姓名)
	string getname()
	{
		return m_name;
	}

	// 获取年龄 可读可写 如果想修改(年龄的范围必须是 0 ~ 150 之间)
	int getage()
	{
		// m_age = 0; // 初始化为0岁
		return m_age;
	}

	// 设置年龄
	void setage(int age)
	{
		if (age < 0 || age > 150)
		{
			cout << "你这个老妖精!" << endl;
			return;
		}
		m_age = age;
	}

	// 设置情人 只写
	void setlover(string lover)
	{
		m_lover = lover;
	}

private:
	// 姓名 可读可写
	string m_name;

	// 年龄 只读
	int m_age;

	// 情人 只写
	string m_lover;
};

int main()
{
	Person p;
	p.setname("张三");
	cout << "姓名为: " << p.getname() << endl;

	// p.m_age = 19; // 错误,只读
	p.setage(18);
	cout << "年龄为: " << p.getage() << endl;

	// 设置情人为苍井女士
	p.setlover("苍井");
	// cout << "情人为: " << p.m_lover << endl; // 不能直接访问

	system("pause");

	return 0;
}
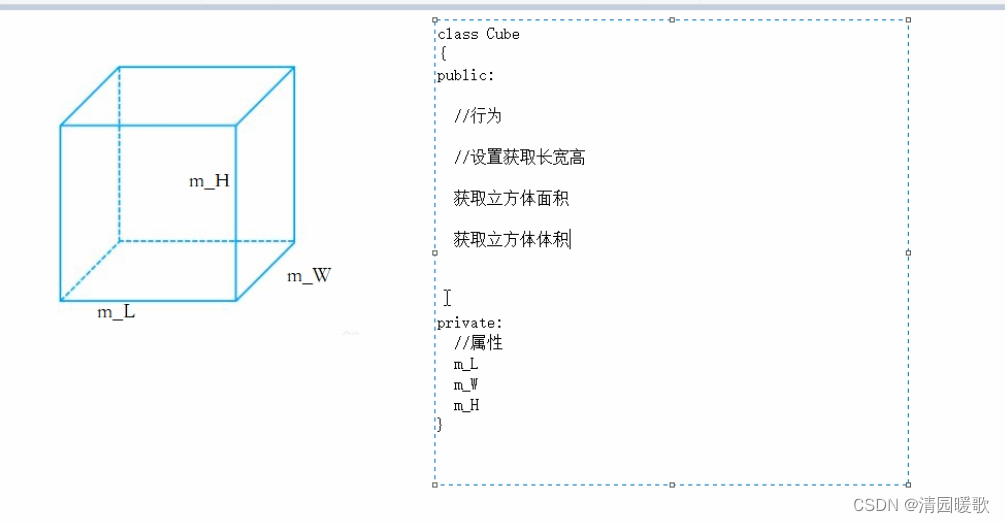
4.1.6 封装案例 - 立方体

#include<iostream>
using namespace std;
#include<string>
// 立方体类设计
// 1、创建立方体类
// 2、设计属性和行为
// 3、设计行为 获取立方体的面积和体积
// 4、分别利用全局函数和成员函数 判断两个立方体是否相等
class Cube
{
public:
// 设置长
void setl(int l)
{
m_l = l;
}
// 获取长
int getl()
{
return m_l;
}
// 设置宽
void setw(int w)
{
m_w = w;
}
// 获取宽
int getw()
{
return m_w;
}
// 设置高
void seth(int h)
{
m_h = h;
}
// 获取高
int geth()
{
return m_h;
}
// 获取立方体面积
int calculateS()
{
return 2 * m_l * m_w + 2 * m_l * m_h + 2 * m_w * m_h;
}
// 获取立方体体积
int calculateV()
{
return m_l * m_h * m_w;
}
// 利用成员函数判断两个立方体是否相等
bool isSameByClass(Cube &c)
{
if (m_l == c.getl() && m_w == c.getw() && m_h == c.geth())
{
return true;
}
return false;
}
private:
int m_l;
int m_w;
int m_h;
};
// 利用全局函数判断 两个立方体是否相等
bool isSame(Cube &c1, Cube &c2)
{
if (c1.getl() == c2.getl() && c1.getw() == c2.getw() && c1.geth() == c2.geth())
{
return true;
}
return false;
}
int main()
{
// 创建一个立方体对象
Cube c1;
c1.setl(10);
c1.setw(10);
c1.seth(10);
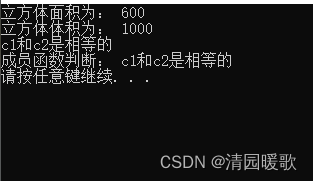
// 600
cout << "立方体面积为: " << c1.calculateS() << endl;
// 1000
cout << "立方体体积为: " << c1.calculateV() << endl;
// 创建第二个立方体
Cube c2;
c2.setl(10);
c2.setw(10);
c2.seth(10);
// 利用全局函数判断
bool ret = isSame(c1, c2);
if (ret)
{
cout << "c1和c2是相等的" << endl;
}
else
{
cout << "c1和c2是不相等的" << endl;
}
// 利用成员函数判断
ret = c1.isSameByClass(c2);
if (ret)
{
cout << "成员函数判断: c1和c2是相等的" << endl;
}
else
{
cout << "成员函数判断: c1和c2是不相等的" << endl;
}
system("pause");
return 0;
}
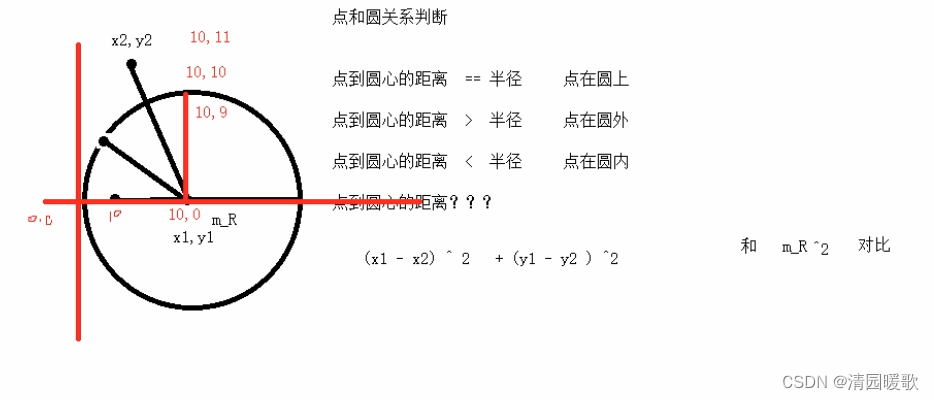
4.1.7 封装案例2 - 点和圆的关系

#include<iostream>
using namespace std;
#include<string>
#include "circle.h"
#include "point.h"
// 点和圆的关系案例
// 点类
class Point
{
public:
// 设置x
void setx(int x)
{
m_x = x;
}
// 获取x
int getx()
{
return m_x;
}
// 设置y
void sety(int y)
{
m_y = y;
}
// 获取y
int gety()
{
return m_y;
}
private:
int m_x;
int m_y;
};
// 圆类
class Circle
{
public:
// 设置半径
void setr(int r)
{
m_r = r;
}
// 获取半径
int getr()
{
return m_r;
}
// 设置圆心
void setcenter(Point center)
{
m_center = center;
}
// 获取圆心
Point getcenter()
{
return m_center;
}
private:
int m_r; // 半径
// 在类中可以让另一个类 作为本类中的成员
Point m_center; // 圆心
};
// 判断点和圆的关系
void isInCircle(Circle& c, Point& p)
{
// 计算两点之间距离 平方
int distance =
(c.getcenter().getx() - p.getx())* (c.getcenter().getx() - p.getx()) +
(c.getcenter().gety() - p.gety()) * (c.getcenter().gety() - p.gety());
// 计算半径的平方
int rdistance = c.getr() * c.getr();
// 判断关系
if (distance == rdistance)
{
cout << "点在圆上" << endl;
}
else if (distance > rdistance)
{
cout << "点在圆外" << endl;
}
else
{
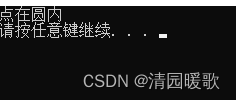
cout << "点在圆内" << endl;
}
}
int main()
{
// 创建圆
Circle c;
c.setr(10);
Point center;
center.setx(10);
center.sety(0);
c.setcenter(center);
// 创建点
Point p;
p.setx(10);
p.sety(9);
// 判断关系
isInCircle(c, p);
system("pause");
return 0;
}
可将类写到声明
point.h
#pragma once
#include<iostream>
using namespace std;

// 点类
class  Point
{
public:
	// 设置x
	void setx(int x);

	// 获取x
	int getx();

	// 设置y
	void sety(int y);

	// 获取y
	int gety();

private:
	int m_x;
	int m_y;
};
point.cpp
#include"point.h"


// 设置x
void Point::setx(int x) // Point作用域下的成员函数
{
	m_x = x;
}

// 获取x
int Point::getx()
{
	return m_x;
}

// 设置y
void Point::sety(int y)
{
	m_y = y;
}

// 获取y
int Point::gety()
{
	return m_y;
}
circle.h
#pragma once
#include<iostream>
using namespace std;
#include "point.h"

// 圆类
class Circle
{
public:
	// 设置半径
	void setr(int r);
	// 获取半径
	int getr();
	// 设置圆心
	void setcenter(Point center);
	// 获取圆心
	Point getcenter();

private:
	int m_r; // 半径

	// 在类中可以让另一个类 作为本类中的成员
	Point m_center; // 圆心

};
circle.cpp
#include "circle.h"


// 设置半径
void Circle::setr(int r)
{
	m_r = r;
}
// 获取半径
int Circle::getr()
{
	return m_r;
}
// 设置圆心
void Circle::setcenter(Point center)
{
	m_center = center;
}
// 获取圆心
Point Circle::getcenter()
{
	return m_center;
}
4.2 对象的初始化和清理

4.2.1 构造函数和析构函数


#include<iostream>
using namespace std;

// 对象的舒适化和清理
class Person
{
public:
	// 1、构造函数
	// 没有返回值 不用写void
	// 函数名 与类名相同
	// 构造函数可以有参数,可以发生重载
	// 创建对象的时候,构造函数会自动调用,而且只调用一次
	Person()
	{
		cout << "Person 构造函数的调用" << endl; // 编译器自动写的是空的
	}

	// 2、析构函数 进行清理的操作
	// 没有返回值 不写 void
	// 函数名和类名相同 在名称前加 ~
	// 析构函数不可以有参数的,不可以发生重载
	// 对象在销毁前 会自动调用析构函数,而且智慧调用一次
	~Person()
	{
		cout << "Person 的析构函数调用" << endl;
	}
};

// 构造和析构都是必须有的实现,如果我们自己不提供,编译器会提供一个空实现的构造和析构
void test01()
{
	Person p; // 在栈上的数据,test01()执行完毕后,释放这个对象
}

int main()
{
	test01(); // 这样直接会有析构

	// Person p; // 这样这个对象在执行完 return 0 之后才会析构

	system("pause");

	return 0;
}
4.2.2 构造函数的分类及调用

#include<iostream>
using namespace std;
// 1、构造函数的分类及调用
// 分类
// 按照参数分类 无参构造(默认构造) 和 有参构造
// 按照类型分类 普通构造 拷贝构造
class Person
{
public:
// 构造函数、普通构造
Person()
{
cout << "Person 的无参构造函数" << endl;
}
Person(int a)
{
age = a;
cout << "Person 的有参构造函数" << endl;
}
// 拷贝构造函数
Person( const Person &p ) // 把p的所有属性拷贝过来,但不能改,所以要const + 引用
{
// 将传入的人身上所有属性,拷贝到我身上
cout << "Person 的拷贝构造函数" << endl;
age = p.age;
}
~Person()
{
cout << "Person 的析构函数" << endl;
}
int age;
};
// 调用
void test01()
{
// 1、括号法
Person p1; // 默认构造函数调用
Person p2(10); // 有参构造函数
Person p3(p2); // 拷贝构造函数
// 注意事项
// 调用默认构造函数时候,不要加()
// 因为下面这行代码,编译器会认为是一个函数的声明,不会认为在创建对象
// 如 void func(),因为在一个函数里可以写另一个函数的声明,所以不会报语法错误
// Person p1(); // 这样调用不会创建对象,就没有构造和析构
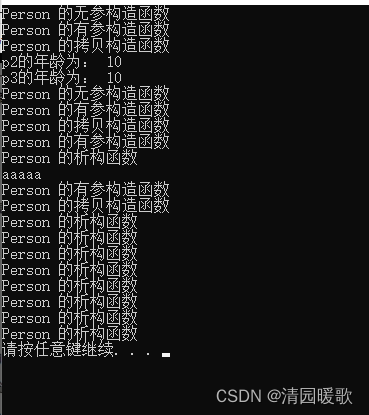
cout << "p2的年龄为: " << p2.age << endl;
cout << "p3的年龄为: " << p3.age << endl;
// 2、显示法
Person p4;
Person p5 = Person(100); // 有参构造
Person p6 = Person(p5); // 拷贝构造
Person(100); // 匿名对象 特点:当前行执行结束后,系统会立即回收掉匿名对象;构造和析构连一起
cout << "aaaaa" << endl;
// 注意事项2
// 不要利用拷贝构造函数 初始化匿名对象,编译器会认为 Person(p6) == Person p3;对象声明
// Person(p6);
// 3、隐式转换法
Person p7 = 10; // 相当于 写了 Person p7 = Person(10) 有参构造
Person p8 = p7; // 拷贝构造
}
int main()
{
test01();
// Person p; // 这样这个对象在执行完 return 0 之后才会析构
system("pause");
return 0;
}


 2833
2833


 被折叠的 条评论
为什么被折叠?
被折叠的 条评论
为什么被折叠?
 到【灌水乐园】发言


