


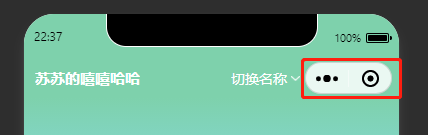
1.实现效果

2.实现原理
2.1获取胶囊的详细信息
let menuButtonObject = wx.getMenuButtonBoundingClientRect();
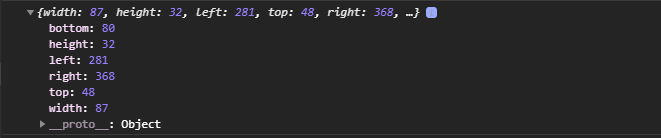
width:胶囊的宽度;
height:胶囊的高度
top:胶囊距离顶部的距离
2.2获取导航栏的整体高度

wx.getSystemInfo({
   success: res => {
   	let statusBarHeight = res.statusBarHeight,navTop = menuButtonObject.top,
   	navHeight = statusBarHeight + menuButtonObject.height + (menuButtonObject.top - statusBarHeight) * 2;
   }
})
整体高度:
状态栏高度+胶囊高度+(胶囊距离-胶囊高度)*2
navHeight = statusBarHeight + menuButtonObject.height + (menuButtonObject.top - statusBarHeight) * 2;
2.3获取胶囊距离右边的距离
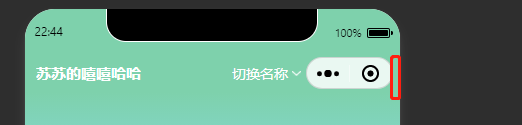
res.windowWidth - menuButtonObject.right
2.4完整获取代码:
let menuButtonObject = wx.getMenuButtonBoundingClientRect();
wx.getSystemInfo({
   success: res => {
     //导航高度
     let statusBarHeight = res.statusBarHeight,
       navTop = menuButtonObject.top,
       navObjWid = res.windowWidth - menuButtonObject.right + menuButtonObject.width, // 胶囊按钮与右侧的距离 = windowWidth - right+胶囊宽度
       navHeight = statusBarHeight + menuButtonObject.height + (menuButtonObject.top - statusBarHeight) * 2;
     this.globalData.navHeight = navHeight; //导航栏总体高度
     this.globalData.navTop = navTop; //胶囊距离顶部距离
     this.globalData.navObj = menuButtonObject.height; //胶囊高度
     this.globalData.navObjWid = navObjWid; //胶囊宽度(包括右边距离)
     // console.log(navHeight,navTop,menuButtonObject.height,navObjWid)
   },
   fail(err) {
     console.log(err);
   }
 })
3.代码实现
在json文件中定义custom,自定义导航栏样式.
{
  "usingComponents": {},
  "navigationBarTitleText": "导航栏自定义~",
  "navigationStyle":"custom"
}
拿到相应的导航栏信息
navHeight: app.globalData.navHeight, //导航栏高度
navTop: app.globalData.navTop, //导航栏距顶部距离
navObj: app.globalData.navObj, //胶囊的高度
navObjWid: app.globalData.navObjWid, //胶囊宽度+距右距离
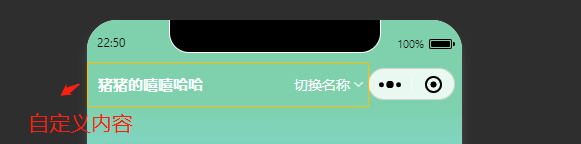
自定义导航栏的样式,设置fixed布局
<view class="custom_head" style="height:{{navHeight}}px;">
  <view class="flex-row j_b" style="height:{{navObj}}px;padding-top:{{navTop}}px;padding-right:{{navObjWid+5}}px;">
    <view class="head_store text_ellipsis">{{store_name}}</view>
    <picker bindchange="bindPickerChange" value="{{index}}" range="{{storeList}}" range-key="name">
      <view class="flex-row picker">
        <text>切换名称</text>
        <image src="/img/down_arr.png" />
      </view>
    </picker>
  </view>
</view>
.custom_head {
  width: 750rpx;
  background: #7ED1AC;
  color: #fff;
  position: fixed;
  top: 0;
  z-index: 999;
}

.head_store {
  font-size: 30rpx;
  font-weight: bold;
  width: 340rpx;
  margin-right: 30rpx;
  margin-left: 22rpx;
  flex-shrink: 0;
}

picker {
  flex-shrink: 0;
}

.picker {
  font-size: 28rpx;
}

.picker image {
  width: 18rpx;
  height: 10rpx;
  margin-left: 8rpx;
}


 1万+
1万+


 被折叠的 条评论
为什么被折叠?
被折叠的 条评论
为什么被折叠?
 到【灌水乐园】发言


