


俺有几个问题写在前面
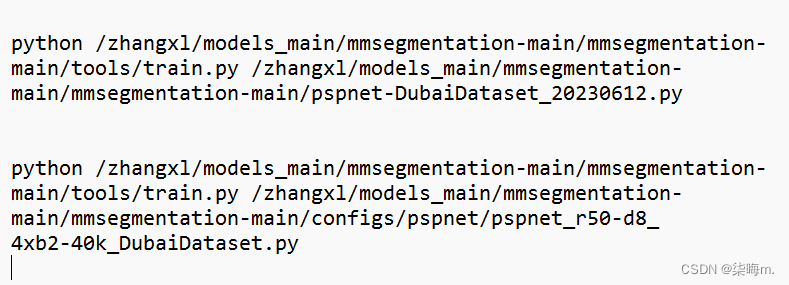
一、配置文件是哪个
pspnet_r50-d8_4xb2-40k_DubaiDataset.py 2、pspnet-DubaiDataset_20230612.py
二、这里说载入config配置文件pspnet_r50-d8_4xb2-40k_DubaiDataset.py再修改config配置文件,最后又说保存config配置文件到pspnet-DubaiDataset_20230612.py,那么我修改的是pspnet_r50-d8_4xb2-40k_DubaiDataset.py还是pspnet-DubaiDataset_20230612.py呢
三、运行语句应该咋写 哪个才是配置文件(救命
- 视频链接:MMSegmentation代码课
教程链接:MMSegmentation_Tutorials/20230612 - 数据集:
Dubai-dataset
结构: ann_dir
——train
|
——val
img_dir
——train
|
——val
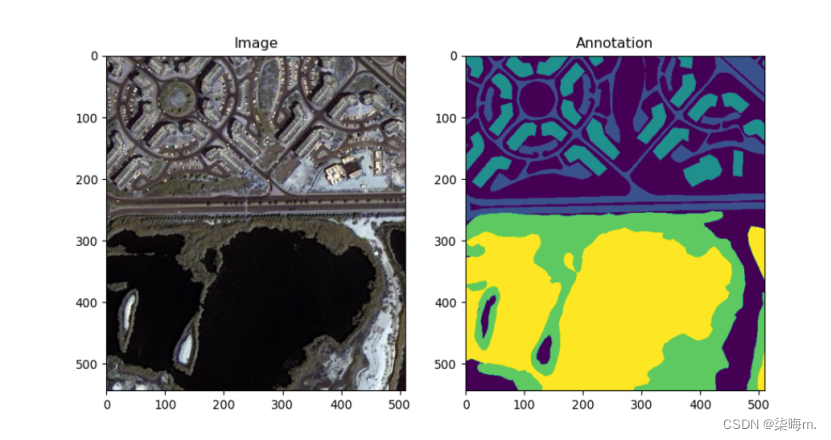
- 数据可视化:
数据可视化
import numpy as np
import matplotlib.pyplot as plt
from PIL import Image
# Load the image and annotation
image_path = r'C:\Users\dell\Desktop\Dubai-dataset\img_dir\train\14.jpg'
annotation_path = r'C:\Users\dell\Desktop\Dubai-dataset\ann_dir\train\14.png'
image = np.array(Image.open(image_path))
annotation = np.array(Image.open(annotation_path))
# Visualize the image and annotation
fig, ax = plt.subplots(1, 2, figsize=(10, 5))
ax[0].imshow(image)
ax[0].set_title("Image")
ax[1].imshow(annotation)
ax[1].set_title("Annotation")
plt.show()
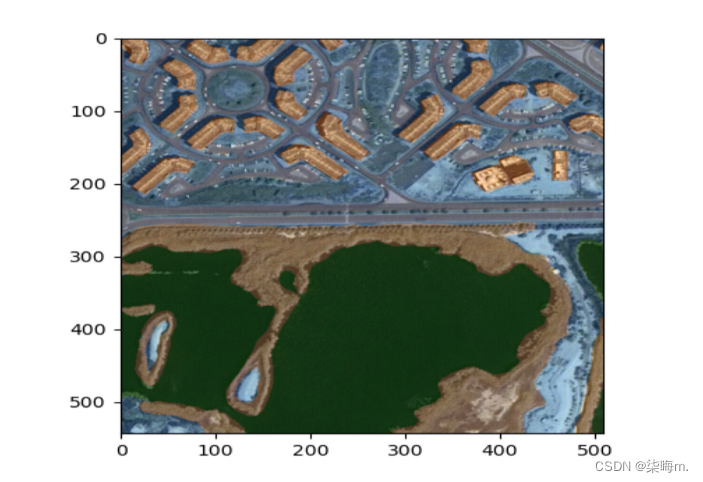
在原图上叠加显示:
import numpy as np
import matplotlib.pyplot as plt
from PIL import Image
# Load the image and annotation
image_path = r'C:\Users\dell\Desktop\Dubai-dataset\img_dir\train\14.jpg'
annotation_path = r'C:\Users\dell\Desktop\Dubai-dataset\ann_dir\train\14.png'
image = np.array(Image.open(image_path))
annotation = np.array(Image.open(annotation_path))
# Create a colormap for visualization
cmap = plt.get_cmap("tab20")
norm = plt.Normalize(vmin=0, vmax=20)
# Convert the annotation to a color image
annotation_color = norm(annotation)
annotation_color = cmap(annotation_color)
annotation_color = (annotation_color[:, :, :3] * 255).astype(np.uint8)
# Merge the image and annotation
merged = cv2.addWeighted(image, 0.7, annotation_color, 0.3, 0)
# Display the merged image
plt.imshow(merged)
plt.show()
批量可视化:
import os
import numpy as np
import matplotlib.pyplot as plt
from PIL import Image
# Set the directory paths
image_dir = r'C:\Users\dell\Desktop\Dubai-dataset\img_dir\train'
annotation_dir = r'C:\Users\dell\Desktop\Dubai-dataset\ann_dir\train'
# Get the file names
image_files = os.listdir(image_dir)
annotation_files = os.listdir(annotation_dir)
# Sort the file names
image_files.sort()
annotation_files.sort()
# Create a colormap for visualization
cmap = plt.get_cmap("tab20")
norm = plt.Normalize(vmin=0, vmax=20)
# Loop through the files
for i, (image_file, annotation_file) in enumerate(zip(image_files, annotation_files)):
# Load the image and annotation
image_path = os.path.join(image_dir, image_file)
annotation_path = os.path.join(annotation_dir, annotation_file)
image = np.array(Image.open(image_path))
annotation = np.array(Image.open(annotation_path))
# Convert the annotation to a color image
annotation_color = norm(annotation)
annotation_color = cmap(annotation_color)
annotation_color = (annotation_color[:, :, :3] * 255).astype(np.uint8)
# Merge the image and annotation
merged = cv2.addWeighted(image, 0.7, annotation_color, 0.3, 0)
# Display the merged image
plt.imshow(merged)
plt.title(f"Image {i+1}")
plt.show()
显示标签名称和种类
import numpy as np
import matplotlib.pyplot as plt
from PIL import Image
# Load the annotation image
annotation_path = r'C:\Users\dell\Desktop\Dubai-dataset\ann_dir\train\14.png'
annotation = np.array(Image.open(annotation_path))
# Determine the number of unique labels in the annotation
unique_labels = np.unique(annotation)
# Convert the unique labels to a list of integers
label_values = unique_labels.astype(int).tolist()
# Load the label names from a dictionary
label_names = {
0: 'background',
1: 'sky',
2: 'building',
3: 'vegetation',
4: 'sidewalk',
5: 'car',
6: 'pedestrian',
7: 'fence',
8: 'pole',
9: 'traffic light',
10: 'traffic sign'
}
# Create a list of label names for the unique labels
label_names_list = [label_names[label_value] for label_value in label_values]
# Print the number of unique labels and their names
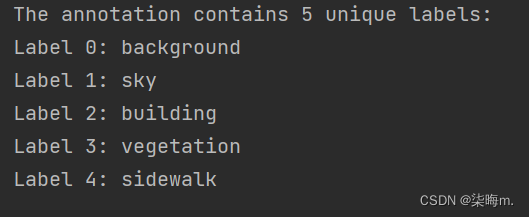
print(f"The annotation contains {len(unique_labels)} unique labels:")
for label_value, label_name in zip(label_values, label_names_list):
print(f"Label {label_value}: {label_name}")
# Select a label to display (e.g., the first unique label)
label_to_display = unique_labels[0]
# Create a binary mask for the selected label
mask = np.zeros_like(annotation)
mask[annotation == label_to_display] = 1
# Apply the binary mask to the original image
image_path = r'C:\Users\dell\Desktop\Dubai-dataset\img_dir\train\14.jpg'
image = np.array(Image.open(image_path))
masked_image = np.zeros_like(image)
for i in range(3):
masked_image[:, :, i] = image[:, :, i] * mask
# Display the masked image
plt.imshow(masked_image)
plt.title(f"Label {label_to_display}: {label_names[label_to_display]}")
plt.show()
十全大补丸
import os
import cv2
import numpy as np
import matplotlib.pyplot as plt
from PIL import Image
# Set the directory paths
# 设置目录路径 和下面是否批量处理图像要对应
image_dir = r'C:\Users\dell\Desktop\Dubai-dataset\img_dir\train'
annotation_dir = r'C:\Users\dell\Desktop\Dubai-dataset\ann_dir\train'
# Load the label names from a dictionary
# 从字典中加载标签名称
label_names = {
0: 'background',
1: 'sky',
2: 'building',
3: 'vegetation',
4: 'sidewalk',
5: 'car',
6: 'pedestrian',
7: 'fence',
8: 'pole',
9: 'traffic light',
10: 'traffic sign'
}
# Set the label to display
# 设置要显示的标签想显示单个标签直接写数字,想显示多个标签[2,3]
label_to_display = 2
# Set whether to process images in batch
# 设置是否批量处理图像 整个文件夹True,单个文件False
process_in_batch = True
# Process images
if process_in_batch:
# Get the file names
image_files = os.listdir(image_dir)
annotation_files = os.listdir(annotation_dir)
# Sort the file names
image_files.sort()
annotation_files.sort()
# Create a colormap for visualization
cmap = plt.get_cmap("tab20")
norm = plt.Normalize(vmin=0, vmax=20)
# Loop through the files
for i, (image_file, annotation_file) in enumerate(zip(image_files, annotation_files)):
# Load the image and annotation
image_path = os.path.join(image_dir, image_file)
annotation_path = os.path.join(annotation_dir, annotation_file)
image = np.array(Image.open(image_path))
annotation = np.array(Image.open(annotation_path))
# Determine the number of unique labels in the annotation
unique_labels = np.unique(annotation)
# Convert the unique labels to a list of integers
label_values = unique_labels.astype(int).tolist()
# Create a list of label names for the unique labels
label_names_list = [label_names[label_value] for label_value in label_values]
# Print the number of unique labels and their names
print(f"Image {i+1} contains {len(unique_labels)} unique labels:")
for label_value, label_name in zip(label_values, label_names_list):
print(f"Label {label_value}: {label_name}")
# Create a binary mask for the selected label
mask = np.zeros_like(annotation)
mask[annotation == label_to_display] = 1
# Convert the annotation to a color image
annotation_color = norm(annotation)
annotation_color = cmap(annotation_color)
annotation_color = (annotation_color[:, :, :3] * 255).astype(np.uint8)
# Apply the binary mask to the color annotation
masked_annotation = np.zeros_like(annotation_color)
for i in range(3):
masked_annotation[:, :, i] = annotation_color[:, :, i] * mask
# Merge the image and masked annotation#
#合并图像和屏蔽注释 权重
merged = cv2.addWeighted(image, 0.7, masked_annotation, 0.3, 0)
# Display the merged image
plt.imshow(merged)
plt.title(f"Image {i+1}")
plt.show()
else:
# Select an image to process
image_path = r'C:\Users\dell\Desktop\Dubai-dataset\img_dir\train\14.jpg'
annotation_path = r'C:\Users\dell\Desktop\Dubai-dataset\ann_dir\train\14.png'
# Load the image and annotation
image = np.array(Image.open(image_path))
annotation = np.array(Image.open(annotation_path))
# Determine the number of unique labels in the annotation
unique_labels = np.unique(annotation)
# Convert the unique labels to a list of integers
label_values = unique_labels.astype(int).tolist()
# Create a list of label names for the unique labels
label_names_list = [label_names[label_value] for label_value in label_values]
# Print the number of unique labels and their names
print(f"The annotation contains {len(unique_labels)} unique labels:")
for label_value, label_name in zip(label_values, label_names_list):
print(f"Label {label_value}: {label_name}")
# Create a binary mask for the selected label
mask = np.zeros_like(annotation)
mask[annotation == label_to_display] = 1
# Convert the annotation to a color image
cmap = plt.get_cmap("tab20")
norm = plt.Normalize(vmin=0, vmax=20)
annotation_color = norm(annotation)
annotation_color = cmap(annotation_color)
annotation_color = (annotation_color[:, :, :3] * 255).astype(np.uint8)
# Apply the binary mask to the color annotation
masked_annotation = np.zeros_like(annotation_color)
for i in range(3):
masked_annotation[:, :, i] = annotation_color[:, :, i] * mask
# Merge the image and masked annotation
merged = cv2.addWeighted(image, 0.7, masked_annotation, 0.3, 0)
# Display the merged image
plt.imshow(merged)
plt.title(f"Label {label_to_display}: {label_names[label_to_display]}")
plt.show()
- 配置
素材位置:
/zhangxl/models_main/mmsegmentation-main/mmsegmentation-main/data Dubai-dataset
配置:
(1)定义数据集类:
/zhangxl/models_main/mmsegmentation-main/mmsegmentation-main/mmseg/datasets
DubaiDataset.py
代码
# 同济子豪兄 2023-2-15
from mmseg.registry import DATASETS
from .basesegdataset import BaseSegDataset
@DATASETS.register_module()
class DubaiDataset(BaseSegDataset):
# 类别和对应的可视化配色
METAINFO = {
'classes':['Land', 'Road', 'Building', 'Vegetation', 'Water', 'Unlabeled'],
'palette':[[132,41,246], [228,193,110], [152,16,60], [58,221,254], [41,169,226], [155,155,155]]
}
# 指定图像扩展名、标注扩展名
def __init__(self,
img_suffix='.jpg',
seg_map_suffix='.png',
reduce_zero_label=False, # 类别ID为0的类别是否需要除去
**kwargs) -> None:
super().__init__(
img_suffix=img_suffix,
seg_map_suffix=seg_map_suffix,
reduce_zero_label=reduce_zero_label,
**kwargs)
(2)注册数据集
/zhangxl/models_main/mmsegmentation-main/mmsegmentation-main/mmseg/datasets
__init__.py
改动
from .DubaiDataset import DubaiDataset
'DubaiDataset'
(3)定义训练及测试pipeline
/zhangxl/models_main/mmsegmentation-main/mmsegmentation-main/configs/_base_/datasets
DubaiDataset_pipeline.py
代码
# dataset settings
#3.4行需要改动一下
dataset_type = 'DubaiDataset' # 数据集类名
data_root = 'Dubai-dataset/' # 数据集路径(相对于mmsegmentation主目录)
crop_size = (64, 64)
train_pipeline = [
dict(type='LoadImageFromFile'),
dict(type='LoadAnnotations'),
dict(
type='RandomResize',
scale=(2048, 1024),
ratio_range=(0.5, 2.0),
keep_ratio=True),
dict(type='RandomCrop', crop_size=crop_size, cat_max_ratio=0.75),
dict(type='RandomFlip', prob=0.5),
dict(type='PhotoMetricDistortion'),
dict(type='PackSegInputs')
]
test_pipeline = [
dict(type='LoadImageFromFile'),
dict(type='Resize', scale=(2048, 1024), keep_ratio=True),
# add loading annotation after ``Resize`` because ground truth
# does not need to do resize data transform
dict(type='LoadAnnotations'),
dict(type='PackSegInputs')
]
img_ratios = [0.5, 0.75, 1.0, 1.25, 1.5, 1.75]
tta_pipeline = [
dict(type='LoadImageFromFile', file_client_args=dict(backend='disk')),
dict(
type='TestTimeAug',
transforms=[
[
dict(type='Resize', scale_factor=r, keep_ratio=True)
for r in img_ratios
],
[
dict(type='RandomFlip', prob=0., direction='horizontal'),
dict(type='RandomFlip', prob=1., direction='horizontal')
], [dict(type='LoadAnnotations')], [dict(type='PackSegInputs')]
])
]
train_dataloader = dict(
batch_size=2,
num_workers=2,
persistent_workers=True,
sampler=dict(type='InfiniteSampler', shuffle=True),
dataset=dict(
type=dataset_type,
data_root=data_root,
data_prefix=dict(
img_path='img_dir/train', seg_map_path='ann_dir/train'),
pipeline=train_pipeline))
val_dataloader = dict(
batch_size=1,
num_workers=4,
persistent_workers=True,
sampler=dict(type='DefaultSampler', shuffle=False),
dataset=dict(
type=dataset_type,
data_root=data_root,
data_prefix=dict(
img_path='img_dir/val', seg_map_path='ann_dir/val'),
pipeline=test_pipeline))
test_dataloader = val_dataloader
val_evaluator = dict(type='IoUMetric', iou_metrics=['mIoU'])
test_evaluator = val_evaluator
- 配置文件: /zhangxl/models_main/mmsegmentation-main/mmsegmentation-main/configs/pspnet pspnet_r50-d8_4xb2-40k_DubaiDataset.py
代码
_base_ = [
'../_base_/models/pspnet_r50-d8.py', '../_base_/datasets/DubaiDataset_pipeline.py',
'../_base_/default_runtime.py', '../_base_/schedules/schedule_40k.py'
]
crop_size = (64, 64) # 输入图像尺寸,根据自己数据集情况修改
data_preprocessor = dict(size=crop_size)
model = dict(data_preprocessor=data_preprocessor)
- 修改配置文件
/zhangxl/models_main/mmsegmentation-main/mmsegmentation-main
pspnet-DubaiDataset_20230612.py
代码
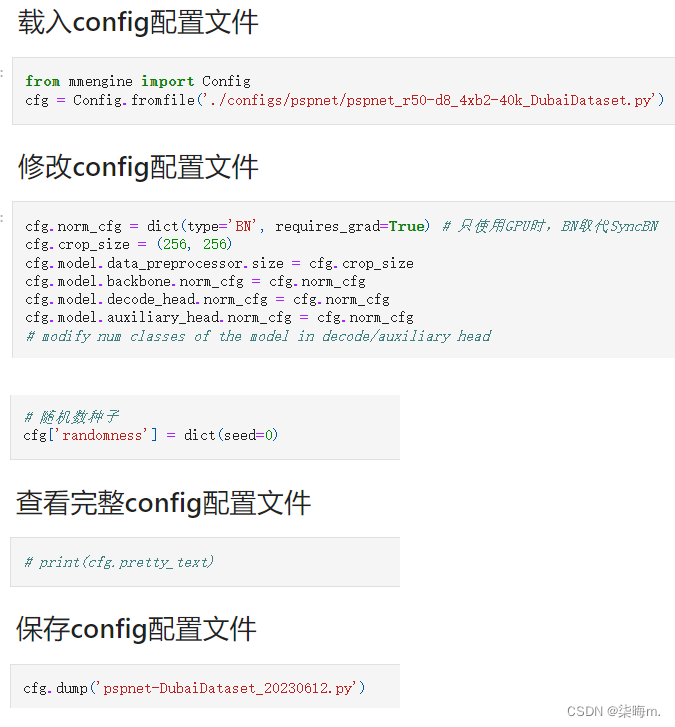
# 载入config配置文件
from mmengine import Config
cfg = Config.fromfile('./configs/pspnet/pspnet_r50-d8_4xb2-40k_DubaiDataset.py
# 根据个人数据集和分割任务,修改config配置文件
cfg.norm_cfg = dict(type='BN', requires_grad=True) # 只使用GPU时,BN取代SyncBN
cfg.crop_size = (256, 256)
cfg.model.data_preprocessor.size = cfg.crop_size
cfg.model.backbone.norm_cfg = cfg.norm_cfg
cfg.model.decode_head.norm_cfg = cfg.norm_cfg
cfg.model.auxiliary_head.norm_cfg = cfg.norm_cfg
# modify num classes of the model in decode/auxiliary head
# 模型 decode/auxiliary 输出头,指定为类别个数
cfg.model.decode_head.num_classes = 6
cfg.model.auxiliary_head.num_classes = 6
cfg.train_dataloader.batch_size = 8
cfg.test_dataloader = cfg.val_dataloader
# 结果保存目录
cfg.work_dir = './work_dirs/DubaiDataset'
# 训练迭代次数
cfg.train_cfg.max_iters = 3000
# 评估模型间隔
cfg.train_cfg.val_interval = 400
# 日志记录间隔
cfg.default_hooks.logger.interval = 100
# 模型权重保存间隔
cfg.default_hooks.checkpoint.interval = 1500
# 随机数种子
cfg['randomness'] = dict(seed=0)
# 查看完整config配置文件
print(cfg.pretty_text)
# 保存config配置文件
cfg.dump('pspnet-DubaiDataset_20230612.py')


 1985
1985


 被折叠的 条评论
为什么被折叠?
被折叠的 条评论
为什么被折叠?
 到【灌水乐园】发言


