


一、File API
以一个文件上传的例子解释File API。
<!DOCTYPE html>
<html lang="en">
<head>
<meta charset="UTF-8" />
<meta name="viewport" content="width=device-width, initial-scale=1.0" />
<title>File Upload</title>
<!-- <link rel="stylesheet" href="styles.css" /> -->
<style>
/* styles.css */
body {
font-family: Arial, sans-serif;
display: flex;
justify-content: center;
align-items: center;
height: 100vh;
margin: 0;
background-color: #f0f0f0;
}
.upload-container {
background-color: white;
padding: 20px;
border-radius: 8px;
box-shadow: 0 2px 4px rgba(0, 0, 0, 0.1);
text-align: center;
}
.custom-file-upload {
background-color: blue;
color: white;
padding: 10px 20px;
border: none;
border-radius: 4px;
cursor: pointer;
font-size: 16px;
}
input[type="file"] {
margin: 10px 0;
}
button {
background-color: #4caf50;
color: white;
padding: 10px 20px;
border: none;
border-radius: 4px;
cursor: pointer;
font-size: 16px;
}
button:hover {
background-color: #45a049;
}
#status {
margin-top: 10px;
color: #666;
}
</style>
</head>
<body>
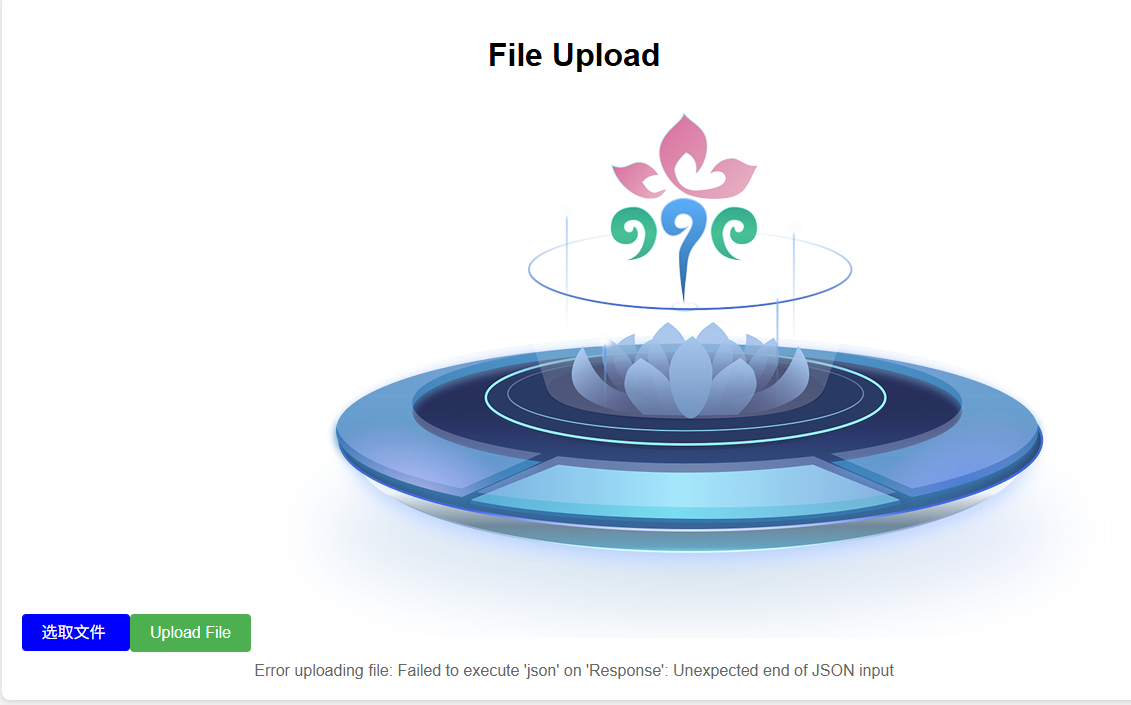
<div class="upload-container">
<h1>File Upload</h1>
<label for="fileInput" class="custom-file-upload">
选取文件
</label>
<input type="file" id="fileInput" multiple style="display: none;"/>
<button id="uploadButton">Upload File</button>
<img src="" alt="" id="previewImage">
<div id="status"></div>
</div>
<script>
// script.js
document.addEventListener("DOMContentLoaded", function () {
const fileInput = document.getElementById("fileInput");
const uploadButton = document.getElementById("uploadButton");
const statusDiv = document.getElementById("status");
fileInput.addEventListener("change", function (event) {
console.log(event.target.files,'文件列表');
let files = event.target.files;
let reader=new FileReader();
if(/image/.test(files[0].type)){
reader.readAsDataURL(files[0]);
}else {
reader.readAsText(files[0]);
}
reader.onerror=function(){
console.log('读取文件失败');
}
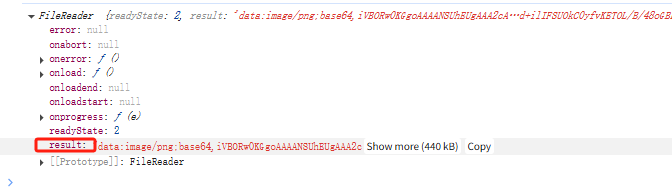
reader.onload=function(){
console.log('读取文件成功');
console.log(reader.result);
document.getElementById('previewImage').src=reader.result;
}
reader.onprogress=function(e){
console.log('读取文件进度:',e.loaded/e.total);
}
})
uploadButton.addEventListener("click", function () {
const file = fileInput.files[0];
if (!file) {
statusDiv.textContent = "Please select a file to upload.";
return;
}
const formData = new FormData();
formData.append("file", file);
// 假设上传的API端点为 '/upload'
fetch("/upload", {
method: "POST",
body: formData,
})
.then((response) => response.json())
.then((data) => {
statusDiv.textContent =
"File uploaded successfully: " + data.message;
})
.catch((error) => {
statusDiv.textContent = "Error uploading file: " + error.message;
});
});
});
</script>
<!-- <script src="script.js"></script> -->
</body>
</html>
1、使用label改变上传按钮的内置样式
2、监听文件上传按钮的change事件,通过event.target.files可以拿到文件列表
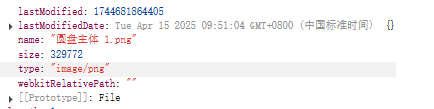
3、文件列表中的每个元素都是File类型的对象,包含以下属性:
name:本地系统中的文件名
size:以字节计的文件大小
type:包含文件MIME类型的字符串
lastModifiedDate:表示文件最后修改时间的字符串
4、FileReader类型表示一种异步文件读取机制。该类型的对象提供了一些读取文件数据的方法,例如:
readAsText:读取纯文本内容并保存在result属性中
readAsDataURL:读取文件并将内容的数据URI保存在result属性中
5、FileReader是一种异步的机制,因此他有一些事件:error,progress,load,可以用来实现文件预览的功能
6、FileReaderSync类型
FileReader类型的同步版本。通常用在工作线程中。向工作线程发送一个File对象,在工作线程中读取一个文件的内容到内存中,然后将文件数据的URL发回来:
//worker.js
        self.onmessage = function(e) {
            const syncReader=new FileReaderSync()

            const result = syncReader.readAsDataUrl(e.data) //e.data是一个File对象

            self.postMessage
        }
二、Blob API
1、File类型的对象调用slice方法的返回值就是一个Blob对象,实际上Blob是File的超类,slice方法位于Blob构造函数的原型上。
files[0].slice(0,10000)的返回值如下:
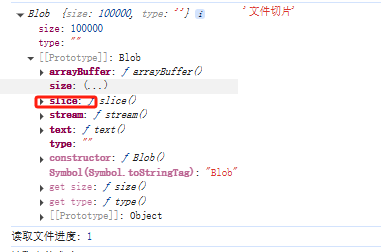
也可以使用FileReader从Blob中读取数据。
2、对象URL
对象URL是指:引用存储在File或者Blob中数据的URL.他的优点是:不用把文件内容读取到js也可以使用文件。
可以使用Window.URL.createObjectURL()方法,并传入一个File或者Blob对象。这个方法返回一个指向内存中地址的字符串,因为这个字符串是URL,可以在DOM中直接使用。
let blob = new Blob([file], { type: "text/plain" }); //Blob对象
        let url=Window.URL.createObjectURL(blob);
        document.getElementById("img").src=url;


 3000
3000

 被折叠的 条评论
为什么被折叠?
被折叠的 条评论
为什么被折叠?
 到【灌水乐园】发言


