


前言:记录二次封装quasar表格 - 多级表头 - 动态表头 - 多列粘性标题/列
个人博客 已更新该文章— 二次封装quasar表格 - 多级表头 - 动态表头 - 多列粘性标题/列
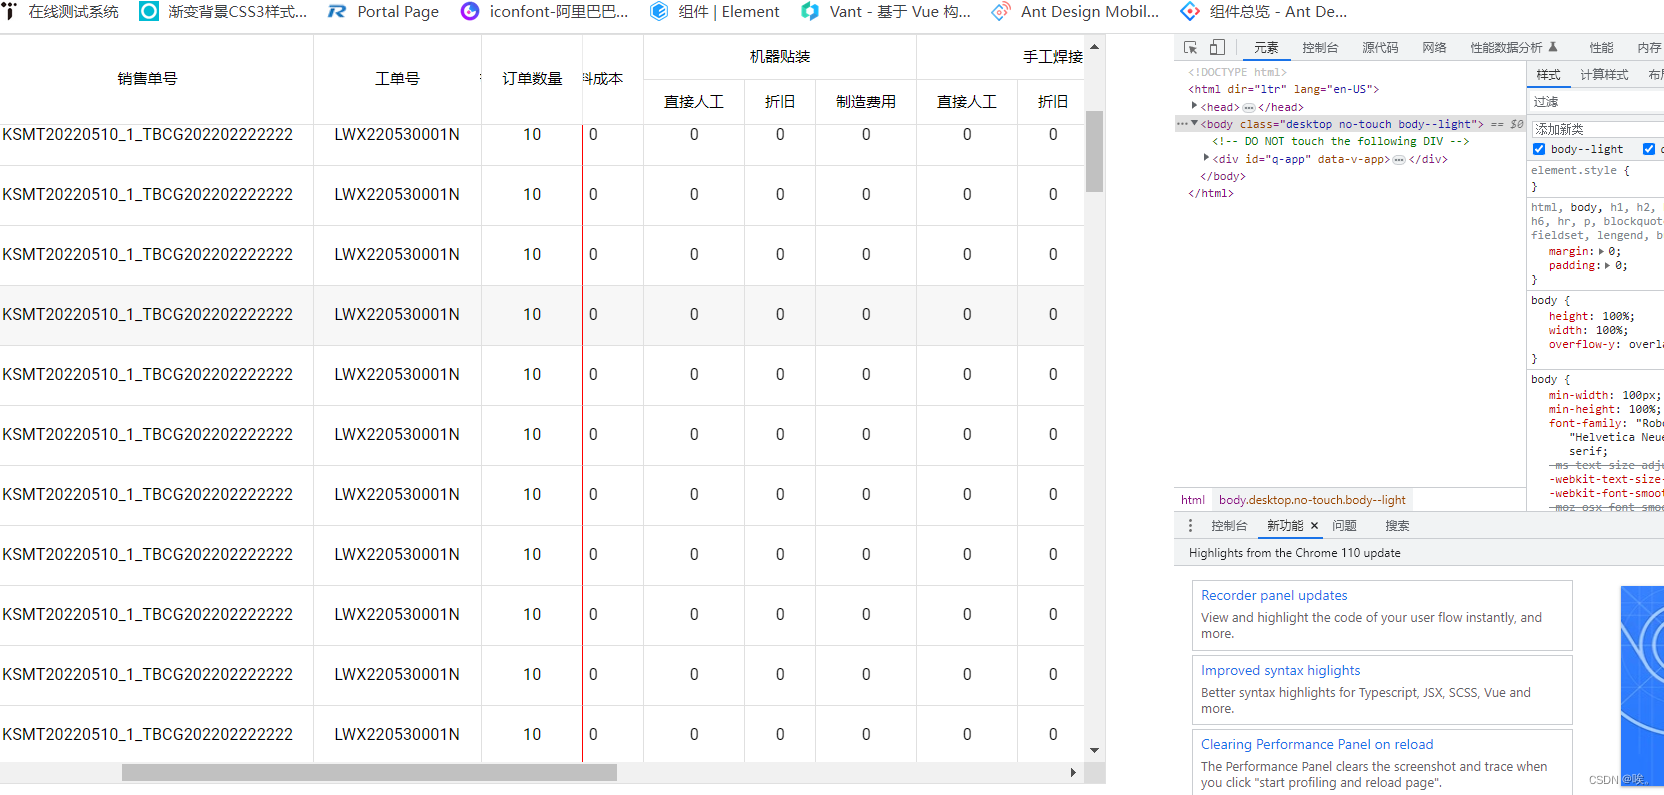
本质上是利用quasar v-slot:header 插槽 控制表头显示双表头。
- 原生 表格属性 rowspan colspan 达到 多级表头目的
- 动态表头同样在渲染表格前就动态设置好 quasar表格配置项
- 多列粘性标题/列 是利用dom原生在初始渲染位置 css控制每个位置
z-index控制层级
代码结构比较多,每个特殊位置都有注释,认真看一下大家都能懂, 适用于我目前项目所需,大家也可以灵活修改,虽然quasar表格比较弱,但是 tr td 组件 原生渲染 tr td标签 也灵活使用
数据区
// 默认列表头配置
export const tableColumns: any = [
  {
    name: 'sales_order',
    label: '销售单号',
    field: 'sales_order',
    align: 'center',
    // 原生跨行表格 属性
    rowspan: '2',
  },
  {
    name: 'prod_order',
    label: '工单号',
    field: 'prod_order',
    align: 'center',
    rowspan: '2',
  },
  {
    name: 'total_qty',
    align: 'center',
    label: '订单数量',
    field: 'total_qty',
    rowspan: '2',
  },
  {
    name: 'status',
    align: 'center',
    label: '订单状态',
    field: 'status',
    rowspan: '2',
  },
  {
    name: 'output_qty',
    align: 'center',
    label: '产出数',
    field: 'output_qty',
    rowspan: '2',
  },
  {
    name: 'material_cost',
    label: '材料成本',
    align: 'center',
    field: 'material_cost',
    rowspan: '2',
  },
];

// 模拟 接口获取的数据
export const res = {
  //多级表头下 -- 一级表头 枚举
  columns: [
    { code: '机器贴装', title: '机器贴装' },
    { code: '手工焊接', title: '手工焊接' },
    { code: '波峰焊', title: '波峰焊' },
    { code: '机箱线缆', title: '机箱线缆' },
    { code: '成品检验', title: '成品检验' },
  ],
  //多级表头下 -- 二级表头 枚举
  cost_items: [
    { code: '直接人工', title: '直接人工' },
    { code: '折旧', title: '折旧' },
    { code: '制造费用', title: '制造费用' },
  ],
  // 表格数据
  data: [
    {
      cost_item_code: '直接人工',
      fix_cost: 0,
      id: 129,
      material_cost: 0,
      output_qty: 0.06,
      prod_order: 'LWX220530001N',
      sales_order: 'KSMT20220510_1_TBCG202202222222',
      status: 'in_production',
      total_cost: 0,
      total_qty: 10,
      wc_code: '机器贴装',
      成品检验_制造费用_fix_cost: 0,
      成品检验_折旧_fix_cost: 0,
      成品检验_直接人工_fix_cost: 0,
      手工焊接_制造费用_fix_cost: 0,
      手工焊接_折旧_fix_cost: 0,
      手工焊接_直接人工_fix_cost: 0,
      机器贴装_制造费用_fix_cost: 0,
      机器贴装_折旧_fix_cost: 0,
      机器贴装_直接人工_fix_cost: 0,
      机箱线缆_制造费用_fix_cost: 0,
      机箱线缆_折旧_fix_cost: 0,
      机箱线缆_直接人工_fix_cost: 0,
      波峰焊_制造费用_fix_cost: 0,
      波峰焊_折旧_fix_cost: 0,
      波峰焊_直接人工_fix_cost: 0,
    },
  ],
};
使用表格组件配置
<script lang="ts" setup>
import { onMounted, reactive } from 'vue';
import { tableColumns, res } from './test';
import SecondaryPackagingTable from '../SecondaryPackagingTable.vue';

const state = reactive({
  data: <any>[],
  tableColumns: <any>[],
});

onMounted(() => {
  getData();
});

function getData() {
  //模拟 await下 数据请求
  let { columns, cost_items, data } = res;
  let summaryColumns = [...tableColumns]; //拷贝数据
  columns?.forEach((colum: { title: string; code: string }) => {
  	//push 表头
    summaryColumns.push({
      name: colum.code,
      label: colum.title,
      field: colum.code,
      align: 'center',
      style: 'display: none', //设置二级表头上一级 是不需要显示数据的 所以使用quasar配置 去掉
      colspan: cost_items.length, //根据 二级枚举控制跨列
    });
	//同时push 二级表头
    cost_items.forEach((res: { title: string }) => {
      summaryColumns.push({
        name: `${colum.title}_${res.title + '_fix_cost'}`,
        label: res.title,
        field: `${colum.title}_${res.title + '_fix_cost'}`,
        align: 'center',
      });
    });
  });

  summaryColumns.push({
    name: 'total',
    label: '合计',
    field: 'total_cost',
    align: 'center',
    rowspan: '2',
  });

  state.tableColumns = summaryColumns;
  state.data = data;
}
</script>
<template>
  <div class="" style="width: 900px; height: 600px; position: relative">
  	//使用组件
    <SecondaryPackagingTable
      :left="3" // 粘性列值
      :columns="state.tableColumns"
      :data="state.data"
    />
  </div>
</template>
封装表格组件
<script lang="ts" setup>
import { reactive, watchEffect } from 'vue';
/*
columns: quasar表头配置
data:quasar 表格数据
left: 控制粘性列 数量
*/
const props = defineProps(['columns', 'data', 'left']);
const state = reactive({
  columns: props.columns || [],
  tableData: props.data || [],
});
watchEffect(() => {
  state.columns = props.columns;
  state.tableData = props.data;
  //异步获取  触发函数 获取dom
  setTimeout(() => {
    stickyTitleFn();
  }, 100);
});

// 设置粘性标题函数
function stickyTitleFn() {
	//获取表格中一级表头
  let thead = <Array<HTMLElement>>(
    (<unknown>document.querySelectorAll('.q-table tr:first-child th'))
  );
  //获取表格中  tbody 所有 tr行
  let tbodyTr = <Array<HTMLElement>>(
    (<unknown>document.querySelectorAll('.q-table tbody tr'))
  );

  if (thead.length && props.left) {
    let num = props.left;
    for (let index = 0; index < num; index++) {
      //取出需要粘性表头的 dom元素
      let theadChild = thead[index];
	/*
	 设置 sticky-column-table 类下(position: sticky;) 的
	 left属性  每格位置
	 z-index  层级
	 最后一个 加 border-right 边框
	*/
      theadChild.style.left = `${theadChild.offsetLeft}px`;
      theadChild.style.zIndex = '10';
      // console.log(theadChild.offsetLeft, index);
      theadChild.classList.add('sticky-column-table');

      if (index == num - 1) {
        theadChild.style.borderRight = '1px solid #ebebeb';
      }
    }
    /*
     同理对 tbody  tr  粘性的td
	 设置 sticky-column-table 类下(position: sticky;) 的
	 left属性  每格位置
	 最后一个 加 border-right 边框
	*/
    tbodyTr.forEach((res) => {
      let tbodyTrChild = <Array<HTMLElement>>(<unknown>res.childNodes);
      tbodyTrChild.forEach((res, j) => {
      //判断粘性列数量td  阈值
        if (j < num) {
          res.classList.add('sticky-column-table');
          res.style.left = `${res.offsetLeft}px`;
        }
        if (j == num - 1) {
          res.style.borderRight = '1px solid #ebebeb';
        }
      });
    });
  }
}
</script>

<template>
  <q-table
    class="no-box-shadow"
    :rows="state.tableData"
    style="width: 100%; height: 100%"
    :columns="state.columns"
    row-key="name"
    separator="cell"
    virtual-scroll  //设置虚拟滚动 数据太多会导致dom渲染慢
    virtual-scroll-item-size="48"
    virtual-scroll-slice-size="20"
    square
    :rows-per-page-options="[0]"
    hide-bottom //隐藏下面分页栏 位置
    bordered
  >
    <template v-slot:header="props">
    //表格 表头 第一行  渲染配置 col.rowspan || col.colspan
      <q-tr :props="props" class="head">
        <template v-for="col in props.cols" :key="col.name">
          <q-th
            v-if="col.rowspan || col.colspan"
            :rowspan="col.rowspan"
            :colspan="col.colspan"
          >
            {{ col.label }}
          </q-th>
        </template>
      </q-tr>
      //表格 表头 第二行  渲染没有配置 !(col.rowspan || col.colspan)
      <q-tr :props="props" class="two-head">
        <template v-for="col in props.cols">
          <q-th
            :props="props"
            v-if="!(col.rowspan || col.colspan)"
            :key="col.name"
            :rowspan="col.rowspan"
            :colspan="col.colspan"
          >
            {{ col.label }}
          </q-th>
        </template>
      </q-tr>
    </template>
  </q-table>
</template>

<style lang="scss" scoped>
//控制表头行的高度
.head,
.two-head {
  height: 36px !important;
  background: #fff;
}

.q-table--cell-separator .two-head th:first-child {
  border-left: 1px rgb(235, 232, 232) solid !important;
}
:deep(.q-table tbody tr:last-child td) {
  border-bottom: 1px rgb(235, 232, 232) solid !important;
}
//粘性类
:deep(.sticky-column-table) {
  position: sticky;
  left: 0;
  z-index: 1;
  background: #fff;
  top: 0;
}

// 固定头
.q-table__container {
  height: 100%;
  max-height: calc(100vh - 90px);
  //控制 竖向滚动下 所有表头粘性
  thead tr th {
    position: sticky;
    z-index: 2;
    background: #fff;
  }
  //控制 竖向滚动下 第一行表头位置
  thead tr:first-child th {
    top: 0;
  }
  //控制 竖向滚动下 第二行表头位置
  thead tr:nth-child(2) th {
    top: 36px;
  }
}
</style>


 775
775

 被折叠的 条评论
为什么被折叠?
被折叠的 条评论
为什么被折叠?
 到【灌水乐园】发言


