【Unity2D:C#Script】为角色添加受伤效果

一、创建尖刺预制体

1. 在prefabs文件夹新建一个尖刺预制体,并添加到场景面板上

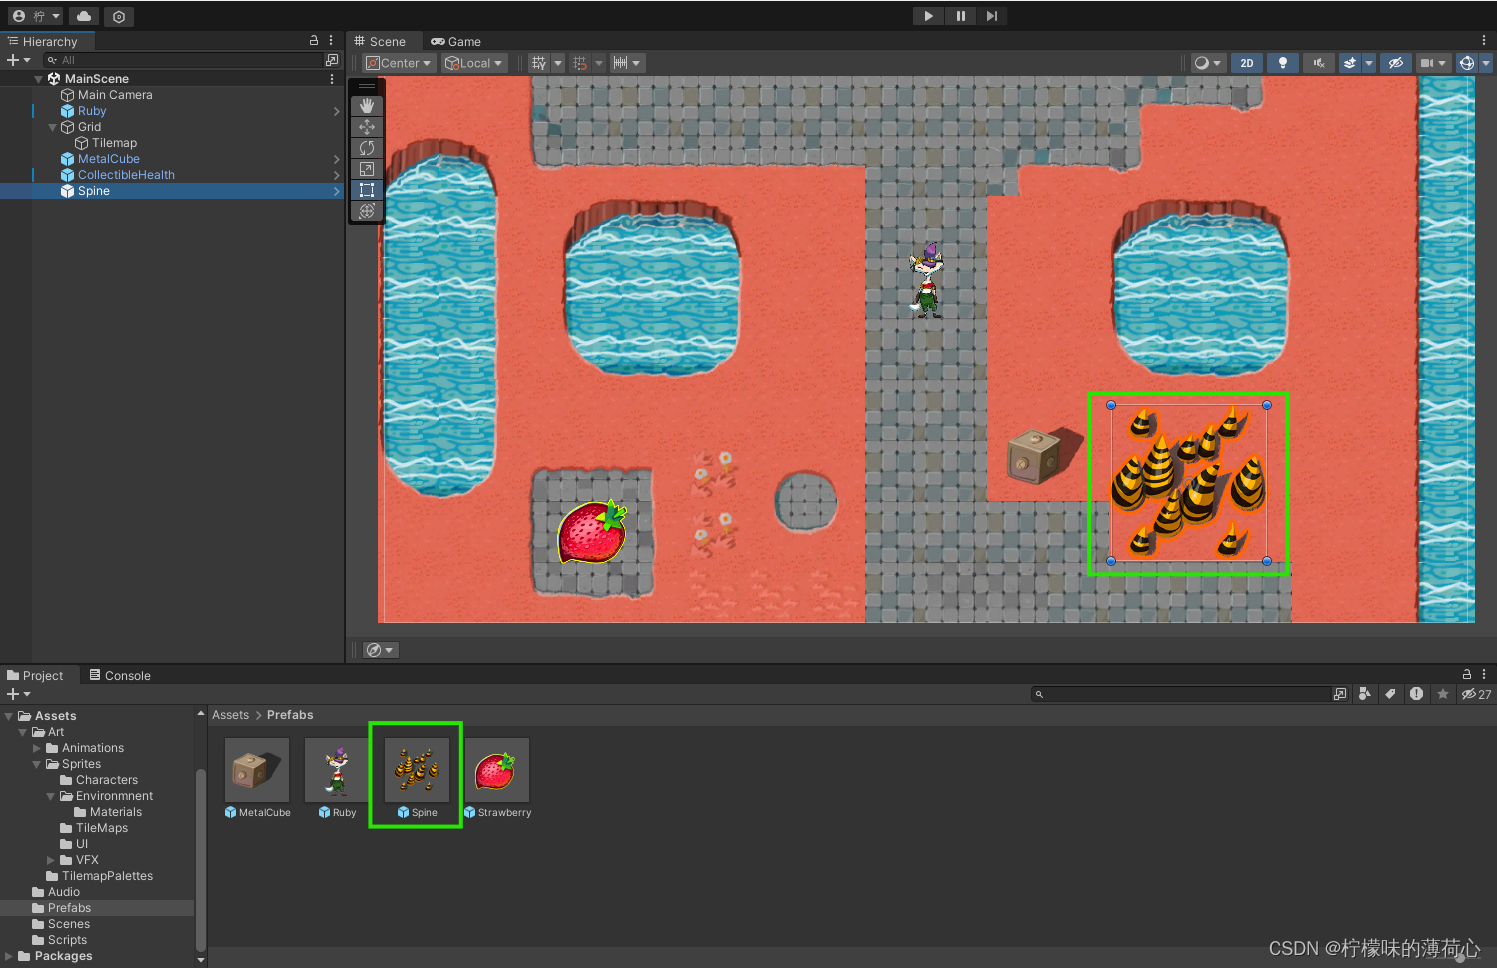
2. 为尖刺预制体添加Box Collider 2D组件,设置碰撞体积,设置属性IsTrigger为true

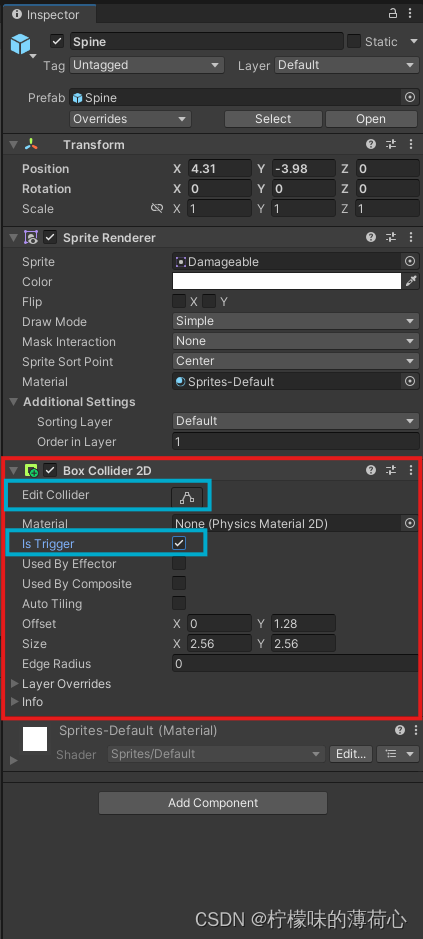
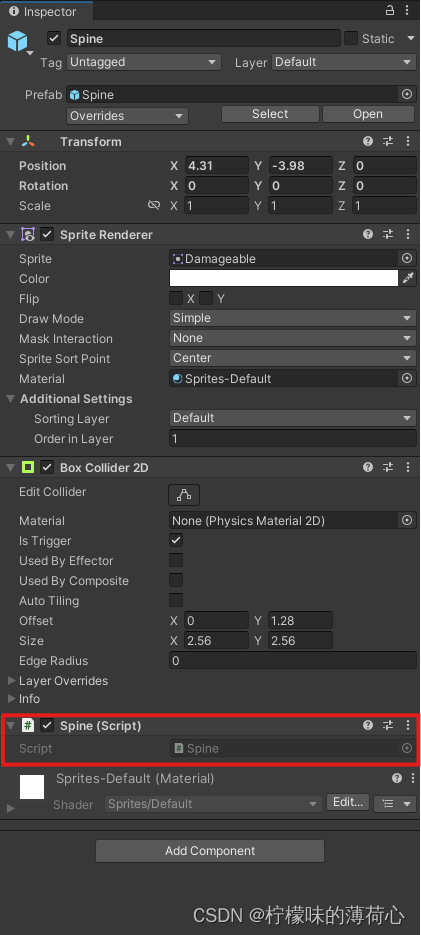
3. 在Scripts文件夹新建一个Spine脚本,并添加到尖刺预制体上

二、编辑Ruby脚本

        详情见:【Unity2D:C#Script】为角色添加回血效果 

using Cinemachine.Utility;
using System.Collections;
using System.Collections.Generic;
using Unity.Mathematics;
using UnityEditor.Rendering;
using UnityEngine;

public class Ruby : MonoBehaviour {

    public int maxHealthPoint = 100;
    public int healthPoint;
    private int speed = 5;
    // 创建rb2d对象
    private Rigidbody2D rb2d;

    void Start() {
        // 设置游戏的帧率为60帧
        Application.targetFrameRate = 60;
        healthPoint = maxHealthPoint;
        // 用rb2d接收Rigidbody组件
        rb2d = GetComponent<Rigidbody2D>();
    }

    void Update() {
        // 创建float型Horizontal变量和Vertical变量,用来接受键盘输入
        float horizontal = Input.GetAxis("Horizontal");
        float vertical = Input.GetAxis("Vertical");
        // 创建一个二维变量position来存储Rigidbody2D组件中的坐标
        Vector2 position = transform.position;

        // 控制Ruby移动
        position.x += horizontal * speed * Time.deltaTime;
        position.y += vertical * speed * Time.deltaTime;

        /*transform.position = position;*/
        rb2d.MovePosition(position);
    }

    public void changeHealthPoint(int value) {
        healthPoint = Mathf.Clamp(healthPoint+value, 0, maxHealthPoint);
        Debug.Log("HP:" + healthPoint + " / " + maxHealthPoint);
    }

}

三、编辑Spine脚本

1. 仿照上一章的内容,Spine脚本代码为:

using System.Collections;
using System.Collections.Generic;
using UnityEngine;

public class Spine : MonoBehaviour
{
    private void OnTriggerEnter2D(Collider2D collision) {
        Ruby ruby = collision.GetComponent<Ruby>();
        if(ruby != null) {
            if(ruby.healthPoint < ruby.maxHealthPoint) {
                ruby.changeHealthPoint(-40);
                Destroy(gameObject);
            }
        }
    }
}

2. 因为尖刺不是消耗品,和Ruby发生碰撞后不会消失,因此可以删除Destory()方法。同时无论Ruby是否满血,碰到尖刺都会损失生命值,因此也可以删掉判断Ruby是否满血的if条件语句

using System.Collections;
using System.Collections.Generic;
using UnityEngine;

public class Spine : MonoBehaviour
{
    private void OnTriggerEnter2D(Collider2D collision) {
        Ruby ruby = collision.GetComponent<Ruby>();
        if(ruby != null) {
            ruby.changeHealthPoint(-40);
        }
    }
}

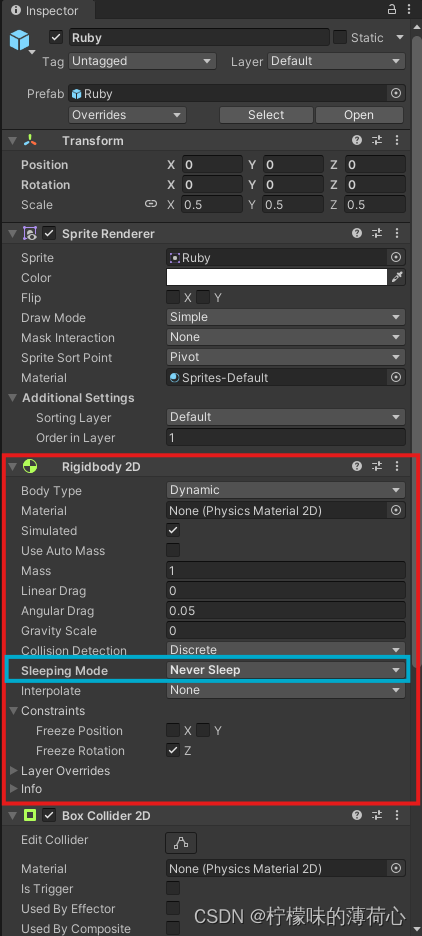
3. 测试后发现,只有当Ruby进入尖刺时才会损失生命值,而我们想要的效果是只要Ruby在尖刺范围内就持续掉血。此时,需要将OnTriggerEnter2D()方法替换为OnTriggerStay2D()方法。与此同时,还需要将Ruby的Rigidbody 2D组件的SleepMode属性设置为Never Sleep,否则当Ruby不移动时将无法出发碰撞检测

using System.Collections;
using System.Collections.Generic;
using UnityEngine;

public class Spine : MonoBehaviour
{
    private void OnTriggerStay2D(Collider2D collision) {
        Ruby ruby = collision.GetComponent<Ruby>();
        if(ruby != null) {
            ruby.changeHealthPoint(-40);
        }
    }
}


四、为主角添加无敌时间 

1. 修改后,Ruby虽然可以在尖刺范围内持续掉血,可是Ruby的血量在一瞬间就减到了0,是因为OnTriggerStay2D()方法每帧都执行一次,相当于每秒执行60次。因此我们需要给Ruby脚本添加无敌时间。首先添加三个变量:整型常量InvincibleTime(用const关键字来创建常量),是无敌状态的持续时间;浮点型变量invinibleTimer,作为计算无敌时间冷却的计时器;布尔变量isInvinible,表示现在是否处于无敌状态

using Cinemachine.Utility;
using System.Collections;
using System.Collections.Generic;
using Unity.Mathematics;
using UnityEditor.Rendering;
using UnityEngine;

public class Ruby : MonoBehaviour {

    // Ruby基础属性
    public int maxHealthPoint = 100;
    public int healthPoint;
    private int speed = 5;
    // 无敌时间
    public const int InvincibleTime = 2;
    public double invinibleTimer;
    public bool isInvinible;
    // 创建rb2d对象
    private Rigidbody2D rb2d;

    void Start() {
        // 设置游戏的帧率为60帧
        Application.targetFrameRate = 60;
        healthPoint = maxHealthPoint;
        // 用rb2d接收Rigidbody组件
        rb2d = GetComponent<Rigidbody2D>();
    }

    void Update() {
        // 创建float型Horizontal变量和Vertical变量,用来接受键盘输入
        float horizontal = Input.GetAxis("Horizontal");
        float vertical = Input.GetAxis("Vertical");
        // 创建一个二维变量position来存储Rigidbody2D组件中的坐标
        Vector2 position = transform.position;

        // 控制Ruby移动
        position.x += horizontal * speed * Time.deltaTime;
        position.y += vertical * speed * Time.deltaTime;

        rb2d.MovePosition(position);
    }

    public void changeHealthPoint(int value) {
        healthPoint = Mathf.Clamp(healthPoint+value, 0, maxHealthPoint);
        Debug.Log("HP:" + healthPoint + " / " + maxHealthPoint);
    }

}

2. 在Start()方法中初始化变量invinibleTimer和isInvinible;在Update()方法中判断isInvinible是否为true,若为true,invinibleTimer将每秒减少1,当invinibleTimer减到小于0时,说明无敌状态已经结束,设置isInvinible的值为false

using Cinemachine.Utility;
using System.Collections;
using System.Collections.Generic;
using Unity.Mathematics;
using UnityEditor.Rendering;
using UnityEngine;

public class Ruby : MonoBehaviour {

    // Ruby基础属性
    public int maxHealthPoint = 100;
    public int healthPoint;
    private int speed = 5;
    // 无敌时间
    public const int InvincibleTime = 2;
    public double invinibleTimer;
    public bool isInvinible;
    // 创建rb2d对象
    private Rigidbody2D rb2d;

    void Start() {
        // 设置游戏的帧率为60帧
        Application.targetFrameRate = 60;
        // 用rb2d接收Rigidbody组件
        rb2d = GetComponent<Rigidbody2D>();
        // 初始化变量
        healthPoint = maxHealthPoint;
        invinibleTimer = 0;
    }

    void Update() {
        // 创建float型Horizontal变量和Vertical变量,用来接受键盘输入
        float horizontal = Input.GetAxis("Horizontal");
        float vertical = Input.GetAxis("Vertical");
        // 创建一个二维变量position来存储Rigidbody2D组件中的坐标
        Vector2 position = transform.position;

        // 控制Ruby移动
        position.x += horizontal * speed * Time.deltaTime;
        position.y += vertical * speed * Time.deltaTime;
        rb2d.MovePosition(position);

        // 无敌时间计时器
        if(isInvinible == true) {
            invinibleTimer -= Time.deltaTime;
            if(invinibleTimer < 0) {
                isInvinible = false;
            }
        }
    }

    public void changeHealthPoint(int value) {
        healthPoint = Mathf.Clamp(healthPoint+value, 0, maxHealthPoint);
        Debug.Log("HP:" + healthPoint + " / " + maxHealthPoint);
    }

}

        注:Time.deltaTime等于每帧的秒数,每秒调用的次数(等于帧数)*  每帧的秒数=1秒,因此invinibleTimer -= Time.deltaTime的含义就是invinibleTimer的值每秒减少1

3. 打开Spine脚本,给减少生命值的语句加一层if条件语句,同时设置invinibleTimer和invinibleTimer的值

using System.Collections;
using System.Collections.Generic;
using UnityEngine;

public class Spine : MonoBehaviour
{
    private void OnTriggerStay2D(Collider2D collision) {
        Ruby ruby = collision.GetComponent<Ruby>();
        if(ruby != null) {
            if(ruby.isInvinible == false) {
                ruby.changeHealthPoint(-40);
                ruby.invinibleTimer = 2;
                ruby.isInvinible = true;
            }
        }
    }
}

        进入Unity,可以看到Ruby的无敌效果已经制作完成,本章完。 

  • 33
    点赞
  • 17
    收藏
    觉得还不错? 一键收藏
  • 1
    评论
Acknowledgments xiii Introduction xv 1. Making Games the Modular Way 1 1.1 Important Programming Concepts.....................................2 1.1.1 Manager and Controller Scripts...............................2 1.1.2 Script Communication.......................................3 1.1.3 Using the Singleton Pattern in Unity...........................5 1.1.4 Inheritance.................................................6 1.1.5 Where to Now?.............................................8 2. Building the Core Game Framework 9 2.1 Controllers and Managers............................................11 2.1.1 Controllers................................................11 2.1.2 Managers.................................................11 2.2 Building the Core Framework Scripts..................................11 2.2.1 BaseGameController.cs.....................................12 2.2.1.1 Script Breakdown................................14 viii Contents 2.2.2 Scene Manager.............................................17 2.2.2.1 Script Breakdown................................17 2.2.3 ExtendedCustomMonoBehavior.cs...........................19 2.2.4 BaseUserManager.cs........................................20 2.2.4.1 Script Breakdown................................22 2.2.5 BasePlayerManager.cs.......................................22 2.2.5.1 Script Breakdown................................23 2.2.6 BaseInputController.cs......................................24 2.2.6.1 Script Breakdown................................26 3. Player Structure 29 3.1 Game-Specific Player Controller......................................31 3.2 Dealing with Input..................................................32 3.3 Player Manager.....................................................35 3.3.1 Script Breakdown..........................................36 3.4 User Data Manager (Dealing with Player Stats Such as Health, Lives, etc.)....37 3.4.1 Script Breakdown..........................................39 4. Recipes: Common Components 41 4.1 Introduction.......................................................41 4.2 The Timer Class....................................................43 4.2.1 Script Breakdown..........................................45 4.3 Spawn Scripts......................................................48 4.3.1 A Simple Spawn Controller..................................49 4.3.1.1 Script Breakdown................................52 4.3.2 Trigger Spawner...........................................56 4.3.3 Path Spawner..............................................57 4.3.3.1 Script Breakdown................................61 4.4 Set Gravity.........................................................66 4.5 Pretend Friction—Friction Simulation to Prevent Slipping Around........66 4.5.1 Script Breakdown..........................................68 4.6 Cameras. . . . . . . . . . . . . . . . . . . . . . . . . . . . . . . . . . . . . . . . . . . . . . . . . . . . . . . . . . .68 4.6.1 Third-Person Camera.......................................69 4.6.1.1 Script Breakdown................................71 4.6.2 Top-Down Camera.........................................74 4.6.2.1 Script Breakdown................................74 4.7 Input Scripts.......................................................75 4.7.1 Mouse Input...............................................75 4.7.1.1 Script Breakdown................................76 4.7.2 Single Axis Keyboard Input.................................78 4.8 Automatic Self-Destruction Script.....................................79 4.8.1 Script Breakdown..........................................79 4.9 Automatic Object Spinner............................................79 4.9.1 Script Breakdown..........................................80 ix Contents 4.10 Scene Manager.....................................................81 4.10.1 Script Breakdown..........................................82 5. Building Player Movement Controllers 85 5.1 Shoot ’Em Up Spaceship.............................................85 5.2 Humanoid Character................................................91 5.2.1 Script Breakdown..........................................96 5.3 Wheeled Vehicle...................................................106 5.3.1 Script Breakdown.........................................109 5.3.2 Wheel Alignment.........................................114 5.3.3 Script Breakdown.........................................116 6. Weapon Systems 121 6.1 Building the Scripts................................................122 6.1.1 BaseWeaponController.cs..................................122 6.1.1.1 Script Breakdown...............................127 6.1.2 BaseWeaponScript.cs......................................134 6.1.2.1 Script Breakdown...............................138 7. Recipe: Waypoints Manager 143 7.1 Waypoint System..................................................143 8. Recipe: Sound Manager 157 8.1 The Sound Controller...............................................158 8.1.1 Script Breakdown.........................................160 8.2 The Music Player...................................................163 8.2.1 Script Breakdown.........................................165 8.3 Adding Sound to the Weapons.......................................167 9. AI Manager 169 9.1 The AI State Control Script..........................................171 9.2 The Base AI Control Script. . . . . . . . . . . . . . . . . . . . . . . . . . . . . . . . . . . . . . . . . .172 9.2.1 Script Breakdown.........................................185 9.3 Adding Weapon Control to the AI Controller..........................206 9.3.1 Script Breakdown.........................................210 10. Menus and User Interface 215 10.1 The Main Menu....................................................215 10.1.1 Script Breakdown.........................................223 10.2 In-Game User Interface.............................................231 x Contents 11. Dish: Lazer Blast Survival 233 11.1 Main Menu Scene..................................................235 11.2 Main Game Scene..................................................236 11.3 Prefabs...........................................................237 11.4 Ingredients........................................................238 11.5 Game Controller...................................................239 11.5.1 Script Breakdown.........................................243 11.6 Player Controller...................................................250 11.6.1 Script Breakdown.........................................253 11.7 Enemies..........................................................259 11.7.1 Script Breakdown.........................................260 11.8 Wave Spawning and Control........................................261 11.8.1 Script Breakdown.........................................263 11.9 Wave Properties...................................................265 11.10 Weapons and Projectiles. . . . . . . . . . . . . . . . . . . . . . . . . . . . . . . . . . . . . . . . . . ..266 11.11 User Interface.....................................................266 11.11.1 Script Breakdown.........................................267 12. Dish: Metal Vehicle Doom 271 12.1 Main Menu Scene..................................................272 12.2 Main Game Scene..................................................272 12.2.1 Prefabs...................................................275 12.3 Ingredients........................................................275 12.3.1 Game Controller..........................................276 12.3.1.1 Script Breakdown...............................282 12.3.2 Race Controller...........................................291 12.3.2.1 Script Breakdown...............................297 12.3.3 Global Race Manager......................................306 12.3.3.1 Script Breakdown...............................311 12.3.4 Vehicle/Custom Player Control.............................318 12.3.4.1 Script Breakdown...............................327 12.3.5 User Interface.............................................344 13. Dish: Making the Game Tank Battle 345 13.1 Main Game Scene..................................................347 13.2 Prefabs...........................................................349 13.3 Ingredients........................................................349 13.4 Game Controller...................................................350 13.4.1 Script Breakdown.........................................356 13.5 Battle Controller...................................................361 13.5.1 Script Breakdown.........................................363 13.6 Global Battle Manager..............................................364 13.6.1 Script Breakdown.........................................368 13.7 Players............................................................373 13.7.1 Script Breakdown.........................................382 xi Contents 13.8 AI Chasing with SetAIChaseTargetBasedOnTag.cs.....................383 13.8.1 Script Breakdown.........................................385 14. Dish: Making the Game Interstellar Paranoids 389 14.1 Main Menu.......................................................392 14.2 Game Scenes......................................................392 14.3 Prefabs...........................................................393 14.3.1 Ingredients...............................................394 14.3.2 Game Controller..........................................395 14.3.2.1 Script Breakdown...............................401 14.3.3 Player Spaceship..........................................411 14.3.3.1 Script Breakdown...............................415 14.3.4 Enemies..................................................423 14.3.4.1 Script Breakdown...............................424 14.3.5 Waypoint Follower........................................426 14.3.5.1 Script Breakdown...............................427 Final Note 429 xiii I would like to thank my wife for all the encouragement, support, and nice cups of tea. I would also like to thank my mum and dad, my brother Steve, and everyone else who knows me. Sophie cat, be nice to the boys. Sincere thanks go to the many people who positively influence my life directly or indirectly: Michelle Ashton, Brian Robbins, George Bray, Nadeem Rasool, Christian Boutin, James and Anna, Rich and Sharon, Liz and Peter, Rob Fearon (the curator of all things shiny), everyone on Twitter who RTs my babble (you know who you are, guys!), Matthew Smith (the creator of Manic Miner), David Braben, Tōru Iwatani, and anyone who made Atari games in the 1980s. I would like to thank everyone at AK Peters/CRC Press for the help and support and for publishing my work. Finally, a massive thank you goes out to you for buying this book and for wanting to do something as cool as to make games. I sincerely hope this book helps your gamemaking adventures—feel free to tell me about them on Twitter @psychicparrot or drop by my website at http://www.psychicparrot.com. Acknowledgments xv As I was starting out as a game developer, as a self-taught programmer my skills took a while to reach a level where I could achieve what I wanted. Sometimes I wanted to do things that I just didn’t have yet the technical skills to achieve. Now and again, software packages came along that could either help me in my quest to make games or even make full games for me; complete game systems such as the Shoot ’Em-Up Construction Kit (aka SEUCK) from Sensible Software, Gary Kitchen’s GameMaker, or The Quill Adventure System could bring to life the kinds of games that went way beyond anything that my limited programming skills could ever dream of building. The downside to using game creation software was that it was tailored to create games within their chosen specific genre. If I wanted to do something outside of the limitations of the software, the source code was inaccessible and there was no way to extend or modify it. When that happened, I longed for a modular code-based system that I could plug together to create different types of games but modify parts of it without having to spend a lot of time learning how the entire system internals work—building block game development that I could actually script and modify if I needed to. After completing my first book, Game Development for iOS with Unity3D, I wanted to follow up by applying a modular style of game building to Unity3D that would provide readers with a highly flexible framework to create just about any kind of game by “plugging in” the different script components. My intention was to make a more technical second book, based on C# programming, that would offer extensibility in any direction a developer might require. In essence, what you are holding in your hands right now is a cookbook Introduction xvi Introduction for game development that has a highly flexible core framework for just about any type of game. A lot of the work I put in at the start of writing this book was in designing a framework that not only made sense in the context of Unity but also could easily cope with the demands of different genres. Prerequisites You can get up and running with the required software for the grand total of zero dollars. Everything you need can be downloaded free of charge with no catches. You may want to consider an upgrade to Unity Pro at some point in the future, to take advantage of some of its advanced features, but to get started all you need to do is grab the free version from the Unity website. Unity Free or Unity Pro (available from the Unity store at http://www.unity3d.com) Unity Free is completely free for anyone or any company making less than $100,000 per year—it may be downloaded for no charge at all, and you don’t even need a credit card. It’s a really sweet deal! We are talking about a fully functional game engine, ready to make 3D or 2D games that may be sold commercially or otherwise. There are no royalties to pay, either. Unity Pro adds a whole host of professional functionality to the engine, such as render culling and profiling. If you are a company with more than $100,000 per year of turnover, you will need a Pro license, but if you find that Unity Free doesn’t pack quite enough power, you may also want to consider going Pro. You can arrange a free trial of the Pro version right from the Unity website to try before you buy. If the trial licence runs out before you feel you know enough to make a purchase, contact Unity about extending it and they are usually very friendly and helpful about it (just don’t try using a trial license for 6 months at a time, as they may just figure it out!). C# programming knowledge Again, to reiterate this very important point, this is nota book about learning how to program. You will need to know some C#, and there are a number of other books out there for that purpose, even if I have tried to make the examples as simple as possible! This book is about making games, not about learning to program. What This Book Doesn’t Cover This is not a book about programming and it is not a book about the right or wrong way to do things. We assume that the reader has some experience with the C# programming language. I am a self-taught programmer, and I understand that there may well be better ways to do things. xvii Introduction This is a book about concepts, and it is inevitable that there will be better methods for achieving some of the same goals. The techniques and concepts offered in this book are meant to provide solid foundation, not to be the final word on any subject. It is the author’s intention that, as you gain your own experiences in game development, you make your own rules and draw your own conclusions. Additional material is available from the CRC Press Web site: http://www.crcpress. com/product/isbn/9781466581401. 1 1 Making Games the Modular Way When I first started making games, I would approach development on a project-to-project basis, recoding and rebuilding everything from scratch each time. As I became a professional developer, landing a job at a game development studio making browser-based games, I was lucky enough to work with a guy who was innovating the scene. He was a master at turning out great games (both visually and gameplay-wise) very quickly. One secret to his success lay in the development of a reusable framework that could easily be refactored to use on all of his projects. His framework was set up to deal with server communication, input handling, browser communication, and UI among other things, saving an incredible amount of time in putting together all of the essentials. By reusing the framework, it allowed more time for him and his team to concentrate on great gameplay and graphics optimization, resulting in games that, at the time, blew the competition away. Of course, the structure was tailored to how he worked (he did build it, after all), and it took me a while to get to grips with his style of development; but once I did, it really opened my eyes. From then on, I used the framework for every project and even taught other programmers how to go about using it. Development time was substantially reduced, which left more time to concentrate on making better games. This book is based on a similar concept of a game-centric framework for use with many different types of games, rather than a set of different games in different styles. The overall goal of this book is to provide script-based components that you can use within that framework to make a head start with your own projects in a way that reduces recoding, repurposing, or adaptation time. 2 1. Making Games the Modular Way In terms of this book as a cookbook, think of the framework as a base soup and the scripting components as ingredients. We can mix and match script components from different games that use the same framework to make new games, and we can share several of the same core scripts in many different games. The framework takes care of the essentials, and we add a little “glue” code to pull everything together the way we want it all to work. This framework is, of course, optional, but you should spend some time familiarizing yourself with it to help understand the book. If you intend to use the components in this book for your own games, the framework may serve either as a base to build your games on or simply as a tutorial test bed for you to rip apart and see how things work. Perhaps you can develop a better framework or maybe you already have a solid framework in place. If you do, find a way to develop a cleaner, more efficient framework or even a framework that isn’t quite so efficient but works better with your own code, and do it. In this chapter, we start by examining some of the major programming concepts used in this book and look at how they affect the design decisions of the framework. 1.1 Important Programming Concepts I had been programming in C# for a fairly long time before I actually sat down and figured out some of the concepts covered in this chapter. It was not because of any particular problem or difficulty with the concepts themselves but more because I had solved the problems in a different way that meant I had no real requirement to learn anything new. For most programmers, these concepts will be second nature and perhaps something taught in school, but I did not know how important they could be. I had heard about things like inheritance, and it was something I put in the to-do list, buried somewhere under “finish the project.” Once I took the time to figure them out, they saved me a lot of time and led to much cleaner code than I would have previously pulled together. If there’s something you are unsure about, give this chapter a read-through and see whether you can work through the ideas. Hopefully, they may save some of you some time in the long run. 1.1.1 Manager and Controller Scripts I am a strong believer in manager and controller scripts. I like to try and split things out into separate areas; for example, in the Metal Vehicle Doomgame, I have race controller scripts and a global race controller script. The race controller scripts are attached to the players and track their positions on the track, waypoints, and other relevant player-specific race information. The global race controller script talks to all the race controller scripts attached to the players to determine who is winning and when the race starts or finishes. By keeping this logic separate from the other game scripts and contained in their own controller scripts, it makes it easier to migrate them from project to project. Essentially, I can take the race controller and global race controller scripts out of the game and apply them to another game, perhaps one that features a completely different type of gameplay— for example, alien characters running around a track instead of cars. As long as I apply the correct control scripts, the race logic is in place, and I can access it in the new game. In the framework that this book contains, there are individual manager and controller scripts dealing with user data, input, game functions, and user interface. We look at those in detail in Chapter 2, but as you read this chapter, you should keep in mind the idea of separated scripts dedicated to managing particular parts of the game structure. It was 3 1.1 Important Programming Concepts important to me to design scripts as standalone so that they may be used in more than one situation. For example, our weapon slot manager will not care what kind of weapon is in any of the slots. The weapon slot manager is merely an interface between the player and the weapon, taking a call to “fire” and responding to it by telling the weapon in the currently selected weapon slot to fire. What happens on the player end will not affect the slot manager just as anything that happens with the weapon itself will not affect the slot manager. It just doesn’t care as long as your code talks to it in the proper way and as long as your weapons receive commands in the proper way. It doesn’t even matter what type of object the slot manager is attached to. If you decide to attach the weapon slot manager to a car, a boat, a telegraph pole, etc., it doesn’t really matter just as long as when you want them to fire, you use the correct function in the slot manager to get it to tell a weapon to fire. Since our core game logic is controlled by manager and controller scripts, we need to be a little smart about how we piece everything together. Some manager scripts may benefit from being static and available globally (for all other scripts to access), whereas others may be better attached to other scripts. We deal with these on a case-by-case basis. To get things started, we will be looking at some of the ways that these manager scripts can communicate with each other. As a final note for the topic in this section, you may be wondering what the difference is between managers and controllers. There really isn’t all that much, and I have only chosen to differentiate for my own sanity. I see controllers as scripts that are larger global systems, such as game state control, and managers as smaller scripts applied to gameObjects, such as weapon slot management or physics control. The terms are applied loosely, so don’t worry if there appear to be inconsistencies in the application of the term in one case versus another. I’ll try my best to keep things logical, but that doesn’t mean it’ll always make sense to everyone else! 1.1.2 Script Communication An important part of our manager- and component-based structures is how our scripts are going to communicate with each other. It is inevitable that we will need to access our scripts from a multitude of other areas of the game, which means we should try to provide interfaces that make the most sense. There are several different ways of communicating between scripts and objects in Unity: 1. Direct referencing manager scripts via variables set in the editor by the Inspector window. The easiest way to have your scripts talk to each other is to have direct references to them in the form of public variables within a class. They are populated in the Unity editor with a direct link to another script. Here is an example of direct referencing: public void aScript otherScript; In the editor window, the Inspector shows the otherScript field. We drag and drop an object containing the script component that we want to talk to. Within the class, function calls are made directly on the variable, such as otherScript.DoSomething(); 4 1. Making Games the Modular Way 2. GameObject referencing using SendMessage. SendMessage is a great way to send a message to a gameObject and call a function in one of its attached scripts or components when we do not need any kind of return result. For example, SomeGameObject.SendMessage("DoSomething"); SendMessage may also take several parameters, such as setting whether or not the engine should throw an error when there is no receiver, that is, no function in any script attached to the gameObject with a name matching the one in the SendMessage call. (SendMessageOptions). You can also pass one parameter into the chosen function just as if you were passing it via a regular function call such as SomeGameObject.SendMessage("AddScore",2); SomeGameObject.SendMessage("AddScore", SendMessageOptions.RequireReceiver); SomeGameObject.SendMessage("AddScore", SendMessageOptions.DontRequireReceiver); 3. Static variables. The static variable type is useful in that it extends across the entire system; it will be accessible in every other script. This is a particularly useful behavior for a game control script, where several different scripts may want to communicate with it to do things such as add to the player’s score, lose a life, or perhaps change a level. An example declaration of a static variable might be private static GameController aController; Although static variables extend across the entire program, you can have private and public static variables. Things get a little tricky when you try to understand the differences between public and private static types—I was glad to have friends on Twitter that could explain it all to me, so let me pass on what I was told: Public static A public static variable exists everywhere in the system and may be accessed from other classes and other types of script. Imagine a situation where a player control script needs to tell the game controller script whenever a player picks up a banana. We could deal with it like this: 1. In our gamecontroller.cs game controller script, we set up a public static: public static GameController gateway; 2. When the game controller (gamecontroller.cs) runs its Start() function, it stores a reference to itself in a public static variable like this: gateway = this; 3. In any other class, we can now access the game controller by referring to its type followed by that static variable (GameController.gateway) such as GameController.gateway.GotBanana(); 5 1.1 Important Programming Concepts Private static A private static variable exists within the class it was declared and in any other instances of the same class. Other classes/types of script will not be able to access it. As a working example, try to imagine that a script named player.cs directly controls player objects in your game. They all need to tell a player manager script when something happens, so we declare the player manager as a static variable in our player.cs script like this: private static PlayerManager playerManager; The playerManager object only needs to be set up once, by a single instance of the player class, to be ready to use for all the other instances of the same class. All player.cs scripts will be able to access the same instance of the PlayerManager. 4. The singleton design pattern. In the previous part of this section, we looked at using a static variable to share a manager script across the entire game code. The biggest danger with this method is that it is possible to create multiple instances of the same script. If this happens, you may find that your player code is talking to the wrong instance of the game controller. A singletonis a commonly used design pattern that allows for only one instance of a particular class to be instantiated at a time. This pattern is ideal for our game scripts that may need to communicate (or be communicated with) across the entire game code. Note that we will be providing a static reference to the script, exactly as we did in the “Static Variables” method earlier in this section, but in implementing a singleton class, we will be adding some extra code to make sure that only one instance of our script is ever created. 1.1.3 Using the Singleton Pattern in Unity It is not too difficult to see how useful static variables can be in communication between different script objects. In the public static example cited earlier, the idea was that we had a game controller object that needed to be accessed from one or more other scripts in our game. The method shown here was demonstrated on the Unity public wiki*by a user named Emil Johansen (AngryAnt). It uses a private static variable in conjunction with a public static function. Other scripts access the public function to gain access to the private static instance of this script, which is returned via the public function so that only one instance of the object will ever exist in a scene regardless of how many components it is attached to and regardless of how many times it is instantiated. A simple singleton structure: public class MySingleton { private static MySingleton instance; public MySingleton () *http://wiki.unity3d.com/index.php/Singleton. 6 1. Making Games the Modular Way { if (instance != null) { Debug.LogError ("Cannot have two instances of singleton."); return; } instance = this; } public static MySingleton Instance { get { if (instance == null) { new MySingleton (); } return instance; } } } The singleton instance of our script may be accessed anywhere, by any script, simply with the following syntax: MySingleton.Instance.MySingletonMember; 1.1.4 Inheritance Inheritanceis a complex concept, which demands some explanation here because of its key role within the scripts provided in this book. Have a read through this section, but don’t worry if you don’t pick up inheritance right away. Once we get to the programming, it will most likely become clear. The bottom line is that inheritance is used in programming to describe a method of providing template scripts that may be overridden, or added to, by other scripts. As a metaphor, imagine a car. All cars have four wheels and an engine. The types of wheels may vary from car to car, as will the engine, so when we say “this is a car” and try to describe how our car behaves, we may also describe the engine and wheels. These relationships may be shown in a hierarchical order: Car -Wheels -Engine Now try to picture this as a C# script: Car class Wheels function Engine function 7 1.1 Important Programming Concepts
Key Features Learn to build exciting 2D Games using Unity's robust set of tools, Get to know the new Unity UI system and learn all about cameras, animation, movement, and more Enable yourself to structure and manage a Unity project from beginning to end, by tapping into the wisdom and experience of seasoned game development veterans Book Description Prepare yourself to travel back to the 90s and build a game like they used to make, using today's technology. That's right-we're talking about making 2D games using Unity! This book will help you build 2D games in Unity using the engine's 2D technologies based on Version 5.x. You'll learn the basics of importing assets and building foundation technology all the way up to full combat and boss battles! With the book's straightforward and practical approach, each chapter takes you a step closer to the final game. We will wrap things up by creating a dynamic gameplay, using algorithms to spawn enemies and organize them. Once you reach the end and have integrated a final battle, you can go back to the challenges included in each chapter and use them to improve the game and your 2D game development skills! What you will learn Build a 2D game using Unity 5.x's native 2D technologies Set up and import assets for 2D game development Create a script that works in the 2D space Design the development and deployment of state systems for object management Use C# events and delegates to pass information between objects Create a menu to handle the interaction with the player Table of Contents Chapter 1. A Flat World in Unity Chapter 2. Baking Cupcake Towers Chapter 3. Communicating with the Player – the User Interface Chapter 4. No Longer Alone – Sweet-Toothed Pandas Strike Chapter 5. The Secret Ingredient Is a Dash of Physics Chapter 6. Through a Sea of Sprinkles – Navigation in Artificial Intelligence Chapter 7. Trading Cupcakes and the Ultimate Battle for the Cake – Gameplay Programming Chapter 8. What Is beyond the Cake?
### 回答1: Unity2D中可以通过Animator和SpriteRenderer组件实现图片轮播。 1. 创建动画控制器:在Assets面板中右键点击空白处,选择Create->Animator Controller,命名为ImageSlider。 2. 添加动画状态:在Animation面板中右键点击空白处,选择Create State->Empty,命名为Image1。再次右键点击空白处,选择Create State->Empty,命名为Image2。 3. 配置动画状态:选中Image1状态,在Inspector面板中将它的Motion属性设置为Image1。选中Image2状态,将它的Motion属性设置为Image2。 4. 添加动画参数:在Animator面板中,点击Parameters,添加一个Trigger类型的参数,命名为Next。 5. 添加动画过渡:选中Image1状态,将Next参数拖拽到它的右上角,即可添加一个从Image1到Image2的过渡。再选中Image2状态,将Next参数拖拽到它的左上角,即可添加一个从Image2到Image1的过渡。 6. 添加SpriteRenderer组件:在场景中创建一个空物体,将需要轮播的图片作为子物体添加进去。给每个子物体添加SpriteRenderer组件,并设置对应的Sprite。 7. 添加脚本控制动画:在空物体上添加一个脚本ImageSlider,实现以下逻辑: ``` using UnityEngine; public class ImageSlider : MonoBehaviour { private Animator animator; // 动画控制器 private void Start() { animator = GetComponent<Animator>(); } private void Update() { if (Input.GetKeyDown(KeyCode.Space)) // 按下空格键 { animator.SetTrigger("Next"); // 触发Next参数,切换图片 } } } ``` 这样就完成了图片轮播的实现,按下空格键即可切换图片。 ### 回答2: 在Unity2D中,可以通过以下步骤来实现图片轮播: 1. 首先,准备好需要轮播的图片资源。可以将这些图片资源放置在项目的文件夹中,确保图片资源的命名清晰明了。 2. 创建一个空的GameObject作为父物体,用于容纳图片。选择Empty Object,在Hierarchy面板中创建一个空物体,将其命名为ImageContainer或其他合适的名字。 3. 在ImageContainer对象上添加一个RectTransform组件。通过在Inspector面板中点击Add Component按钮,搜索并添加RectTransform组件。 4. 在ImageContainer对象下创建多个子物体,每个子物体代表一个图片。通过在Hierarchy面板中右键点击ImageContainer,选择Create Empty或复制粘贴多个子物体。 5. 在每个子物体上添加一个Image组件。通过在Inspector面板中点击Add Component按钮,搜索并添加Image组件。 6. 将准备好的图片资源分配给每个子物体上的Image组件。可以通过在Inspector面板的Image组件中的Image字段下拖拽图片资源到对应的子物体上。 7. 在ImageContainer对象上添加一个脚本组件,用于实现轮播功能。可以通过在Inspector面板中点击Add Component按钮,选择New Script并命名为SlideshowController或其他合适的名字。然后通过在脚本编辑器中编写代码来实现轮播功能。 8. 在脚本代码中,利用一个计时器来控制图片的显示和切换。通过使用协程、Invoke函数或Update函数来实现定时切换图片的功能。在切换图片时,可以通过获取ImageContainer对象下的子物体,并通过操作其Image组件的sprite字段来切换显示的图片。 9. 可以根据需求,添加一些额外的功能,例如图片的切换效果、自动循环播放等。 通过以上步骤,就可以在Unity2D中实现图片的轮播效果。根据具体需求可以对代码进行适当调整和优化。 ### 回答3: 在Unity2D中,实现图片轮播可以通过以下步骤: 1. 导入图片资源:将要使用的图片资源导入到Unity项目中,可以将图片拖拽到项目视图中的合适文件夹中。 2. 创建画布:在Hierarchy面板中点击右键,选择UI -> Canvas以创建一个新的画布。画布用于显示UI元素。 3. 创建Image对象:在Hierarchy面板中点击右键,选择UI -> Image以创建一个新的Image对象。这将会自动创建一个Image游戏对象和一个CanvasRenderer组件。 4. 设置图片:选择刚刚创建的Image对象,在Inspector面板中找到Image组件的Source Image属性,将其设置为想要显示的第一张图片。 5. 创建脚本:右键点击项目视图中的合适文件夹,选择Create -> C# Script,创建一个新的脚本。给脚本取一个合适的名字,例如"ImageSlider"。 6. 编写脚本:双击打开刚刚创建的脚本,在脚本中编写代码逻辑。可以使用Coroutine来实现图片的切换。 ```csharp using System.Collections; using UnityEngine; using UnityEngine.UI; public class ImageSlider : MonoBehaviour { public Sprite[] images; // 图片数组,存储要显示的图片 public Image image; // Image对象,用于显示图片 public float delayTime; // 图片切换的间隔时间 private int currentIndex; // 当前显示的图片索引 void Start() { StartCoroutine(SlideImages()); } IEnumerator SlideImages() { while (true) { image.sprite = images[currentIndex]; yield return new WaitForSeconds(delayTime); currentIndex = (currentIndex + 1) % images.Length; } } } ``` 7. 添加脚本:将编写好的脚本挂载到Image对象上,将要显示的图片拖拽到ImageSlider组件的Images属性中。 8. 调整Image对象的大小和位置,以确保图片正确显示。 9. 运行游戏,就可以看到图片按照设定的间隔时间进行轮播了。 通过以上步骤,就可以在Unity2D中实现图片轮播效果

“相关推荐”对你有帮助么?

  • 非常没帮助
  • 没帮助
  • 一般
  • 有帮助
  • 非常有帮助
提交
评论 1
添加红包

请填写红包祝福语或标题

红包个数最小为10个

红包金额最低5元

当前余额3.43前往充值 >
需支付:10.00
成就一亿技术人!
领取后你会自动成为博主和红包主的粉丝 规则
hope_wisdom
发出的红包
实付
使用余额支付
点击重新获取
扫码支付
钱包余额 0

抵扣说明:

1.余额是钱包充值的虚拟货币,按照1:1的比例进行支付金额的抵扣。
2.余额无法直接购买下载,可以购买VIP、付费专栏及课程。

余额充值