


传送门:
文章目录
一、环境配置
全部工作在Autodl上完成,下面是简单记录。
1.1 配置MetaGPT
下面直接以开发模式安装MetaGPT(拉取MetaGPT项目安装,本文安装的是0.8.1版本),这样可以更加灵活的使用MetaGPT框架,适合尝试新的想法或者利用框架创建复杂功能(如新颖的记忆机制)的开发者和研究者。
conda create -n MetaGPT python=3.10
conda activate MetaGPT

git clone https://github.com/geekan/MetaGPT.git
cd /your/path/to/MetaGPT
pip install -e .
Autodl默认使用jupyter来编写代码,且默认是base环境下的内核。如果要切换成Conda环境下的python内核,需要运行:
# 将新的Conda虚拟环境加入jupyterlab中
conda activate MetaGPT                       # 切换到创建的虚拟环境:MetaGPT
conda install ipykernel
ipython kernel install --user --name=MetaGPT   # 设置kernel,--user表示当前用户,MetaGPT为虚拟环境名称
执行以上命令后,如果创建新的Notebook,那么可以选择名为MetaGPT的Notebook。已有的Notebook也可以在右上角切换成MetaGPT内核(ipykernel)。
1.2 配置大模型api_key
下面使用文心一言 API来进行演示,注册即送20元的额度,有效期一个月。首先我们需要进入文心千帆服务平台,注册登录之后选择“应用接入”——“创建应用”。然后简单输入基本信息,选择默认配置,创建应用即可。

创建完成后,点击应用的“详情”即可看到此应用的 AppID,API Key,Secret Key。然后在百度智能云在线调试平台-示例代码中心快速调试接口,获取AccessToken(不解之处,详见API文档)。最后在项目文件夹下使用vim .env(Linux)或type nul > .env(Windows cmd)创建.env文件,并在其中写入:
QIANFAN_AK="xxx"
QIANFAN_SK="xxx"
access_token="xxx"
下面将这些变量配置到环境中,后续就可以自动使用了。
# 使用openai、智谱ChatGLM、百度文心需要分别安装openai,zhipuai,qianfan
import os
import openai,zhipuai,qianfan
from langchain.llms import ChatGLM
from langchain.chat_models import ChatOpenAI,QianfanChatEndpoint

from dotenv import load_dotenv, find_dotenv
_ = load_dotenv(find_dotenv()) # read local .env file
openai.api_key =os.environ['OPENAI_API_KEY']
zhipuai.api_key =os.environ['ZHIPUAI_API_KEY']
qianfan.qianfan_ak=os.environ['QIANFAN_AK']
qianfan.qianfan_sk=os.environ['QIANFAN_SK']
MetaGPT还可以使用yaml文件来配置模型和key,其配置优先级为:config/key.yaml > config/config.yaml > environment variable。clone安装的话,项目默认是读取config/config2.yaml,直接将其进行修改(先备份):
# Full Example: https://github.com/geekan/MetaGPT/blob/main/config/config2.example.yaml
# Reflected Code: https://github.com/geekan/MetaGPT/blob/main/metagpt/config2.py
# Config Docs: https://docs.deepwisdom.ai/main/en/guide/get_started/configuration.html
llm:
  api_type: "zhipuai"  # or azure / ollama / groq etc.
  model: "GLM-3-Turbo"  # or gpt-3.5-turbo
  api_key: "YOUR_API_KEY"
1.3 测试demo
如果你使用git clone方法进行安装,只需在Linux终端简单执行以下代码:
metagpt "write a 2048 game"
此时报错:
ImportError: /lib/x86_64-linux-gnu/libstdc++.so.6: version `GLIBCXX_3.4.29' not found (required by
/root/miniconda3/envs/MetaGPT/lib/python3.10/site-packages/zmq/backend/cython/../../../../../libzmq.so.5)
这是因为在导入 zmq(PyZMQ)这个库时,它的依赖库 libstdc++的一个特定版本 GLIBCXX_3.4.29 没有被找到没有找到,需要将libstdc++的路径手动添加到当前的 LD_LIBRARY_PATH 环境变量。
echo $LD_LIBRARY_PATH
/usr/local/nvidia/lib:/usr/local/nvidia/lib64 # 当前LD_LIBRARY_PATH的值

find / -name libstdc++.so  # 查找libstdc++安装路径
/root/miniconda3/envs/MetaGPT/lib/libstdc++.so
/root/miniconda3/lib/libstdc++.so
/root/miniconda3/pkgs/libstdcxx-ng-9.3.0-hd4cf53a_17/lib/libstdc++.so
/root/miniconda3/pkgs/libstdcxx-ng-11.2.0-h1234567_1/lib/libstdc++.so
/usr/lib/gcc/x86_64-linux-gnu/9/libstdc++.so
运行以下代码手动添加libstdc++安装路径:
export LD_LIBRARY_PATH=$LD_LIBRARY_PATH:/root/miniconda3/envs/MetaGPT/lib
再次运行metagpt "write a 2048 game":
2024-05-13 23:05:39.184 | INFO | metagpt.const:get_metagpt_package_root:29 - Package root set to /root/autodl-tmp/MetaGPT
2024-05-13 23:05:46.278 | INFO | metagpt.team:invest:93 - Investment: $3.0.
2024-05-13 23:05:46.280 | INFO | metagpt.roles.role:_act:396 - Alice(Product Manager): to do PrepareDocuments(PrepareDocuments)
2024-05-13 23:05:46.366 | INFO | metagpt.utils.file_repository:save:57 - save to: /root/autodl-tmp/MetaGPT/workspace/20240513230546/docs/requirement.txt
2024-05-13 23:05:46.371 | INFO | metagpt.roles.role:_act:396 - Alice(Product Manager): to do WritePRD(WritePRD)
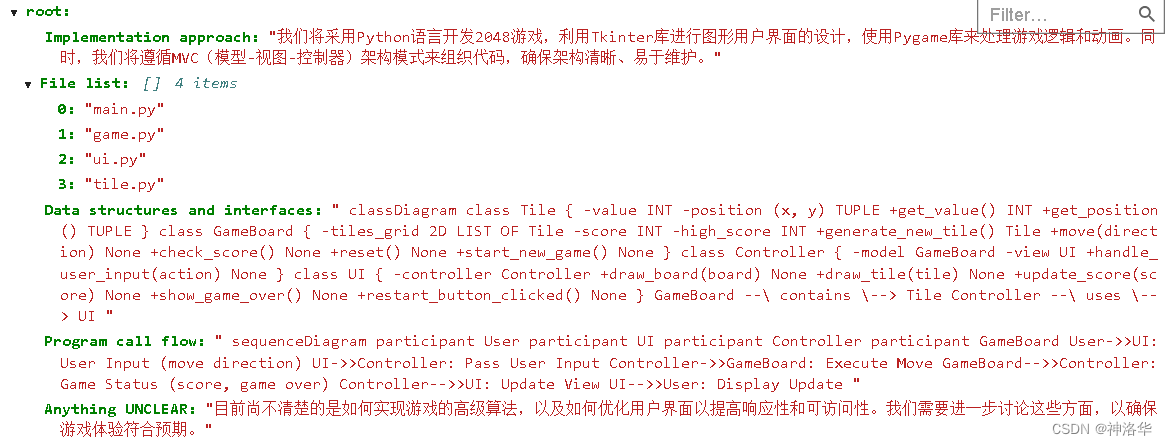
2024-05-13 23:05:46.372 | INFO | metagpt.actions.write_prd:run:86 - New requirement detected: write a 2048 game
[CONTENT]
{
"Language": "zh_cn",
"Programming Language": "Python",
"Original Requirements": "开发一个2048游戏",
"Project Name": "2048_game",
"Product Goals": [
"提供有趣的用户体验",
"提高可访问性,确保响应性",
"拥有更优美的界面"
],
"User Stories": [
"作为一名玩家,我希望能够选择难度等级",
"作为一名玩家,我希望每局游戏后都能看到我的分数",
"作为一名玩家,当我失败时,我希望有一个重新开始的按钮",
"作为一名玩家,我希望看到一个使我感觉良好的优美界面",
"作为一名玩家,我希望能够在手机上玩游戏"
],
"Competitive Analysis": [
"2048游戏A:界面简单,缺乏响应性功能",
"play2048.co:具有优美的响应性界面,并显示我的最佳分数",
"2048game.com:具有响应性界面并显示我的最佳分数,但广告较多"
],
...
...
Based on the provided code snippet, there are no bugs, and the implementation aligns with the requirements. However, without the full context of how this class is used within the larger application, and without confirmation that all necessary pre-dependencies have been imported, it's not possible to give a definitive LGTM (Looks Good To Me) approval. Therefore, the code is recommended to be merged with some changes, specifically ensuring that all pre-dependencies are imported and any intended reuse of methods from other files is correctly implemented.
2024-05-13 23:12:06.911 | WARNING | metagpt.utils.cost_manager:update_cost:49 - Model GLM-3-Turbo not found in TOKEN_COSTS.
2024-05-13 23:12:06.916 | INFO | metagpt.utils.file_repository:save:57 - save to: /root/autodl-tmp/MetaGPT/workspace/2048_game/2048_game/tile.py
2024-05-13 23:12:06.919 | INFO | metagpt.utils.file_repository:save:62 - update dependency: /root/autodl-tmp/MetaGPT/workspace/2048_game/2048_game/tile.py:['docs/system_design/20240513230605.json', 'docs/task/20240513230605.json']
2024-05-13 23:12:06.928 | INFO | metagpt.utils.git_repository:archive:168 - Archive: ['.dependencies.json', '2048_game/game.py', '2048_game/main.py', '2048_game/tile.py', '2048_game/ui.py', 'docs/prd/20240513230605.json', 'docs/requirement.txt', 'docs/system_design/20240513230605.json', 'docs/task/20240513230605.json', 'requirements.txt', 'resources/competitive_analysis/20240513230605.mmd', 'resources/data_api_design/20240513230605.mmd', 'resources/prd/20240513230605.md', 'resources/seq_flow/20240513230605.mmd', 'resources/system_design/20240513230605.md']
Unclosed connection
client_connection: Connection<ConnectionKey(host='open.bigmodel.cn', port=443, is_ssl=True, ssl=None, proxy=None, proxy_auth=None, proxy_headers_hash=None)>
整个运行下来花了0.06元左右,结果在autodl-tmp/MetaGPT/workspace/2048_game下。
或者是在终端运行以下代码:
# test.py
# 如果是ipynb文件会报错asyncio.run() cannot be called from a running event loop

import asyncio

from metagpt.actions import Action
from metagpt.environment import Environment
from metagpt.roles import Role
from metagpt.team import Team

action1 = Action(name="AlexSay", instruction="Express your opinion with emotion and don't repeat it")
action2 = Action(name="BobSay", instruction="Express your opinion with emotion and don't repeat it")
alex = Role(name="Alex", profile="Democratic candidate", goal="Win the election", actions=[action1], watch=[action2])
bob = Role(name="Bob", profile="Republican candidate", goal="Win the election", actions=[action2], watch=[action1])
env = Environment(desc="US election live broadcast")
team = Team(investment=10.0, env=env, roles=[alex, bob])

asyncio.run(team.run(idea="Topic: climate change. Under 80 words per message.", send_to="Alex", n_round=5))
二、Agent System Overview
2.1 智能体概述
学术界和工业界对Agent(智能体)提出了各种定义。大致来说,一个智能体应具备类似人类的思考和规划能力,拥有记忆甚至情感,并具备一定的技能以便与环境、智能体和人类进行交互。一般的LLM,例如ChatGPT,只会接收单一查询的输入并返回输出,它一次不能完成超过一个任务,而AI Agent则可以自驱的定义工作流程并规划任务,进而解决更复杂的任务。
关键点:ChatGPT只解决了聊天,并没有解决协作。而智能体可以与人类协作,意味着智能体会成为互联网级别的入口,并且会存在于大量的IM、硬件之中,取代已有的大量SaaS
AI Agent的火花诞生于 GPT插件商城(工具调用)以及AutoGPT(任务规划),LLM 充当Agents的大脑,并辅以几个关键组成部分(详见《LLM Powered Autonomous Agents》):
- 规划
- 子目标和分解:Agents将大型任务分解为更小的、可管理的子目标,从而能够有效处理复杂的任务。
- 反思和完善:Agents可以对过去的行为进行自我批评和自我反思,从错误中吸取教训,并针对未来的步骤进行完善,从而提高最终结果的质量。
- 记忆
- 短期记忆:我认为所有的上下文学习(参见提示工程)都是利用模型的短期记忆来学习。
- 长期记忆:这为Agents提供了长时间保留和回忆(无限)信息的能力,通常是通过利用外部向量存储和快速检索来实现。
- 工具使用
- Agents学习调用外部 API 来获取模型权重中缺失的额外信息(通常在预训练后很难更改),包括当前信息、代码执行能力、对专有信息源的访问等。

- Agents学习调用外部 API 来获取模型权重中缺失的额外信息(通常在预训练后很难更改),包括当前信息、代码执行能力、对专有信息源的访问等。
在MetaGPT看来,可以把智能体想象成环境中的数字人,其中:
A
g
e
n
t
=
大语言模型(
L
L
M
)
+
观察
+
思考
+
行动
+
记忆
Agent = 大语言模型(LLM) + 观察 + 思考 + 行动 + 记忆
Agent=大语言模型(LLM)+观察+思考+行动+记忆
- 大语言模型(LLM):LLM作为智能体的“大脑”部分,使其能够处理信息,从交互中学习,做出决策并执行行动。
- 观察:这是智能体的感知机制,使其能够感知其环境。智能体可能会接收来自另一个智能体的文本消息、来自监视摄像头的视觉数据或来自客户服务录音的音频等一系列信号。这些观察构成了所有后续行动的基础。
- 思考:思考过程涉及分析观察结果和记忆内容并考虑可能的行动。这是智能体内部的决策过程,其可能由LLM进行驱动。
- 行动:这些是智能体对其思考和观察的显式响应。行动可以是利用 LLM 生成代码,或是手动预定义的操作,如阅读本地文件。此外,智能体还可以执行使用工具的操作,包括在互联网上搜索天气,使用计算器进行数学计算等。
- 记忆:智能体的记忆存储过去的经验。这对学习至关重要,因为它允许智能体参考先前的结果并据此调整未来的行动。
2.2 多智能体
多智能体系统可以视为一个智能体社会,其中:
多智能体
=
智能体
+
环境
+
S
O
P
+
评审
+
路由
+
订阅
+
经济
多智能体 = 智能体+环境+SOP+评审+路由+订阅+经济
多智能体=智能体+环境+SOP+评审+路由+订阅+经济
- 智能体:在单个智能体的基础上,扩展了多智能体定义。在多智能体系统中,可以由多个单智能体协同工作,每个智能体都具备独特有的LLM、观察、思考、行动和记忆。
- 环境:环境是智能体生存和互动的公共场所。智能体从环境中观察到重要信息,并发布行动的输出结果以供其他智能体使用。
- 标准流程(SOP):这些是管理智能体行动和交互的既定程序,确保系统内部的有序和高效运作。
- 评审:评审是为了解决幻觉问题。人类的幻觉实际高于大语言模型,但人类已经习惯了幻觉与错误,日常中会通过大量评审来保障复杂工作每一步的可靠性。严谨有效的评审过程能将复杂工作整体的错误率降低90%
- 路由:通信是智能体之间信息交流的过程。它对于系统内的协作、谈判和竞争至关重要。
- 订阅:需求说了一个制度改革或市场变化,所有人都应该关注/判断影响/修改计划
- 经济:这指的是多智能体环境中的价值交换系统,决定资源分配和任务优先级。
下面是一个简单的例子,展示了智能体如何工作:

- 在环境中,存在三个智能体
Alice、Bob和Charlie,它们相互作用。 - 它们可以将消息或行动的输出结果发布到环境中,这些会被其他智能体观察到。
下面将揭示智能体Charlie的内部过程,该过程同样适用于Alice和Bob。
- 在内部,智能体
Charlie具备我们上述所介绍的部分组件,如LLM、观察、思考、行动。Charlie思考和行动的过程可以由LLM驱动,并且还能在行动的过程中使用工具。 Charlie观察来自Alice的相关文件和来自Bob的需求,获取有帮助的记忆,思考如何编写代码,执行写代码的行动,最终发布结果。Charlie通过将结果发布到环境中以通知Bob。Bob在接收后回复了一句赞美的话。
2.3 MetaGPT
MetaGPT是一个多智能体协作框架,将标准化操作(SOP) 程序编码为提示确保解决问题时采用结构化方法。要求智能体以专家形式参与协作,并按要求生成结构化的输出,例如高质量的需求文档、架构设计图和流程图等。结构化的输出对于单个智能体即是更高层次的思维链(Chain-of-Thought),对于下游角色则是语义清晰、目标明确的上下文(Context)。通过明确定义的角色分工,复杂的工作得以分解为更小、更具体的任务。从而提升了LLMs的输出质量。主要特点:
- 稳定的解决方案:借助SOP,与其他 Agents 相比,MetaGPT 已被证明可以生成更一致和正确的解决方案。
- 多样化的角色分配:为LLM分配不同角色的能力确保了解决问题的全面性。
下面介绍一个使用MetaGPT的经典案例——软件公司。
MetaGPT 以一行需求为输入,输出用户故事/竞争分析/需求/数据结构/API/文档等。在内部,MetaGPT 包括产品经理/架构师/项目经理/工程师。它提供了软件公司的整个过程以及精心编排的 SOP。

- 需求分析:收到需求后,该过程开始。这一阶段致力于明确软件所需的功能和要求。
- 产品经理:产品经理以需求和可行性分析为基础,开启整个流程。他们负责理解需求,并为项目制定明确的方向。
- 架构师:一旦需求明确,架构师将为项目创建技术设计方案。他们负责构建系统接口设计,确保技术实现符合需求。在MetaGPT中,架构 Agent 可以自动生成系统界面设计,如内容推荐引擎的开发。
- 项目经理:项目经理使用序列流程图来满足每个需求。他们确保项目按计划前行,每个阶段都得到适时执行。
- 工程师:工程师负责实际的代码开发。他们使用设计和流程图,将其转化为功能完备的代码。
- 质量保证(QA)工程师:在开发阶段结束后,QA工程师进行全面的测试。他们确保软件符合所需标准,不存在任何错误或问题。

2.4 其他多智能体框架
-
ChatDev: 一家虚拟软件公司,通过担任不同角色的各种智能代理进行运营,ChatDev 中的代理通过参加专门的功能研讨会进行协作,包括设计、编码、测试和文档等任务。 -
AutoAgents:一个实验性的开源应用程序,用于基于 LLM的自动代理生成实验。该程序由 LLM驱动,自动生成多智能体以实现您设定的任何目标。 -
Agents: 一个用于构建自治语言代理的开源库/框架,使用代理时只需用自然语言填写配置文件,即可自定义语言代理或多代理系统,并将语言代理部署在终端、Gradio界面或后端服务中。Agents 框架允许用户通过 SOP(标准操作流程)为语言代理提供细粒度的控制和指导。SOP 定义了整个任务的子目标/子任务,并允许用户为语言代理定制细粒度的工作流程。 -
Camel:提出了一种名为角色扮演的新型交际代理框架,使用初始提示来指导聊天代理完成任务,同时保持与人类意图的一致性。 -
AutoGen:AutoGen 框架支持使用多个代理开发LLM应用程序,这些代理可以相互交谈以解决任务。AutoGen 代理是可定制的、可对话的,并且无缝地允许人工参与。它们可以在各种模式下运行,这些模式采用人工输入和工具的LLMs组合。
更多仓库以及产品见Awesome AI Agents:

三、单智能体入门
3.1 使用现成的智能体
# 可导入任何角色,初始化它,用一个开始的消息运行它,完成!
import asyncio

from metagpt.context import Context
from metagpt.roles.product_manager import ProductManager
from metagpt.logs import logger

async def main():
    msg = "Write a PRD for a snake game"
    context = Context()  # 显式创建会话Context对象,Role对象会隐式的自动将它共享给自己的Action对象
    role = ProductManager(context=context)
    while msg:
        msg = await role.run(msg)
        logger.info(str(msg))

if __name__ == '__main__':
    asyncio.run(main())
3.2 单动作智能体开发
如果一个智能体能够执行某些动作(无论是由LLM驱动还是其他方式),它就具有一定的用途。MetaGPT提供高度灵活性,以定义您自己所需的行为和智能体。下面是一个智能体运行周期的流程图:

我们来理解一下这个图:
- Agent首先观察当前环境,并将观察得到结果存放到记忆中,
- Agent根据观察得到的信息进行思考,选择下一步要执行的行动,也就是从Action1,Action2…中选择要执行的行动;
- Agent执行上一步选择的行动,执行完毕后,我们可以得到执行的反馈,并将其存储到记忆中,然后Agent根据反馈记忆和当前任务再次决策选择下一步行动,如此循环,直到完成任务为止;
假设我们想用自然语言编写代码,并想让一个智能体为我们做这件事。让我们称这个智能体为 SimpleCoder,我们需要两个步骤来让它工作:
- 定义一个编写代码的动作
- 为智能体配备这个动作
3.2.1 RoleContext
先简要说说RoleContex的基本概念; Agent在与环境上下文进行的交互,是通过内部的RoleContext对象来实现的,其源码为:
class RoleContext(BaseModel):
    """Role Runtime Context(角色运行时上下文)"""

    model_config = ConfigDict(arbitrary_types_allowed=True)

    # # env exclude=True to avoid `RecursionError: maximum recursion depth exceeded in comparison`
    env: "Environment" = Field(default=None, exclude=True)  # # avoid circular import
    # TODO judge if ser&deser
    msg_buffer: MessageQueue = Field(
        default_factory=MessageQueue, exclude=True
    )  # Message Buffer with Asynchronous Updates
    memory: Memory = Field(default_factory=Memory)
    # long_term_memory: LongTermMemory = Field(default_factory=LongTermMemory)
    working_memory: Memory = Field(default_factory=Memory)
    state: int = Field(default=-1)  # -1 indicates initial or termination state where todo is None
    todo: Action = Field(default=None, exclude=True)
    watch: set[str] = Field(default_factory=set)
    news: list[Type[Message]] = Field(default=[], exclude=True)  # TODO not used
    react_mode: RoleReactMode = (
        RoleReactMode.REACT
    )  # see `Role._set_react_mode` for definitions of the following two attributes
    max_react_loop: int = 1
这里解释一下上面的参数:
env:Environment 对象,当 Role 被添加到 Environment 时,Role 会对 Environment 进行引用。msg_buffer:一个 MessageQueue 对象,用于 Role 与环境中其他 Role 进行信息交互。它是对 asyncio 的 Queue 进行了简单的封装,提供了非阻塞的 pop/push 方法。memory:记忆对象,用于存储 Role 执行过程中产生的消息。当 Role 执行 _act 时,会将执行得到的响应转换为 Message 对象存储在 memory 中。当 Role 执行 _observe 时,会把 msg_buffer 中的所有消息转移到 memory 中。state:记录 Role 的执行状态。初始状态值为 -1,当所有 Action 执行完成后也会被重置为 -1。todo:下一个待执行的 Action。当 state >= 0 时,会指向最后一个 Action。watch:一个字符串列表,用于记录当前 Role 观察的 Action。在 _observe 方法中用于过滤消息。news:存储在执行 _observe 时读取到的与当前 Role 上下游相关的消息。react_mode:ReAct 循环的三种模式:REACT:默认模式,按照 ReAct 论文中的思考——行动循环来执行,即_think -> _act -> _think -> _act -> ...。BY_ORDER:按照指定的 Action 顺序执行PLAN_AND_ACT:一次思考后执行多个动作
max_react_loop:在 react_mode 为 REACT 模式时生效,用于设置最大的思考-行动循环次数,超过后会停止 _react 执行。这点我记得ChatDev中有同样的配置;
当Agent启动后,每一次的交互都要调用到RoleContext对象,以得到最新的环境理解,来确保下一步行为的准确性;
3.2.2 编写SimpleWriteCode动作
在 MetaGPT 中,Action 类是动作的逻辑抽象。用户可以通过简单地调用 self._aask 函数令 LLM 赋予这个动作能力,即这个函数将在底层调用 LLM api,根据输出的提示词生成回答。
async def _aask(self, prompt: str, system_msgs: Optional[list[str]] = None) -> str:
    """Append default prefix"""
    return await self.llm.aask(prompt, system_msgs)
在本场景中,我们定义了一个Action的子类 SimpleWriteCode 。虽然它主要是一个围绕提示和 LLM 调用的包装器,但这个 Action 更直观,在下游和高级任务中,使用它作为一个整体感觉更自然。
import re
import asyncio
from metagpt.actions import Action

class SimpleWriteCode(Action):
    PROMPT_TEMPLATE: str = """
    Write a python function that can {instruction} and provide two runnnable test cases.
    Return ```python your_code_here ```with NO other texts,
    your code:
    """

    name: str = "SimpleWriteCode"		# 指定动作名称

    async def run(self, instruction: str):
        prompt = self.PROMPT_TEMPLATE.format(instruction=instruction)

        rsp = await self._aask(prompt)

        code_text = SimpleWriteCode.parse_code(rsp)

        return code_text

    @staticmethod
    def parse_code(rsp):
        pattern = r"```python(.*)```"
        match = re.search(pattern, rsp, re.DOTALL)
        code_text = match.group(1) if match else rsp
        return code_text
上面代码中,我们定义的SimpleWriteCode 类继承自 Action类,我们重写了run 方法,该方法决定了我们对传入的内容到底要做什么样的处理。此处是将用户的输入传入提示词模板PROMPT_TEMPLATE,然后将格式化的prompt传入LLM,等到LLM返回生成结果后,我们再取出其中的代码部分并返回。
parse_code方法使用正则表达式来匹配用户输入的代码文本。它会查找以```python开头且以```结尾的代码块,并提取其中的代码内容。如果找到匹配的代码块,则返回提取的代码内容;否则,返回原始的用户输入。
3.2.3 设计SimpleCoder角色
在MetaGPT中, Role 类是智能体的逻辑抽象。一个 Role 能执行特定的 Action,拥有记忆、思考并采用各种策略行动,基本上,它充当一个将所有这些组件联系在一起的凝聚实体。
要自己实现一个最简单的Role,只需要重写Role基类的 _init_与 _act 方法:
- 指定
name(名称)和profile(人设) - 在
_init_方法中,使用self._init_action函数为其配备期望的动作——SimpleWriteCode; - 重写
_act方法,编写智能体具体的行动逻辑。智能体将从最新的记忆中获取人类指令,运行配备的动作,MetaGPT将其作为待办事项 (self.rc.todo) 在幕后处理,最后返回一个完整的消息。
from metagpt.logs import logger
from metagpt.roles import Role
from metagpt.schema import Message

class SimpleCoder(Role):
    name: str = "Alice"
    profile: str = "SimpleCoder"

    def __init__(self, **kwargs):
        super().__init__(**kwargs)
        self.set_actions([SimpleWriteCode])  # 为角色配备 CodeWrite 动作

    async def _act(self) -> Message:
        logger.info(f"{self._setting}: to do {self.rc.todo}({self.rc.todo.name})")
        todo = self.rc.todo  			    # 获取待执行的动作 (CodeWriter)

        msg = self.get_memories(k=1)[0]     # 获取最近一条记忆 (用户输入)
        code_text = await todo.run(msg.content)
        msg = Message(content=code_text, role=self.profile, cause_by=type(todo))

        return msg
self.set_actions([SimpleWriteCode]):为 Role 配备了我们之前写好的动作 SimpleWriteCode,之后,这个动作就会被加入到代办self.rc.todo中,后续可以通过调用todo.run()方法来执行这个动作。
下面对其中重要的部分进一步讲解
3.2.3.1Message
Message 类是MetaGPT中最基本的信息类型,其组成如下,除了content,其它都是可选的。本章只涉及content、role 和cause_by 。

可以看到,Message的组成包括以下几个部分:
content:用于存放消息的内容;instruct_content:与content功能相同,但存放的是结构化的数据;role:表示消息的角色,是调用LLM的参数的一部分,属于meta信息的一部分;cause_by:用作分类标签和路由标签,表示由哪个动作导致产生的message;sent_from:用作展示时显示的发言者信息,属于meta信息的一部分;send_to:用作路由参数,用来筛选发给特定角色的消息;restricted_to:用作群发的路由参数,用来筛选发给特定角色的消息;
3.2.3.2 Memory
Memory类是智能体的记忆的抽象,在MetaGPT中,当用户与Agent交互时,所有的内容都会被存储在其自有的Memory中。当初始化时,Role初始化一个Memory对象作为self.rc.memory属性,它将在之后的_observe中存储每个Message,以便后续的检索。简而言之,Role的记忆是一个含有Message的列表。
当需要获取记忆时(获取LLM输入的上下文),我们可以使用self.get_memories函数:
def get_memories(self, k=0) -> list[Message]:
    """A wrapper to return the most recent k memories of this role, return all when k=0"""
    return self.rc.memory.get(k=k)
在SimpleCoder中,我们只需要获取最近的一条记忆,也就是用户下达的需求,将它传递给action即可。
msg = self.get_memories(k=1)[0]  # find the most recent messages
code_text = await todo.run(msg.content)
然后我们就将拿到大模型给我们的输出啦,最后我们将拿到的信息封装为MetaGPT中通信的基本格式 Message 返回,这样,我们就实现了一个简单的单动作Agent。
有关Memory的更多内容,详见《use_memories》
3.2.4 运行SimpleCoder角色
现在我们可以让我们的智能体开始工作,只需初始化它并使用一个起始消息运行它。
import asyncio

from metagpt.context import Context

async def main():
    msg = "write a function that calculates the sum of a list"
    context = Context()
    role = SimpleCoder(context=context)
    logger.info(msg)
    result = await role.run(msg)
    logger.info(result)

asyncio.run(main)
上述代码中加入了
context = Context()的内容,去掉这一行,并设置role = SimpleCoder()也可以正确运行。
异步相关的代码在ipython或者notebook环境下,asyncio.run(xxx) 得改成 await xxx ,比如asyncio.run(main()) 需要改成 await main(),否则报错RuntimeError: asyncio.run() cannot be called from a running event loop。运行结果如下:
2024-05-17 07:20:58.849 | INFO     | __main__:main:9 - write a function that calculates the sum of a list
2024-05-17 07:20:58.852 | INFO     | __main__:_act:14 - Alice(SimpleCoder): to do SimpleWriteCode(SimpleWriteCode)
```python
def calculate_sum(lst):
    return sum(lst)

# Test case 1
test_list1 = [1, 2, 3, 4, 5]
result1 = calculate_sum(test_list1)
print("Test case 1 result:", result1)

# Test case 2
test_list2 = [-1, 0, 1, -2, 2]
result2 = calculate_sum(test_list2)
print("Test case 2 result:", result2)   # 下面的\是转义符,只是为了正确显示```,下同。
\```
3.3 多动作智能体开发
如果一个智能体只能够执行一个动作,那实际上我们并不需要一个智能体。通过直接运行动作本身,我们可以得到相同的结果。智能体的力量,或者说Role抽象的惊人之处,在于动作的组合(以及记忆等其他组件)。通过连接动作,我们可以构建一个工作流程,使智能体能够完成更复杂的任务。
假设现在我们不仅希望用自然语言编写代码,而且还希望生成的代码立即执行,我们可以创建一个拥有多个动作的智能体——RunnableCoder。这个Role需要写代码并立即运行,所以我们需要两个Action:SimpleWriteCode 和 SimpleRunCode。
3.3.1 编写 SimpleRunCode 动作
从概念上讲,一个动作可以利用LLM,也可以在没有LLM的情况下运行。在SimpleRunCode的情况下,LLM不涉及其中。我们只需启动一个子进程来运行代码并获取结果。我们希望展示的是,对于动作逻辑的结构,我们没有设定任何限制,用户可以根据需要完全灵活地设计逻辑。
在Python中,我们通过标准库中的subprocess包来fork一个子进程,并运行一个外部的程序。subprocess包中定义有数个创建子进程的函数,这些函数分别以不同的方式创建子进程,所以我们可以根据需要来从中选取一个使用。
第一个进程是你的Python程序本身,它执行了包含 SimpleRunCode 类定义的代码。第二个进程是由 subprocess.run 创建的,它执行了 python3 -c 命令,用于运行 code_text 中包含的Python代码。这两个进程相互独立,通过 subprocess.run ,你的Python程序可以启动并与第二个进程进行交互,获取其输出结果。
class SimpleRunCode(Action):
    name: str = "SimpleRunCode"

    async def run(self, code_text: str):
        result = subprocess.run(["python3", "-c", code_text], capture_output=True, text=True)
        code_result = result.stdout
        logger.info(f"{code_result=}")
        return code_result
3.3.2 设计RunnableCoder 角色
与定义单一动作的智能体没有太大不同!让我们来映射一下:
- 用
self.set_actions初始化所有 Action; - 指定每次 Role 会选择哪个 Action。我们将
react_mode设置为 “by_order”(按self.set_actions中指定的顺序执行动作,更多讨论,请参见 思考和行动)。此时,当 Role 执行_act时,self.rc.todo将首先是SimpleWriteCode,然后是SimpleRunCode。 - 覆写
_act函数。Role 从上一轮的人类输入或动作输出中检索消息,用适当的 Message 内容提供当前的 Action (self.rc.todo),最后返回由当前 Action 输出组成的 Message。
class RunnableCoder(Role):
    name: str = "Alice"
    profile: str = "RunnableCoder"

    def __init__(self, **kwargs):
        super().__init__(**kwargs)
        self.set_actions([SimpleWriteCode, SimpleRunCode])
        self._set_react_mode(react_mode="by_order")

    async def _act(self) -> Message:
        logger.info(f"{self._setting}: to do {self.rc.todo}({self.rc.todo.name})")
        # By choosing the Action by order under the hood
        # todo will be first SimpleWriteCode() then SimpleRunCode()
        todo = self.rc.todo

        msg = self.get_memories(k=1)[0]  # find the most k recent messages
        result = await todo.run(msg.content)

        msg = Message(content=result, role=self.profile, cause_by=type(todo))
        self.rc.memory.add(msg)
        return msg
3.2.3 运行 RunnableCoder 角色
只需初始化 RunnableCoder并使用一个起始消息运行它:
import asyncio

from metagpt.context import Context

async def main():
    msg = "write a function that calculates the sum of a list"
    context = Context()
    role = RunnableCoder(context=context)
    logger.info(msg)
    result = await role.run(msg)
    logger.info(result)

asyncio.run(main)
以上完整代码见build_customized_agent.py,可以通过以下命令运行:
python3 examples/build_customized_agent.py --msg "write a function that calculates the sum of a list"
3.4 进阶:编写文档助手
参考《MetaGPT中文文档:tutorial_assistant》(当前版本:
MetaGPT 0.8.1)
3.4.1角色介绍
-
功能说明:输入一句话,生成一篇偏技术类教程文档,支持自定义语言。
-
设计思路:先通过
LLM大模型生成教程的目录,再对目录按照二级标题进行分块,对于每块目录按照标题生成详细内容,最后再将标题和内容进行拼接。分块的设计解决了LLM大模型长文本的限制问题。
3.4.2 编写 WriteContent 动作
WriteContent:根据用户需求生成文章大纲。
- 重写Action 类的
__init__方法。
__init__方法包含name参数。第一行代码使用super().__init__(name, *args, **kwargs)调用父类的构造函数,实现action的初始化。这里使用args、kwargs将其他参数传递给父类的构造函数,比如context、llm。
"""
@Time    : 2023/9/4 15:40:40
@Author  : Stitch-z
@File    : tutorial_assistant.py
@Describe : Actions of the tutorial assistant, including writing directories and document content.
"""

from typing import Dict

from metagpt.actions import Action
from metagpt.prompts.tutorial_assistant import DIRECTORY_PROMPT, CONTENT_PROMPT
from metagpt.utils.common import OutputParser


class WriteDirectory(Action):
    """Action class for writing tutorial directories.

    Args:
        name: The name of the action.
        language: The language to output, default is "Chinese".
    """

    def __init__(self, name: str = "", language: str = "Chinese", *args, **kwargs):
        super().__init__(name, *args, **kwargs)
        self.language = language
- 重写
run方法。run方法是 action 执行的主要函数,使用self._aask(prompt=prompt)方法提问 LLM 大模型。
async def run(self, topic: str, *args, **kwargs) -> Dict:
    """Execute the action to generate a tutorial directory according to the topic.

    Args:
        topic: The tutorial topic.

    Returns:
        the tutorial directory information, including {"title": "xxx", "directory": [{"dir 1": ["sub dir 1", "sub dir 2"]}]}.
    """
    prompt = DIRECTORY_PROMPT.format(topic=topic, language=self.language)
    resp = await self._aask(prompt=prompt)
    return OutputParser.extract_struct(resp, dict)
DIRECTORY_PROMPT代码如下,有topic,language两个参数:
COMMON_PROMPT = """
You are now a seasoned technical professional in the field of the internet.
We need you to write a technical tutorial with the topic "{topic}".
"""

DIRECTORY_PROMPT = (
    COMMON_PROMPT
    + """
Please provide the specific table of contents for this tutorial, strictly following the following requirements:
1. The output must be strictly in the specified language, {language}.
2. Answer strictly in the dictionary format like {{"title": "xxx", "directory": [{{"dir 1": ["sub dir 1", "sub dir 2"]}}, {{"dir 2": ["sub dir 3", "sub dir 4"]}}]}}.
3. The directory should be as specific and sufficient as possible, with a primary and secondary directory.The secondary directory is in the array.
4. Do not have extra spaces or line breaks.
5. Each directory title has practical significance.
"""
)
主要就是我们把自己的需求放入我们准备好的提示词模板里,询问大模型得到结果,然后我们对得到的内容做一个解析。解析函数extract_struct如果提取和解析成功,它将返回相应的数据结构(列表或字典),如果提取失败或解析遇到错误,则抛出异常。解析示例如下:
>>> text = 'xxx [1, 2, ["a", "b", [3, 4]], {"x": 5, "y": [6, 7]}] xxx'
>>> result_list = OutputParser.extract_struct(text, "list")
>>> print(result_list)
>>> # Output: [1, 2, ["a", "b", [3, 4]], {"x": 5, "y": [6, 7]}]

>>> text = 'xxx {"x": 1, "y": {"a": 2, "b": {"c": 3}}} xxx'
>>> result_dict = OutputParser.extract_struct(text, "dict")
>>> print(result_dict)
>>> # Output: {"x": 1, "y": {"a": 2, "b": {"c": 3}}}
这样我们就将大模型输出的目录结构转为了可解析的字典对象,这里以写一篇Mysql教程文档为例,它的输出就如下:
{'title': 'MySQL 教程', 'directory': [{'MySQL 简介': []}, {'安装与配置': ['安装MySQL', '配置MySQL']}, {'基本操作': ['创建数据库', '创建表', '插入数据', '查询数据', '更新数据', '删除数据']}, {'高级操作': ['索引', '约束', '连接查询', '子查询', '事务', '视图']}, {'备份与恢复': ['备份数据库', '恢复数据库']}, {'性能优化': ['优化查询语句', '优化表结构', '缓存配置']}, {'常见问题': ['连接问题', '权限问题', '性能问题']}]}
拿到目录后我们就需要根据每个章节的标题来生成章节内容了。
3.4.3 编写 WriteContent 动作
WriteContent:根据传入的子标题来生成内容
class WriteContent(Action):
    """Action class for writing tutorial content.

    Args:
        name: The name of the action.
        directory: The content to write.
        language: The language to output, default is "Chinese".
    """

    def __init__(self, name: str = "", directory: str = "", language: str = "Chinese", *args, **kwargs):
        super().__init__(name, *args, **kwargs)
        self.language = language
        self.directory = directory

    async def run(self, topic: str, *args, **kwargs) -> str:
        """Execute the action to write document content according to the directory and topic.

        Args:
            topic: The tutorial topic.

        Returns:
            The written tutorial content.
        """
        prompt = CONTENT_PROMPT.format(topic=topic, language=self.language, directory=self.directory)
        return await self._aask(prompt=prompt)
CONTENT_PROMPT代码如下,有topic,language,directory三个参数:
CONTENT_PROMPT = (
    COMMON_PROMPT
    + """
Now I will give you the module directory titles for the topic.
Please output the detailed principle content of this title in detail.
If there are code examples, please provide them according to standard code specifications.
Without a code example, it is not necessary.

The module directory titles for the topic is as follows:
{directory}

Strictly limit output according to the following requirements:
1. Follow the Markdown syntax format for layout.
2. If there are code examples, they must follow standard syntax specifications, have document annotations, and be displayed in code blocks.
3. The output must be strictly in the specified language, {language}.
4. Do not have redundant output, including concluding remarks.
5. Strict requirement not to output the topic "{topic}".
"""
)
3.4.4 编写 TutorialAssistant 角色
- 定义角色类,继承
Role基类,重写__init__初始化方法。__init__方法必须包含name、profile、goal、constraints参数。第一行代码使用super().__init__(name, profile, goal, constraints)调用父类的构造函数,实现Role的初始化。- 使用
self.set_actions([WriteDirectory(language=language)])添加初始的action和states,这里先添加写目录的action。同时,也可以自定义参数,这里加了language参数支持自定义语言。 constraints是我们期望对输出内容的约束,我们希望内容最终以markdown格式输出方便我们导入到网页或者其他内容中
"""
@Time    : 2023/9/4 15:40:40
@Author  : Stitch-z
@File    : tutorial_assistant.py
"""

from datetime import datetime
from typing import Dict

from metagpt.actions.write_tutorial import WriteContent, WriteDirectory
from metagpt.const import TUTORIAL_PATH
from metagpt.logs import logger
from metagpt.roles.role import Role, RoleReactMode
from metagpt.schema import Message
from metagpt.utils.file import File

class TutorialAssistant(Role):
    """Tutorial assistant, input one sentence to generate a tutorial document in markup format.

    Args:
        name: The name of the role.
        profile: The role profile description.
        goal: The goal of the role.
        constraints: Constraints or requirements for the role.
        language: The language in which the tutorial documents will be generated.
    """

    def __init__(
        self,
        name: str = "Stitch",
        profile: str = "Tutorial Assistant",
        goal: str = "Generate tutorial documents",
        constraints: str = "Strictly follow Markdown's syntax, with neat and standardized layout",
        language: str = "Chinese",
    ):
        super().__init__(name, profile, goal, constraints)
        self.set_actions([WriteDirectory(language=language)])
        self.topic = ""
        self.main_title = ""
        self.total_content = ""
        self.language = language
        self._set_react_mode(react_mode="by_order")   # 按顺序执行动作列表
-
重写
react方法。使用await super().react()调用Role基类的react方法,根据__init__初始化方法设置的react_mode="by_order"按顺序执行states的每一个action。这里重写的目的是为了执行完所有的action后可以做最后的操作,即把拼接完的教程内容写成markdown文件。async def react(self) -> Message: msg = await super().react() root_path = TUTORIAL_PATH / datetime.now().strftime("%Y-%m-%d_%H-%M-%S") await File.write(root_path, f"{self.main_title}.md", self.total_content.encode('utf-8')) return msg
TUTORIAL_PATH部分详见const.py,其实就是METAGPT_ROOT/"data"/"tutorial_docx",其中METAGPT_ROOT是项目根目录。后面的代码是创建以当前时间命名的子目录。File类是一个用于文件操作的通用工具类,它使用 aiofiles 库。其write方法用于将文件内容写入指定的本地路径,最后返回完整的文件名,例如 “/data/test.txt”。详细代码如下:
# File类代码

from pathlib import Path

import aiofiles

from metagpt.logs import logger
from metagpt.utils.exceptions import handle_exception

class File:
    """A general util for file operations."""

    CHUNK_SIZE = 64 * 1024

    @classmethod
    @handle_exception
    async def write(cls, root_path: Path, filename: str, content: bytes) -> Path:
        """Write the file content to the local specified path.

        Args:
            root_path: The root path of file, such as "/data".
            filename: The name of file, such as "test.txt".
            content: The binary content of file.

        Returns:
            The full filename of file, such as "/data/test.txt".

        Raises:
            Exception: If an unexpected error occurs during the file writing process.
        """
        root_path.mkdir(parents=True, exist_ok=True)
        full_path = root_path / filename
        async with aiofiles.open(full_path, mode="wb") as writer:
            await writer.write(content)
            logger.debug(f"Successfully write file: {full_path}")
            return full_path
-
重写
_act方法- 使用
todo = self.rc.todo从上下文获取下一步要执行的action,再执行action的run方法。这里是先通过WriteDirectory获取教程的目录结构,再分块目录,每块生成一个WriteContent的action,再初始化新添加的action。 - 再次调用
await super().react(),这 是为了从头执行新添加的所有WriteContentaction。每个 action 执行完的结果生成消息Message(content=resp, role=self.profile),可以将其放入上下文内存self.rc.memory,该角色不需要存入。
async def _act(self) -> Message: """Perform an action as determined by the role. Returns: A message containing the result of the action. """ todo = self.rc.todo if type(todo) is WriteDirectory: msg = self.rc.memory.get(k=1)[0] self.topic = msg.content resp = await todo.run(topic=self.topic) logger.info(resp) await self._handle_directory(resp) return await super().react() resp = await todo.run(topic=self.topic) logger.info(resp) if self.total_content != "": self.total_content += "\n\n\n" self.total_content += resp return Message(content=resp, role=self.profile) async def _handle_directory(self, titles: Dict) -> Message: """Handle the directories for the tutorial document. Args: titles: A dictionary containing the titles and directory structure, such as {"title": "xxx", "directory": [{"dir 1": ["sub dir 1", "sub dir 2"]}]} Returns: A message containing information about the directory. """ self.main_title = titles.get("title") directory = f"{self.main_title}\n" self.total_content += f"# {self.main_title}" actions = list() for first_dir in titles.get("directory"): actions.append(WriteContent(language=self.language, directory=first_dir)) key = list(first_dir.keys())[0] directory += f"- {key}\n" for second_dir in first_dir[key]: directory += f" - {second_dir}\n" self.set_actions(actions) - 使用
以上完整代码见tutorial_assistant.py、write_tutorial.py(MetaGPT 0.8.1)
3.4.5 运行 TutorialAssistant 角色
接下来你只需要初始化它并使用一个起始消息运行它。
import asyncio
from metagpt.logs import logger
from metagpt.roles.tutorial_assistant import TutorialAssistant

async def main():
    msg = "MySQL 教程"
    role = TutorialAssistant()
    logger.info(msg)
    result = await role.run(msg)
    logger.info(result)

asyncio.run(main())
前几次运行都失败了,报错:
2024-05-16 22:16:14.561 | ERROR    | metagpt.utils.common:extract_struct:237 - No <class 'dict'> found in the text.
...
File "/root/autodl-tmp/MetaGPT/metagpt/roles/tutorial_assistant.py", line 60, in _handle_directory
    for first_dir in titles.get("directory"):
TypeError: 'NoneType' object is not iterable
查看WriteDirectory代码:
class WriteDirectory(Action):
	...
	async def run(self, topic: str, *args, **kwargs) -> Dict:
	...
		prompt = DIRECTORY_PROMPT.format(topic=topic, language=self.language)
		        resp = await self._aask(prompt=prompt)
		        return OutputParser.extract_struct(resp, dict)
打印resp发现其为markdown格式,所以也是按markdown格式编写目录,而不是字典格式:
```markdown
# MySQL 教程

## 目录

### 第一部分:基础入门
1. 数据库概述
2. MySQL 安装与配置
...
\```
而OutputParser.extract_struct函数只能处理list或者dict格式,所以此时返回的结果是空字典{}。而如果生成的resp是json格式,则大概率解析正确.以下是修改的DIRECTORY_PROMPT,加了in JSON format以及第二条(规定只写两个子目录,只是演示而已省点tokens,结果每个子目录9章)。
DIRECTORY_PROMPT = (
    COMMON_PROMPT
    + """
Please provide the specific table of contents for this tutorial in JSON format, strictly following the following requirements:
1. The output must be strictly in the specified language, {language}.
2. Include a primary directory with two practical sub-directory titles.
3. Answer strictly in the dictionary format like {{"title": "xxx", "directory": [{{"dir 1": ["sub dir 1", "sub dir 2"]}}, {{"dir 2": ["sub dir 3", "sub dir 4"]}}]}}.
4. The directory should be as specific and sufficient as possible, with a primary and secondary directory.The secondary directory is in the array.
5. Do not have extra spaces or line breaks.
6. Each directory title has practical significance.
"""
)
```json
{
  "title": "MySQL 教程",
  "directory": [
    {
      "MySQL 基础": [
        "第1章:MySQL 简介",
        "第2章:安装和配置 MySQL",
        "第3章:SQL 语言基础",
        "第4章:数据库的创建和管理",
        "第5章:表的创建和管理",
        "第6章:数据类型和约束",
        "第7章:索引的使用",
        "第8章:数据的增删改查",
        "第9章:视图和存储过程"
      ]
    },
    {
      "MySQL 进阶": [
        "第10章:触发器和函数",
        "第11章:事务管理",
        "第12章:数据库性能优化",
        "第13章:MySQL 备份与恢复",
        "第14章:MySQL 安全",
        "第15章:MySQL 复制",
        "第16章:MySQL 高级特性",
        "第17章:MySQL 与其他系统的集成",
        "第18章:MySQL 故障排查与维护"
      ]
    }
  ]
}

\```
WriteDirectory返回结果为:
metagpt.roles.tutorial_assistant:_act:79 - {'title': 'MySQL 教程', 'directory': [{'MySQL 基础': ['第1章:MySQL 简介', '第2章:安装和配置 MySQL', '第3章:SQL 语言基础', '第4章:数据库的创建和管理', '第5章:表的创建和管理', '第6章:数据类型和约束', '第7章:索引的使用', '第8章:数据的增删改查', '第9章:视图和存储过程']}, {'MySQL 进阶': ['第10章:触发器和函数', '第11章:事务管理', '第12章:数据库性能优化', '第13章:MySQL 备份与恢复', '第14章:MySQL 安全', '第15章:MySQL 复制', '第16章:MySQL 高级特性', '第17章:MySQL 与其他系统的集成', '第18章:MySQL 故障排查与维护']}]}
生成的教程文档在项目的 /data/tutorial_docx 目录下:

注意:该角色暂未支持联网搜索能力,内容生成依赖 LLM 大模型训练的数据。
3.5 作业
按以下要求编写智能体:
- 拥有三个动作: 打印1 打印2 打印3(初始化时 init_action([print,print,print]))
- 重写有关方法(请不要使用act_by_order,我希望你能独立实现)使得 Agent 顺序执行上面三个动作
- 当上述三个动作执行完毕后,为 Agent 生成新的动作 打印4 打印5 打印6 并顺序执行,(之前我们初始化了三个 print 动作,执行完毕后,重新 init_action([…,…,…]),然后顺序执行这个新生成的动作列表)
这个作业可以用多种思路去解决,比如我可以直接写死一整套的逻辑,甚至都不需要引入llm来完成这个工作;也可以试着在中间的某个环节中加入llm的交互,来尝试减少硬编码的工作(就像1.4中,我们实际上是让llm帮我们设计了 action 列表的内容)。你还也可以在此基础上做出更多的尝试,希望大家通过这个作业来感受 MetaGPT 中 Agent 的行动逻辑——run->react->think->act 的这样一个过程。
为了完成作业,对role源码进行部分解析。
3.5.1 Role简介
class Role(SerializationMixin, ContextMixin, BaseModel):
    """Role/Agent"""
	# model_config:存储智能体各种配置的字典。
    model_config = ConfigDict(arbitrary_types_allowed=True, extra="allow")

    name: str = ""
    profile: str = "" 									# 描述智能体担当的角色或者特征。
    goal: str = ""
    constraints: str = ""   								# 智能体的约束条件。
    desc: str = ""          								# 智能体的描述。
    is_human: bool = False									# 标志智能体是否是人类。

    role_id: str = ""										# 智能体的唯一标识符。
    states: list[str] = []  								# 智能体状态列表。

    # scenarios to set action system_prompt:
    #   1. `__init__` while using Role(actions=[...])
    #   2. add action to role while using `role.set_action(action)`
    #   3. set_todo while using `role.set_todo(action)`
    #   4. when role.system_prompt is being updated (e.g. by `role.system_prompt = "..."`)
    # Additional, if llm is not set, we will use role's llm
    actions: list[SerializeAsAny[Action]] = Field(default=[], validate_default=True)
    rc: RoleContext = Field(default_factory=RoleContext)  # `RoleContext` 实例,用于管理智能体的上下文信息。
    addresses: set[str] = set()  					  	  # 智能体的地址集合,可能是信息传播的标签。
    planner: Planner = Field(default_factory=Planner) 	  # `Planner` 实例,用于规划智能体的行为。

    # builtin variables
    recovered: bool = False  						 	  # 标志智能体是否已从中断中恢复。
    latest_observed_msg: Optional[Message] = None    	  # 记录中断时智能体最近观察到的信息。
其主要方法为:
-
行为方法:
set_todo: 设置智能体的后续动作。_reset: 重置智能体的状态和动作。set_action: 添加一个动作。set_actions: 添加多个动作。_set_react_mode: 设置智能体的响应模式。_watch: 让智能体监视感兴趣的动作。_set_state: 更新当前状态。_get_prefix: 获取智能体的前缀,用于构建提示或者信息。_think: 智能体思考下一步动作。_act: 智能体执行动作。_observe: 准备新消息以供处理。_react: 标准的思考-行动循环。_act_by_order: 根据顺序执行动作。_plan_and_act: 首先规划,然后执行一个动作序列。publish_message: 将消息发布给环境。put_message: 将消息放入私有消息缓冲区。run: 观察并基于观察的结果思考和行动。
-
信息处理方法:
get_memories: 获取记忆中的消息。think: 导出的API,用于AgentStore RPC。act: 导出的API,用于AgentStore RPC。
-
其他方法:
is_idle: 判断智能体是否闲置。action_description: 获取当前智能体行动的描述。
3.5.2 set_actions
set_actions函数用于将动作加入到self.actions 中,最终self.actions列表存储了我们所有的动作。
def set_actions(self, actions: list[Union[Action, Type[Action]]]):
    """Add actions to the role.

    Args:
        actions: list of Action classes or instances
    """
    self._reset()
    for action in actions:
        if not isinstance(action, Action):
            i = action(context=self.context)
        else:
            if self.is_human and not isinstance(action.llm, HumanProvider):
                logger.warning(
                    f"is_human attribute does not take effect, "
                    f"as Role's {str(action)} was initialized using LLM, "
                    f"try passing in Action classes instead of initialized instances"
                )
            i = action
        self._init_action(i)
        self.actions.append(i)
        self.states.append(f"{len(self.actions) - 1}. {action}")
def _reset(self):
	self.states = []
	self.actions = []

def _init_action(self, action: Action):
    if not action.private_config:
        action.set_llm(self.llm, override=True)
    else:
        action.set_llm(self.llm, override=False)
    action.set_prefix(self._get_prefix())
代码解析:
-
初始化
self.states、self.actions为空列表 -
遍历
actions列表,检查每个action是否是Action类的实例。- 如果不是,则创建一个新的
Action实例并赋值给变量i; - 如果是,会检查是否设置为人工操作(is_human)。如果是人工操作,则会发出警告,并创建一个新的
Action实例并将其赋值给变量i。
- 如果不是,则创建一个新的
-
初始化变量
i,使用set_prefix方法,设置action的前缀。 -
将
i添加到actions列表中。 -
将表示操作的字符串添加到
states列表中
最后输出的样例:
['0. WriteContent', '1. WriteContent', '2. WriteContent', '3. WriteContent', '4. WriteContent', '5. WriteContent', '6. WriteContent', '7. WriteContent', '8. WriteContent']
3.5.3 run方法
接着我们来查看Role基类中run方法的实现。
- 预处理
with_message,将入参转化为Message对象并添加到role的记忆中。 - 执行
react方法,采取三种react_mode中的一种来执行Actions。完毕后执行self._set_state()方法将此时状态设为-1,则此时self.rc.todo为None,不再执行动作。 - 完毕后执行
self.set_todo(None),self.publish_message(rsp)。
 async def run(self, with_message=None) -> Message | None:
    """Observe, and think and act based on the results of the observation"""

    if with_message:
    	'''如果with_message存在,它会检查其的类型,字符串转为Message对象;
		   列表则将表中的消息合并成一个新的消息;最后调用react()方法;'''
        msg = None
        if isinstance(with_message, str):
            msg = Message(content=with_message)
        elif isinstance(with_message, Message):
            msg = with_message
        elif isinstance(with_message, list):
            msg = Message(content="\n".join(with_message))
        if not msg.cause_by:
            msg.cause_by = UserRequirement
        self.put_message(msg)
    if not await self._observe():
        # If there is no new information, suspend and wait
        logger.debug(f"{self._setting}: no news. waiting.")
        return

    rsp = await self.react()

    # Reset the next action to be taken.
    self.set_todo(None)
    # Send the response message to the Environment object to have it relay the message to the subscribers.
    self.publish_message(rsp)
    return rsp
react方法的实现:
async def react(self) -> Message:
    """Entry to one of three strategies by which Role reacts to the observed Message"""
    if self.rc.react_mode == RoleReactMode.REACT or self.rc.react_mode == RoleReactMode.BY_ORDER:
        rsp = await self._react()
    elif self.rc.react_mode == RoleReactMode.PLAN_AND_ACT:
        rsp = await self._plan_and_act()
    else:
        raise ValueError(f"Unsupported react mode: {self.rc.react_mode}")
    self._set_state(state=-1)  # current reaction is complete, reset state to -1 and todo back to None
    return rsp
当为REACT模式或者BY_ORDER模式时,会按照_react方法执行动作,当self._think()为空时退出执行,否则循环执行_act方法,并将actions_taken+1,最后返回最终执行结果rsp。
async def _react(self) -> Message:
    """Think first, then act, until the Role _think it is time to stop and requires no more todo.
    This is the standard think-act loop in the ReAct paper, which alternates thinking and acting in task solving, i.e. _think -> _act -> _think -> _act -> ...
    Use llm to select actions in _think dynamically
    """
    actions_taken = 0
    rsp = Message(content="No actions taken yet", cause_by=Action)  # will be overwritten after Role _act
    while actions_taken < self.rc.max_react_loop:
        # think
        todo = await self._think()
        if not todo:
            break
        # act
        logger.debug(f"{self._setting}: {self.rc.state=}, will do {self.rc.todo}")
        rsp = await self._act()
        actions_taken += 1
    return rsp  # return output from the last action
self.rc.max_react_loop的值为:
if react_mode == RoleReactMode.REACT:
    self.rc.max_react_loop = max_react_loop
    ...
if self.rc.react_mode == RoleReactMode.BY_ORDER:
    if self.rc.max_react_loop != len(self.actions):
        self.rc.max_react_loop = len(self.actions)
    self._set_state(self.rc.state + 1)
        return self.rc.state >= 0 and self.rc.state < len(self.actions)
    ....
_set_state方法如下,这里的state就代表当前agent需要执行动作的下标,当state为-1时,此时没有需要执行的action, self.rc.todo 就为空。
def _set_state(self, state: int):
    """Update the current state."""
    self.rc.state = state
    logger.debug(f"actions={self.actions}, state={state}")
    # 根据action的下标获取列表中对应的action,如果state为-1,则设为None
    self.set_todo(self.actions[self.rc.state] if state >= 0 else None)
def set_todo(self, value: Optional[Action]):
        """Set action to do and update context"""
        if value:
            value.context = self.context
        self.rc.todo = value
3.5.4 _act方法、_think方法
_react方法中调用了_act方法和_think方法,代码如下:
async def _act(self) -> Message:
    logger.info(f"{self._setting}: to do {self.rc.todo}({self.rc.todo.name})")
    response = await self.rc.todo.run(self.rc.history)
    if isinstance(response, (ActionOutput, ActionNode)):
        msg = Message(
            content=response.content,
            instruct_content=response.instruct_content,
            role=self._setting,
            cause_by=self.rc.todo,
            sent_from=self,
        )
    elif isinstance(response, Message):
        msg = response
    else:
        msg = Message(content=response or "", role=self.profile, cause_by=self.rc.todo, sent_from=self)
    self.rc.memory.add(msg)

	return msg
async def _think(self) -> bool:
    """Consider what to do and decide on the next course of action. Return false if nothing can be done."""
    if len(self.actions) == 1:
        # If there is only one action, then only this one can be performed
        self._set_state(0)

        return True

    if self.recovered and self.rc.state >= 0:
        self._set_state(self.rc.state)  # action to run from recovered state
        self.recovered = False  # avoid max_react_loop out of work
        return True

    prompt = self._get_prefix()
    prompt += STATE_TEMPLATE.format(
        history=self.rc.history,
        states="\n".join(self.states),
        n_states=len(self.states) - 1,
        previous_state=self.rc.state,
    )

    next_state = await self.llm.aask(prompt)
    next_state = extract_state_value_from_output(next_state)
    logger.debug(f"{prompt=}")

    if (not next_state.isdigit() and next_state != "-1") or int(next_state) not in range(-1, len(self.states)):
        logger.warning(f"Invalid answer of state, {next_state=}, will be set to -1")
        next_state = -1
    else:
        next_state = int(next_state)
        if next_state == -1:
            logger.info(f"End actions with {next_state=}")
    self._set_state(next_state)
    return True


 4111
4111

 被折叠的 条评论
为什么被折叠?
被折叠的 条评论
为什么被折叠?
 到【灌水乐园】发言


