


文章目录
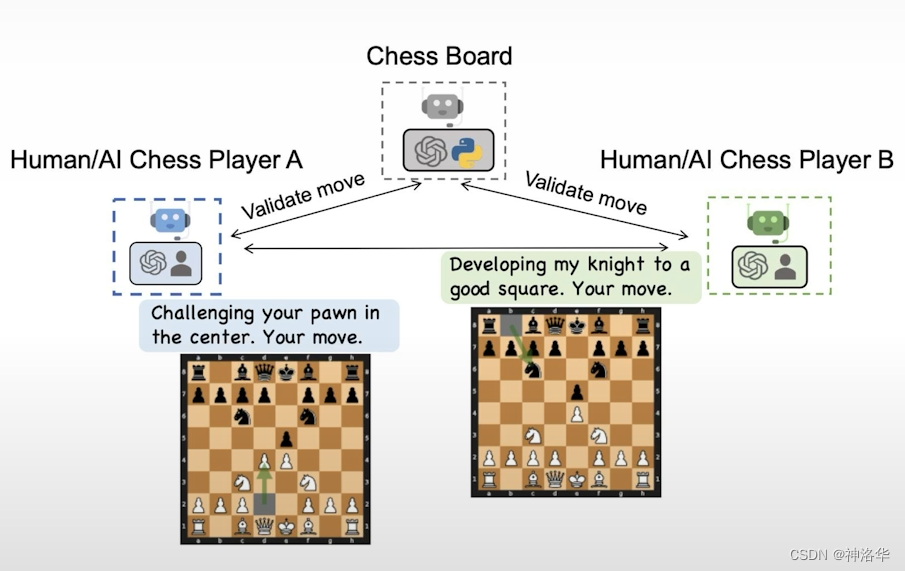
四、工具使用: 国际象棋游戏
在前几节课中,我们学习了如何使用AutoGen中的对话代理进行对话,并使用LLM生成回复。在本课中,我们将学习一种新功能,以嵌套聊天作为对话模式,使代理能够使用工具完成任务。我们将在两个代理之间构建一个对话式的国际象棋游戏,在对话中调用工具,在棋盘上合法移动。
4.1 准备工具
- 使用Python的chess库来管理棋盘和游戏进程。
- 初始化棋盘,并创建一个变量
made_move跟踪是否已进行移动。 - 定义工具函数:
get_legal_moves:返回棋盘上所有合法的移动,以UCI格式表示。
将棋子移动情况以UCI格式的字符串表示,并添加注释Annotated[str, "A list of legal moves in UCI format"],可以让代理明白内容格式及其含义,明白它采取了哪些动作。make_move:根据输入的UCI格式移动棋子,并返回移动结果。
import chess
import chess.svg
from typing_extensions import Annotated

llm_config = {"model": "gpt-4-turbo"}
board = chess.Board()                   # 初始化棋盘
made_move = False						# 定义变量跟踪棋盘移动状态

def get_legal_moves(
    ) -> Annotated[str, "A list of legal moves in UCI format"]:
    return "Possible moves are: " + ",".join(
        [str(move) for move in board.legal_moves]
    )

def make_move(
    move: Annotated[str, "A move in UCI format."]
) -> Annotated[str, "Result of the move."]:
	"""
	代理可以根据特定字符串调用此函数,所以也需要UCI格式。
	函数的值是移动结果的字符串
	"""
    move = chess.Move.from_uci(move)  # 解析输入的棋步
    board.push_uci(str(move))		  # 执行棋步
    global made_move
    made_move = True				  # 表示已经做出棋步

    # 展示更新后的棋盘,并高亮显示所移动的棋子和目标位置
    display(
        chess.svg.board(
            board,
            arrows=[(move.from_square, move.to_square)],
            fill={move.from_square: "gray"},
            size=200
        )
    )

    # 返回一个字符串,描述这次移动,包括棋子的名称和位置变化
    piece = board.piece_at(move.to_square)
    piece_symbol = piece.unicode_symbol()
    piece_name = (
        chess.piece_name(piece.piece_type).capitalize()
        if piece_symbol.isupper()
        else chess.piece_name(piece.piece_type)
    )
    return f"Moved {piece_name} ({piece_symbol}) from "\
    f"{chess.SQUARE_NAMES[move.from_square]} to "\
    f"{chess.SQUARE_NAMES[move.to_square]}."
4.2 创建两个棋手代理和棋盘代理
- 定义
player_white和player_black作为两个棋手代理,分别扮演白方和黑方,并通过system_message指示它们如何行动以及可调用的工具:先调用get_legal_moves()获取合法棋步,然后调用make_move(move)来做出棋步。 - 定义
board_proxy代理负责管理棋盘状态。- 使用
check_made_move函数用于检查是否有新的棋步发生,检查玩家的移动是否合法 - 使用
is_termination_msg设置终止条件,当有移动时(check_made_move=True),终止与棋手代理的交谈,否则它会不停询问棋手代理要求其采取行动("Please make a move.")。 - 并更新棋盘状态(移动后重置
made_move)。
- 使用
from autogen import ConversableAgent

# 白方棋手代理
player_white = ConversableAgent(
    name="Player White",
    system_message="You are a chess player and you play as white. "
    "First call get_legal_moves(), to get a list of legal moves. "
    "Then call make_move(move) to make a move.",
    llm_config=llm_config,
)

# 黑方棋手代理
player_black = ConversableAgent(
    name="Player Black",
    system_message="You are a chess player and you play as black. "
    "First call get_legal_moves(), to get a list of legal moves. "
    "Then call make_move(move) to make a move.",
    llm_config=llm_config,
)

def check_made_move(msg):
    global made_move
    if made_move:
        made_move = False
        return True
    else:
        return False

# 棋盘代理
board_proxy = ConversableAgent(
    name="Board Proxy",
    llm_config=False,
    is_termination_msg=check_made_move,
    default_auto_reply="Please make a move.",
    human_input_mode="NEVER",
)
4.3 注册工具到代理
使用Autogen的register函数将工具get_legal_moves和make_move注册到玩家代理,其中caller为调用方,executor为执行方。注册后,棋手代理可以调用这两个工具,而棋盘代理将执行工具调用的结果。
from autogen import register_function

for caller in [player_white, player_black]:
    register_function(
        get_legal_moves,
        caller=caller,
        executor=board_proxy,
        name="get_legal_moves",
        description="Get legal moves.",
    )

    register_function(
        make_move,
        caller=caller,
        executor=board_proxy,
        name="make_move",
        description="Call this tool to make a move.",
    )
我们可以检查黑方玩家现在所配置的工具,这些工具遵循OpenAI的工具定义。
player_black.llm_config["tools"]
[{'type': 'function',
  'function': {'description': 'Get legal moves.',
   'name': 'get_legal_moves',
   'parameters': {'type': 'object', 'properties': {}, 'required': []}}},
 {'type': 'function',
  'function': {'description': 'Call this tool to make a move.',
   'name': 'make_move',
   'parameters': {'type': 'object',
    'properties': {'move': {'type': 'string',
      'description': 'A move in UCI format.'}},
    'required': ['move']}}}]
4.4 创建对话流程,开始对话
配置白方和黑方的对话流程。在玩家进行移动前,将与棋盘代理对话确保移动合法。每当一方做出棋步时,棋盘代理会触发消息发送给对手。
player_white.register_nested_chats(
    trigger=player_black,
    chat_queue=[
        {
            "sender": board_proxy,
            "recipient": player_white,
            "summary_method": "last_msg",
        }
    ],
)

player_black.register_nested_chats(
    trigger=player_white,
    chat_queue=[
        {
            "sender": board_proxy,
            "recipient": player_black,
            "summary_method": "last_msg",
        }
    ],
)
trigger=player_black: 这意味着每当黑方完成一个动作或发送一条消息后,将触发白方player_white.register_nested_chats()定义的一系列动作。chat_queue: 这是一个字典列表,定义了在trigger发生后,哪些消息将被发送和接收。sender: 定义消息的发送者。当触发后,board_proxy将会发送一条消息给player_white。recipient: 定义消息的接收者,即player_white。接收到消息后,白方棋手可以做出相应的行动(如获取合法棋步、做出棋步等)。summary_method: 定义了如何总结和传递消息。在这个例子中,使用"last_msg",表示将最后一条消息作为摘要传递给接收者player_white。
这段代码定义了自动化交互流程——当黑方做出动作后,如何自动通知白方进行下一步操作。完成动作后,另一个代理能收到相应的通知,从而保持游戏的连贯性和顺畅进行。
board = chess.Board()
chat_result = player_black.initiate_chat(
    player_white,
    message="Let's play chess! Your move.",
    max_turns=2,
)
- 白棋代理生成初始消息,要求黑棋进行移动。
- 黑棋代理调用工具
get_legal_moves获取合法移动,并选择一个移动。 - 棋盘代理执行该移动并更新棋盘状态,随后黑棋代理将结果回复给白棋代理。
- 白棋代理和黑棋代理轮流进行上述步骤,确保每一步都是合法的。
4.5 增加趣味性:加入闲聊
这场比赛中,两位棋手只是在谈论如何下棋,为了增加一些趣味性,可以为棋手代理增加闲聊功能,使游戏更有趣。我们可以更改棋手代理的系统消息,加入”在移动后,闲聊以使游戏更有趣“的指令,接下来是相同的流程。
# 定义棋手代理
player_white = ConversableAgent(
    name="Player White",
    system_message="You are a chess player and you play as white. "
    "First call get_legal_moves(), to get a list of legal moves. "
    "Then call make_move(move) to make a move. "
    "After a move is made, chitchat to make the game fun.",
    llm_config=llm_config,
)

player_black = ConversableAgent(
    name="Player Black",
    system_message="You are a chess player and you play as black. "
    "First call get_legal_moves(), to get a list of legal moves. "
    "Then call make_move(move) to make a move. "
    "After a move is made, chitchat to make the game fun.",
    llm_config=llm_config,
)

# 为棋手代理注册工具
for caller in [player_white, player_black]:
    register_function(
        get_legal_moves,
        caller=caller,
        executor=board_proxy,
        name="get_legal_moves",
        description="Get legal moves.",
    )

    register_function(
        make_move,
        caller=caller,
        executor=board_proxy,
        name="make_move",
        description="Call this tool to make a move.",
    )
设置silent为True,可以隐去代理内部的工具调用过程,只显示代理之间的外部对话过程。
# 创建对话流程
player_white.register_nested_chats(
    trigger=player_black,
    chat_queue=[
        {
            "sender": board_proxy,
            "recipient": player_white,
            "summary_method": "last_msg",
            "silent": True,
        }
    ],
)

player_black.register_nested_chats(
    trigger=player_white,
    chat_queue=[
        {
            "sender": board_proxy,
            "recipient": player_black,
            "summary_method": "last_msg",
            "silent": True,
        }
    ],
)

# 开始对话
board = chess.Board()

chat_result = player_black.initiate_chat(
    player_white,
    message="Let's play chess! Your move.",
    max_turns=2,
)


本课展示了一种在消息聊天中使用工具的具体方法,代理可以提出工具使用请求并由另一个代理执行。在其他应用中,你可能希望明确展示工具的使用提议和执行过程。在下一课中,我们将演示其他使用工具的方法,例如使自由编写代码或用户自定义函数的使用。
五、代码编写:财务分析
在前几节课中,我们学习了如何使用AutoGen创建能够使用工具的代理,利用OpenAI的工具使用功能。一个局限是许多其他模型没有相同的功能,或者有时你希望代理在编写自由风格代码时更具创造性,而不仅仅是使用某些预定义的函数。
在本课中,我们将探索如何为代理添加编程能力,并使用生成的代码完成财务分析任务。你将构建两个代理系统,代理们将协作解决任务,同时请求人类反馈。第一个代理将使用大模型从头生成代码,第二个代理将利用用户提供的代码。

5.1导入和配置代码执行器
首先 ,我们创建一个代码执行器并进行配置,例如设置超时限制为60秒,工作目录为coding(保存所有代码和中间结果)。
from autogen.coding import LocalCommandLineCodeExecutor

executor = LocalCommandLineCodeExecutor(
    timeout=60,
    work_dir="coding",
)
AutoGen有多种类型的代码执行器,包括基于Docker的代理执行器和基于jupyter notebook的代码执行器。
5.2 创建 代码执行/编写 代理
接下来,创建一个代码执行代理code_executor_agent,这个代理不需要使用大模型进行回复,而只是执行代码。同时,设置人类输入模式为always,即在执行代码前总是请求人类确认。如果此代理找不到任何可执行的代码,它将回复”请继续,如果一切完成,回复终止“。
from autogen import ConversibleAgent, AssistantAgent

code_executor_agent = ConversableAgent(
    name="code_executor_agent",
    llm_config=False,
    code_execution_config={"executor": executor},
    human_input_mode="ALWAYS",
    default_auto_reply=
    "Please continue. If everything is done, reply 'TERMINATE'.",
)
创建一个能够使用LLM编写代码的代理code_writer_agent,设置人类输入模式为never。 code_execution_config设为False,表示只编写代码而不执行。
llm_config = {"model": "gpt-4-turbo"}

code_writer_agent = AssistantAgent(
    name="code_writer_agent",
    llm_config=llm_config,
    code_execution_config=False,
    human_input_mode="NEVER",
)
我们可以打印代理的系统消息,查看其详细说明。
code_writer_agent_system_message = code_writer_agent.system_message
print(code_writer_agent_system_message)
You are a helpful AI assistant.
Solve tasks using your coding and language skills.
In the following cases, suggest python code (in a python coding block) or shell script (in a sh coding block) for the user to execute.
    1. When you need to collect info, use the code to output the info you need, for example, browse or search the web, download/read a file, print the content of a webpage or a file, get the current date/time, check the operating system. After sufficient info is printed and the task is ready to be solved based on your language skill, you can solve the task by yourself.
    2. When you need to perform some task with code, use the code to perform the task and output the result. Finish the task smartly.
Solve the task step by step if you need to. If a plan is not provided, explain your plan first. Be clear which step uses code, and which step uses your language skill.
When using code, you must indicate the script type in the code block. The user cannot provide any other feedback or perform any other action beyond executing the code you suggest. The user can't modify your code. So do not suggest incomplete code which requires users to modify. Don't use a code block if it's not intended to be executed by the user.
If you want the user to save the code in a file before executing it, put # filename: <filename> inside the code block as the first line. Don't include multiple code blocks in one response. Do not ask users to copy and paste the result. Instead, use 'print' function for the output when relevant. Check the execution result returned by the user.
If the result indicates there is an error, fix the error and output the code again. Suggest the full code instead of partial code or code changes. If the error can't be fixed or if the task is not solved even after the code is executed successfully, analyze the problem, revisit your assumption, collect additional info you need, and think of a different approach to try.
When you find an answer, verify the answer carefully. Include verifiable evidence in your response if possible.
Reply "TERMINATE" in the end when everything is done.
"""中文翻译:
你是一个有用的人工智能助手。
使用你的编码和语言技能来解决任务。
在以下情况下,为用户建议执行Python代码(在Python代码块中)或Shell脚本(在sh代码块中)。
    1. 当你需要收集信息时,使用代码输出你需要的信息,例如浏览或搜索网络,下载/读取文件,打印网页或文件内容,获取当前日期/时间,检查操作系统。在打印出足够的信息并准备好基于你的语言技能解决任务之后,你可以自己解决这个任务。
    2. 当你需要使用代码执行某些任务时,使用代码执行任务并输出结果。智能地完成任务。
如果需要,请逐步解决任务。如果没有提供计划,请先解释你的计划。明确哪一步使用代码,哪一步使用你的语言技能。
使用代码时,你必须在代码块中指示脚本类型。用户除了执行你建议的代码之外,不能提供任何其他反馈或执行任何其他操作。用户不能修改你的代码。因此不要建议需要用户修改的不完整代码。如果不打算让用户执行,请不要使用代码块。
如果你希望用户在执行之前将代码保存到文件中,请在代码块的第一行内放入 # filename: <filename>。不要在一个响应中包含多个代码块。不要要求用户复制和粘贴结果。相反,当相关时使用'print'函数进行输出。检查用户返回的执行结果。
如果结果表明有错误,请修复错误并再次输出代码。建议完整的代码,而不是部分代码或代码更改。如果错误无法修复,或者即使代码执行成功任务也没有解决,请分析问题,重新审视你的假设,收集你需要的其他信息,并思考尝试不同的方法。
当你找到答案时,请仔细验证答案。如果可能的话,请在回复中包含可验证的证据。
当一切都完成时,最后回复"TERMINATE"。
"""
5.3 定义财务分析任务,启动对话
接下来我们定义一个财务分析任务,要求创建一张显示 NVDA 和 TSLA 股票年初至今涨幅的图表,确保代码在 markdown 代码块中,并将图像保存为 ytd_stock_gains.png。
import datetime

today = datetime.datetime.now().date()
message = f"Today is {today}. "\
"Create a plot showing stock gain YTD for NVDA and TLSA. "\
"Make sure the code is in markdown code block and save the figure"\
" to a file ytd_stock_gains.png."

chat_result = code_executor_agent.initiate_chat(
    code_writer_agent,
    message=message,
)
code_executor_agent (to code_writer_agent):

Today is 2024-05-01. Create a plot showing stock gain YTD for NVDA and TLSA. Make sure the code is in markdown code block and save the figure to a file ytd_stock_gains.png.

--------------------------------------------------------------------------------
code_writer_agent (to code_executor_agent):

To create a plot showing the Year-To-Date (YTD) stock gains for Nvidia (NVDA) and Tesla (TSLA) as of 2024-05-01, we can use Python with libraries such as `pandas`, `pandas_datareader`, and `matplotlib`. Below are the steps we'll take in the script:

1. Define the start date of the year (2024-01-01) and the end date (2024-05-01).
2. Fetch the stock data for NVDA and TSLA using `pandas_datareader` from a suitable data source like Yahoo Finance.
3. Calculate daily gains based on the closing prices.
4. Plot the stock performance (% gains) from the start of the year to the specified date.
5. Save the resulting plot to a PNG file named `ytd_stock_gains.png`.

I'll provide you the entire script to execute. This script will use Yahoo Finance to obtain the stock data.

Make sure you have Python and the required libraries installed. If not, you can install them using pip:pip install pandas pandas_datareader matplotlib
Here's the complete Python script: # 接下来是代理给出的代码内容

# filename: plot_stock_gains_ytd.py
import pandas as pd
import pandas_datareader.data as web
import matplotlib.pyplot as plt
from datetime import datetime

# Define the date range
start_date = '2024-01-01'
end_date = '2024-05-01'

# Fetch stock data
nvda = web.DataReader('NVDA', 'yahoo', start_date, end_date)
tsla = web.DataReader('TSLA', 'yahoo', start_date, end_date)

# Calculate the YTD performance in percentage
nvda['Gain'] = (nvda['Close'] / nvda['Close'].iloc[0] - 1) * 100
tsla['Gain'] = (tsla['Close'] / tsla['Close'].iloc[0] - 1) * 100

# Create the plot
plt.figure(figsize=(10, 5))
plt.plot(nvda.index, nvda['Gain'], label='NVDA YTD Gain %')
plt.plot(tsla.index, tsla['Gain'], label='TSLA YTD Gain %')
plt.title('YTD Stock Gains for NVDA and TSLA as of 2024-06-03')
plt.xlabel('Date')
plt.ylabel('Percentage Gain')
plt.legend()
plt.grid(True)

# Save the plot
plt.savefig('ytd_stock_gains.png')
plt.show()

Copy this script into a Python file named `plot_stock_gains_ytd.py`, and execute this script. It should display the plot and save it to `ytd_stock_gains.png`. Let me know if there are any issues!
打印图表:
import os
from IPython.display import Image

Image(os.path.join("coding", "ytd_stock_gains.png"))

5.4 用户提供代码给代理使用
为了更好搞得控制财务分析任务的完成,用户也可以提供自己编写的部分代码来让代理使用,而不是完全让代理编写所有代码。
5.4.1 编写股价获取和绘图函数
下面我们直接编写get_stock_prices函数和plot_stock_prices函数,分别用于获取股票价格以及绘制股价图。
def get_stock_prices(stock_symbols, start_date, end_date):
    """Get the stock prices for the given stock symbols between
    the start and end dates.

    Args:
        stock_symbols (str or list): The stock symbols to get the
        prices for.
        start_date (str): The start date in the format
        'YYYY-MM-DD'.
        end_date (str): The end date in the format 'YYYY-MM-DD'.

    Returns:
        pandas.DataFrame: The stock prices for the given stock
        symbols indexed by date, with one column per stock
        symbol.
    """
    import yfinance

	# 使用 yfinance下载股票数据
    stock_data = yfinance.download(
        stock_symbols, start=start_date, end=end_date
    )
    return stock_data.get("Close")
stock_symbols:股票符号列表,如 [‘NVDA’, ‘TSLA’]return stock_data.get("Close"):使用 yfinance 库下载股票数据,并返回收盘价数据
def plot_stock_prices(stock_prices, filename):
    """Plot the stock prices for the given stock symbols.

    Args:
        stock_prices (pandas.DataFrame): The stock prices for the
        given stock symbols.
    """
    import matplotlib.pyplot as plt

    plt.figure(figsize=(10, 5))
    for column in stock_prices.columns:
        plt.plot(
            stock_prices.index, stock_prices[column], label=column
                )
    plt.title("Stock Prices")
    plt.xlabel("Date")
    plt.ylabel("Price")
    plt.grid(True)
    plt.savefig(filename)
5.4.2 让编码代理使用预定义函数完成任务
两个预定义的函数已经编写好了,下面在executor的创建方法中加入functions参数,来告诉代理可以使用这两个函数作为工具调用。
executor = LocalCommandLineCodeExecutor(
    timeout=60,
    work_dir="coding",
    functions=[get_stock_prices, plot_stock_prices],
)

# 将执行器中的函数格式化为系统消息,追加到 code_writer_agent_system_message中
code_writer_agent_system_message += executor.format_functions_for_prompt()
print(code_writer_agent_system_message)
更新后的code_writer_agent的系统消息前半部分不变,后面增加了使用用户预定义函数内的部分:
Reply "TERMINATE" in the end when everything is done.
    You have access to the following user defined functions. They can be accessed from the module called `functions` by their function names.

For example, if there was a function called `foo` you could import it by writing `from functions import foo`

def get_stock_prices(stock_symbols, start_date, end_date):
    """Get the stock prices for the given stock symbols between
        the start and end dates.

        Args:
            stock_symbols (str or list): The stock symbols to get the
            prices for.
            start_date (str): The start date in the format
            'YYYY-MM-DD'.
            end_date (str): The end date in the format 'YYYY-MM-DD'.

        Returns:
            pandas.DataFrame: The stock prices for the given stock
            symbols indexed by date, with one column per stock
            symbol.
    """
    ...

def plot_stock_prices(stock_prices, filename):
    """Plot the stock prices for the given stock symbols.

        Args:
            stock_prices (pandas.DataFrame): The stock prices for the
            given stock symbols.
    """
    ...
5.4.3 使用新的系统消息更新agents,开始对话
- 创建代理,配置系统消息和语言模型
- 不使用代码执行配置(
code_execution_config=False) - 人工输入模式设置为 “
NEVER”
code_writer_agent = ConversableAgent(
    name="code_writer_agent",
    system_message=code_writer_agent_system_message,
    llm_config=llm_config,
    code_execution_config=False,
    human_input_mode="NEVER",
)

code_executor_agent = ConversableAgent(
    name="code_executor_agent",
    llm_config=False,
    code_execution_config={"executor": executor},
    human_input_mode="ALWAYS",
    default_auto_reply=
    "Please continue. If everything is done, reply 'TERMINATE'.",
)
chat_result = code_executor_agent.initiate_chat(
    code_writer_agent,
    message=f"Today is {today}."
    "Download the stock prices YTD for NVDA and TSLA and create"
    "a plot. Make sure the code is in markdown code block and "
    "save the figure to a file stock_prices_YTD_plot.png.",
)

Image(os.path.join("coding", "stock_prices_YTD_plot.png"))

5.5 总结
本章介绍了两种创建代理实现代码编写并执行的方式: 基于默认助手代理的代码编写方式
和基于用户提供的函数的代码编写方式(工具调用)。下面总结这两种方式的区别以及它们的适用场景:
-
基于大模型的代码编写能力
- 优点
- 高度灵活:能够根据自然语言描述动态生成所需的代码(依赖大模型的代码编写和生成能力)。
- 适合复杂任务:可以处理多种复杂任务,尤其是那些需要生成新代码的场景。
- 减少初始工作量:无需预定义函数或工具,可以直接生成代码。
- 缺点:
- 模型依赖:需要底层模型具备强大的代码编写能力,对于某些模型可能不够稳定或准确。
- 安全性、确定性、可维护性差:生成的代码可能不在预期范围内,存在执行未知代码的风险,可能不易维护和调试。
- 优点
-
基于用户提供的函数(工具调用)
- 优点
- 普遍性:不依赖于大模型的代码编写能力,只需要模型能够调用预定义函数,故适用于任何具备函数调用能力的模型,更加通用。
- 适合标准化任务:更适合重复性、标准化的任务。
- 安全性、确定性、维护性高:只执行预定义的、经过验证的函数,减少风险。代码结构化,易于理解和维护。
- 缺点:
- 初始工作量大:需要预先定义和测试函数。
- 灵活性较低:只能执行预定义的功能,无法动态生成新代码。
- 优点
总结: 基于大模型的代码编写方式适用于需要动态生成代码、处理复杂和多样化任务的场景。 基于用户提供的函数方式适用于重复性、高安全性和标准化的任务。两种方式可以互相结合,确保任务顺利完成。
本课展示了如何为代理添加编程能力,完成财务分析任务。我们还讨论了代码执行和工具调用的区别,以及不同方法的优缺点。下一课中,我们将学习使用编码代理、规划代理和执行代理,通过群聊模式完成一个更复杂的任务。
六、多代理群聊:库存报告生成
在本课中,我们将学习最后一种代理设计模式——规划(planing),以及一种新的对话形式——群聊。通过构建一个自定义的群聊系统,以协作生成股票过去一个月表现的详细报告。这一复杂任务涉及规划,通过在群聊中引入一个规划代理来实现。此外,我们还将学习如何自定义群聊中的发言人切换。
6.1 任务定义和代理配置
在之前的课程中,我们学习了一种称为顺序聊天的对话模式,它可以执行多步骤任务,但这需要人类设计每个步骤的具体步骤和涉及的具体代理。如果我们想简化问题,比如我们只想定义代理,让它们一起工作来解决这个任务,而不是为每个步骤给出非常具体的详细指令,那么该如何实现呢?
我们有一种更高效的实现方法——群聊。无需为每个步骤提供非常具体、详细的指令,代理们可以根据任务需求自主协作,减少了人类干预,使得系统更加自动化和灵活,可能会大大提高复杂任务的执行效率。下面我们将以使用GPT-4 Turbo模型完成股票表现报告生成任务为例进行说明。
首先定义角色代理:
user_proxy:用户代理,用于向其它代理发送任务指示,这里是要求作家代理撰写博客文章。- 配置:不开启代码执行,使用大模型,始终需要人类输入。
planner:规划代理,用于将复杂任务分解为更小的子任务,并监督任务进度。- 系统消息:指导如何获取信息和检查任务进度
- 负责根据任务确定完成任务所需的信息
- 确保所有信息都可以通过Python获取
- 监控任务进度,在每个步骤完成后检查进度并指导剩余步骤
- 如果某一步失败,尝试绕过并继续
- 描述:帮助其他代理理解其角色。
- 系统消息:指导如何获取信息和检查任务进度
engineer:工程师代理,根据 “planner” 提供的计划编写代码- 使用AutoGen的助手代理来构建,其默认的系统消息中含有编写代码的详细说明,所以此时不需要再写系统消息。
Executor:执行代理,用于执行代码。- 配置:代码执行配置,使用本地命令行环境。
Writer:作家代理,编写博客文章。- 系统消息:编写Markdown格式的博客,并根据Admin的反馈进行修改。
本章通过提供一个字典配置(code_execution_config)来使用代码执行器,更多信息详见ConversableAgent。当然,你也可以继续使用
LocalCommandLineCodeExecutor。
import autogen

llm_config={"model": "gpt-4-turbo"}
task = "Write a blogpost about the stock price performance of "\
"Nvidia in the past month. Today's date is 2024-04-23."

user_proxy = autogen.ConversableAgent(
    name="Admin",
    system_message="Give the task, and send "
    "instructions to writer to refine the blog post.",
    code_execution_config=False,
    llm_config=llm_config,
    human_input_mode="ALWAYS",
)

planner = autogen.ConversableAgent(
    name="Planner",
    system_message="Given a task, please determine "
    "what information is needed to complete the task. "
    "Please note that the information will all be retrieved using"
    " Python code. Please only suggest information that can be "
    "retrieved using Python code. "
    "After each step is done by others, check the progress and "
    "instruct the remaining steps. If a step fails, try to "
    "workaround",
    description="Planner. Given a task, determine what "
    "information is needed to complete the task. "
    "After each step is done by others, check the progress and "
    "instruct the remaining steps",
    llm_config=llm_config,
)

engineer = autogen.AssistantAgent(
    name="Engineer",
    llm_config=llm_config,
    description="An engineer that writes code based on the plan "
    "provided by the planner.",
)

executor = autogen.ConversableAgent(
    name="Executor",
    system_message="Execute the code written by the "
    "engineer and report the result.",
    human_input_mode="NEVER",
    code_execution_config={
        "last_n_messages": 3,
        "work_dir": "coding",
        "use_docker": False,
    },
)

writer = autogen.ConversableAgent(
    name="Writer",
    llm_config=llm_config,
    system_message="Writer."
    "Please write blogs in markdown format (with relevant titles)"
    " and put the content in pseudo ```md```code block. "
    "You take feedback from the admin and refine your blog.",
    description="Writer."
    "Write blogs based on the code execution results and take "
    "feedback from the admin to refine the blog."
)
这里构建代理时使用了description,它和System Message的区别是:
-
System Message:系统消息是一个代理内部的指令,只有该代理需要知道这个指令,其他代理不需要了解。系统消息通常包含详细的、针对性的指令。 -
Description:描述用来让其他代理了解当前代理角色的信息。描述通常更高层次、不那么详细,但能概括代理的功能,它是从第三人称的角度来描述这个代理的作用。例如,一个管理者(manager)可以根据描述决定何时使用这个代理。
举例来说,对于一个Planner代理,其描述可能是:"给定一个任务,确定完成任务所需的信息。在其他代理完成每个步骤后,检查进度并指导剩余步骤。"总之,系统消息是代理内部的详细指令,而描述是对外的高层次功能概括。这种设计有助于代理之间的协作和管理。
五种角色的代理已经创建完成了,下面只需要将所有代理放在一个群聊中,提供一些初始信息,并设置最大对话轮数为10。通过这种方式,代理们将在群聊中相互协作,完成任务,而不需要详细指示每个代理的具体操作步骤,只需定义各自的角色并让他们共同工作来完成任务。
6.2 群聊管理和任务执行
-
创建群聊
groupchat,包含上述五个代理,初始化消息列表,设置最大轮次为10。 -
创建群聊管理器代理
manager:通过将之前创建的群聊和语言模型配置结合起来,管理群聊过程。 -
启动群聊:通过
user_proxy代理,使用提供的任务启动群聊
groupchat = autogen.GroupChat(
    agents=[user_proxy, engineer, writer, executor, planner],
    messages=[],
    max_round=10,
)

manager = autogen.GroupChatManager(
    groupchat=groupchat, llm_config=llm_config
)

groupchat_result = user_proxy.initiate_chat(
    manager,
    message=task,
)
下面是运行结果,无需指定发言顺序,所有代理自动协作来完成任务。
-
任务开始: 管理员(
user_proxy)首先将任务发送给群聊管理器。管理器会将这条消息广播给群聊中的每个代理,所有代理都会看到这条信息。 -
代理响应: 群聊管理器会根据当前的对话历史和每个代理的角色,选择下一个发言的代理。第一次选择的是
Planner。Planner规划任务:Planner建议任务分解步骤,包括获取股票数据、分析股票数据、研究相关事件、草拟博客文章,最后重复第一步并建议一些操作。Engineer编写代码:群聊管理器选择Engineer作为下一个发言者。工程师会根据规划者的建议,编写获取股票数据的代码。Executor运行代码并输出数据。Planner再次发言:在第一步完成后,Planner再次被选择,建议下一步的操作,如分析股票数据和研究相关事件,并提供一个Python代码示例。Engineer会完成关于股票数据分析的代码。Executor运行代码并输出结果,包括股票价格和每日变动情况。Writer草拟博客文章:在前两步完成后,群聊管理器选择Writer开始草拟博客文章。写作者基于已有的信息撰写博客文章,格式为Markdown,包括介绍、股票价格分析、股票表现、重大事件及其影响和结论等部分。
-
用户反馈: Admin代理询问用户反馈。这一步如果跳过,大模型将自动进行回复,提出修改建议,比如详细分析、图表分析等。
-
文章修改: Writer根据反馈改进文章,还总结了改进的要点。
通过这种方式,代理们在群聊中相互协作,逐步完成复杂任务,而不需要人为干预每个具体步骤。群聊的发言过程由群聊管理器自动触发,并遵循预定义的角色及其描述,所以角色和描述需要精心设计,以确保可以遵循正确的发言次序。
Admin (to chat_manager):
Write a blogpost about the stock price performance of Nvidia in the past month. Today's date is 2024-04-23.
--------------------------------------------------------------------------------
>>>>>>>> USING AUTO REPLY...
Planner (to chat_manager):
To write a blog post about the stock price performance of Nvidia for the past month, you will need to gather and analyze the following information using Python code:
1. **Stock Price Data**: Obtain historical stock price data for Nvidia from 2024-03-23 to 2024-04-23. This includes daily opening, closing, high, and low prices, as well as trading volume.
2. **Performance Analysis**: Calculate and analyze changes in the stock prices over the given period. This might include percentage changes over the month, weekly fluctuations, and comparison to the previous month.
3. **Market Context**: Get some broader market context to see how Nvidia's performance compares to that of the overall market or its sector. This can be done by looking at major indexes like the S&P 500 or NASDAQ, or sector-specific benchmarks.
4. **News and Events**: Retrieve any significant news or events that might have affected Nvidia's stock within this timeframe. This could be new product launches, quarterly earnings reports, changes in executive leadership, or broader economic factors.
Here's how you can proceed step-by-step using Python:
1. **Retrieve Stock Data**: Use a Python library like `yfinance` to download Nvidia's historical stock data for the desired period. `yfinance` can easily fetch this data and allow for various manipulations to examine stock performance.
2. **Analyze the Data**: Utilize libraries such as `pandas` for data handling and `matplotlib` or `seaborn` for data visualization to analyze the performance trends and visualize them in meaningful ways.
3. **Fetch News and Contextual Data**: Use web scraping tools like `BeautifulSoup` or APIs that provide news data to find relevant events affecting the stock. Comparison with market indexes can also be done using data fetched via `yfinance` or similar services.
4. **Compose the Blog Post**: Synthesize the fetched and analyzed data into a structured narrative. This includes an introduction, a detailed analysis with visual aids (charts, graphs), interpretation of how specific events influenced stock prices, and a concluding section.
If you're ready, you can start by implementing step 1, retrieving the stock data for Nvidia. After completing each step, review the extracted data, ensure it's accurate, and move on to subsequent analyses as outlined.
--------------------------------------------------------------------------------
Engineer (to chat_manager):
Let's begin by retrieving Nvidia's stock price data for the past month using Python. You'll need to install the `yfinance` package if it's not already installed, and then fetch the data.
Please follow these steps to get started:
1. Ensure you have Python installed on your system.
2. Install the `yfinance` library using pip if it's not already installed. You can do this by executing `pip install yfinance` in your command line.
3. Use the following Python script to fetch and print Nvidia's stock data from 2024-03-23 to 2024-04-23.
```python
# filename: fetch_nvda_data.py
import yfinance as yf
import pandas as pd
def fetch_stock_data(stock_ticker, start_date, end_date):
# Fetch historical data from Yahoo Finance
stock_data = yf.download(stock_ticker, start=start_date, end=end_date)
return stock_data
# Define the ticker symbol for Nvidia and date range
ticker_symbol = 'NVDA'
start_date = '2024-03-23'
end_date = '2024-04-24' # Include 2024-04-23 data by using the next day as the endpoint
# Fetch the data
nvda_data = fetch_stock_data(ticker_symbol, start_date, end_date)
# Display the fetched data
print(nvda_data)
\```
Please save this script as `fetch_nvda_data.py` and execute it. Once executed, it will display Nvidia's stock data for the specified date range. This output will help us proceed with the performance analysis in the next step.
--------------------------------------------------------------------------------
>>>>>>>> EXECUTING CODE BLOCK 0 (inferred language is python)...
Executor (to chat_manager):
exitcode: 0 (execution succeeded)
Code output:
Open High ... Adj Close Volume
Date ...
2024-03-25 939.409973 967.659973 ... 950.020020 55213600
2024-03-26 958.510010 963.750000 ... 925.609985 51364800
2024-03-27 931.119995 932.400024 ... 902.500000 58606700
2024-03-28 900.000000 913.000000 ... 903.559998 43521200
...
...
[21 rows x 6 columns]
--------------------------------------------------------------------------------
>>>>>>>> USING AUTO REPLY...
Writer (to chat_manager):
```md
# Analyzing Nvidia's Stock Performance Over The Past Month
## Introduction
Nvidia Corporation (NASDAQ: NVDA), a leader in the graphics processing unit (GPU) industry, has shown a mix of volatility and resilience over the past month. Here, we delve into Nvidia's stock performance from March 23, 2024, to April 23, 2024, examining key price movements and external factors that may have influenced the stock.
## Month in Review
The data retrieved for Nvidia shows fluctuating prices with notable highs and lows during the observed period:
- **Start of the Period**: Nvidia opened at $939.41 on March 25, 2024.
- **Highest Price**: The stock reached its peak at $967.66 on the same day.
- **Lowest Price**: The lowest closing price was $762.00 on April 19, 2024.
- **End of the Period**: It closed at $824.23 on April 23, 2024.
## Weekly Performance Highlights
The week-by-week analysis reveals significant fluctuations:
- **Week 1**: Starting strong, the stock saw a decrease by the end of the week.
- **Week 2-3**: The price continued to drop amidst market volatility.
- **Week 4**: A rebound was observed, although it didn't fully recover to the starting levels.
## Major Influences
Several events and announcements could have influenced Nvidia’s stock prices:
1. **Industry Competition**: Increased competition from rivals in the GPU market.
2. **Economic Indicators**: General downturn in tech stocks influenced by macroeconomic factors.
3. **Product Announcements**: While new product launches typically boost stock prices, there was no major release during this period.
## Graphical Analysis
Here's a simplified view of the stock movement:

## Conclusion
Nvidia's stock performance in the past month showcases the volatility inherent in tech stocks, influenced by market trends and possibly internal dynamics. While the company experienced a notable drop, the latter recovery hints at investors' ongoing confidence in Nvidia’s long-term potential. Looking forward, Nvidia remains a key player in the technology sector, with its future moves highly anticipated by investors.
---
Stay tuned for further updates and detailed analysis on how Nvidia continues to shape the future of the GPU market and its impact on the stock market.
\```
This analysis incorporates the daily data retrieved, highlights fluctuations, and explores potential reasons for rises and falls in stock value. Further graphical representation of the stock's movement would enhance understanding, enabling clearer insights into the trends observed.
--------------------------------------------------------------------------------
Provide feedback to chat_manager. Press enter to skip and use auto-reply, or type 'exit' to end the conversation:
>>>>>>>> USING AUTO REPLY...
Admin (to chat_manager):
The drafted blog post provides a solid starting point and covers the essential aspects of Nvidia's stock performance over the past month. To refine and enhance its effectiveness, consider the following suggestions:
1. **Introduction Enhancement:**
- Add a bit more context about Nvidia as a company. Briefly mention its role in the technology sector and its market significance. This would cater not only to seasoned investors but also to newcomers who might be less familiar with the company.
2. **Detailed Data Analysis:**
- Include a deeper analysis of the stock price movements. Specifically, analyze the percentage change from the opening price on March 25 to the closing price on April 23. Discuss the volatility index if available, to give readers a sense of how erratic the stock movements have been.
- Consider discussing trading volume trends and how they correlate with price movements.
3. **Graphical Analysis:**
- Incorporate actual graphs into the blog post. Use a tool like matplotlib in Python to create charts that depict the weekly trends and major dips or increases in stock prices. Graphs make the data more digestible and visually engaging for readers.
- Ensure to label the axes and provide a legend for any colors or lines used in the graph.
...
...
6.3 自定义发言人顺序
我们回顾上面这段过程可以看到,规划者确实发挥了建议初步计划的作用,并在某些步骤完成后,审查进度并提出后续步骤。但并不是所有的步骤都完全按照规划者的建议执行。例如,在完成前两步之后,写作者跳过了第三步,直接开始撰写博客文章。使用GroupChatManager来决定发言顺序有其缺点,即某些步骤被跳过。为了增强对对话的控制,可以设置一些约束条件来控制发言者的顺序。
groupchat = autogen.GroupChat(
    agents=[user_proxy, engineer, writer, executor, planner],
    messages=[],
    max_round=10,
    allowed_or_disallowed_speaker_transitions={
        user_proxy: [engineer, writer, executor, planner],
        engineer: [user_proxy, executor],
        writer: [user_proxy, planner],
        executor: [user_proxy, engineer, planner],
        planner: [user_proxy, engineer, writer],
    },
    speaker_transitions_type="allowed",
)
上述代码创建了一个群聊实例,并设置了特定的发言顺序约束,以控制每个代理在对话中的发言顺序。
allowed_or_disallowed_speaker_transitions:定义了每个代理的允许发言接替顺序。具体的发言顺序约束为:user_proxy代理之后,允许engineer、writer、executor和planner进行发言。engineer代理之后,只允许user_proxy和executor发言。writer代理之后,只允许user_proxy和planner发言。executor代理之后,允许user_proxy、engineer和planner发言。planner代理之后,允许user_proxy、engineer和writer发言。
speaker_transitions_type:设置为"allowed",表示allowed_or_disallowed_speaker_transitions中定义的是允许的发言接替顺序,只有在该列表中明确允许的代理才能作为下一个发言者。如果设为"disallowed",表示allowed_or_disallowed_speaker_transitions中定义的是不允许的发言接替顺序。
通过这些设置,群聊管理器将在选择下一个发言者时遵循这些约束,从而更加有序地进行对话,避免出现某些步骤被跳过的情况,比如executor之后不会有writer 直接发言。
manager = autogen.GroupChatManager(
    groupchat=groupchat, llm_config=llm_config
)

groupchat_result = user_proxy.initiate_chat(
    manager,
    message=task,
)
重新执行代码之后会看到,Executor在第二步撰写代码之后,planner会进行接管对话,回顾前面的步骤并给出后续建议。尽管添加了一些约束,整体任务的完成仍然是非线性的。这保持了代理在需要时可以来回交互和发言的灵活性,比顺序对话(sequential chat)更灵活。
另外,可以在代理的描述中添加自然语言指令,不仅可以指定约束,还可以详细说明在何种情况下转到哪个代理。还可以使用编程语言定义精确的转换顺序。尽管这节课没有涉及,但可以在Autogen的网站上找到相关信息。此外,Autogen还支持许多高级功能,如多模态、视觉能力、OpenAI助手后端、代理评估工具等。


 766
766

 被折叠的 条评论
为什么被折叠?
被折叠的 条评论
为什么被折叠?
 到【灌水乐园】发言


