


图片组件
Image为图片组件,常用于在应用中显示图片。Image支持加载string、PixelMap和Resource类型的数据源,支持png、jpg、bmp、svg和gif类型的图片格式。
需要权限
使用网络图片时,需要申请权限ohos.permission.INTERNET。具体申请方式请参考权限申请声明。
子组件
无
接口
Image(src: string | PixelMap | Resource)
通过图片数据源获取图片,用于后续渲染展示。
Image组件加载图片失败或图片尺寸为0时,图片组件大小自动为0,不跟随父组件的布局约束。
从API version 9开始,该接口支持在ArkTS卡片中使用。
Image定义介绍
interface ImageInterface {
  (src: string | PixelMap | Resource): ImageAttribute;
}
-
src:设置要加载的图片资源,支持从本地、网络和内存中加载图片,简单样例如下:
 Flex() {
          Image($r("app.media.fanhui"))
            .width('30')
            .margin({ top: 10 });
        }.width("100%")

        Flex() {
          Image($r("app.media.xiaoxi"))
            .width('120')
            .margin({ top: 10 });
        }.offset({ x: "120vp" })

Image属性介绍:
declare class ImageAttribute extends CommonMethod<ImageAttribute> {
  alt(value: string | Resource): ImageAttribute;
  matchTextDirection(value: boolean): ImageAttribute;
  fitOriginalSize(value: boolean): ImageAttribute;
  fillColor(value: ResourceColor): ImageAttribute;
  objectFit(value: ImageFit): ImageAttribute;
  objectRepeat(value: ImageRepeat): ImageAttribute;
  autoResize(value: boolean): ImageAttribute;
  renderMode(value: ImageRenderMode): ImageAttribute;
  interpolation(value: ImageInterpolation): ImageAttribute;
  sourceSize(value: { width: number; height: number }): ImageAttribute;
  syncLoad(value: boolean): ImageAttribute;
  onComplete(
    callback: (event?: {
      width: number;
      height: number;
      componentWidth: number;
      componentHeight: number;
      loadingStatus: number;
    }) => void,
  ): ImageAttribute;
  onError(callback: (event?: { componentWidth: number; componentHeight: number }) => void): ImageAttribute;
  onFinish(event: () => void): ImageAttribute;
}-
alt:设置占位图,图片显示之前先显示占位图,比如在加载网络图片或者图片加载失败时的场景。
-
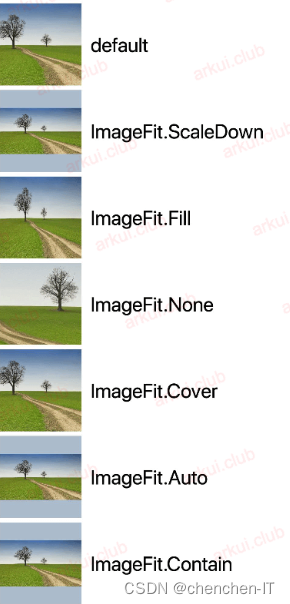
objectFit:设置图片的放缩类型,当
Image组件大小和图片大小不同时指定图片的放缩类型,ImageFit提供了以下5种匹配模式:-
Cover(默认值):保持图片宽高比进行放缩显示,使得图片完全显示在显示边界外。
-
Contain:保持图片宽高比进行放缩显示,使得图片完全显示在显示边界内。
-
Fill:不保持图片宽高比显示,是图片完全充满显示边界。
-
None:保持图片原有尺寸显示,通常配合
objectRepeat属性一起使用。 -
ScaleDown:保持图片宽高比显示,使图片缩小或者保持不变的显示出来。
-
以上6中匹配模式运行结果如下图所示:
renderMode:设置图片的渲染模式, ImageRenderMode 定义了以下2种渲染模式:
-
Original(默认值):按照原图进行渲染。
-
Template:将图像渲染为模板图像,忽略图片的颜色信息。
代码:
          Image($r("app.media.xiaoxi"))
            .width(90)
            .height(90)
            .renderMode(ImageRenderMode.Original) // 原图渲染

          Image($r("app.media.xiaoxi"))
            .width(90)
            .height(90)
.renderMode(ImageRenderMode.Template) // 模板渲染 
sourceSize:对原始图片做部分解码,样例如下:
Image($r("app.media.xiaoxi"))
  .width(90)
  .height(90)

Image($r("app.media.xiaoxi"))
  .width(90)
  .height(90)
.sourceSize({width: 10, height: 10}) // 设置解码的宽高 
Image事件介绍
declare class ImageAttribute extends CommonMethod<ImageAttribute> {
  onComplete(
    callback: (event?: {
      width: number;
      height: number;
      componentWidth: number;
      componentHeight: number;
      loadingStatus: number;
    }) => void,
  ): ImageAttribute;
  onError(callback: (event?: { componentWidth: number; componentHeight: number }) => void): ImageAttribute;
  onFinish(event: () => void): ImageAttribute;
}
- onComplete:图片成功加载时触发该回调,返回图片原始尺寸信息。
- onError:图片加载出现异常时触发该回调。
- onFinish:当加载的源文件为带动效的 svg 图片时,当 svg 动效播放完成时会触发这个回调,如果动效为无限循环动效,则不会触发这个回调。
Image加载方式
-
从本地加载
-
拷贝 test.png 图片到工程的 resources/main/base/media 目录下
-
加载图片,直接使用系统提供的资源访问符
$()或者本地文件加载import image from '@ohos.multimedia.image'; import file from '@ohos.fileio'; @Entry @Component struct ComponentTest { @State pixelMap: PixelMap = undefined; build() { Column() { if (undefined == this.pixelMap) { Image($r("app.media.test")) .width(180) .height(80) } else { Image(this.pixelMap) .width(180) .height(80) } } .alignItems(HorizontalAlign.Center) .width('100%') .height(('100%')) .padding(10) } private aboutToAppear() { var fd = file.openSync("/data/imgs/test.png"); image.createImageSource(fd).createPixelMap({ sampleSize: 1, rotate: 0, editable: false }).then((pixelMap) => { this.pixelMap = pixelMap; }) } }
-
-
从网络加载
Image('https://img.sample.com/imgs/test.png') .width(180) .height(80) -
从内存加载
Image(this.pixelMap) // pixelMap为内存图片
  .width(180)
  .height(80)
Image缓存设置
Image 组件没有提供图片缓存相关的 api ,ArkUI开发框架在 @system.app 模块内提供了图片的全局缓存策略,全局缓存策略使用了 LRU 算法:
-
setImageCacheCount:设置内存中缓存解码后图片的数量上限,单位为 number。
-
setImageRawDataCacheSize:设置内存中缓存解码前图片数据的大小上限,单位为字节。
-
setImageFileCacheSize:设置图片文件缓存的大小上限,单位为字节。
在APP启动的时候,设置全局缓存策略,用法如下:
import app from '@system.app';

export default {
  onCreate() {
    console.info('Application onCreate')
    app.setImageRawDataCacheSize(100 * 1024 * 1024) // 设置解码前图片数据内存缓存上限为100MB
  },
  onDestroy() {
    console.info('Application onDestroy')
  },
}
官方示例
加载基本类型图片
@Entry
@Component
struct ImageExample1 {
  build() {
    Column() {
      Flex({ direction: FlexDirection.Column, alignItems: ItemAlign.Start }) {
        Row() {
          // 加载png格式图片
          Image($r('app.media.ic_camera_master_ai_leaf'))
            .width(110).height(110).margin(15)
            .overlay('png', { align: Alignment.Bottom, offset: { x: 0, y: 20 } })
          // 加载gif格式图片
          Image($r('app.media.loading'))
            .width(110).height(110).margin(15)
            .overlay('gif', { align: Alignment.Bottom, offset: { x: 0, y: 20 } })
        }
        Row() {
          // 加载svg格式图片
          Image($r('app.media.ic_camera_master_ai_clouded'))
            .width(110).height(110).margin(15)
            .overlay('svg', { align: Alignment.Bottom, offset: { x: 0, y: 20 } })
          // 加载jpg格式图片
          Image($r('app.media.ic_public_favor_filled'))
            .width(110).height(110).margin(15)
            .overlay('jpg', { align: Alignment.Bottom, offset: { x: 0, y: 20 } })
        }
      }
    }.height(320).width(360).padding({ right: 10, top: 10 })
  }
} 
加载网络图片
加载网络图片时,默认网络超时是5分钟,建议使用alt配置加载时的占位图。如果需要更灵活的网络配置,可以使用SDKHTTP工具包发送网络请求,接着将返回的数据解码为Image组件中的PixelMap
使用网络图片时,需要申请权限ohos.permission.INTERNET。具体申请方式请参考权限申请声明。
@Entry
@Component
struct ImageExample2 {
  build() {
    Column({ space: 10 }) {
      Image("https://www.example.com/xxx.png")// 直接加载网络地址,请填写一个具体的网络图片地址
        .alt($r('app.media.icon'))// 使用alt,在网络图片加载成功前使用占位图
        .width(100)
        .height(100)
    }
  }
}
为图片添加事件
@Entry
@Component
struct ImageExample3 {
  @State widthValue: number = 0;
  @State heightValue: number = 0;
  private on: Resource = $r('app.media.image_on');
  private off: Resource = $r('app.media.image_off');
  private on2off: Resource = $r('app.media.image_on2off');
  private off2on: Resource = $r('app.media.image_off2on');
  @State src: Resource = this.on;

  build() {
    Column() {
      Row({ space: 20 }) {
        Column() {
          Image($r('app.media.img_example1'))
            .alt($r('app.media.ic_public_picture'))
            .sourceSize({
              width: 900,
              height: 900
            })
            .objectFit(ImageFit.Cover)
            .height(180).width(180)
            // 图片加载完成后,获取图片尺寸。
            .onComplete((msg: { width: number,height: number }) => {
              this.widthValue = msg.width
              this.heightValue = msg.height
            })
            .onError(() => {
              console.log('load image fail')
            })
            .overlay('\nwidth: ' + String(this.widthValue) + ' height: ' + String(this.heightValue), {
              align: Alignment.Bottom,
              offset: { x: 0, y: 20 }
            })
        }
        // 为图片添加点击事件,点击完成后加载特定图片
        Image(this.src)
          .width(120).height(120)
          .onClick(() => {
            if (this.src == this.on || this.src == this.off2on) {
              this.src = this.on2off
            } else {
              this.src = this.off2on
            }
          })
          .onFinish(() => {
            if (this.src == this.off2on) {
              this.src = this.on
            } else {
              this.src = this.off
            }
          })
      }
    }.width('100%')
  }
} 

拓展:
ImageKnife
专门为OpenHarmony打造的一款图像加载缓存库,致力于更高效、更轻便、更简单。
简介
本项目基于开源库 Glide 进行OpenHarmony的自研版本:
- 支持内存缓存,使用LRUCache算法,对图片数据进行内存缓存。
- 支持磁盘缓存,对于下载图片会保存一份至磁盘当中。
- 支持进行图片变换: 支持图像像素源图片变换效果。
- 支持用户配置参数使用:( 例如:配置是否开启一级内存缓存,配置磁盘缓存策略,配置仅使用缓存加载数据,配置图片变换效果,配置占位图,配置加载失败占位图等)。
- 推荐使用ImageKnifeComponent组件配合ImageKnifeOption参数来实现功能。
- 支持用户自定义配置实现能力参考ImageKnifeComponent组件中对于入参ImageKnifeOption的处理。
下载安装
ohpm install @ohos/imageknife
使用说明
1.依赖配置
在entry\src\main\ets\entryability\EntryAbility.ts中做如下配置初始化全局ImageKnife实例:
import UIAbility from '@ohos.app.ability.UIAbility';
import window from '@ohos.window';
import { ImageKnife } from '@ohos/imageknife'

export default class EntryAbility extends UIAbility {
  onWindowStageCreate(windowStage: window.WindowStage) {
    windowStage.loadContent('pages/Index', (err, data) => {
    });
    // 初始化全局ImageKnife
    ImageKnife.with(this.context);
  	// 后续访问ImageKnife请通过:ImageKnifeGlobal.getInstance().getImageKnife()方式
  }
}
2.加载普通图片
接下来我们来写个简单实例看看:
import { ImageKnifeComponent, ImageKnifeOption } from '@ohos/imageknife'

@Entry
@Component
struct Index {
  @State message: string = 'Hello World'
  @State option: ImageKnifeOption = {
    loadSrc: $r('app.media.icon')
  }

  build() {
      Row() {
        Column() {
          Text(this.message)
            .fontSize(50)
            .fontWeight(FontWeight.Bold)
          ImageKnifeComponent({ imageKnifeOption: this.option })
            .width(300)
            .height(300)
        }.width('100%')
      }.height('100%')
  }
}
非常简单,仅需定义一个ImageKnifeOption数据对象,然后在你需要的UI位置,加入ImageKnifeComponent自定义组件就可以加载出一张图像了。
3.加载SVG图片
加载svg其实和普通流程没有区别,只要将 loadSrc: $r('app.media.jpgSample'), 改成一张 loadSrc: $r('app.media.svgSample'), svg类型图片即可。
4.加载GIF图片
加载GIF其实和普通流程也没有区别只要将 loadSrc: $r('app.media.jpgSample'), 改成一张 loadSrc: $r('app.media.gifSample'), GIF图片即可。
4.1加载GIF图片
更改ImageKnifeOption对象的autoPlay(可选autoPlay = true为开始播放,autoPlay = false为暂停播放)
5.自定义Key
因为通常改变标识符比较困难或者根本不可能,所以ImageKnife也提供了 签名 API 来混合(你可以控制的)额外数据到你的缓存键中。 签名(signature)适用于媒体内容,也适用于你可以自行维护的一些版本元数据。
将签名传入加载请求
imageKnifeOption = {
                loadSrc: 'https://aahyhy.oss-cn-beijing.aliyuncs.com/blue.jpg',
                signature: new ObjectKey(new Date().getTime().toString())
              }
详细样例请参考SignatureTestPage文件
代码示例
6.自定义请求头规格
设置全局header并且设置request的header时,当key不同时全局和request并行,当key相同时request的header覆盖全局的header
7.自定义网络栈加载图片
7.1 自定义网络栈加载单个图片,在imageKnifeNextOption中添加customGetImage标签,然后完善custom函数的逻辑即可,
ImageKnifeNextComponent({
  imageKnifeNextOption: {
      loadSrc: 'http://e.hiphotos.baidu.com/image/pic/item/4e4a20a4462309f7e41f5cfe760e0cf3d6cad6ee.jpg',
      placeholderSrc: $r('app.media.icon_loading'),
      errorholderSrc: $r('app.media.icon_failed'),
      customGetImage: custom
 }
}).width(100).height(100)
// 自定义实现图片获取方法,如自定义网络下载
@Concurrent
async function custom(context: Context, src: string): Promise<ArrayBuffer | undefined> {
  let result: DataFetchResult = new DataFetchResult();
  result.data = arraybuffer; //此处替换成自己网络获取的ArrayBuffer的逻辑
  return result;
}
7.2 自定义网络栈加载全部图片
1.先执行ImageKnifeGlobal.getInstance().getImageKnife()?.replaceDataFetch(new CustomDataFetchClient()); 替换网络栈
2.在CustomDataFetchClient这个类中也通过下面的逻辑替换成自己网络获取的ArrayBuffer的逻辑
  let result: DataFetchResult = new DataFetchResult();
  result.data = arraybuffer; //此处替换成自己网络获取的ArrayBuffer的逻辑
  return result;
7.3 取消自定义网络栈加载全部图片
如果用户执行了自定义网络加载全部图片,后面又不想自定义网络栈加载全部图片了,可以通过下面的方式恢复
ImageKnifeGlobal.getInstance().getImageKnife()?.replaceDataFetch(new CustomDataFetchClient());
ImageKnife更高阶用法参考:
OpenHarmony-TPC/ImageKnife (gitee.com)


 8652
8652

 被折叠的 条评论
为什么被折叠?
被折叠的 条评论
为什么被折叠?
 到【灌水乐园】发言


