


功能组件(数据管道、回调函数、特征列处理)
前言
本文是《pytorch-tensorflow-Comparative study》,pytorch和tensorflow对比学习专栏,第三章——功能组件(数据管道、回调函数、特征列处理部分)。
虽然说这两个框架在语法和接口的命名上有很多地方是不同的,但是深度学习的建模过程确实基本上都是一个套路的。
所以该笔记的笔记方式是:在使用相同的处理功能模块上,对比记录pytorch和tensorflow两者的API接口,和语法。

1,有利于深入理解深度学习建模过程流程。
2,有利于理解pytorch,和tensorflow设计上的不同,更加灵活的使用在自己的项目中。
3,有利于深入理解各个功能模块的使用。
本章节主要对比学习pytorch 和tensorflow有关功能组件(数据管道、回调函数、特征列处理)部分的API接口,和语法。

数据管道
Pytorch通常使用Dataset和DataLoader这两个工具类来构建数据管道。tensorflow没有DataLoader和Dataset分工的区分,相同的数据管道功能实现通常在tf.data API接口下的函数。
pytorch中:
Dataset和DataLoader概述
1,获取一个batch数据的步骤让我们考虑一下从一个数据集中获取一个batch的数据需要哪些步骤。(假定数据集的特征和标签分别表示为张量X和Y,数据集可以表示为(X,Y), 假定batch大小为m)
1,首先我们要确定数据集的长度n。结果类似:n = 1000。
2,然后我们从0到n-1的范围中抽样出m个数(batch大小)。假定m=4, 拿到的结果是一个列表,类似:indices = [1,4,8,9]
3,接着我们从数据集中去取这m个数对应下标的元素。拿到的结果是一个元组列表,类似:samples = [(X[1],Y[1]),(X[4],Y[4]),(X[8],Y[8]),(X[9],Y[9])]
4,最后我们将结果整理成两个张量作为输出。拿到的结果是两个张量,类似batch = (features,labels),其中 features = torch.stack([X[1],X[4],X[8],X[9]]),labels = torch.stack([Y[1],Y[4],Y[8],Y[9]])
Dataset和DataLoader的功能分工
上述第1个步骤确定数据集的长度是由 Dataset的__len__ 方法实现的。
第2个步骤从0到n-1的范围中抽样出m个数的方法是由 DataLoader的 sampler和 batch_sampler参数指定的。
sampler参数指定单个元素抽样方法,一般无需用户设置,程序默认在DataLoader的参数shuffle=True时采用随机抽样,shuffle=False时采用顺序抽样。
batch_sampler参数将多个抽样的元素整理成一个列表,一般无需用户设置,默认方法在DataLoader的参数drop_last=True时会丢弃数据集最后一个长度不能被batch大小整除的批次,在drop_last=False时保留最后一个批次。
第3个步骤的核心逻辑根据下标取数据集中的元素 是由 Dataset的 __getitem__方法实现的。
第4个步骤的逻辑由DataLoader的参数collate_fn指定。一般情况下也无需用户设置。
总体来说,Dataset的作用类似于将我们的数据集处理成pytorch张量可以使用的数据集(格式的变化)。DataLoader作用类似于从数据集中一批一批的拿数据。
tensorflow中:
没有Dataset和DataLoader分工的概念,使用 tf.data API 可以构建数据输入管道,轻松处理大量的数据,不同的数据格式,以及不同的数据转换。同时分批次拿数据的操作可以自定义函数实现,也可以通过设置tf.data API中的参数实现。
这一点上来说数据管道实现的过程中,tensorflow的功能接口集成度要高一些。
Dataset创建数据集(pytorch)
pytorch
pytorch构建数据管道分两步,第一步使用Dataset创建数据集,第二部使用DataLoader加载数据集。
Dataset和DataLoader的主要接口
以下是 Dataset和 DataLoader的核心接口逻辑伪代码,不完全和源码一致。
import torch
class Dataset(object):
    def __init__(self):
        pass

    def __len__(self):
        raise NotImplementedError

    def __getitem__(self,index):
        raise NotImplementedError


class DataLoader(object):
    def __init__(self,dataset,batch_size,collate_fn,shuffle = True,drop_last = False):
        self.dataset = dataset
        self.collate_fn = collate_fn
        self.sampler =torch.utils.data.RandomSampler if shuffle else \
           torch.utils.data.SequentialSampler
        self.batch_sampler = torch.utils.data.BatchSampler
        self.sample_iter = self.batch_sampler(
            self.sampler(range(len(dataset))),
            batch_size = batch_size,drop_last = drop_last)

    def __next__(self):
        indices = next(self.sample_iter)
        batch = self.collate_fn([self.dataset[i] for i in indices])
        return batch
Dataset创建数据集常用的方法有:
- 使用 torch.utils.data.TensorDataset 根据Tensor创建数据集(numpy的array,Pandas的DataFrame需要先转换成Tensor)。
- 使用 torchvision.datasets.ImageFolder 根据图片目录创建图片数据集。
- 继承 torch.utils.data.Dataset 创建自定义数据集。
此外,还可以通过
- torch.utils.data.random_split 将一个数据集分割成多份,常用于分割训练集,验证集和测试集。
- 调用Dataset的加法运算符(
+)将多个数据集合并成一个数据集。
import numpy as np
import torch
from torch.utils.data import TensorDataset,Dataset,DataLoader,random_split
根据Tensor创建数据集
# 根据Tensor创建数据集

from sklearn import datasets
iris = datasets.load_iris()
ds_iris = TensorDataset(torch.tensor(iris.data),torch.tensor(iris.target))

# 分割成训练集和预测集
n_train = int(len(ds_iris)*0.8)
n_valid = len(ds_iris) - n_train
ds_train,ds_valid = random_split(ds_iris,[n_train,n_valid])

print(type(ds_iris))
print(type(ds_train))
# 使用DataLoader加载数据集
dl_train,dl_valid = DataLoader(ds_train,batch_size = 8),DataLoader(ds_valid,batch_size = 8)

for features,labels in dl_train:
    print(features,labels)
    break
# 演示加法运算符(`+`)的合并作用

ds_data = ds_train + ds_valid

print('len(ds_train) = ',len(ds_train))
print('len(ds_valid) = ',len(ds_valid))
print('len(ds_train+ds_valid) = ',len(ds_data))

print(type(ds_data))
根据图片目录创建图片数据集
from torchvision import transforms,datasets
#演示一些常用的图片增强操作
from PIL import Image

img = Image.open('./data/cat.jpeg')

# 随机数值翻转
transforms.RandomVerticalFlip()(img)

#随机旋转
transforms.RandomRotation(45)(img)
# 定义图片增强操作

transform_train = transforms.Compose([
   transforms.RandomHorizontalFlip(), #随机水平翻转
   transforms.RandomVerticalFlip(), #随机垂直翻转
   transforms.RandomRotation(45),  #随机在45度角度内旋转
   transforms.ToTensor() #转换成张量
  ]
)

transform_valid = transforms.Compose([
    transforms.ToTensor()
  ]
)
# 根据图片目录创建数据集
ds_train = datasets.ImageFolder("./data/cifar2/train/",
            transform = transform_train,target_transform= lambda t:torch.tensor([t]).float())
ds_valid = datasets.ImageFolder("./data/cifar2/test/",
            transform = transform_train,target_transform= lambda t:torch.tensor([t]).float())

print(ds_train.class_to_idx)
{'0_airplane': 0, '1_automobile': 1}
# 使用DataLoader加载数据集

dl_train = DataLoader(ds_train,batch_size = 50,shuffle = True,num_workers=3)
dl_valid = DataLoader(ds_valid,batch_size = 50,shuffle = True,num_workers=3)
for features,labels in dl_train:
    print(features.shape)
    print(labels.shape)
    break
torch.Size([50, 3, 32, 32])
torch.Size([50, 1])
创建自定义数据集
下面通过继承Dataset类创建imdb文本分类任务的自定义数据集。
大概思路如下:首先,对训练集文本分词构建词典。然后将训练集文本和测试集文本数据转换成token单词编码。
接着将转换成单词编码的训练集数据和测试集数据按样本分割成多个文件,一个文件代表一个样本。
最后,我们可以根据文件名列表获取对应序号的样本内容,从而构建Dataset数据集。
import numpy as np
import pandas as pd
from collections import OrderedDict
import re,string

MAX_WORDS = 10000  # 仅考虑最高频的10000个词
MAX_LEN = 200  # 每个样本保留200个词的长度
BATCH_SIZE = 20

train_data_path = 'data/imdb/train.tsv'
test_data_path = 'data/imdb/test.tsv'
train_token_path = 'data/imdb/train_token.tsv'
test_token_path =  'data/imdb/test_token.tsv'
train_samples_path = 'data/imdb/train_samples/'
test_samples_path =  'data/imdb/test_samples/'
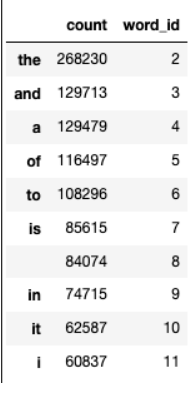
首先我们构建词典,并保留最高频的MAX_WORDS个词。
##构建词典

word_count_dict = {}

#清洗文本
def clean_text(text):
    lowercase = text.lower().replace("\n"," ")
    stripped_html = re.sub('<br />', ' ',lowercase)
    cleaned_punctuation = re.sub('[%s]'%re.escape(string.punctuation),'',stripped_html)
    return cleaned_punctuation

with open(train_data_path,"r",encoding = 'utf-8') as f:
    for line in f:
        label,text = line.split("\t")
        cleaned_text = clean_text(text)
        for word in cleaned_text.split(" "):
            word_count_dict[word] = word_count_dict.get(word,0)+1

df_word_dict = pd.DataFrame(pd.Series(word_count_dict,name = "count"))
df_word_dict = df_word_dict.sort_values(by = "count",ascending =False)

df_word_dict = df_word_dict[0:MAX_WORDS-2] #
df_word_dict["word_id"] = range(2,MAX_WORDS) #编号0和1分别留给未知词<unkown>和填充<padding>

word_id_dict = df_word_dict["word_id"].to_dict()

df_word_dict.head(10)
然后我们利用构建好的词典,将文本转换成token序号。
#转换token

# 填充文本
def pad(data_list,pad_length):
    padded_list = data_list.copy()
    if len(data_list)> pad_length:
         padded_list = data_list[-pad_length:]
    if len(data_list)< pad_length:
         padded_list = [1]*(pad_length-len(data_list))+data_list
    return padded_list

def text_to_token(text_file,token_file):
    with open(text_file,"r",encoding = 'utf-8') as fin,\
      open(token_file,"w",encoding = 'utf-8') as fout:
        for line in fin:
            label,text = line.split("\t")
            cleaned_text = clean_text(text)
            word_token_list = [word_id_dict.get(word, 0) for word in cleaned_text.split(" ")]
            pad_list = pad(word_token_list,MAX_LEN)
            out_line = label+"\t"+" ".join([str(x) for x in pad_list])
            fout.write(out_line+"\n")

text_to_token(train_data_path,train_token_path)
text_to_token(test_data_path,test_token_path)
接着将token文本按照样本分割,每个文件存放一个样本的数据。
# 分割样本
import os

if not os.path.exists(train_samples_path):
    os.mkdir(train_samples_path)

if not os.path.exists(test_samples_path):
    os.mkdir(test_samples_path)


def split_samples(token_path,samples_dir):
    with open(token_path,"r",encoding = 'utf-8') as fin:
        i = 0
        for line in fin:
            with open(samples_dir+"%d.txt"%i,"w",encoding = "utf-8") as fout:
                fout.write(line)
            i = i+1

split_samples(train_token_path,train_samples_path)
split_samples(test_token_path,test_samples_path)
print(os.listdir(train_samples_path)[0:100])
# ['11303.txt', '3644.txt', '19987.txt', '18441.txt', '5235.txt', '17772.txt', '1053.txt', '13514.txt', '8711.txt', '15165.txt', '7422.txt', '8077.txt', '15603.txt', '7344.txt', '1735.txt', '13272.txt', '9369.txt', '18327.txt', '5553.txt', '17014.txt', '4895.txt', '11465.txt', '3122.txt', '19039.txt', '5547.txt', '18333.txt', '17000.txt', '4881.txt', '2228.txt', '11471.txt', '3136.txt', '4659.txt', '15617.txt', '8063.txt', '7350.txt', '12178.txt', '1721.txt', '13266.txt', '14509.txt', '6728.txt', '1047.txt', '13500.txt', '15171.txt', '8705.txt', '7436.txt', '16478.txt', '11317.txt', '3650.txt', '19993.txt', '10009.txt', '5221.txt', '18455.txt', '17766.txt', '3888.txt', '6700.txt', '14247.txt', '9433.txt', '13528.txt', '12636.txt', '15159.txt', '16450.txt', '4117.txt', '19763.txt', '3678.txt', '17996.txt', '2566.txt', '10021.txt', '5209.txt', '17028.txt', '2200.txt', '10747.txt', '11459.txt', '16336.txt', '4671.txt', '19005.txt', '7378.txt', '12150.txt', '1709.txt', '6066.txt', '14521.txt', '9355.txt', '12144.txt', '289.txt', '6072.txt', '9341.txt', '14535.txt', '2214.txt', '10753.txt', '16322.txt', '19011.txt', '4665.txt', '16444.txt', '19777.txt', '4103.txt', '17982.txt', '2572.txt', '10035.txt', '18469.txt', '6714.txt', '9427.txt']
一切准备就绪,我们可以创建数据集Dataset, 从文件名称列表中读取文件内容了。
# 自定义dataset
import os
class imdbDataset(Dataset):
    def __init__(self,samples_dir):
        self.samples_dir = samples_dir
        self.samples_paths = os.listdir(samples_dir)

    def __len__(self):
        return len(self.samples_paths)

    def __getitem__(self,index):
        path = self.samples_dir + self.samples_paths[index]
        with open(path,"r",encoding = "utf-8") as f:
            line = f.readline()
            label,tokens = line.split("\t")
            label = torch.tensor([float(label)],dtype = torch.float)
            feature = torch.tensor([int(x) for x in tokens.split(" ")],dtype = torch.long)
            return  (feature,label)

ds_train = imdbDataset(train_samples_path)
ds_test = imdbDataset(test_samples_path)
print(len(ds_train))
print(len(ds_test))
# 20000
# 5000
# DataLoader 加载数据
dl_train = DataLoader(ds_train,batch_size = BATCH_SIZE,shuffle = True,num_workers=4)
dl_test = DataLoader(ds_test,batch_size = BATCH_SIZE,num_workers=4)

for features,labels in dl_train:
    print(features)
    break
# tensor([[   1,    1,    1,  ...,   29,    8,    8],
#         [  13,   11,  247,  ...,    0,    0,    8],
#         [8587,  555,   12,  ...,    3,    0,    8],
#         ...,
#         [   1,    1,    1,  ...,    2,    0,    8],
#         [ 618,   62,   25,  ...,   20,  204,    8],
#         [   1,    1,    1,  ...,   71,   85,    8]])
DataLoader加载数据集(pytorch)
pytorch
pytorch构建数据管道分两步,第一步使用Dataset创建数据集,第二步使用DataLoader加载数据集。
DataLoader能够控制batch的大小,batch中元素的采样方法,以及将batch结果整理成模型所需输入形式的方法,并且能够使用多进程读取数据。
DataLoader的函数签名如下。
DataLoader(
    dataset,
    batch_size=1,
    shuffle=False,
    sampler=None,
    batch_sampler=None,
    num_workers=0,
    collate_fn=None,
    pin_memory=False,
    drop_last=False,
    timeout=0,
    worker_init_fn=None,
    multiprocessing_context=None,
)
一般情况下,我们仅仅会配置 dataset, batch_size, shuffle, num_workers, drop_last这五个参数,其他参数使用默认值即可。
DataLoader除了可以加载我们前面讲的 torch.utils.data.Dataset 外,还能够加载另外一种数据集 torch.utils.data.IterableDataset。
和Dataset数据集相当于一种列表结构不同,IterableDataset相当于一种迭代器结构。 它更加复杂,一般较少使用。
- dataset : 数据集
- batch_size: 批次大小
- shuffle: 是否乱序
- sampler: 样本采样函数,一般无需设置。
- batch_sampler: 批次采样函数,一般无需设置。
- num_workers: 使用多进程读取数据,设置的进程数。
- collate_fn: 整理一个批次数据的函数。
- pin_memory: 是否设置为锁业内存。默认为False,锁业内存不会使用虚拟内存(硬盘),从锁业内存拷贝到GPU上速度会更快。
- drop_last: 是否丢弃最后一个样本数量不足batch_size批次数据。
- timeout: 加载一个数据批次的最长等待时间,一般无需设置。
- worker_init_fn: 每个worker中dataset的初始化函数,常用于 IterableDataset。一般不使用。
#构建输入数据管道
ds = TensorDataset(torch.arange(1,50))
dl = DataLoader(ds,
                batch_size = 10,
                shuffle= True,
                num_workers=2,
                drop_last = True)
#迭代数据
for batch, in dl:
    print(batch)
# tensor([43, 44, 21, 36,  9,  5, 28, 16, 20, 14])
# tensor([23, 49, 35, 38,  2, 34, 45, 18, 15, 40])
# tensor([26,  6, 27, 39,  8,  4, 24, 19, 32, 17])
# tensor([ 1, 29, 11, 47, 12, 22, 48, 42, 10,  7])
tf.data API构建数据管道(tensorflow)
tensorflow
可以从 Numpy array, Pandas DataFrame, Python generator, csv文件, 文本文件, 文件路径, tfrecords文件等方式构建数据管道。
其中通过Numpy array, Pandas DataFrame, 文件路径构建数据管道是最常用的方法。
通过tfrecords文件方式构建数据管道较为复杂,需要对样本构建tf.Example后压缩成字符串写到tfrecords文件,读取后再解析成tf.Example。
但tfrecords文件的优点是压缩后文件较小,便于网络传播,加载速度较快。
从Numpy array构建数据管道
# 从Numpy array构建数据管道
import tensorflow as tf
import numpy as np
from sklearn import datasets
iris = datasets.load_iris()

ds1 = tf.data.Dataset.from_tensor_slices((iris["data"],iris["target"]))
for features,label in ds1.take(5):
    print(features,label)
# tf.Tensor([5.1 3.5 1.4 0.2], shape=(4,), dtype=float64) tf.Tensor(0, shape=(), dtype=int64)
# tf.Tensor([4.9 3.  1.4 0.2], shape=(4,), dtype=float64) tf.Tensor(0, shape=(), dtype=int64)
# tf.Tensor([4.7 3.2 1.3 0.2], shape=(4,), dtype=float64) tf.Tensor(0, shape=(), dtype=int64)
# tf.Tensor([4.6 3.1 1.5 0.2], shape=(4,), dtype=float64) tf.Tensor(0, shape=(), dtype=int64)
# tf.Tensor([5.  3.6 1.4 0.2], shape=(4,), dtype=float64) tf.Tensor(0, shape=(), dtype=int64)
从 Pandas DataFrame构建数据管道
import pandas as pd
iris = datasets.load_iris()
dfiris = pd.DataFrame(iris["data"],columns = iris.feature_names)
ds2 = tf.data.Dataset.from_tensor_slices((dfiris.to_dict("list"),iris["target"]))

for features,label in ds2.take(3):
    print(features,label)
# {'sepal length (cm)': <tf.Tensor: shape=(), dtype=float32, numpy=5.1>, 'sepal width (cm)': <tf.Tensor: shape=(), dtype=float32, numpy=3.5>, 'petal length (cm)': <tf.Tensor: shape=(), dtype=float32, numpy=1.4>, 'petal width (cm)': <tf.Tensor: shape=(), dtype=float32, numpy=0.2>} tf.Tensor(0, shape=(), dtype=int64)
# {'sepal length (cm)': <tf.Tensor: shape=(), dtype=float32, numpy=4.9>, 'sepal width (cm)': <tf.Tensor: shape=(), dtype=float32, numpy=3.0>, 'petal length (cm)': <tf.Tensor: shape=(), dtype=float32, numpy=1.4>, 'petal width (cm)': <tf.Tensor: shape=(), dtype=float32, numpy=0.2>} tf.Tensor(0, shape=(), dtype=int64)
# {'sepal length (cm)': <tf.Tensor: shape=(), dtype=float32, numpy=4.7>, 'sepal width (cm)': <tf.Tensor: shape=(), dtype=float32, numpy=3.2>, 'petal length (cm)': <tf.Tensor: shape=(), dtype=float32, numpy=1.3>, 'petal width (cm)': <tf.Tensor: shape=(), dtype=float32, numpy=0.2>} tf.Tensor(0, shape=(), dtype=int64)
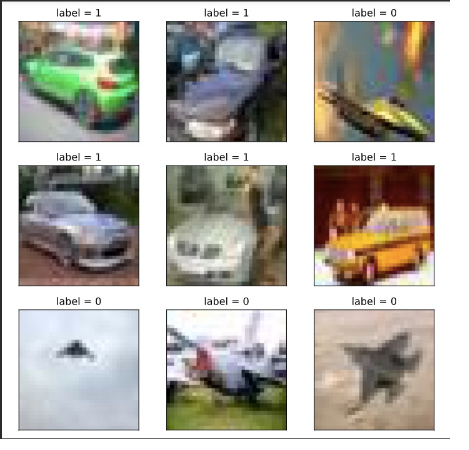
从Python generator构建数据管道
# 从Python generator构建数据管道
import tensorflow as tf
from matplotlib import pyplot as plt
from tensorflow.keras.preprocessing.image import ImageDataGenerator

# 定义一个从文件中读取图片的generator
image_generator = ImageDataGenerator(rescale=1.0/255).flow_from_directory(
                    "./data/cifar2/test/",
                    target_size=(32, 32),
                    batch_size=20,
                    class_mode='binary')

classdict = image_generator.class_indices
print(classdict)

def generator():
    for features,label in image_generator:
        yield (features,label)

ds3 = tf.data.Dataset.from_generator(generator,output_types=(tf.float32,tf.int32))
plt.figure(figsize=(6,6))
for i,(img,label) in enumerate(ds3.unbatch().take(9)):
    ax=plt.subplot(3,3,i+1)
    ax.imshow(img.numpy())
    ax.set_title("label = %d"%label)
    ax.set_xticks([])
    ax.set_yticks([])
plt.show()
从csv文件构建数据管道
# 从csv文件构建数据管道
ds4 = tf.data.experimental.make_csv_dataset(
      file_pattern = ["./data/titanic/train.csv","./data/titanic/test.csv"],
      batch_size=3,
      label_name="Survived",
      na_value="",
      num_epochs=1,
      ignore_errors=True)

for data,label in ds4.take(2):
    print(data,label)
# OrderedDict([('PassengerId', <tf.Tensor: shape=(3,), dtype=int32, numpy=array([540,  58, 764], dtype=int32)>), ('Pclass', <tf.Tensor: shape=(3,), dtype=int32, numpy=array([1, 3, 1], dtype=int32)>), ('Name', <tf.Tensor: shape=(3,), dtype=string, numpy=
# array([b'Frolicher, Miss. Hedwig Margaritha', b'Novel, Mr. Mansouer',
#        b'Carter, Mrs. William Ernest (Lucile Polk)'], dtype=object)>), ('Sex', <tf.Tensor: shape=(3,), dtype=string, numpy=array([b'female', b'male', b'female'], dtype=object)>), ('Age', <tf.Tensor: shape=(3,), dtype=float32, numpy=array([22. , 28.5, 36. ], dtype=float32)>), ('SibSp', <tf.Tensor: shape=(3,), dtype=int32, numpy=array([0, 0, 1], dtype=int32)>), ('Parch', <tf.Tensor: shape=(3,), dtype=int32, numpy=array([2, 0, 2], dtype=int32)>), ('Ticket', <tf.Tensor: shape=(3,), dtype=string, numpy=array([b'13568', b'2697', b'113760'], dtype=object)>), ('Fare', <tf.Tensor: shape=(3,), dtype=float32, numpy=array([ 49.5   ,   7.2292, 120.    ], dtype=float32)>), ('Cabin', <tf.Tensor: shape=(3,), dtype=string, numpy=array([b'B39', b'', b'B96 B98'], dtype=object)>), ('Embarked', <tf.Tensor: shape=(3,), dtype=string, numpy=array([b'C', b'C', b'S'], dtype=object)>)]) tf.Tensor([1 0 1], shape=(3,), dtype=int32)
# OrderedDict([('PassengerId', <tf.Tensor: shape=(3,), dtype=int32, numpy=array([845,  66, 390], dtype=int32)>), ('Pclass', <tf.Tensor: shape=(3,), dtype=int32, numpy=array([3, 3, 2], dtype=int32)>), ('Name', <tf.Tensor: shape=(3,), dtype=string, numpy=
# array([b'Culumovic, Mr. Jeso', b'Moubarek, Master. Gerios',
#        b'Lehmann, Miss. Bertha'], dtype=object)>), ('Sex', <tf.Tensor: shape=(3,), dtype=string, numpy=array([b'male', b'male', b'female'], dtype=object)>), ('Age', <tf.Tensor: shape=(3,), dtype=float32, numpy=array([17.,  0., 17.], dtype=float32)>), ('SibSp', <tf.Tensor: shape=(3,), dtype=int32, numpy=array([0, 1, 0], dtype=int32)>), ('Parch', <tf.Tensor: shape=(3,), dtype=int32, numpy=array([0, 1, 0], dtype=int32)>), ('Ticket', <tf.Tensor: shape=(3,), dtype=string, numpy=array([b'315090', b'2661', b'SC 1748'], dtype=object)>), ('Fare', <tf.Tensor: shape=(3,), dtype=float32, numpy=array([ 8.6625, 15.2458, 12.    ], dtype=float32)>), ('Cabin', <tf.Tensor: shape=(3,), dtype=string, numpy=array([b'', b'', b''], dtype=object)>), ('Embarked', <tf.Tensor: shape=(3,), dtype=string, numpy=array([b'S', b'C', b'C'], dtype=object)>)]) tf.Tensor([0 1 1], shape=(3,), dtype=int32)
从文本文件构建数据管道
# 从文本文件构建数据管道

ds5 = tf.data.TextLineDataset(
    filenames = ["./data/titanic/train.csv","./data/titanic/test.csv"]
    ).skip(1) #略去第一行header

for line in ds5.take(5):
    print(line)
# tf.Tensor(b'493,0,1,"Molson, Mr. Harry Markland",male,55.0,0,0,113787,30.5,C30,S', shape=(), dtype=string)
# tf.Tensor(b'53,1,1,"Harper, Mrs. Henry Sleeper (Myna Haxtun)",female,49.0,1,0,PC 17572,76.7292,D33,C', shape=(), dtype=string)
# tf.Tensor(b'388,1,2,"Buss, Miss. Kate",female,36.0,0,0,27849,13.0,,S', shape=(), dtype=string)
# tf.Tensor(b'192,0,2,"Carbines, Mr. William",male,19.0,0,0,28424,13.0,,S', shape=(), dtype=string)
# tf.Tensor(b'687,0,3,"Panula, Mr. Jaako Arnold",male,14.0,4,1,3101295,39.6875,,S', shape=(), dtype=string)
从文件路径构建数据管道
ds6 = tf.data.Dataset.list_files("./data/cifar2/train/*/*.jpg")
for file in ds6.take(5):
    print(file)
# tf.Tensor(b'./data/cifar2/train/automobile/1263.jpg', shape=(), dtype=string)
# tf.Tensor(b'./data/cifar2/train/airplane/2837.jpg', shape=(), dtype=string)
# tf.Tensor(b'./data/cifar2/train/airplane/4264.jpg', shape=(), dtype=string)
# tf.Tensor(b'./data/cifar2/train/automobile/4241.jpg', shape=(), dtype=string)
# tf.Tensor(b'./data/cifar2/train/automobile/192.jpg', shape=(), dtype=string)
从tfrecords文件构建数据管道
# 创建tfrecords文件
import os
import numpy as np

# inpath:原始数据路径 outpath:TFRecord文件输出路径
def create_tfrecords(inpath,outpath):
    writer = tf.io.TFRecordWriter(outpath)
    dirs = os.listdir(inpath)
    for index, name in enumerate(dirs):
        class_path = inpath +"/"+ name+"/"
        for img_name in os.listdir(class_path):
            img_path = class_path + img_name
            img = tf.io.read_file(img_path)
            #img = tf.image.decode_image(img)
            #img = tf.image.encode_jpeg(img) #统一成jpeg格式压缩
            example = tf.train.Example(
               features=tf.train.Features(feature={
                    'label': tf.train.Feature(int64_list=tf.train.Int64List(value=[index])),
                    'img_raw': tf.train.Feature(bytes_list=tf.train.BytesList(value=[img.numpy()]))
               }))
            writer.write(example.SerializeToString())
    writer.close()

create_tfrecords("./data/cifar2/test/","./data/cifar2_test.tfrecords/")
from matplotlib import pyplot as plt

def parse_example(proto):
    description ={ 'img_raw' : tf.io.FixedLenFeature([], tf.string),
                   'label': tf.io.FixedLenFeature([], tf.int64)}
    example = tf.io.parse_single_example(proto, description)
    img = tf.image.decode_jpeg(example["img_raw"])   #注意此处为jpeg格式
    img = tf.image.resize(img, (32,32))
    label = example["label"]
    return(img,label)

ds7=tf.data.TFRecordDataset("./data/cifar2_test.tfrecords").map(parse_example).shuffle(3000)

for i,(img,label) in enumerate(ds7.take(9)):
    ax=plt.subplot(3,3,i+1)
    ax.imshow((img/255.0).numpy())
    ax.set_title("label = %d"%label)
    ax.set_xticks([])
    ax.set_yticks([])
plt.show()
应用数据转换
Dataset数据结构应用非常灵活,因为它本质上是一个Sequece序列,其每个元素可以是各种类型,例如可以是张量,列表,字典,也可以是Dataset。
Dataset包含了非常丰富的数据转换功能。
- map: 将转换函数映射到数据集每一个元素。
- flat_map: 将转换函数映射到数据集的每一个元素,并将嵌套的Dataset压平。
- interleave: 效果类似flat_map,但可以将不同来源的数据夹在一起。
- filter: 过滤掉某些元素。
- zip: 将两个长度相同的Dataset横向铰合。
- concatenate: 将两个Dataset纵向连接。
- reduce: 执行归并操作。
- batch : 构建批次,每次放一个批次。比原始数据增加一个维度。 其逆操作为unbatch。
- padded_batch: 构建批次,类似batch, 但可以填充到相同的形状。
- window :构建滑动窗口,返回Dataset of Dataset.
- shuffle: 数据顺序洗牌。
- repeat: 重复数据若干次,不带参数时,重复无数次。
- shard: 采样,从某个位置开始隔固定距离采样一个元素。
- take: 采样,从开始位置取前几个元素。
#map:将转换函数映射到数据集每一个元素

ds = tf.data.Dataset.from_tensor_slices(["hello world","hello China","hello Beijing"])
ds_map = ds.map(lambda x:tf.strings.split(x," "))
for x in ds_map:
    print(x)
# tf.Tensor([b'hello' b'world'], shape=(2,), dtype=string)
# tf.Tensor([b'hello' b'China'], shape=(2,), dtype=string)
# tf.Tensor([b'hello' b'Beijing'], shape=(2,), dtype=string)
#flat_map:将转换函数映射到数据集的每一个元素,并将嵌套的Dataset压平。

ds = tf.data.Dataset.from_tensor_slices(["hello world","hello China","hello Beijing"])
ds_flatmap = ds.flat_map(lambda x:tf.data.Dataset.from_tensor_slices(tf.strings.split(x," ")))
for x in ds_flatmap:
    print(x)
# tf.Tensor(b'hello', shape=(), dtype=string)
# tf.Tensor(b'world', shape=(), dtype=string)
# tf.Tensor(b'hello', shape=(), dtype=string)
# tf.Tensor(b'China', shape=(), dtype=string)
# tf.Tensor(b'hello', shape=(), dtype=string)
# tf.Tensor(b'Beijing', shape=(), dtype=string)
# interleave: 效果类似flat_map,但可以将不同来源的数据夹在一起。

ds = tf.data.Dataset.from_tensor_slices(["hello world","hello China","hello Beijing"])
ds_interleave = ds.interleave(lambda x:tf.data.Dataset.from_tensor_slices(tf.strings.split(x," ")))
for x in ds_interleave:
    print(x)

# tf.Tensor(b'hello', shape=(), dtype=string)
# tf.Tensor(b'hello', shape=(), dtype=string)
# tf.Tensor(b'hello', shape=(), dtype=string)
# tf.Tensor(b'world', shape=(), dtype=string)
# tf.Tensor(b'China', shape=(), dtype=string)
# tf.Tensor(b'Beijing', shape=(), dtype=string)
#filter:过滤掉某些元素。

ds = tf.data.Dataset.from_tensor_slices(["hello world","hello China","hello Beijing"])
#找出含有字母a或B的元素
ds_filter = ds.filter(lambda x: tf.strings.regex_full_match(x, ".*[a|B].*"))
for x in ds_filter:
    print(x)

# tf.Tensor(b'hello China', shape=(), dtype=string)
# tf.Tensor(b'hello Beijing', shape=(), dtype=strin
#zip:将两个长度相同的Dataset横向铰合。

ds1 = tf.data.Dataset.range(0,3)
ds2 = tf.data.Dataset.range(3,6)
ds3 = tf.data.Dataset.range(6,9)
ds_zip = tf.data.Dataset.zip((ds1,ds2,ds3))
for x,y,z in ds_zip:
    print(x.numpy(),y.numpy(),z.numpy())
# 0 3 6
# 1 4 7
# 2 5 8
# #condatenate:将两个Dataset纵向连接。

ds1 = tf.data.Dataset.range(0,3)
ds2 = tf.data.Dataset.range(3,6)
ds_concat = tf.data.Dataset.concatenate(ds1,ds2)
for x in ds_concat:
    print(x)
# tf.Tensor(0, shape=(), dtype=int64)
# tf.Tensor(1, shape=(), dtype=int64)
# tf.Tensor(2, shape=(), dtype=int64)
# tf.Tensor(3, shape=(), dtype=int64)
# tf.Tensor(4, shape=(), dtype=int64)
# tf.Tensor(5, shape=(), dtype=int64)
#reduce:执行归并操作。

ds = tf.data.Dataset.from_tensor_slices([1,2,3,4,5.0])
result = ds.reduce(0.0,lambda x,y:tf.add(x,y))
result
# <tf.Tensor: shape=(), dtype=float32, numpy=15.0>
#batch:构建批次,每次放一个批次。比原始数据增加一个维度。 其逆操作为unbatch。

ds = tf.data.Dataset.range(12)
ds_batch = ds.batch(4)
for x in ds_batch:
    print(x)
# tf.Tensor([0 1 2 3], shape=(4,), dtype=int64)
# tf.Tensor([4 5 6 7], shape=(4,), dtype=int64)
# tf.Tensor([ 8  9 10 11], shape=(4,), dtype=int64)
#padded_batch:构建批次,类似batch, 但可以填充到相同的形状。

elements = [[1, 2],[3, 4, 5],[6, 7],[8]]
ds = tf.data.Dataset.from_generator(lambda: iter(elements), tf.int32)

ds_padded_batch = ds.padded_batch(2,padded_shapes = [4,])
for x in ds_padded_batch:
    print(x)
# tf.Tensor(
# [[1 2 0 0]
#  [3 4 5 0]], shape=(2, 4), dtype=int32)
# tf.Tensor(
# [[6 7 0 0]
#  [8 0 0 0]], shape=(2, 4), dtype=int32)
#window:构建滑动窗口,返回Dataset of Dataset.

ds = tf.data.Dataset.range(12)
#window返回的是Dataset of Dataset,可以用flat_map压平
ds_window = ds.window(3, shift=1).flat_map(lambda x: x.batch(3,drop_remainder=True))
for x in ds_window:
    print(x)
# tf.Tensor([0 1 2], shape=(3,), dtype=int64)
# tf.Tensor([1 2 3], shape=(3,), dtype=int64)
# tf.Tensor([2 3 4], shape=(3,), dtype=int64)
# tf.Tensor([3 4 5], shape=(3,), dtype=int64)
# tf.Tensor([4 5 6], shape=(3,), dtype=int64)
# tf.Tensor([5 6 7], shape=(3,), dtype=int64)
# tf.Tensor([6 7 8], shape=(3,), dtype=int64)
# tf.Tensor([7 8 9], shape=(3,), dtype=int64)
# tf.Tensor([ 8  9 10], shape=(3,), dtype=int64)
# tf.Tensor([ 9 10 11], shape=(3,), dtype=int64)
#shuffle:数据顺序洗牌。

ds = tf.data.Dataset.range(12)
ds_shuffle = ds.shuffle(buffer_size = 5)
for x in ds_shuffle:
    print(x)

# tf.Tensor(1, shape=(), dtype=int64)
# tf.Tensor(4, shape=(), dtype=int64)
# tf.Tensor(0, shape=(), dtype=int64)
# tf.Tensor(6, shape=(), dtype=int64)
# tf.Tensor(5, shape=(), dtype=int64)
# tf.Tensor(2, shape=(), dtype=int64)
# tf.Tensor(7, shape=(), dtype=int64)
# tf.Tensor(11, shape=(), dtype=int64)
# tf.Tensor(3, shape=(), dtype=int64)
# tf.Tensor(9, shape=(), dtype=int64)
# tf.Tensor(10, shape=(), dtype=int64)
# tf.Tensor(8, shape=(), dtype=int64)
#repeat:重复数据若干次,不带参数时,重复无数次。

ds = tf.data.Dataset.range(3)
ds_repeat = ds.repeat(3)
for x in ds_repeat:
    print(x)
# tf.Tensor(0, shape=(), dtype=int64)
# tf.Tensor(1, shape=(), dtype=int64)
# tf.Tensor(2, shape=(), dtype=int64)
# tf.Tensor(0, shape=(), dtype=int64)
# tf.Tensor(1, shape=(), dtype=int64)
# tf.Tensor(2, shape=(), dtype=int64)
# tf.Tensor(0, shape=(), dtype=int64)
# tf.Tensor(1, shape=(), dtype=int64)
# tf.Tensor(2, shape=(), dtype=int64)
#shard:采样,从某个位置开始隔固定距离采样一个元素。

ds = tf.data.Dataset.range(12)
ds_shard = ds.shard(3,index = 1)

for x in ds_shard:
    print(x)
# tf.Tensor(1, shape=(), dtype=int64)
# tf.Tensor(4, shape=(), dtype=int64)
# tf.Tensor(7, shape=(), dtype=int64)
# tf.Tensor(10, shape=(), dtype=int64)
#take:采样,从开始位置取前几个元素。

ds = tf.data.Dataset.range(12)
ds_take = ds.take(3)

list(ds_take.as_numpy_iterator())
# [0, 1, 2]
提升管道性能(tensorflow)
训练深度学习模型常常会非常耗时。
模型训练的耗时主要来自于两个部分,一部分来自数据准备,另一部分来自参数迭代。
参数迭代过程的耗时通常依赖于GPU来提升。
而数据准备过程的耗时则可以通过构建高效的数据管道进行提升。
以下是一些构建高效数据管道的建议。
- 1,使用 prefetch 方法让数据准备和参数迭代两个过程相互并行。
- 2,使用 interleave 方法可以让数据读取过程多进程执行,并将不同来源数据夹在一起。
- 3,使用 map 时设置num_parallel_calls 让数据转换过程多进程执行。
- 4,使用 cache 方法让数据在第一个epoch后缓存到内存中,仅限于数据集不大情形。
- 5,使用 map转换时,先batch, 然后采用向量化的转换方法对每个batch进行转换。
使用 prefetch 方法让数据准备和参数迭代两个过程相互并行。
import tensorflow as tf

#打印时间分割线
@tf.function
def printbar():
    ts = tf.timestamp()
    today_ts = ts%(24*60*60)

    hour = tf.cast(today_ts//3600+8,tf.int32)%tf.constant(24)
    minite = tf.cast((today_ts%3600)//60,tf.int32)
    second = tf.cast(tf.floor(today_ts%60),tf.int32)

    def timeformat(m):
        if tf.strings.length(tf.strings.format("{}",m))==1:
            return(tf.strings.format("0{}",m))
        else:
            return(tf.strings.format("{}",m))

    timestring = tf.strings.join([timeformat(hour),timeformat(minite),
                timeformat(second)],separator = ":")
    tf.print("=========="*8,end = "")
    tf.print(timestring)
import time

# 数据准备和参数迭代两个过程默认情况下是串行的。

# 模拟数据准备
def generator():
    for i in range(10):
        #假设每次准备数据需要2s
        time.sleep(2)
        yield i
ds = tf.data.Dataset.from_generator(generator,output_types = (tf.int32))

# 模拟参数迭代
def train_step():
    #假设每一步训练需要1s
    time.sleep(1)
# 训练过程预计耗时 10*2+10*1 = 30s
printbar()
tf.print(tf.constant("start training..."))
for x in ds:
    train_step()
printbar()
tf.print(tf.constant("end training..."))

# =======================================================
# 使用 prefetch 方法让数据准备和参数迭代两个过程相互并行。

# 训练过程预计耗时 max(10*2,10*1) = 20s
printbar()
tf.print(tf.constant("start training with prefetch..."))

# tf.data.experimental.AUTOTUNE 可以让程序自动选择合适的参数
for x in ds.prefetch(buffer_size = tf.data.experimental.AUTOTUNE):
    train_step()

printbar()
tf.print(tf.constant("end training..."))
使用 interleave 方法可以让数据读取过程多进程执行,并将不同来源数据夹在一起。
ds_files = tf.data.Dataset.list_files("./data/titanic/*.csv")
ds = ds_files.flat_map(lambda x:tf.data.TextLineDataset(x).skip(1))
for line in ds.take(4):
    print(line)
# tf.Tensor(b'493,0,1,"Molson, Mr. Harry Markland",male,55.0,0,0,113787,30.5,C30,S', shape=(), dtype=string)
# tf.Tensor(b'53,1,1,"Harper, Mrs. Henry Sleeper (Myna Haxtun)",female,49.0,1,0,PC 17572,76.7292,D33,C', shape=(), dtype=string)
# tf.Tensor(b'388,1,2,"Buss, Miss. Kate",female,36.0,0,0,27849,13.0,,S', shape=(), dtype=string)
# tf.Tensor(b'192,0,2,"Carbines, Mr. William",male,19.0,0,0,28424,13.0,,S', shape=(), dtype=string)
ds_files = tf.data.Dataset.list_files("./data/titanic/*.csv")
ds = ds_files.interleave(lambda x:tf.data.TextLineDataset(x).skip(1))
for line in ds.take(8):
    print(line)
# tf.Tensor(b'181,0,3,"Sage, Miss. Constance Gladys",female,,8,2,CA. 2343,69.55,,S', shape=(), dtype=string)
# tf.Tensor(b'493,0,1,"Molson, Mr. Harry Markland",male,55.0,0,0,113787,30.5,C30,S', shape=(), dtype=string)
# tf.Tensor(b'405,0,3,"Oreskovic, Miss. Marija",female,20.0,0,0,315096,8.6625,,S', shape=(), dtype=string)
# tf.Tensor(b'53,1,1,"Harper, Mrs. Henry Sleeper (Myna Haxtun)",female,49.0,1,0,PC 17572,76.7292,D33,C', shape=(), dtype=string)
# tf.Tensor(b'635,0,3,"Skoog, Miss. Mabel",female,9.0,3,2,347088,27.9,,S', shape=(), dtype=string)
# tf.Tensor(b'388,1,2,"Buss, Miss. Kate",female,36.0,0,0,27849,13.0,,S', shape=(), dtype=string)
# tf.Tensor(b'701,1,1,"Astor, Mrs. John Jacob (Madeleine Talmadge Force)",female,18.0,1,0,PC 17757,227.525,C62 C64,C', shape=(), dtype=string)
# tf.Tensor(b'192,0,2,"Carbines, Mr. William",male,19.0,0,0,28424,13.0,,S', shape=(), dtype=string)
使用 map 时设置num_parallel_calls 让数据转换过程多进行执行。
ds = tf.data.Dataset.list_files("./data/cifar2/train/*/*.jpg")
def load_image(img_path,size = (32,32)):
    label = 1 if tf.strings.regex_full_match(img_path,".*/automobile/.*") else 0
    img = tf.io.read_file(img_path)
    img = tf.image.decode_jpeg(img) #注意此处为jpeg格式
    img = tf.image.resize(img,size)
    return(img,label)
#单进程转换
printbar()
tf.print(tf.constant("start transformation..."))

ds_map = ds.map(load_image)
for _ in ds_map:
    pass

printbar()
tf.print(tf.constant("end transformation..."))
#多进程转换
printbar()
tf.print(tf.constant("start parallel transformation..."))

ds_map_parallel = ds.map(load_image,num_parallel_calls = tf.data.experimental.AUTOTUNE)
for _ in ds_map_parallel:
    pass

printbar()
tf.print(tf.constant("end parallel transformation..."))
使用 cache 方法让数据在第一个epoch后缓存到内存中,仅限于数据集不大情形。
import time

# 模拟数据准备
def generator():
    for i in range(5):
        #假设每次准备数据需要2s
        time.sleep(2)
        yield i

# 使用 cache 方法让数据在第一个epoch后缓存到内存中,仅限于数据集不大情形。
ds = tf.data.Dataset.from_generator(generator,output_types = (tf.int32)).cache()

# 模拟参数迭代
def train_step():
    #假设每一步训练需要0s
    time.sleep(0)

# ===================================================
# 训练过程预计耗时 (5*2+5*0)+(5*0+5*0)*2 = 10s
printbar()
tf.print(tf.constant("start training..."))
for epoch in tf.range(3):
    for x in ds:
        train_step()
    printbar()
    tf.print("epoch =",epoch," ended")
printbar()
tf.print(tf.constant("end training..."))
使用 map转换时,先batch, 然后采用向量化的转换方法对每个batch进行转换。
#先map后batch
ds = tf.data.Dataset.range(100000)
ds_map_batch = ds.map(lambda x:x**2).batch(20)

printbar()
tf.print(tf.constant("start scalar transformation..."))
for x in ds_map_batch:
    pass
printbar()
tf.print(tf.constant("end scalar transformation..."))
#先batch后map
ds = tf.data.Dataset.range(100000)
ds_batch_map = ds.batch(20).map(lambda x:x**2)

printbar()
tf.print(tf.constant("start vector transformation..."))
for x in ds_batch_map:
    pass
printbar()
tf.print(tf.constant("end vector transformation..."))
回调函数(tensorflow)
回调函数是tensorflow 提供的功能模块!!(所以说tensorflow丰满,pytorch轻盈。这里面可能还有一层tensorflow最终还是要编译成静态图的缘故,所以不可能像pytorch一样在训练过程中很方便的插入变量或者一些用户想要使用的操作等,因此回调函数就诞生了。)
tf.keras的回调函数实际上是一个类,一般是在model.fit时作为参数指定,用于控制在训练过程开始或者在训练过程结束,在每个epoch训练开始或者训练结束,在每个batch训练开始或者训练结束时执行一些操作,例如收集一些日志信息,改变学习率等超参数,提前终止训练过程等等。
同样地,针对model.evaluate或者model.predict也可以指定callbacks参数,用于控制在评估或预测开始或者结束时,在每个batch开始或者结束时执行一些操作,但这种用法相对少见。
大部分时候,keras.callbacks子模块中定义的回调函数类已经足够使用了,如果有特定的需要,我们也可以通过对keras.callbacks.Callbacks实施子类化构造自定义的回调函数。
所有回调函数都继承至 keras.callbacks.Callbacks基类,拥有params和model这两个属性。
其中params 是一个dict,记录了训练相关参数 (例如 verbosity, batch size, number of epochs 等等)。
model即当前关联的模型的引用。
此外,对于回调类中的一些方法如on_epoch_begin,on_batch_end,还会有一个输入参数logs, 提供有关当前epoch或者batch的一些信息,并能够记录计算结果,如果model.fit指定了多个回调函数类,这些logs变量将在这些回调函数类的同名函数间依顺序传递。
内置回调函数
- BaseLogger: 收集每个epoch上metrics在各个batch上的平均值,对stateful_metrics参数中的带中间状态的指标直接拿最终值无需对各个batch平均,指标均值结果将添加到logs变量中。该回调函数被所有模型默认添加,且是第一个被添加的。
- History: 将BaseLogger计算的各个epoch的metrics结果记录到history这个dict变量中,并作为model.fit的返回值。该回调函数被所有模型默认添加,在BaseLogger之后被添加。
- EarlyStopping: 当被监控指标在设定的若干个epoch后没有提升,则提前终止训练。
- TensorBoard: 为Tensorboard可视化保存日志信息。支持评估指标,计算图,模型参数等的可视化。
- ModelCheckpoint: 在每个epoch后保存模型。
- ReduceLROnPlateau:如果监控指标在设定的若干个epoch后没有提升,则以一定的因子减少学习率。
- TerminateOnNaN:如果遇到loss为NaN,提前终止训练。
- LearningRateScheduler:学习率控制器。给定学习率lr和epoch的函数关系,根据该函数关系在每个epoch前调整学习率。
- CSVLogger:将每个epoch后的logs结果记录到CSV文件中。
- ProgbarLogger:将每个epoch后的logs结果打印到标准输出流中。
自定义回调函数
可以使用callbacks.LambdaCallback编写较为简单的回调函数,也可以通过对callbacks.Callback子类化编写更加复杂的回调函数逻辑。
如果需要深入学习tf.Keras中的回调函数,不要犹豫阅读内置回调函数的源代码。
import numpy as np
import pandas as pd
import tensorflow as tf
from tensorflow.keras import layers,models,losses,metrics,callbacks
import tensorflow.keras.backend as K
# 示范使用LambdaCallback编写较为简单的回调函数

import json
json_log = open('./data/keras_log.json', mode='wt', buffering=1)
json_logging_callback = callbacks.LambdaCallback(
    on_epoch_end=lambda epoch, logs: json_log.write(
        json.dumps(dict(epoch = epoch,**logs)) + '\n'),
    on_train_end=lambda logs: json_log.close()
)
# 示范通过Callback子类化编写回调函数(LearningRateScheduler的源代码)

class LearningRateScheduler(callbacks.Callback):

    def __init__(self, schedule, verbose=0):
        super(LearningRateScheduler, self).__init__()
        self.schedule = schedule
        self.verbose = verbose

    def on_epoch_begin(self, epoch, logs=None):
        if not hasattr(self.model.optimizer, 'lr'):
            raise ValueError('Optimizer must have a "lr" attribute.')
        try:
            lr = float(K.get_value(self.model.optimizer.lr))
            lr = self.schedule(epoch, lr)
        except TypeError:  # Support for old API for backward compatibility
            lr = self.schedule(epoch)
        if not isinstance(lr, (tf.Tensor, float, np.float32, np.float64)):
            raise ValueError('The output of the "schedule" function '
                             'should be float.')
        if isinstance(lr, ops.Tensor) and not lr.dtype.is_floating:
            raise ValueError('The dtype of Tensor should be float')
        K.set_value(self.model.optimizer.lr, K.get_value(lr))
        if self.verbose > 0:
            print('\nEpoch %05d: LearningRateScheduler reducing learning '
                 'rate to %s.' % (epoch + 1, lr))

    def on_epoch_end(self, epoch, logs=None):
        logs = logs or {}
        logs['lr'] = K.get_value(self.model.optimizer.lr)
特征列处理(tensorflow)
特征列 通常用于对结构化数据实施特征工程时候使用,图像或者文本数据一般不会用到特征列。
做过结构化数据有监督学的同学可能知道,有时候我们需要对输入的Y值列,进行一下处理,可能是one_hot编码,也和能使catogori分组,频词分组等,这些操作。在tensorflow中提供了专门的一些接口,方便上开发人员使用。
特征列feature_column,tensorflow提供了相应的接口,但是pytorch中并没有相应的接口!(究其原因可能还是源自于tensorflow有一层编译,所以tensorflow定义变量一般为tf中的内置变量。所以提供了相应接口进行处理(笔者猜测))。pytorch进行特征列处理,可以直接使用python自带功能函数,或者借用numpy,sklearn功能函数实现。
特征列用法概述
使用特征列可以将类别特征转换为one-hot编码特征,将连续特征构建分桶特征,以及对多个特征生成交叉特征等等。
要创建特征列,请调用 tf.feature_column 模块的函数。该模块中常用的九个函数如下图所示,所有九个函数都会返回一个 Categorical-Column 或一个 Dense-Column 对象,但却不会返回 bucketized_column,后者继承自这两个类。
注意:所有的Catogorical Column类型最终都要通过indicator_column转换成Dense Column类型才能传入模型!

-
numeric_column 数值列,最常用。
-
bucketized_column 分桶列,由数值列生成,可以由一个数值列出多个特征,one-hot编码。
-
categorical_column_with_identity 分类标识列,one-hot编码,相当于分桶列每个桶为1个整数的情况。
-
categorical_column_with_vocabulary_list 分类词汇列,one-hot编码,由list指定词典。
-
categorical_column_with_vocabulary_file 分类词汇列,由文件file指定词典。
-
categorical_column_with_hash_bucket 哈希列,整数或词典较大时采用。
-
indicator_column 指标列,由Categorical Column生成,one-hot编码
-
embedding_column 嵌入列,由Categorical Column生成,嵌入矢量分布参数需要学习。嵌入矢量维数建议取类别数量的 4 次方根。
-
crossed_column 交叉列,可以由除categorical_column_with_hash_bucket的任意分类列构成。
特征列使用范例
import datetime
import numpy as np
import pandas as pd
from matplotlib import pyplot as plt
import tensorflow as tf
from tensorflow.keras import layers,models
# 直接数值 numeric_column, numeric_column : 输入数值即可

number = tf.feature_column.numeric_column("number")
feature_dict = {"number": [1.1, 1.2, 1.3]}
feature_layer = tf.keras.layers.DenseFeatures(number)
output = feature_layer(feature_dict)
print(output)
print("=========================")

# tf.Tensor(
# [[1.1]
#  [1.2]
#  [1.3]], shape=(3, 1), dtype=float32)
# =========================
# normalizer_fn : 数值类型还支持归一化函数,可以传入函数或者 lambda 表达式表征归一化方法

number = tf.feature_column.numeric_column("number", normalizer_fn=lambda x: (x - 1.0) / 2.0)
feature_dict = {"number": [1.1, 1.2, 1.3]}
feature_layer = tf.keras.layers.DenseFeatures(number)
output = feature_layer(feature_dict)
print(output)
print("=========================")

#    tf.Tensor(
#[[0.05000001]
# [0.10000002]
# [0.14999998]], shape=(3, 1), dtype=float32)
#=========================
# 数字分桶  numeric_column + bucketized_column
# numeric_column: 获取离散数值
# buketized_column: 离散数值分桶,需给定 boundaries

cos_index = tf.feature_column.bucketized_column(
    tf.feature_column.numeric_column(key='cos', shape=(1,),
                                     default_value=0,
                                     dtype=tf.dtypes.float32),
    boundaries=[0.1, 0.2, 0.3, 0.4, 0.5, 0.6, 0.7, 0.8, 0.9])

product_dict = {"cos": np.random.random(size=(10, 1))}
feature_layer = tf.keras.layers.DenseFeatures(cos_index)
output = feature_layer(product_dict)
print(output)
print("=========================")

#     tf.Tensor(
# [[0. 0. 1. 0. 0. 0. 0. 0. 0. 0.]
#  [0. 0. 0. 0. 0. 0. 0. 1. 0. 0.]
#  [0. 1. 0. 0. 0. 0. 0. 0. 0. 0.]
#  [0. 0. 0. 1. 0. 0. 0. 0. 0. 0.]
#  [0. 0. 0. 0. 0. 1. 0. 0. 0. 0.]
#  [0. 1. 0. 0. 0. 0. 0. 0. 0. 0.]
#  [0. 1. 0. 0. 0. 0. 0. 0. 0. 0.]
#  [0. 0. 0. 0. 0. 1. 0. 0. 0. 0.]
#  [0. 0. 0. 0. 0. 0. 1. 0. 0. 0.]
#  [0. 0. 0. 0. 0. 0. 1. 0. 0. 0.]], shape=(10, 10), dtype=float32)
其他方法不一一示例,样例代码参考
《Tensorflow - 一文搞懂 TF2.x tf.feature_column》
https://blog.csdn.net/BIT_666/article/details/119234194
说明
笔记中很多代码案例来自于:
《20天吃掉那只Pytorch》
- 🚀 github项目地址: https://github.com/lyhue1991/eat_pytorch_in_20_days
《30天吃掉那只TensorFlow2》
- 🚀 github项目地址: https://github.com/lyhue1991/eat_tensorflow2_in_30_days
感兴趣的同学可以进入学习。
===========================================================================
我的笔记一部分是将这两项目中内容整理归纳,一部分是相应功能的内容自己找资料整理归纳。
笔记以MD格式存入我的git仓库,另外代码案例所需要数据集文件也在其中:可以clone下来学习使用。
《pytorch-tensorflow对比学习笔记》
🚀 github项目地址: https://github.com/Boris-2021/pytorch-tensorflow-Comparative-study
===========================================================================
笔记中增加了很多趣味性的图片,增加阅读乐趣。
===========================================================================
感觉对你的学习有帮助,就点个星,点个赞,点个关注再走把,整理不易,拒绝白嫖从我做起!


 720
720


 被折叠的 条评论
为什么被折叠?
被折叠的 条评论
为什么被折叠?
 到【灌水乐园】发言


