


目录
我的vs2022,window11
环境安装
看这个文章即可,博客很详细,按照这个没问题的
(5条消息) 【OSG】OSG环境部署 OSG3.6.5+vs2017+win10_x64(超详细)_osg环境配置_bailang_zhizun的博客-CSDN博客
我的osglogo没有地球,不过无所谓,反正vs代码运行牛和logo都正常。应该是资源路径问题。
补充文章:(5条消息) OSG-OpenSceneGraph在WIN10与VS2022下的部署(OSG3.6.5+VS2022+Win10_x64)个人笔记详细_vs2022 osg_食月的博客-CSDN博客
最快的入门方式就是实操案例
案例一:
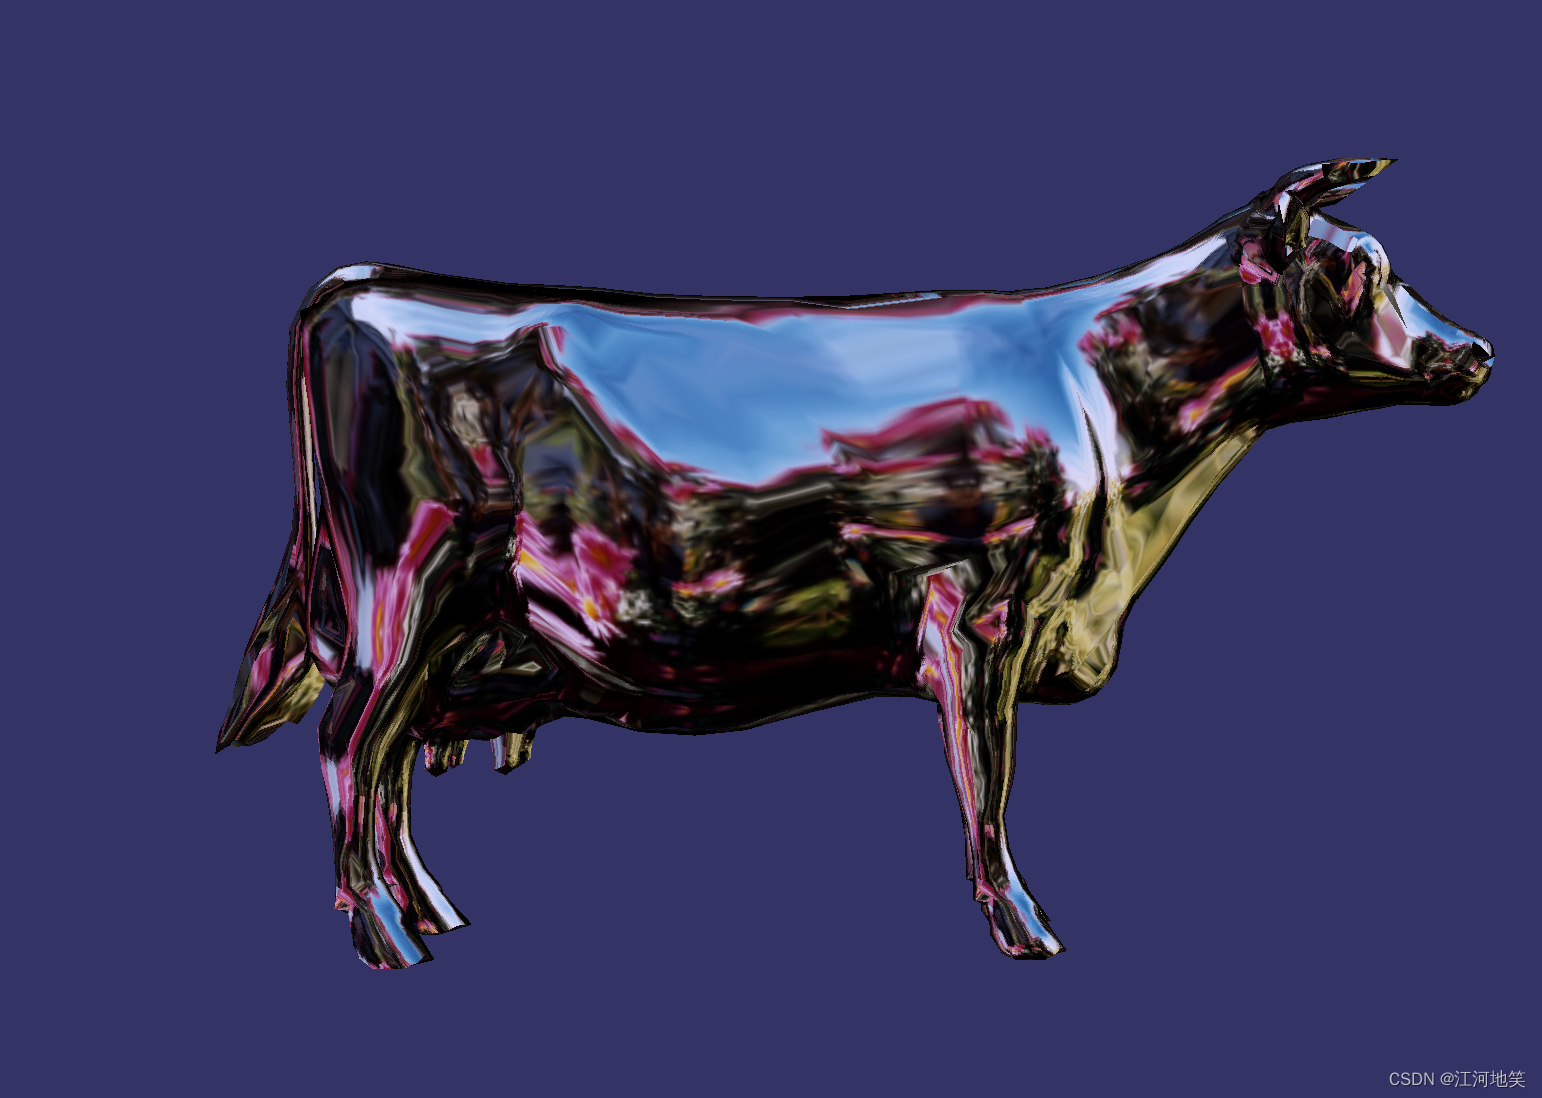
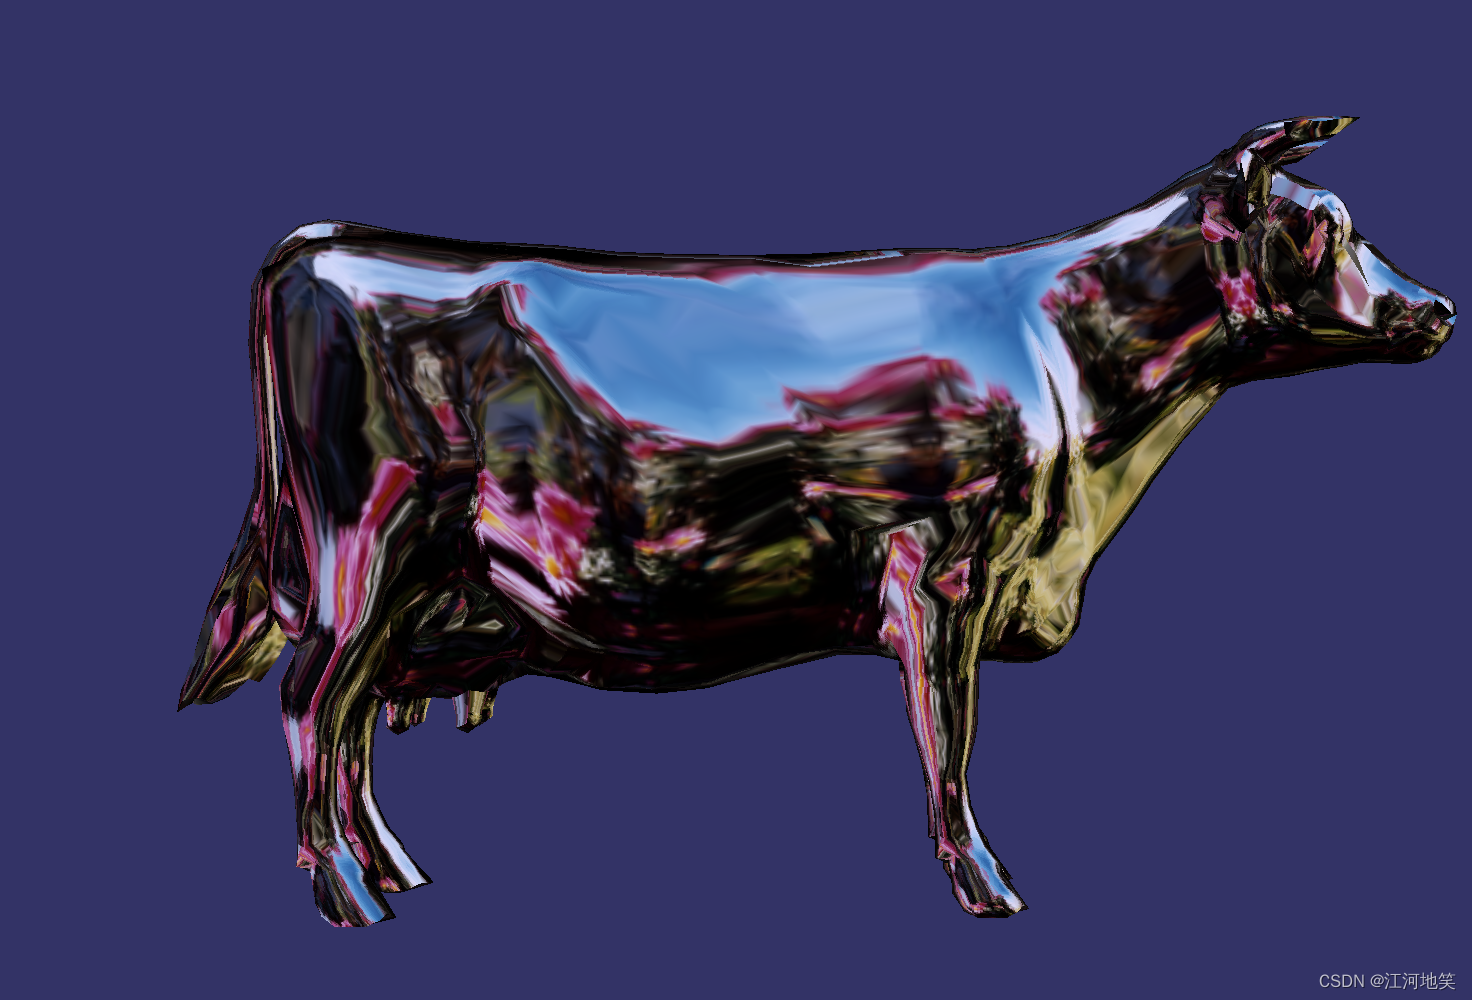
牛在vs中的代码(release,x64)
(1)设置WIN32
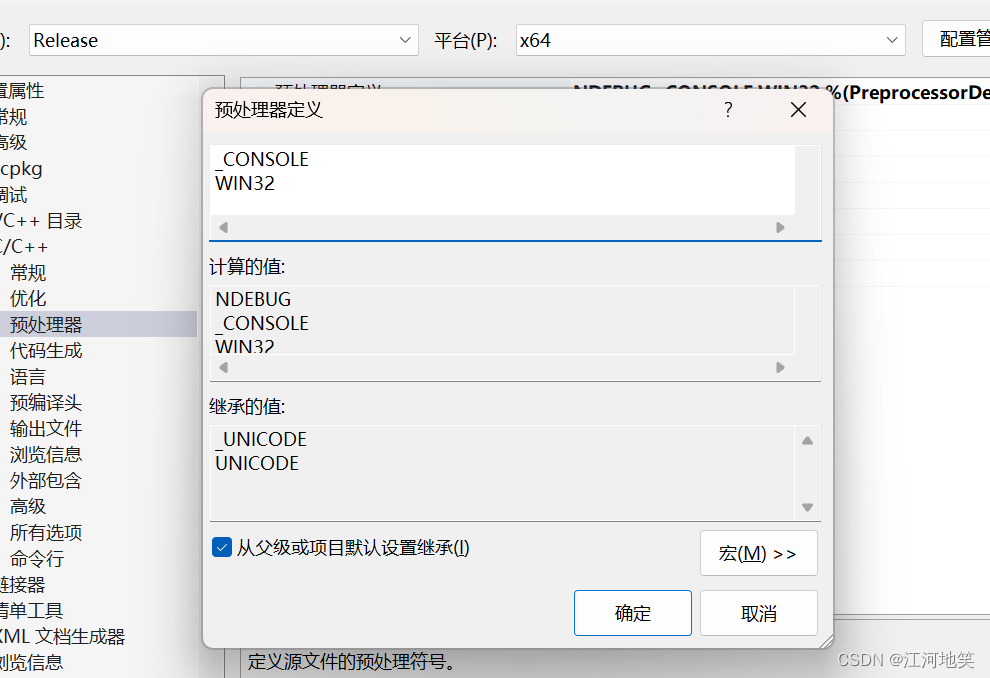
否则可能报错,这个案例可能不报错,下面的不加WIN32肯定报错。下图是不加WIN32

(2)设置include库
D:\CPlusProject\ThirdParty\OSG\build\include(3)设置链接器
D:\CPlusProject\ThirdParty\OSG\build\lib


osg.lib;osgDB.lib;osgUtil.lib;osgGA.lib;osgViewer.lib;osgText.lib;%(AdditionalDependencies)
(4)代码
#include <Windows.h>
#include <osgViewer/Viewer>
#include <osgDB/ReadFile>

using namespace osg;
using namespace osgViewer;
using namespace osgDB;

int main(int argc, char* argv[])
{
	osgViewer::Viewer viewer;
	viewer.setSceneData(osgDB::readNodeFile("D:/CPlusProject/ThirdParty/OSG/Data/OpenSceneGraph-Data/cow.osg"));
	return viewer.run();

}
(5)展示
案例二:
一个初步的带lod的案例
#include <string>
#include <iostream>

#include <osgViewer/Viewer>
#include <osgDB/ReadFile>
#include <osgDB/WriteFile>
#include <osg/Node>
#include <osg/Geode>
#include <osg/Group>
#include <osg/PagedLOD>


using namespace std;


int main() {
	osg::ref_ptr<osg::LOD> lod = new osg::LOD();
	lod->addChild(osgDB::readNodeFile("D:/CPlusProject/ThirdParty/OSG/Data/OpenSceneGraph-Data/glider.osg"), 0.0f, 20);
	lod->addChild(osgDB::readNodeFile("D:/CPlusProject/ThirdParty/OSG/Data/OpenSceneGraph-Data/cessna.osg"), 20, 100);
	lod->addChild(osgDB::readNodeFile("D:/CPlusProject/ThirdParty/OSG/Data/OpenSceneGraph-Data/clock.osgt"), 100, FLT_MAX);

	osg::ref_ptr<osgViewer::Viewer> viewer = new osgViewer::Viewer;
	osg::ref_ptr<osg::Group> sceneRoot = new osg::Group;

	sceneRoot->addChild(lod.get());
	viewer->setSceneData(sceneRoot);

	return viewer->run();

}
运行结果:这是层级为二的飞机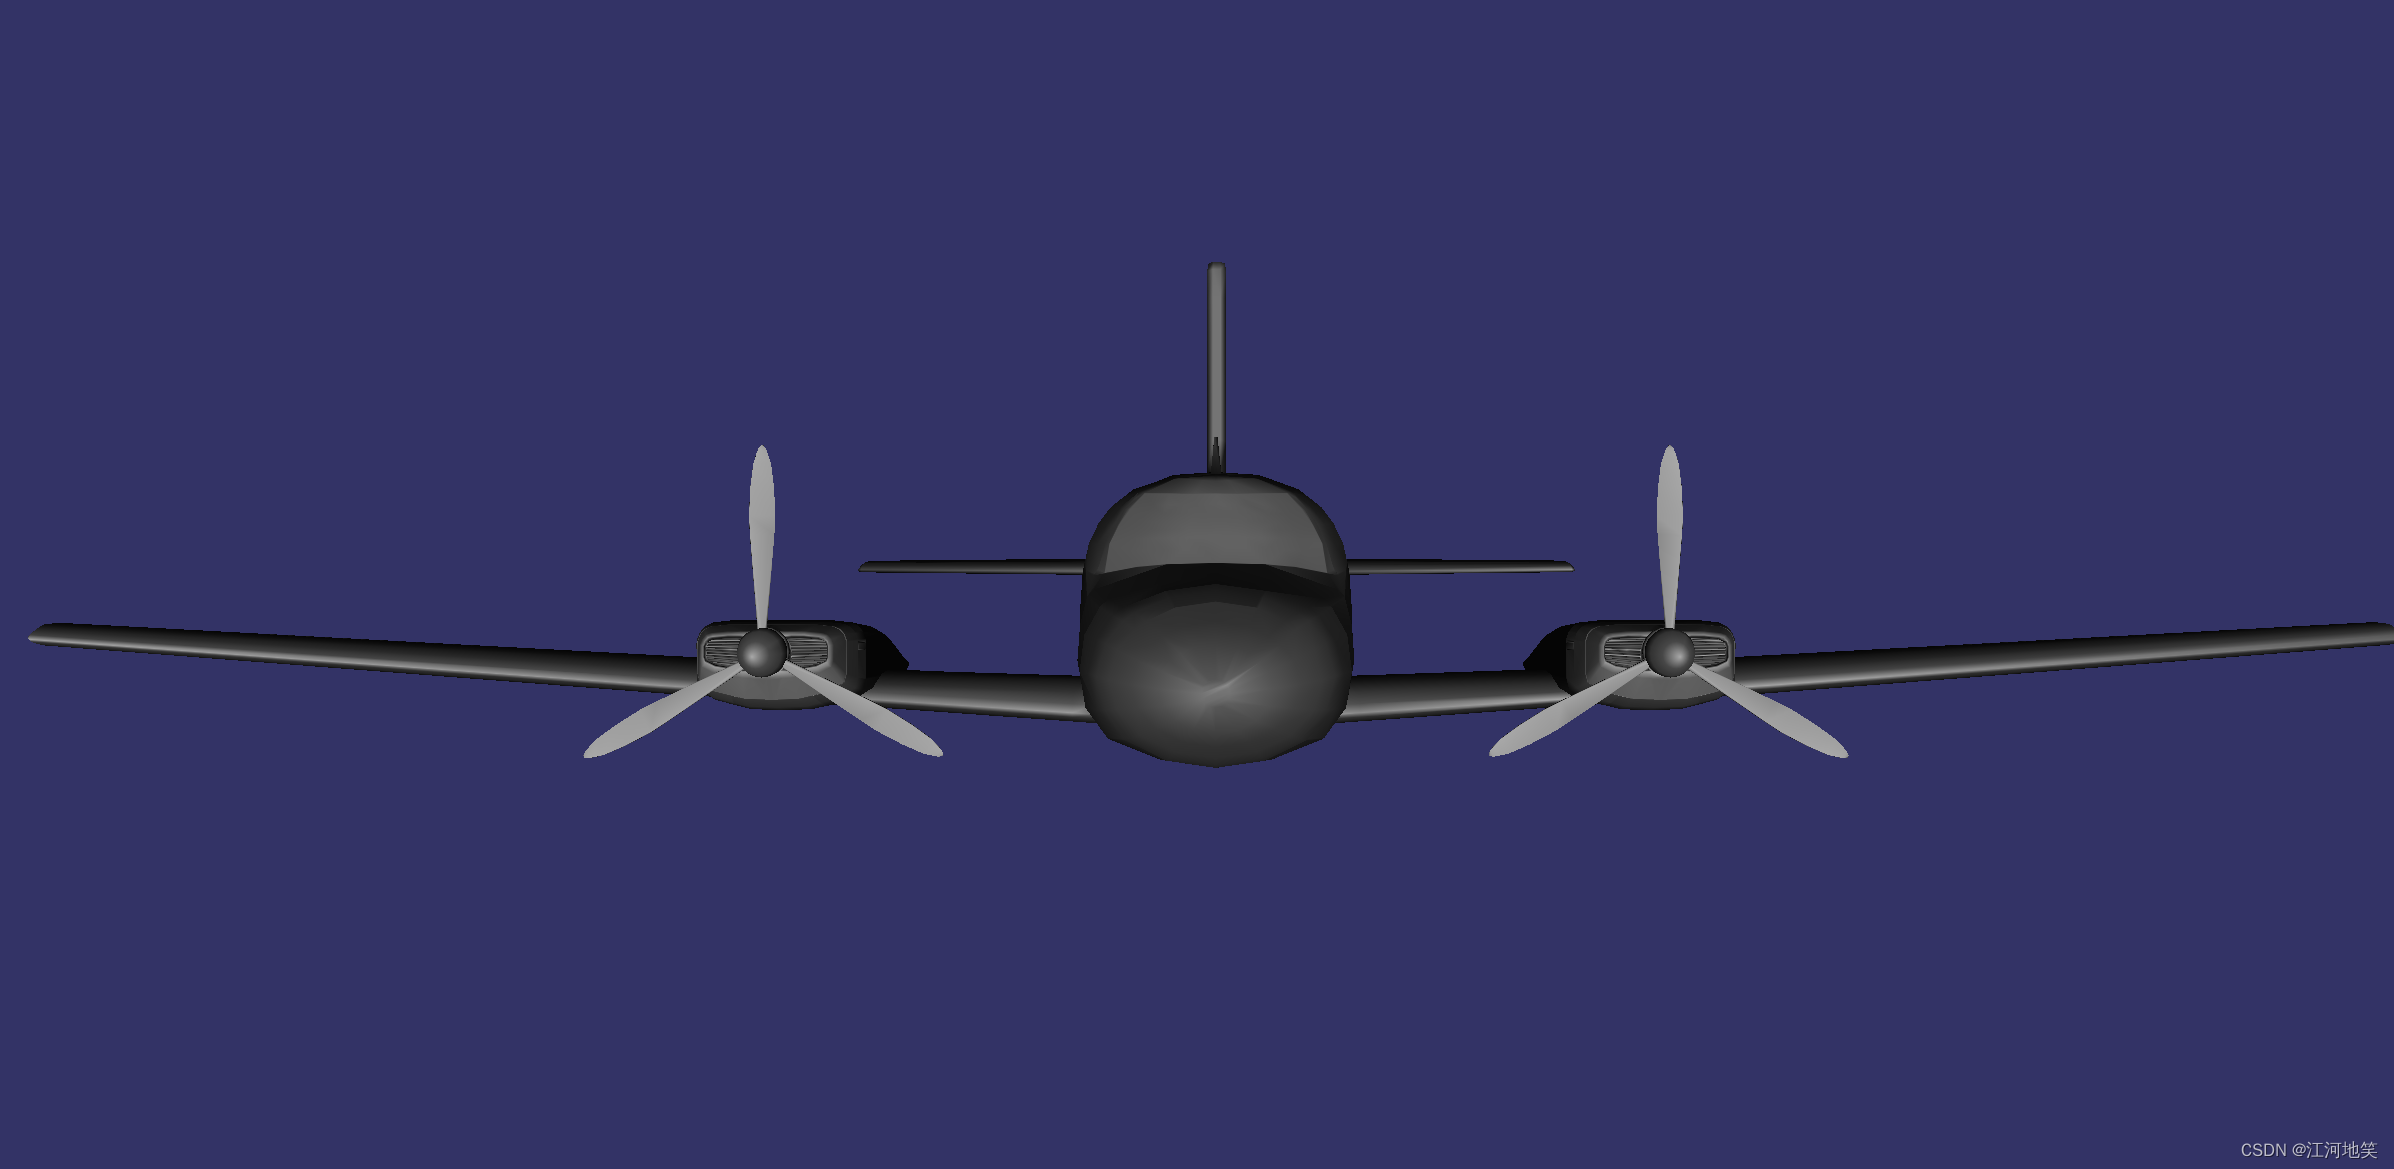
参考文档:(10条消息) 基于OSG讲解一下LOD_osg lod_微小的鱼的博客-CSDN博客
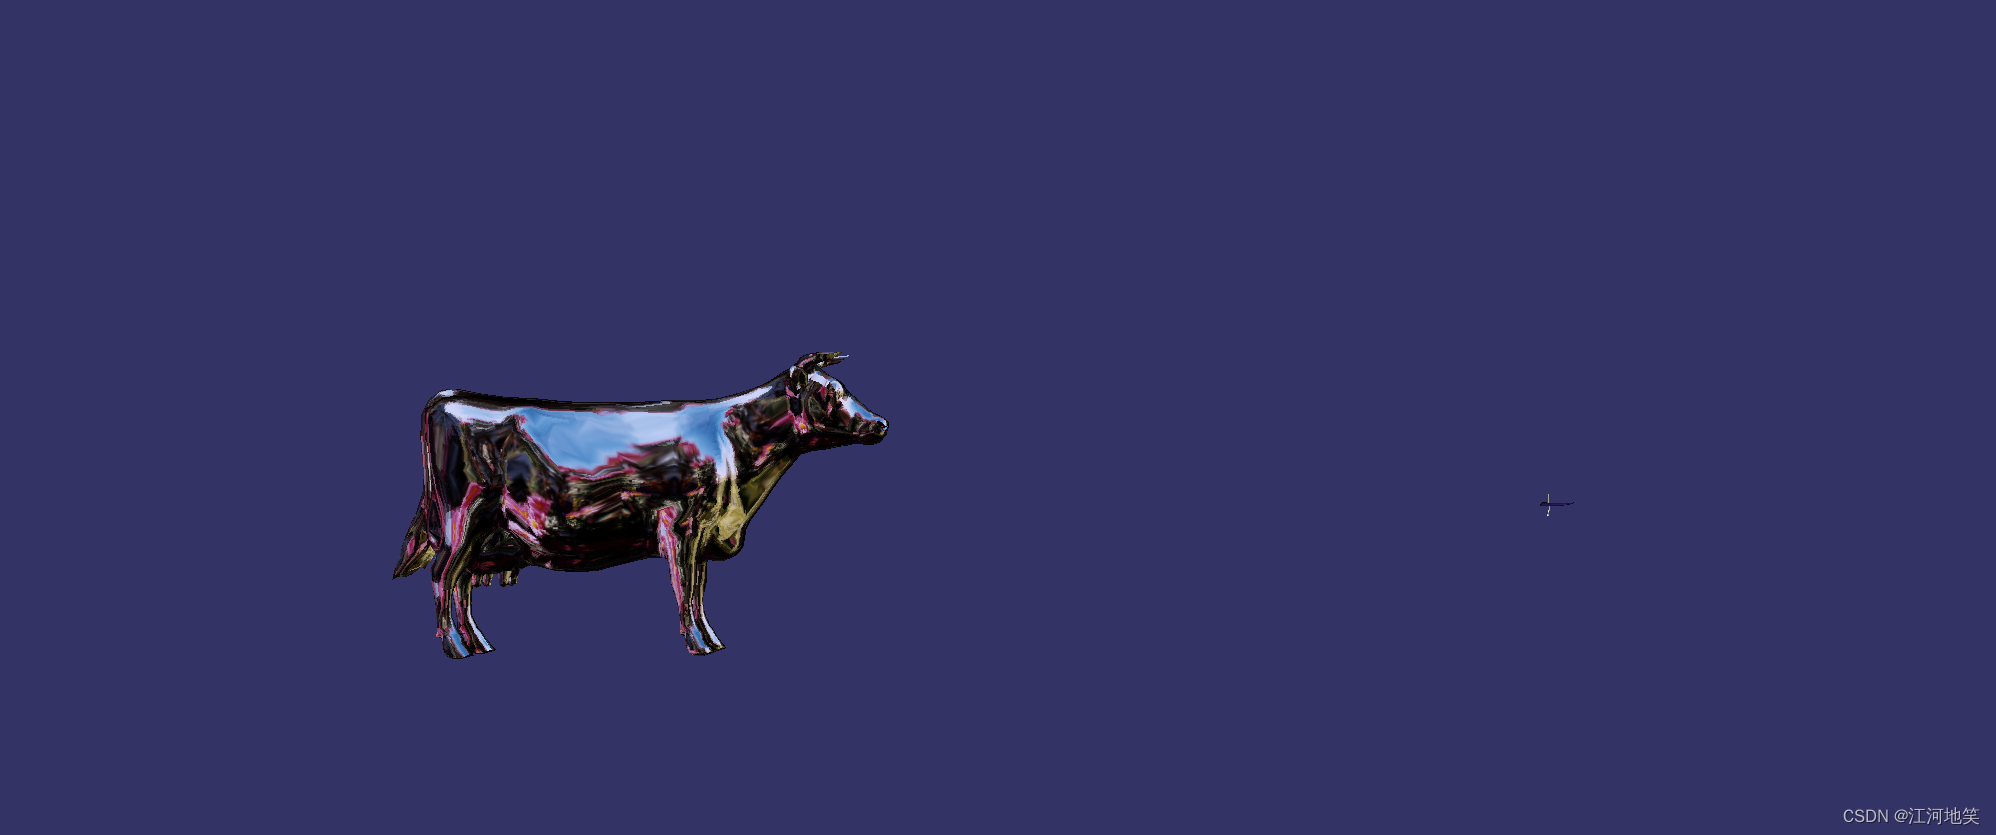
案例三:
两种lod显示方式
#include <string>
#include <iostream>

#include <osgViewer/Viewer>
#include <osgDB/ReadFile>
#include <osgDB/WriteFile>
#include <osg/Node>
#include <osg/Geode>
#include <osg/Group>
#include <osg/PagedLOD>

#include <osg/PositionAttitudeTransform>

osg::ref_ptr<osg::Node> CreateNode() {
	osg::ref_ptr<osg::Group> _root = new osg::Group;
	//创建牛模型
	osg::ref_ptr<osg::Node> node1 = osgDB::readNodeFile("D:/CPlusProject/ThirdParty/OSG/Data/OpenSceneGraph-Data/cow.osg");
	//创建滑翔机模型
	osg::ref_ptr<osg::Node> node2 = osgDB::readNodeFile("D:/CPlusProject/ThirdParty/OSG/Data/OpenSceneGraph-Data/glider.osg");
	//创建一个细节层次的节点LOD
	osg::ref_ptr<osg::LOD> lode = new osg::LOD;
	//添加子节点,在0到30的范围显示牛
	lode->addChild(node1.get(), 0.0f, 30.0f);
	//添加子节点,在30到100显示滑翔机
	lode->addChild(node2.get(), 30.0f, 100.0f);


	//创建一个细节层次节点LOD
	osg::ref_ptr<osg::LOD> lode1 = new osg::LOD;
	//按照像素大小来判断
	lode1->setRangeMode(osg::LOD::PIXEL_SIZE_ON_SCREEN);
	lode1->addChild(node1.get(), 0.0f, 1000.0f);
	lode1->addChild(node2.get(), 1000.0f, 2000.0f);
	//创建一个位置
	osg::ref_ptr<osg::PositionAttitudeTransform> pat1 = new osg::PositionAttitudeTransform();
	pat1->setPosition(osg::Vec3(-20.0f, 0.0f, 0.0f));
	pat1->addChild(lode1.get());


	_root->addChild(lode.get());
	_root->addChild(pat1.get());
	return _root.get();


}

using namespace std;


int main() {


	osg::ref_ptr<osg::Node> node=CreateNode();

	osgViewer::Viewer viewer;
	viewer.setSceneData(node);
	return viewer.run();

	return 0;
}
可能有用的文章:
[原][osg][oe]分析一块倾斜摄影瓦片的数据 - 南水之源 - 博客园 (cnblogs.com)
OSG中距离转像素公式(PIXEL_SIZE_ON_SCREEN) - 代码天地 (codetd.com)
案例四:
osg::LOD会一次性载入所有模型进入内存,只是进行有选择的绘制而已。为了避免这种一次性加入内存的浪费行为,OpenSceneGraph提供了另外一种细节层次节点:分页细节层次节点osg::PagedLOD,PagedLOD继承自osg::LOD,可实现动态分页加载,可根据需要来加载模型文件,加载过程中有单独的线程负责实时调度和加载。
#include <string>
#include <iostream>

#include <osgViewer/Viewer>
#include <osgDB/ReadFile>
#include <osgDB/WriteFile>
#include <osg/Node>
#include <osg/Geode>
#include <osg/Group>
#include <osg/PagedLOD>

#include <osg/PositionAttitudeTransform>

osg::ref_ptr<osg::Node> CreateNode() {
	osg::ref_ptr<osg::Group> _root = new osg::Group;
	//创建牛模型
	osg::ref_ptr<osg::Node> node1 = osgDB::readNodeFile("D:/CPlusProject/ThirdParty/OSG/Data/OpenSceneGraph-Data/cow.osg");
	//创建滑翔机模型
	osg::ref_ptr<osg::Node> node2 = osgDB::readNodeFile("D:/CPlusProject/ThirdParty/OSG/Data/OpenSceneGraph-Data/glider.osg");
	//创建一个细节层次的节点PageLOD
	osg::ref_ptr<osg::PagedLOD> lode = new osg::PagedLOD;
	//添加子节点,在0到30的范围显示牛
	lode->addChild(node1.get(), 0.0f, 30.0f);
	//添加子节点,在30到100显示滑翔机
	lode->addChild(node2.get(), 30.0f, 100.0f);


	_root->addChild(lode.get());
	return _root.get();


}

using namespace std;


int main() {


	osg::ref_ptr<osg::Node> node=CreateNode();

	osgViewer::Viewer viewer;
	viewer.setSceneData(node);
	return viewer.run();

	return 0;
}
案例五
这边一定要注意预处理器要加win32,并且保证运行的版本debug或者release是自己已经编译过的osg库版本
#include <osg/Geode>
#include <osg/Geometry>
#include <osgDB/Registry>
#include <osgDB/WriteFile>
#include <osg/Notify>
#include <osg/PrimitiveSet>


osg::ref_ptr<osg::Node> createSceneGraph() {
    //创建一个用于保存几何信息的对象
    osg::ref_ptr<osg::Geometry> geom = new osg::Geometry;

    //创建四个顶点的数组
    osg::ref_ptr<osg::Vec3Array> v = new osg::Vec3Array;
    v->push_back(osg::Vec3(-1.f, 0.f, 1.f));
    v->push_back(osg::Vec3(1.f, 0.f, -1.f));
    v->push_back(osg::Vec3(1.f, 0.f, 1.f));
    v->push_back(osg::Vec3(-1.f, 0.f, 1.f));
    geom->setVertexArray(v.get());

    //创建四个颜色的数组
    osg::ref_ptr<osg::Vec4Array> c = new osg::Vec4Array;
    geom->setColorArray(c.get());
    geom->setColorBinding(osg::Geometry::BIND_PER_VERTEX);
    c->push_back(osg::Vec4(1.f, 0.f, 0.f, 1.f));
    c->push_back(osg::Vec4(0.f, 1.f, 0.f, 1.f));
    c->push_back(osg::Vec4(0.f, 0.f, 1.f, 1.f));
    c->push_back(osg::Vec4(1.f, 1.f, 1.f, 1.f));

    //为唯一的法线创建一个数组
    osg::ref_ptr<osg::Vec3Array> n = new osg::Vec3Array;
    geom->setNormalArray(n.get());
    geom->setNormalBinding(osg::Geometry::BIND_OVERALL);
    n->push_back(osg::Vec3(0.f, -1.f, 0.f));


    //由保存的数据绘制四个顶点的多边形
    geom->addPrimitiveSet(new osg::DrawArrays(osg::PrimitiveSet::QUADS, 0, 4));


    osg::ref_ptr<osg::Geode> geode = new osg::Geode;
    geode->addDrawable(geom.get());

    return geode.get();


}


int main()
{
    osg::ref_ptr<osg::Node> root = createSceneGraph();
    if (!root.valid()) {
        osg::notify(osg::FATAL) << "Failed" << std::endl;
    }

    std::string osg = R"(D:\CPlusProject\LearnOSG\learn01\Data\1.osg)";
    bool result = osgDB::writeNodeFile(*(root.get()), osg);


}
osgviewer.exe 1.osg

案例六
#include <osg/Geode>
#include <osg/Group>
#include <osg/MatrixTransform>
#include <osg/Geode>
#include <osg/Geometry>
#include <osg/StateSet>
#include <osg/StateAttribute>
#include <osg/ShadeModel>
#include <osg/CullFace>
#include <osg/PolygonMode>
#include <osg/LineWidth>

#include <osg/Geode>
#include <osg/Geometry>
#include <osgDB/Registry>
#include <osgDB/WriteFile>
#include <osg/Notify>
#include <osg/PrimitiveSet>

osg::ref_ptr<osg::Geometry> createDrawable() {
    //创建一个用于保存几何信息的对象
    osg::ref_ptr<osg::Geometry> geom = new osg::Geometry;

    //创建四个顶点的数组
    osg::ref_ptr<osg::Vec3Array> v = new osg::Vec3Array;
    v->push_back(osg::Vec3(-1.f, 0.f, -1.f));
    v->push_back(osg::Vec3(1.f, 0.f, -1.f));
    v->push_back(osg::Vec3(1.f, 0.f, 1.f));
    v->push_back(osg::Vec3(-1.f, 0.f, 1.f));
    geom->setVertexArray(v.get());

    //创建四个颜色的数组
    osg::ref_ptr<osg::Vec4Array> c = new osg::Vec4Array;
    geom->setColorArray(c.get());
    geom->setColorBinding(osg::Geometry::BIND_PER_VERTEX);
    c->push_back(osg::Vec4(1.f, 0.f, 0.f, 1.f));
    c->push_back(osg::Vec4(0.f, 1.f, 0.f, 1.f));
    c->push_back(osg::Vec4(0.f, 0.f, 1.f, 1.f));
    c->push_back(osg::Vec4(1.f, 1.f, 1.f, 1.f));

    //为唯一的法线创建一个数组
    osg::ref_ptr<osg::Vec3Array> n = new osg::Vec3Array;
    geom->setNormalArray(n.get());
    geom->setNormalBinding(osg::Geometry::BIND_OVERALL);
    n->push_back(osg::Vec3(0.f, -1.f, 0.f));


    //由保存的数据绘制四个顶点的多边形
    geom->addPrimitiveSet(new osg::DrawArrays(osg::PrimitiveSet::QUADS, 0, 4));

    return geom;
}

osg::ref_ptr<osg::Node> createSceneGraph() {

	//创建Group根节点
	osg::ref_ptr<osg::Group> root = new osg::Group;

	{
		//在根节点的StateSet中禁止光照。
		//使用PROTECTED以保证这修改不会呗osgviewer覆盖
		osg::StateSet* state = root->getOrCreateStateSet();
		state->setMode(GL_LIGHTING, osg::StateAttribute::OFF | osg::StateAttribute::PROTECTED);

	}

	//创建Geode叶节点并关联Drawable
	osg::ref_ptr<osg::Geode> geode = new osg::Geode;
	geode->addDrawable(createDrawable().get());

    osg::Matrix m;
    {
        //左上角:使用缺省属性渲染几何体。
        osg::ref_ptr<osg::MatrixTransform> mt = new osg::MatrixTransform;
        m.makeTranslate(-2.f, 0.f, 2.f);
        mt->setMatrix(m);
        root->addChild(mt.get());
        mt->addChild(geode.get());
    }


    {
        // 右上角:设置着色模式为 FLAT(单色)。
        osg::ref_ptr<osg::MatrixTransform> mt = new osg::MatrixTransform;
        m.makeTranslate(2.f, 0.f, 2.f);
        mt->setMatrix(m);
        root->addChild(mt.get());
        mt->addChild(geode.get());

        osg::StateSet* state = mt->getOrCreateStateSet();
        osg::ShadeModel* sm = new osg::ShadeModel();
        sm->setMode(osg::ShadeModel::FLAT);
        state->setAttribute(sm);
    }

    {
        // 左下角:开启背面剔除。
        osg::ref_ptr<osg::MatrixTransform> mt = new osg::MatrixTransform;
        m.makeTranslate(-2.f, 0.f, -2.f);
        mt->setMatrix(m);
        root->addChild(mt.get());
        mt->addChild(geode.get());

        osg::StateSet* state = mt->getOrCreateStateSet();
        osg::CullFace* cf = new osg::CullFace(); // 缺省值为 BACK
        state->setAttributeAndModes(cf);
    }

    {
        // 右下角:设置多边形填充模式为 LINE(线框)。
        osg::ref_ptr<osg::MatrixTransform> mt = new osg::MatrixTransform;
        m.makeTranslate(2.f, 0.f, -2.f);
        mt->setMatrix(m);
        root->addChild(mt.get());
        mt->addChild(geode.get());

        osg::StateSet* state = mt->getOrCreateStateSet();
        osg::PolygonMode* pm = new osg::PolygonMode(
            osg::PolygonMode::FRONT_AND_BACK,
            osg::PolygonMode::LINE);
        state->setAttributeAndModes(pm);
        // 同时还设置线宽为 3。
        osg::LineWidth* lw = new osg::LineWidth(3.f);
        state->setAttribute(lw);
    }

    return root.get();
}


int main() {
    osg::ref_ptr<osg::Node> root = createSceneGraph();
    if (!root.valid()) {
        osg::notify(osg::FATAL) << "Failed" << std::endl;
    }

    std::string osg = R"(D:\CPlusProject\LearnOSG\learn01\Data\2.osg)";
    bool result = osgDB::writeNodeFile(*(root.get()), osg);
}


 2413
2413


 被折叠的 条评论
为什么被折叠?
被折叠的 条评论
为什么被折叠?
 到【灌水乐园】发言


