


 本文介绍了STM32F103单片机如何利用内部温度传感器进行温度测量,包括ADC配置、温度计算公式以及与USART通信展示实时温度的示例代码。
uart+adc
温度计算公式
STM32F103 有一个内部的温度传感器,可以用来测量CPU及周围的温度(TA)。
该温度传 感器在内部和 ADCx_IN16 输入通道相连接,此通道把传感器输出的电压转换成数字值。温度 传感器模拟输入推荐采样时间是 17.1μs。
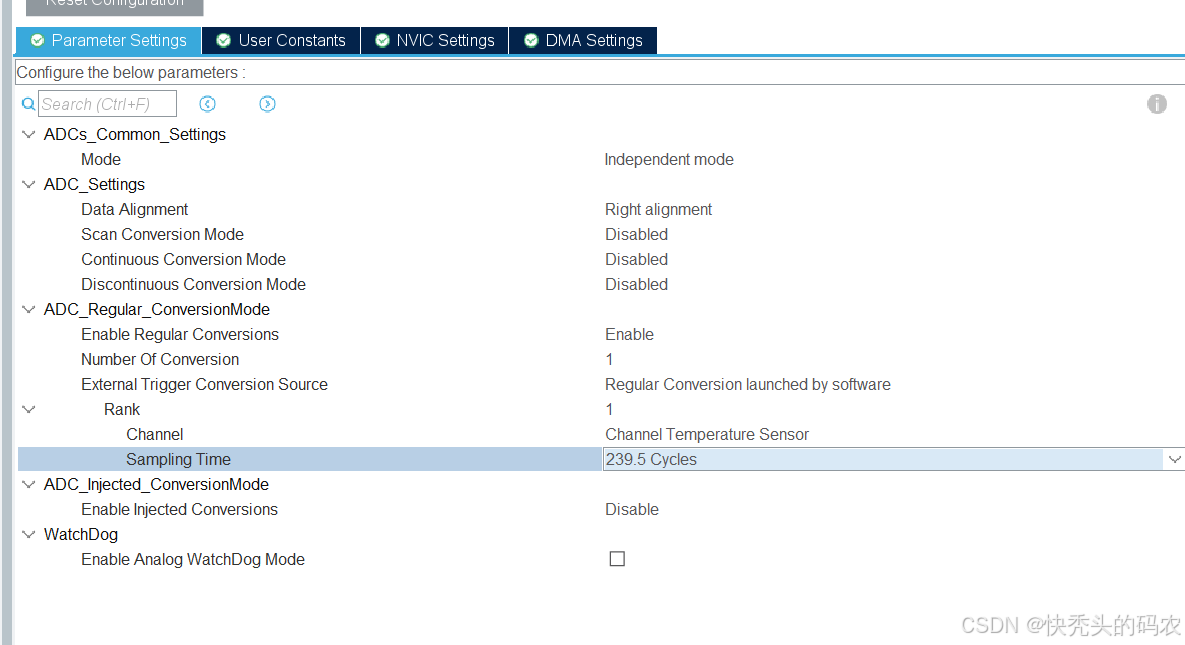
STM32 的内部温度传感器支持的温度范围为:-40~125 度。精度比较差,为±1.5℃左右。 STM32 内部温度传感器的使用很简单,只要设置一下内部 ADC,并激活其内部通道就差 不多了。关于 ADC 的设置,我们在第上一章已经进行了详细的介绍,这里就不再多说。
接下 来我们介绍一下和温度传感器设置相关的2个地方。
第一个地方,我们要使用STM32的内部温度传感器,必须先激活ADC的内部通道,这里 通过ADC_CR2的AWDEN位(bit23)设置。设置该位为1则启用内部温度传感器。
第二个地方,STM32的内部温度传感器固定的连接在ADC的通道16上,所以,我们在设 置好ADC之后只要读取通道16的值,就是温度传感器返回来的电压值了。根据这个值,我们 就可以计算出当前温度。
公式
温度 = (V25-Vsense ) / Avg_Slope + 25°C
V25是温度传感器在25°C时的输出电压。(典型值为:1.43)Vsense是当前温度下的温度传感器输出电压,可以通过ADC读数转换得到。Avg_Slope是温度传感器输出电压随温度变化的平均斜率(单位:mV/°C)。//4.325°C是参考温度,即V25对应的温度。
如电压为3v时
温度=(3.0-1.43)/4.3+25
注意
在配置stm32f103cubeMX时将采样时间调高一些使其精度变高(不调的话采集的数据可能不对)
main代码
int main(void)
{
/* USER CODE BEGIN 1 */
/* USER CODE END 1 */
/* MCU Configuration--------------------------------------------------------*/
/* Reset of all peripherals, Initializes the Flash interface and the Systick. */
HAL_Init();
/* USER CODE BEGIN Init */
/* USER CODE END Init */
/* Configure the system clock */
SystemClock_Config();
/* USER CODE BEGIN SysInit */
/* USER CODE END SysInit */
/* Initialize all configured peripherals */
MX_GPIO_Init();
MX_ADC1_Init();
MX_USART1_UART_Init();
/* USER CODE BEGIN 2 */
uint8_t data_zi[]={"温度为:"};
char data_char[5];//存储字符温度
float data_float;//电压
float data_float1;//温度
/* USER CODE END 2 */
/* Infinite loop */
/* USER CODE BEGIN WHILE */
while (1)
{
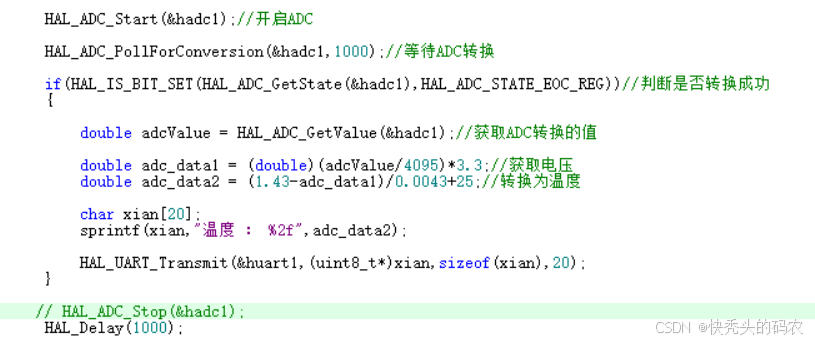
HAL_ADC_Start(&hadc1); //开启ADC
HAL_Delay(20); //等待转换
if(HAL_ADC_PollForConversion(&hadc1,20)==HAL_OK){ //判断是否完成转换
data_float=((float)(HAL_ADC_GetValue(&hadc1)/4095.0)*3.3); //计算电压值
data_float1 = (1.43-data_float)/0.0043+ 25.0; //计算温度
sprintf(data_char,"%2f",data_float1); //类型转换
HAL_UART_Transmit(&huart1,data_zi,sizeof(data_zi),20); //文字
HAL_UART_Transmit(&huart1,(uint8_t*)data_char,sizeof(data_char),20);//温度
}
HAL_Delay(1000);
/* USER CODE END WHILE */
/* USER CODE BEGIN 3 */
}
/* USER CODE END 3 */
}
注意单位
main文件代码
/* USER CODE BEGIN Header */
/**
  ******************************************************************************
  * @file           : main.c
  * @brief          : Main program body
  ******************************************************************************
  * @attention
  *
  * Copyright (c) 2024 STMicroelectronics.
  * All rights reserved.
  *
  * This software is licensed under terms that can be found in the LICENSE file
  * in the root directory of this software component.
  * If no LICENSE file comes with this software, it is provided AS-IS.
  *
  ******************************************************************************
  */
/* USER CODE END Header */
/* Includes ------------------------------------------------------------------*/
#include "main.h"
#include "adc.h"
#include "usart.h"
#include "gpio.h"

/* Private includes ----------------------------------------------------------*/
/* USER CODE BEGIN Includes */
#include "stdio.h"
/* USER CODE END Includes */

/* Private typedef -----------------------------------------------------------*/
/* USER CODE BEGIN PTD */

/* USER CODE END PTD */

/* Private define ------------------------------------------------------------*/
/* USER CODE BEGIN PD */

/* USER CODE END PD */

/* Private macro -------------------------------------------------------------*/
/* USER CODE BEGIN PM */

/* USER CODE END PM */

/* Private variables ---------------------------------------------------------*/

/* USER CODE BEGIN PV */

/* USER CODE END PV */

/* Private function prototypes -----------------------------------------------*/
void SystemClock_Config(void);
/* USER CODE BEGIN PFP */

/* USER CODE END PFP */

/* Private user code ---------------------------------------------------------*/
/* USER CODE BEGIN 0 */

/* USER CODE END 0 */

/**
  * @brief  The application entry point.
  * @retval int
  */
int main(void)
{

  /* USER CODE BEGIN 1 */

  /* USER CODE END 1 */

  /* MCU Configuration--------------------------------------------------------*/

  /* Reset of all peripherals, Initializes the Flash interface and the Systick. */
  HAL_Init();

  /* USER CODE BEGIN Init */

  /* USER CODE END Init */

  /* Configure the system clock */
  SystemClock_Config();

  /* USER CODE BEGIN SysInit */

  /* USER CODE END SysInit */

  /* Initialize all configured peripherals */
  MX_GPIO_Init();
  MX_ADC1_Init();
  MX_USART1_UART_Init();
  /* USER CODE BEGIN 2 */
	uint8_t data_zi[]={"温度为:"};
	char data_char[5];//存储字符温度
	float data_float;//电压
	float data_float1;//温度
  /* USER CODE END 2 */

  /* Infinite loop */
  /* USER CODE BEGIN WHILE */
  while (1)
  {
		HAL_ADC_Start(&hadc1);																						//开启ADC
		HAL_Delay(20);																										//等待转换
		if(HAL_ADC_PollForConversion(&hadc1,20)==HAL_OK){									//判断是否完成转换
				data_float=((float)(HAL_ADC_GetValue(&hadc1)/4095.0)*3.3);		//计算电压值
				data_float1 = (1.43-data_float)/0.0043+ 25.0;										//计算温度
				sprintf(data_char,"%2f",data_float1);													//类型转换
				HAL_UART_Transmit(&huart1,data_zi,sizeof(data_zi),20);					//文字
				HAL_UART_Transmit(&huart1,(uint8_t*)data_char,sizeof(data_char),20);//温度
		}

		HAL_Delay(1000);
    /* USER CODE END WHILE */

    /* USER CODE BEGIN 3 */
  }
  /* USER CODE END 3 */
}

/**
  * @brief System Clock Configuration
  * @retval None
  */
void SystemClock_Config(void)
{
  RCC_OscInitTypeDef RCC_OscInitStruct = {0};
  RCC_ClkInitTypeDef RCC_ClkInitStruct = {0};
  RCC_PeriphCLKInitTypeDef PeriphClkInit = {0};

  /** Initializes the RCC Oscillators according to the specified parameters
  * in the RCC_OscInitTypeDef structure.
  */
  RCC_OscInitStruct.OscillatorType = RCC_OSCILLATORTYPE_HSE;
  RCC_OscInitStruct.HSEState = RCC_HSE_ON;
  RCC_OscInitStruct.HSEPredivValue = RCC_HSE_PREDIV_DIV1;
  RCC_OscInitStruct.HSIState = RCC_HSI_ON;
  RCC_OscInitStruct.PLL.PLLState = RCC_PLL_ON;
  RCC_OscInitStruct.PLL.PLLSource = RCC_PLLSOURCE_HSE;
  RCC_OscInitStruct.PLL.PLLMUL = RCC_PLL_MUL9;
  if (HAL_RCC_OscConfig(&RCC_OscInitStruct) != HAL_OK)
  {
    Error_Handler();
  }

  /** Initializes the CPU, AHB and APB buses clocks
  */
  RCC_ClkInitStruct.ClockType = RCC_CLOCKTYPE_HCLK|RCC_CLOCKTYPE_SYSCLK
                              |RCC_CLOCKTYPE_PCLK1|RCC_CLOCKTYPE_PCLK2;
  RCC_ClkInitStruct.SYSCLKSource = RCC_SYSCLKSOURCE_PLLCLK;
  RCC_ClkInitStruct.AHBCLKDivider = RCC_SYSCLK_DIV1;
  RCC_ClkInitStruct.APB1CLKDivider = RCC_HCLK_DIV2;
  RCC_ClkInitStruct.APB2CLKDivider = RCC_HCLK_DIV1;

  if (HAL_RCC_ClockConfig(&RCC_ClkInitStruct, FLASH_LATENCY_2) != HAL_OK)
  {
    Error_Handler();
  }
  PeriphClkInit.PeriphClockSelection = RCC_PERIPHCLK_ADC;
  PeriphClkInit.AdcClockSelection = RCC_ADCPCLK2_DIV6;
  if (HAL_RCCEx_PeriphCLKConfig(&PeriphClkInit) != HAL_OK)
  {
    Error_Handler();
  }
}

/* USER CODE BEGIN 4 */

/* USER CODE END 4 */

/**
  * @brief  This function is executed in case of error occurrence.
  * @retval None
  */
void Error_Handler(void)
{
  /* USER CODE BEGIN Error_Handler_Debug */
  /* User can add his own implementation to report the HAL error return state */
  __disable_irq();
  while (1)
  {
  }
  /* USER CODE END Error_Handler_Debug */
}

#ifdef  USE_FULL_ASSERT
/**
  * @brief  Reports the name of the source file and the source line number
  *         where the assert_param error has occurred.
  * @param  file: pointer to the source file name
  * @param  line: assert_param error line source number
  * @retval None
  */
void assert_failed(uint8_t *file, uint32_t line)
{
  /* USER CODE BEGIN 6 */
  /* User can add his own implementation to report the file name and line number,
     ex: printf("Wrong parameters value: file %s on line %d\r\n", file, line) */
  /* USER CODE END 6 */
}
#endif /* USE_FULL_ASSERT */


 1万+
1万+

 被折叠的 条评论
为什么被折叠?
被折叠的 条评论
为什么被折叠?
 到【灌水乐园】发言


