


 本文讲述了在使用DS18B20温度传感器与单片机通信过程中遇到的问题,包括初始化错误、LCD1602显示问题和OneWire通信时序调整。作者详细分析了问题并给出了相应的修正方法,以及对I2C通信方式的讨论。
第十三节 DS18B20温度传感器
2024.1.29更新
#温度存储格式

MS BYTE和LS BYTE两个字节中BIT的解释:
BIT16~BIT11作为符号位,表示温度的正负
BIT10~BIT4存储温度的整数部分
BIT3~BIT0存储温度的小数部分,BIT0 ‘1’对应 “0.0625”
首先写第一个函数,用于初始化,其中添加Askbit,在LCD1602上显示一个数值,观察初始化函数是否有效,即从机是否响应。
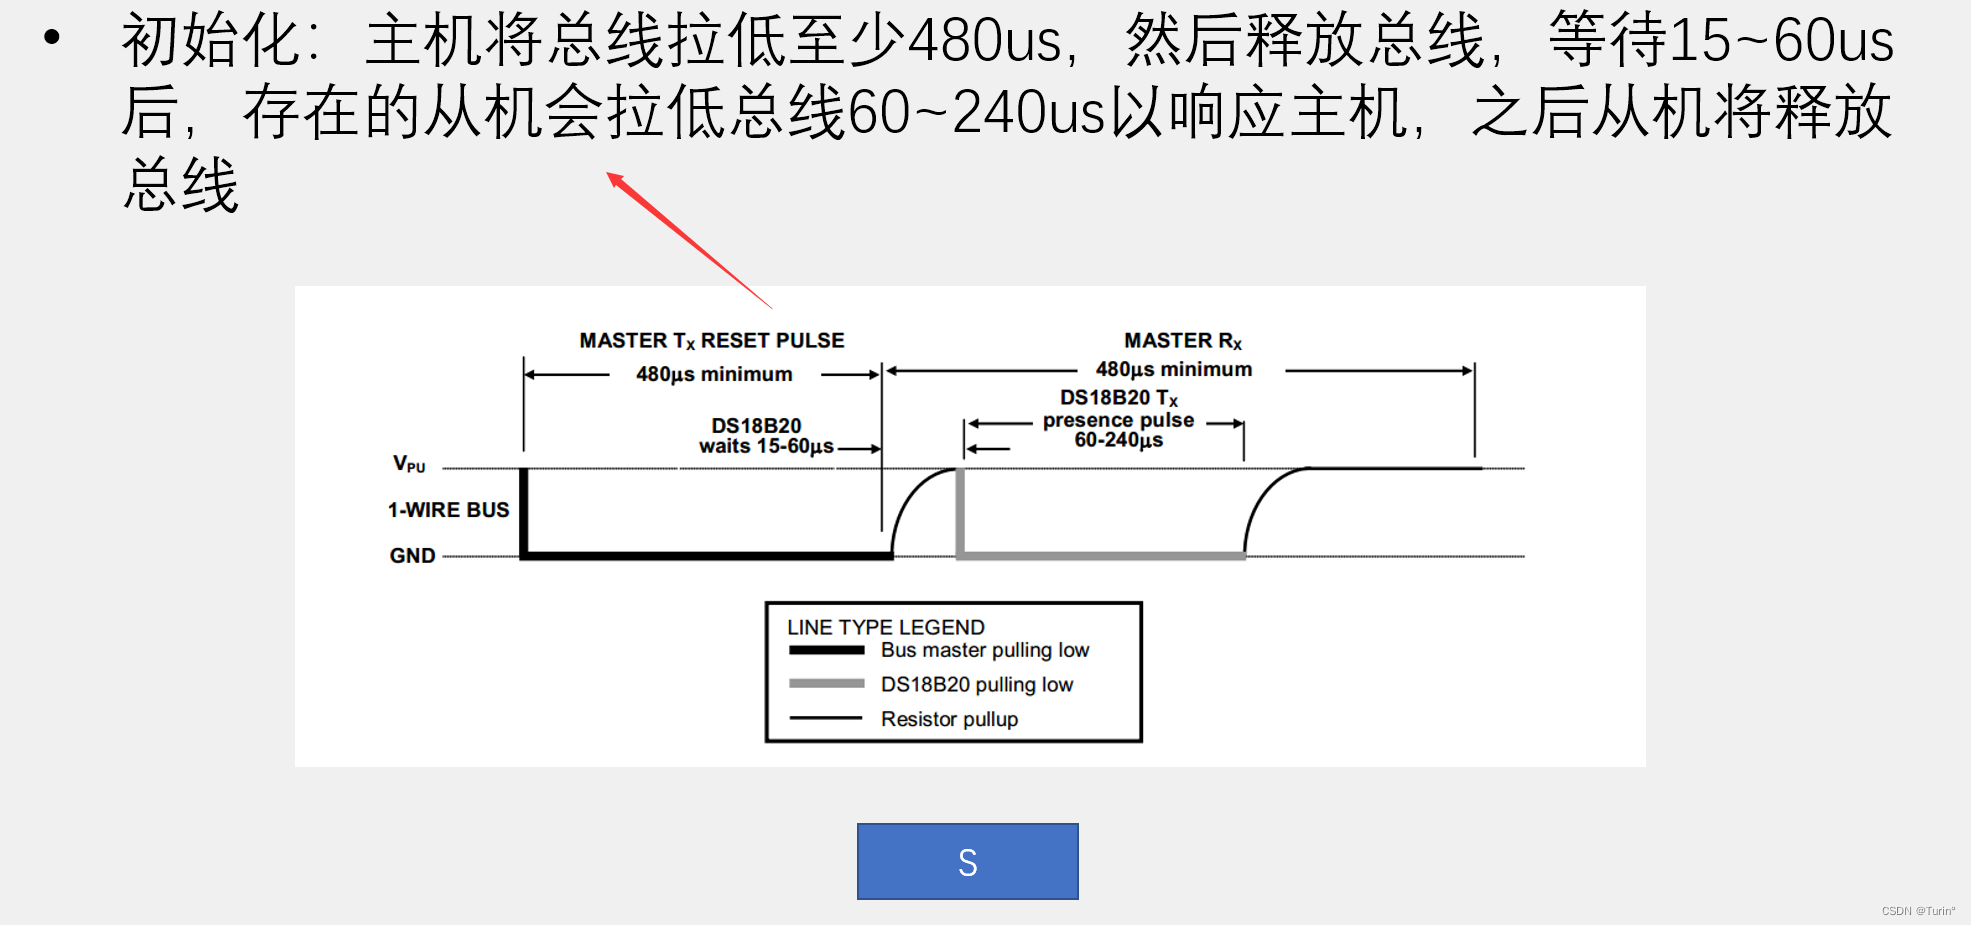
首先编写好单总线的初始化程序,如果代码正确,根据单总线的通信协议,从机会发送一个应答信号(拉低总线)。
进行应答测试,通过LCD1602观察应答位,检测代码是否有效
#include <REGX52.H>

sbit OneWire_DQ=P3^7;//通信口

unsigned char OneWire_Init(void)
{
	unsigned char i,Askbit;
	OneWire_DQ=1;
	OneWire_DQ=0;
	i = 227;while (--i);//500um
	OneWire_DQ=1;
	i = 29;while (--i);//70um
	Askbit = OneWire_DQ;
	return Askbit;
}
一、DS18B20温度读取
将程序下载到单片机上,运行
如下为main.c文件
#include <REGX52.H>
#include "LCD1602.h"
#include "DS18B20.h"
#include "OneWire.h"

void main()
{
	LCD_Init();
	LCD_ShowString(1,1,"Temperture:");
	DS18B20_Start();

	while(1)
	{
		unsigned int temp=DS18B20_Read()*10000;
		if(temp>0)
		{
			LCD_ShowString(2,1,"+");
		}
		else if(temp<0)
		{
			LCD_ShowString(2,1,"-");
		}
		LCD_ShowNum(2,2,temp/10000,4);
		LCD_ShowNum(2,6,temp%10000,4);
	}
}
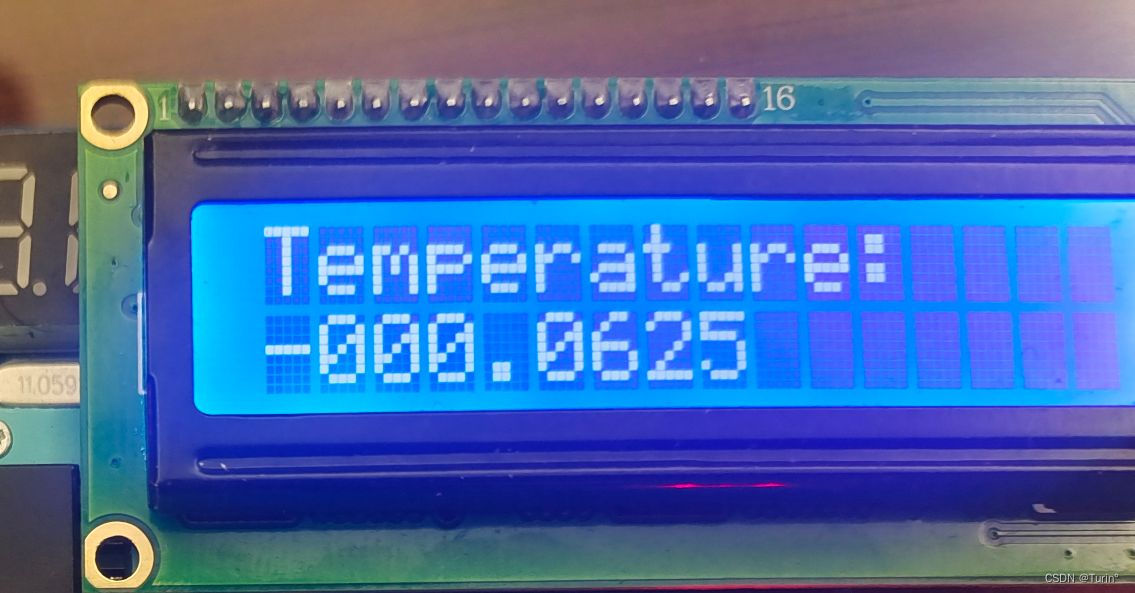
结果异常:LCD1602第二行显示不正确数据/显示-000.0625
分析:
main.c中存在语法错误
OneWire.c DS18B20.c中的函数时序定义有误
对main.c进行更改
#include <REGX52.H>
#include "Delay.h"
#include "LCD1602.h"
#include "DS18B20.h"


float T;
void main()
{
	DS18B20_Convert();
	Delay(1000);
	LCD_Init();
	LCD_ShowString(1,1,"Temperature:");
	while(1)
	{
		DS18B20_Convert();
		T=DS18B20_Read();
		if(T<0)
		{
			LCD_ShowChar(2,1,'-');
			T=-T;
		}
		else
		{
			LCD_ShowChar(2,1,'+');
		}
		LCD_ShowNum(2,2,T,3);
		LCD_ShowChar(2,5,'.');
		LCD_ShowNum(2,6,(unsigned long)(T*10000)%10000,4);//强制类型转换
	}
}
OneWire.c 错误分析:
#include <REGX52.H>

sbit OneWire_DQ=P3^7;//通信口

void OneWire_Init(void)
{
	unsigned char i,AskBit;
	OneWire_DQ=1;
	OneWire_DQ=0;
	i = 227;while (--i);//500um
	OneWire_DQ=1;//释放总线
	i = 29;while (--i);//70um
	AskBit=OneWire_DQ;//主机判断从机是否发送应答
	i = 227;while (--i);//500um,要根据时序图构造代码
}

void OneWire_SendBit(unsigned char Bit)//发送一位
{
	unsigned char i;
	OneWire_DQ=1;
	i = 2;while (--i);//10um
	OneWire_DQ=Bit;
	i = 22;while (--i);//54um
}

unsigned char OneWire_ReadBit(void)//接收一位
{
	unsigned char i,Bit;
	OneWire_DQ=0;
	i = 2;while (--i);//10um
	OneWire_DQ=1;//释放总线
	i = 2;while (--i);//10um
	Bit=OneWire_DQ;
	i = 22;while (--i);//54um
	return Bit;
}

void OneWire_WriteByte(int Byte)
{
	unsigned int i;
	for(i=0;i<8;i++)
	{
		OneWire_SendBit(Byte&(0x01<<i));//低位在前
	}
}

unsigned char OneWire_ReadByte()
{
	unsigned int i;
	unsigned int Byte;
	for(i=0;i<8;i++)
	{
		Byte=OneWire_ReadBit()|(0x01<<i);//低位在前
	}
	return Byte;
}
对OneWire.c进行更改
#include <REGX52.H>

sbit OneWire_DQ=P3^7;//通信口

unsigned char OneWire_Init(void)
{
	unsigned char i,AskBit;
	OneWire_DQ=1;
	OneWire_DQ=0;
	i = 247;while (--i);//500us
	OneWire_DQ=1;//释放总线
	i = 29;while (--i);//70us
	AskBit=OneWire_DQ;//主机判断从机是否发送应答
	i = 247;while (--i);//500um,要根据时序图构造代码
	return AskBit;
}

void OneWire_SendBit(unsigned char Bit)//发送一位
{
	unsigned char i;
	OneWire_DQ=0;//错误,应为0
	i = 2;while (--i);//10us
	OneWire_DQ=Bit;
	i = 20;while (--i);//50us
	OneWire_DQ=1;//遗漏
}

unsigned char OneWire_ReadBit(void)//接收一位
{
	unsigned char i,Bit;
	OneWire_DQ=0;
	i = 1;while (--i);//8us
	OneWire_DQ=1;//释放总线
	i = 1;while (--i);//8us
	Bit=OneWire_DQ;
	i = 20;while (--i);//50us
	return Bit;
}

void OneWire_WriteByte(unsigned char Byte)
{
	unsigned char i;
	for(i=0;i<8;i++)
	{
		OneWire_SendBit(Byte&(0x01<<i));//低位在前
	}
}

unsigned char OneWire_ReadByte(void)
{
	unsigned char i;
	unsigned char Byte=0x00;
	for(i=0;i<8;i++)
	{
		if(OneWire_ReadBit()){Byte|=(0x01<<i);}//低位在前
	}
	return Byte;
}
结论:OneWire_SendBit函数对总线的电平处理不正确
void OneWire_SendBit(unsigned char Bit)//发送一位
{
unsigned char i;
OneWire_DQ=1;//此处错误,应为0
i = 2;while (–i);//10us
OneWire_DQ=Bit;
i = 20;while (–i);//50us
OneWire_DQ=1;//遗漏
}
二、DS18B20温度报警器
#include <REGX52.H>
#include "Delay.h"
#include "LCD1602.h"
#include "DS18B20.h"
#include "AT24C02.h"
#include "I2C.h"
#include "Key.h"
#include "Timer0.h"


//mark
//在编写单片机程序时,要考虑到运行的高效性,定义变量的数据类型,优先选择较低内存占用的类型
float T;
float Tshow;
char Thigh,Tlow;
unsigned char KeyNum;


void main()
{
	Thigh=AT24C02_ReadByte(0);//每次开机,读取存储器中的数据
	Tlow=AT24C02_ReadByte(1);

	DS18B20_Convert();//温度装载,防止T第一次读取到的是默认值20,消除多余现象
	Delay(1000);

	LCD_Init();
	Timer0_Init();
	LCD_ShowString(1,1,"T:");

	while(1)
	{
		DS18B20_Convert();//温度装载
		T=DS18B20_Read();
		if(T<0)
		{
			LCD_ShowChar(1,3,'-');
			//T=-T,这里T=-T的话,进行温度预置判断有问题,所以再定义一个变量Tshow
			Tshow=-T;
		}
		else
		{
			LCD_ShowChar(1,3,'+');
			Tshow=T;
		}
		LCD_ShowNum(1,4,Tshow,3);
		LCD_ShowChar(1,7,'.');
		LCD_ShowNum(1,8,(unsigned char)(Tshow*100)%100,2);

		//温度阈值控制
		KeyNum=Key();
		if(KeyNum)
		{
			if(KeyNum==1)
			{
				Thigh++;
				if(Thigh>125)
				{
					Thigh--;
				}
			}
			else if(KeyNum==2)
			{
				Thigh--;
				if(Thigh<=Tlow)
				{
					Thigh++;
				}
			}
			else if(KeyNum==3)
			{
				Tlow++;
				if(Tlow>=Thigh)
				{
					Tlow--;
				}
			}
			else if(KeyNum==4)
			{
				Tlow--;
				if(Tlow<-125)
				{
					Tlow++;
				}
			}
			AT24C02_WriteByte(0,Thigh);
			Delay(5);
			AT24C02_WriteByte(1,Tlow);
			Delay(5);
		}
		//Thigh=AT24C02_ReadByte(1);
	    //Tlow=AT24C02_ReadByte(2);错误写法,会导致出现短暂的Thigh或者Tlow被赋值0,AT24C02没来得及读取数据就赋值给变量
		LCD_ShowString(2,1,"TH:");
		LCD_ShowString(2,10,"TL:");
		LCD_ShowSignedNum(2,4,Thigh,3);//显示带符号的数字
		LCD_ShowSignedNum(2,13,Tlow,3);

		//温度报警,LCD1602显示
		if(T>Thigh)
		{
			LCD_ShowString(1,13,"OV:H");

		}
		else if(T<Tlow)
		{
			LCD_ShowString(1,13,"OV:L");
		}
		else
		{
			LCD_ShowString(1,13,"    ");
		}

	}
}


void Timer0_Routine() interrupt 1 //中断子程序
{

		static unsigned int T0Count1;//静态局部变量,保证退出函数之后不销毁
		TL0 = 0x66;				//设置定时初始值
		TH0 = 0xFC;				//设置定时初始值
		T0Count1++;//每次进入中断子程序,秒控制器自加一
		if(T0Count1>=20)
		{
			T0Count1=0;
			Key_Loop();
		}
}
实验现象1:加入定时器扫描按键后,按下按键不影响温度的读取和显示,但是LCD1602上显示的温度数值会出现闪烁的状态
分析:每隔20ms进入中断程序,对按键进行扫描检测,但是,单总线上对数据的发送和接受,部分过程时间在几十us,远远小于20ms,中断程序打断了温度的正常读取
解决方案:每个OneWire的读写操作加入定时器的关闭动作,这样不会对OneWire的读写操作产生影响
如下:
#include <REGX52.H>

sbit OneWire_DQ=P3^7;//通信口

unsigned char OneWire_Init(void)
{
	unsigned char i,AskBit;
	EA=0;
	OneWire_DQ=1;
	OneWire_DQ=0;
	i = 247;while (--i);//500us
	OneWire_DQ=1;//释放总线
	i = 29;while (--i);//70us
	AskBit=OneWire_DQ;//主机判断从机是否发送应答
	i = 247;while (--i);//500um,要根据时序图构造代码
	EA=1;
	return AskBit;
}

void OneWire_SendBit(unsigned char Bit)//发送一位
{
	unsigned char i;
	EA=0;
	OneWire_DQ=0;//错误,应为0
	i = 2;while (--i);//10us
	OneWire_DQ=Bit;
	i = 20;while (--i);//50us
	OneWire_DQ=1;//遗漏
	EA=1;
}

unsigned char OneWire_ReadBit(void)//接收一位
{
	unsigned char i,Bit;
	EA=0;
	OneWire_DQ=0;
	i = 1;while (--i);//8us
	OneWire_DQ=1;//释放总线
	i = 1;while (--i);//8us
	Bit=OneWire_DQ;
	i = 20;while (--i);//50us
	EA=1;
	return Bit;
}

void OneWire_WriteByte(unsigned char Byte)
{
	unsigned char i;
	EA=0;
	for(i=0;i<8;i++)
	{
		OneWire_SendBit(Byte&(0x01<<i));//低位在前
	}
	EA=1;
}

unsigned char OneWire_ReadByte(void)
{
	unsigned char i;
	unsigned char Byte=0x00;
	EA=0;
	for(i=0;i<8;i++)
	{
		if(OneWire_ReadBit()){Byte|=(0x01<<i);}//低位在前
	}
	EA=1;
	return Byte;
}
缺点:对定时器有较大影响,需要区分任务的优先级,这里我们只有对温度进行处理的任务,一但存在多个任务,比如这里同时在数码管上显示一个时钟,使用单总线的局限性会非常大
IIC通信方式一般比单总线广泛地多
思考:IIC和单总线地区别


 254
254


 被折叠的 条评论
为什么被折叠?
被折叠的 条评论
为什么被折叠?
 到【灌水乐园】发言


